
- 1Linux真的很难吗?文末送5本《Linux运维之道(第3版)》_linux运维之道(第3版)pdf
- 2jetson nano基础使用笔记_jetson nano跳线帽
- 3在Qt中实现C++与QML的交互_qml和c++互相调用
- 4【考生说】你当初想成为程序员的初衷,还在保持吗?
- 5【温度预测】开普勒算法优化多头注意力机制的卷积神经网络结合长短记忆神经网络温度预测KOA-CNN-LSTM-Multihead-Attention【含Matlab源码 3739期】_cnn lstm进行温度预测
- 6大模型应用开发极简入门:基于GPT-4和ChatGPT 推荐!_大模型应用开发极简入门:基于gpt-4和chatgpt pdf
- 7Flink 本地单机/Standalone集群/YARN模式集群搭建_flink 单机部署
- 8三段式状态机的写法总结_状态机三段式写法
- 9您与此网站之间建立的连接不安全_您与此网站之间建立的连接不安全怎么办
- 10python queue 生产者 消费者_Python 队列queue与多线程组合(生产者+消费者模式)
Apollo规划代码ros移植-动态障碍物处理(一)_预测动态障碍物
赞
踩
Apollo规划代码ros移植-动态障碍物处理(一)
工程代码看这篇:Apollo6.0规划代码ros移植-路径规划可跑工程分享。
关于动态障碍物的处理,目前我认为主要有三种反映:
(1)超车
(2)跟随(减速避让)
(3)停车
目前,在模拟障碍物时,我们提前生成障碍物的行使轨迹点。然后设置一定的速度让障碍物移动。目前通过sleep的方式控制车的移动速度,后面完善一下。还有,目前先学习Lattice规划对动态障碍物的处理。需要说明一下的事情,只能用Lattice采样规划,因为Lattice二次规划在代码里面只用static_obs_sl_boundaries_进行处理,说明只针对静态障碍物。
一.超车
从代码来看,Apollo在巡航模式的纵向轨迹采样后面接了障碍物的ST图采样:
//产生纵向轨迹,即速度规划
void Trajectory1dGenerator::GenerateLongitudinalTrajectoryBundle(const PlanningTarget &planning_target,
                                                                 Trajectory1DBundle *ptr_lon_trajectory_bundle) const
{
  // 巡航轨迹是无规则规划的,不考虑障碍物
  GenerateSpeedProfilesForCruising(planning_target.cruise_speed(), ptr_lon_trajectory_bundle); //巡航

  GenerateSpeedProfilesForPathTimeObstacles(ptr_lon_trajectory_bundle); //超车或者跟随前车

  if (planning_target.has_stop_point()) //停车
  {
    GenerateSpeedProfilesForStopping(planning_target.stop_point(), ptr_lon_trajectory_bundle);
  }
}
- 1
- 2
- 3
- 4
- 5
- 6
- 7
- 8
- 9
- 10
- 11
- 12
- 13
- 14
GenerateSpeedProfilesForPathTimeObstacles函数如下:
void Trajectory1dGenerator::GenerateSpeedProfilesForPathTimeObstacles(Trajectory1DBundle *ptr_lon_trajectory_bundle) const
{
  auto end_conditions = end_condition_sampler_.SampleLonEndConditionsForPathTimePoints();
  if (end_conditions.empty())
  {
    return;
  }
  GenerateTrajectory1DBundle<5>(init_lon_state_, end_conditions, ptr_lon_trajectory_bundle);
}
- 1
- 2
- 3
- 4
- 5
- 6
- 7
- 8
- 9
采样的时候分两种,即超车和跟随采样:
std::vector<SamplePoint> EndConditionSampler::QueryPathTimeObstacleSamplePoints() const
{
  std::vector<SamplePoint> sample_points;

  for (const auto &path_time_obstacle : ptr_path_time_graph_->GetPathTimeObstacles()) //遍历障碍物的ST信息
  {
    std::string obstacle_id = path_time_obstacle.id();
    QueryFollowPathTimePoints(obstacle_id, &sample_points);   //跟随采样
    QueryOvertakePathTimePoints(obstacle_id, &sample_points); //超车采样
  }
  return sample_points;
}
- 1
- 2
- 3
- 4
- 5
- 6
- 7
- 8
- 9
- 10
- 11
- 12
这里的处理我觉得很奇怪,那是要跟随呢还是超车呢,我在想是不是需要有一个决策,例如EM里面的STBoundary有下面的类型:
  enum class BoundaryType
  {
    UNKNOWN,
    STOP,
    FOLLOW,
    YIELD,
    OVERTAKE,
    KEEP_CLEAR,
  };
- 1
- 2
- 3
- 4
- 5
- 6
- 7
- 8
- 9
根据这些类型来决定如何采样才是清晰的思路。好的,先按照源码的结构来。
超车采样函数:
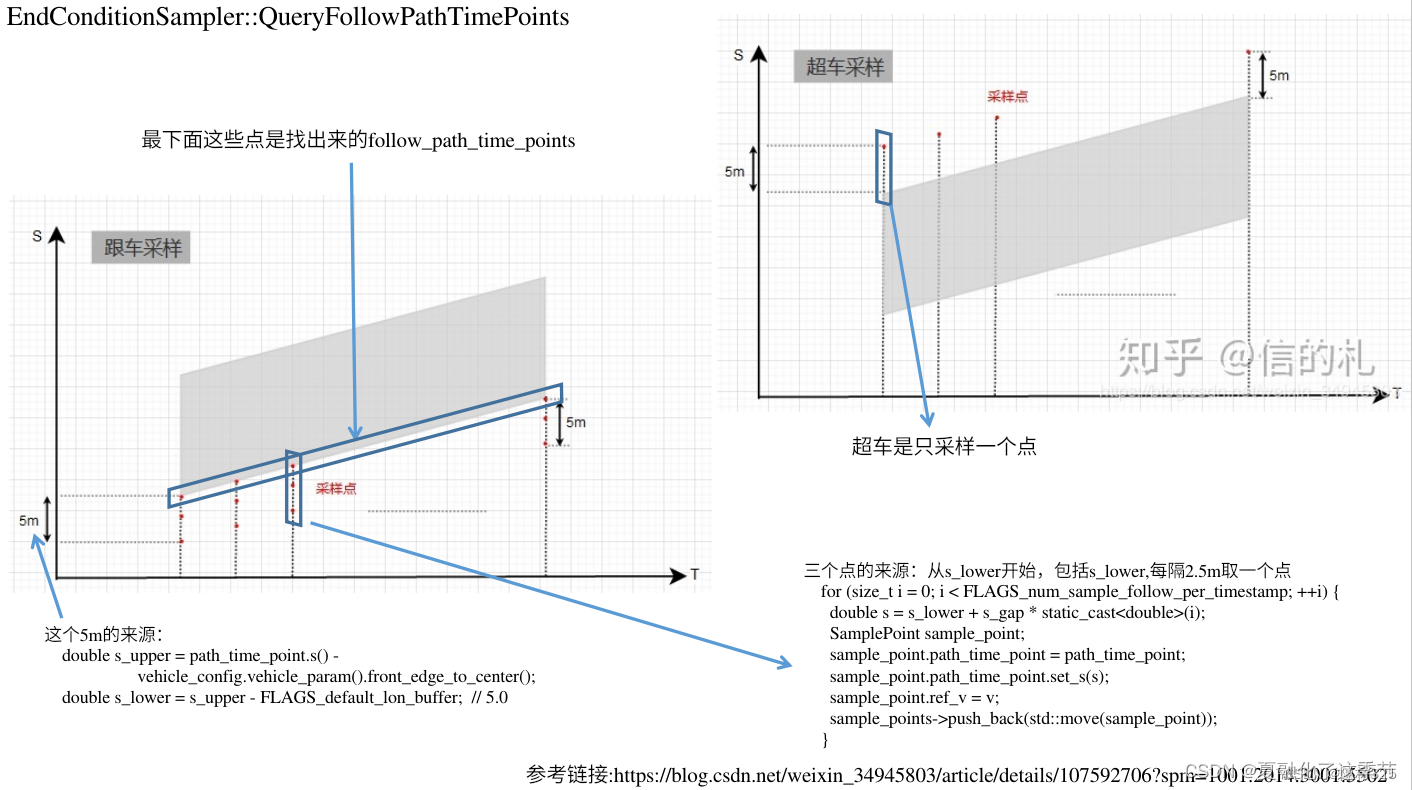
//超车采样
void EndConditionSampler::QueryOvertakePathTimePoints(const std::string &obstacle_id, std::vector<SamplePoint> *sample_points) const
{
  // 获取障碍物周围点的ST
  std::vector<STPoint> overtake_path_time_points =
      ptr_path_time_graph_->GetObstacleSurroundingPoints(
          obstacle_id, Config_.FLAGS_numerical_epsilon, Config_.FLAGS_time_min_density);
  //取点
  for (const auto &path_time_point : overtake_path_time_points)
  {
    double v = ptr_prediction_querier_->ProjectVelocityAlongReferenceLine(obstacle_id, path_time_point.s(), path_time_point.t());
    SamplePoint sample_point;
    sample_point.path_time_point = path_time_point;
    sample_point.path_time_point.set_s(path_time_point.s() + Config_.FLAGS_default_lon_buffer);
    sample_point.ref_v = v;
    sample_points->push_back(std::move(sample_point));
  }
}

- 1
- 2
- 3
- 4
- 5
- 6
- 7
- 8
- 9
- 10
- 11
- 12
- 13
- 14
- 15
- 16
- 17
- 18
采样原理其实不难理解,就是在取ST图的上面的边界点,每个FLAGS_time_min_density取一个。接着求出映射参考线的速度。最后取边界点往上距FLAGS_default_lon_buffer的点。图可以看这个大佬的解析:
Apollo6.0代码Lattice算法详解——Part5: 生成横纵向轨迹,下面图片取自这位大佬。
二.跟随(减速避让)
这里的跟随和减速避让应该是有差别的,但是好像采样方式一样,采样原理看上面那个图。代码如下:
//跟车采样
void EndConditionSampler::QueryFollowPathTimePoints(const std::string &obstacle_id, std::vector<SamplePoint> *const sample_points) const
{
  // 获取障碍物周围点的ST
  std::vector<STPoint> follow_path_time_points =
      ptr_path_time_graph_->GetObstacleSurroundingPoints(obstacle_id, -Config_.FLAGS_numerical_epsilon, Config_.FLAGS_time_min_density);

  // for循环遍历ST下边界点
  for (const auto &path_time_point : follow_path_time_points)
  {
    // 沿参考线速度投影,求出障碍物的速度在参考线方向的分量
    double v = ptr_prediction_querier_->ProjectVelocityAlongReferenceLine(
        obstacle_id, path_time_point.s(), path_time_point.t());

    // Generate candidate s
    double s_upper = path_time_point.s() - Config_.front_edge_to_center;
    double s_lower = s_upper - Config_.FLAGS_default_lon_buffer;
    // CHECK_GE(FLAGS_num_sample_follow_per_timestamp, 2);

    double s_gap = Config_.FLAGS_default_lon_buffer /
                   static_cast<double>(Config_.FLAGS_num_sample_follow_per_timestamp - 1);

    // 三个点,从s_lower开始,包括s_lower,每隔 s_gap m取一个点
    for (size_t i = 0; i < Config_.FLAGS_num_sample_follow_per_timestamp; ++i)
    {
      double s = s_lower + s_gap * static_cast<double>(i);
      SamplePoint sample_point;
      sample_point.path_time_point = path_time_point;
      sample_point.path_time_point.set_s(s);
      sample_point.ref_v = v;
      sample_points->push_back(std::move(sample_point));
    }
  }
}
- 1
- 2
- 3
- 4
- 5
- 6
- 7
- 8
- 9
- 10
- 11
- 12
- 13
- 14
- 15
- 16
- 17
- 18
- 19
- 20
- 21
- 22
- 23
- 24
- 25
- 26
- 27
- 28
- 29
- 30
- 31
- 32
- 33
- 34
三.停车
停车简单,距离障碍物很近自动停下,注意这里停车,不是指停车规划(停到目标位置),而是一种行使反映。
四.动态障碍物预测
以下是我仿照的预测轨迹。通过设定预测时间,可以求出预测轨迹的每个轨迹点的参数。
//产生pre_timepre_time秒的预测
prediction::Ob_Trajectory Obstacle_avoid::Generater_Trajectory(geometry_msgs::Pose ob_pos, double pre_time, double obstacle_threa, double obstacle_velocity)
{
  prediction::Ob_Trajectory result;
  std::vector<TrajectoryPoint> Trajectories;
  Eigen::MatrixXd ob_points;
  ob_points = Eigen::MatrixXd::Zero(2, 3); //初始化零矩阵
  ob_points(0, 0) = ob_pos.position.x;
  ob_points(0, 1) = ob_pos.position.y;
  ob_points(0, 2) = 0;

  ob_points(1, 0) = ob_pos.position.x + pre_time * cos(obstacle_threa);
  ob_points(1, 1) = ob_pos.position.y + pre_time * sin(obstacle_threa);
  ob_points(1, 2) = 0;

  Eigen::MatrixXd path_point_after_interpolation;
  average_interpolation(ob_points, path_point_after_interpolation, pre_time); //线性插值

  double s = 0.0;
  double prev_x = 0.0;
  double prev_y = 0.0;
  double relative_time = 0.0;
  bool empty_path = true;
  std::vector<double> headings;
  std::vector<double> kappas;
  std::vector<double> dkappas;
  std::vector<double> accumulated_s;
  std::vector<std::pair<double, double>> xy_points;

  for (size_t i = 0; i < path_point_after_interpolation.rows(); i++)
  {
    xy_points.emplace_back(path_point_after_interpolation(i, 0), path_point_after_interpolation(i, 1));
  }

  if (!PathMatcher::ComputePathProfile(xy_points, &headings, &accumulated_s, &kappas, &dkappas))
  {
    ROS_WARN("obstacle prediction trajectory generate failed!");
  }
  // std::cout << "path_point_after_interpolation.rows():" << path_point_after_interpolation.rows() << "\n";

  for (int i = 0; i < path_point_after_interpolation.rows(); i++)//遍历每个预测轨迹点
  {
    TrajectoryPoint tra_;
    tra_.set_x(path_point_after_interpolation(i, 0)); // x
    tra_.set_y(path_point_after_interpolation(i, 1)); // y
    tra_.set_theta(headings[i]);
    tra_.set_v(obstacle_velocity); //假设未来匀速
    tra_.set_a(0);                 //匀速,那么a=0
    tra_.set_kappa(kappas[i]);
    tra_.set_dkappa(dkappas[i]);
    tra_.set_s(accumulated_s[i]);

    tra_.set_relative_time(relative_time);

    Trajectories.push_back(tra_);

    relative_time += Config_.FLAGS_trajectory_time_resolution;
  }

  result.Set_Trajectory(Trajectories);
  return result;
}
- 1
- 2
- 3
- 4
- 5
- 6
- 7
- 8
- 9
- 10
- 11
- 12
- 13
- 14
- 15
- 16
- 17
- 18
- 19
- 20
- 21
- 22
- 23
- 24
- 25
- 26
- 27
- 28
- 29
- 30
- 31
- 32
- 33
- 34
- 35
- 36
- 37
- 38
- 39
- 40
- 41
- 42
- 43
- 44
- 45
- 46
- 47
- 48
- 49
- 50
- 51
- 52
- 53
- 54
- 55
- 56
- 57
- 58
- 59
- 60
- 61
- 62
可看课程系列:
https://www.bilibili.com/video/BV1j94y1B7Ai/?buvid=XY4BB7D48AA71766FB7E422428AB2162768E4&is_story_h5=false&mid=vLcmcVJZwLVM5M3cErNrKw%3D%3D&plat_id=240&share_from=ugc&share_medium=android&share_plat=android&share_source=QQ&share_tag=s_i×tamp=1689339850&unique_k=CP6TAse&up_id=300556577
需要代码可私信。

