
热门标签
热门文章
- 1XIlinx Vivado的System Generator for DSP 现在叫(Vitis Model Composer)与Matlab的对应版本_vivado2022model compose和matlab
- 2利用Git及GitHub对项目进行版本控制_github版本控制
- 3FPGA之FIFO详解,初识FIFO_fpga fifo
- 4完整版进栈出栈的代码_c语言入栈出栈代码
- 5Git 将一个项目同时推送到多个远程仓库
- 6(4-1)Q-learning与贝尔曼方程:Q-learning算法原理
- 7Vivado IP核锁定的两种解决方法_vivadoip核上锁提升在禁用核容器的情况下继续
- 8基于stm32f103zet6的DS1302学习_stm32f103zet6 ds1302
- 9Spring Boot 中单元测试框架 Mockito 的正确使用
- 10java泛型问题 关于警告:XX is a raw type【转】
当前位置: article > 正文
iOS8毛玻璃效果-UIView模糊效果_uiblureffectstyledark
作者:小小林熬夜学编程 | 2024-04-13 23:21:29
赞
踩
uiblureffectstyledark
最近公司忙,没来得及写博客,补发一篇UIView模糊处理的小技巧,希望大家能用得上
//定义毛玻璃效果
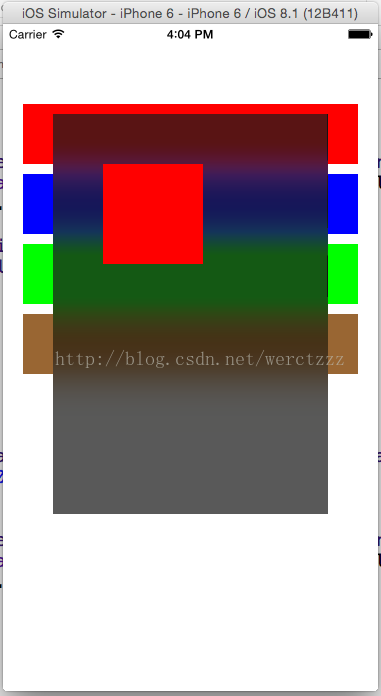
- UIBlurEffect * blur = [UIBlurEffecteffectWithStyle:UIBlurEffectStyleDark];
- UIVisualEffectView * effe = [[UIVisualEffectViewalloc]initWithEffect:blur];
- effe.frame =CGRectMake(50,90, self.view.frame.size.width - 100, 400);
// 把要添加的视图加到毛玻璃上
- UIButton * btn = [[UIButtonalloc]initWithFrame:CGRectMake(50,50, 100,100)];
- btn.backgroundColor = [UIColorredColor];
- [effeaddSubview:btn];
- [self.viewaddSubview:effe];
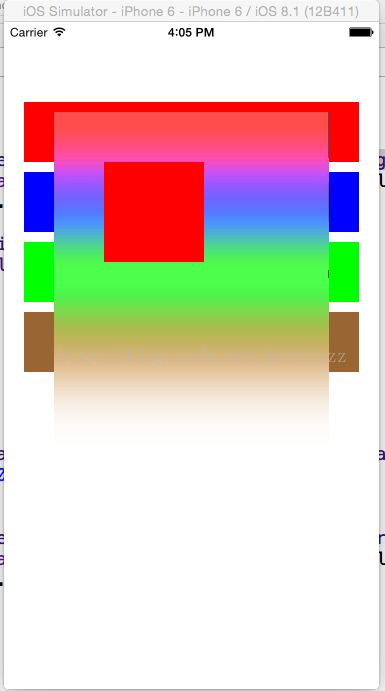
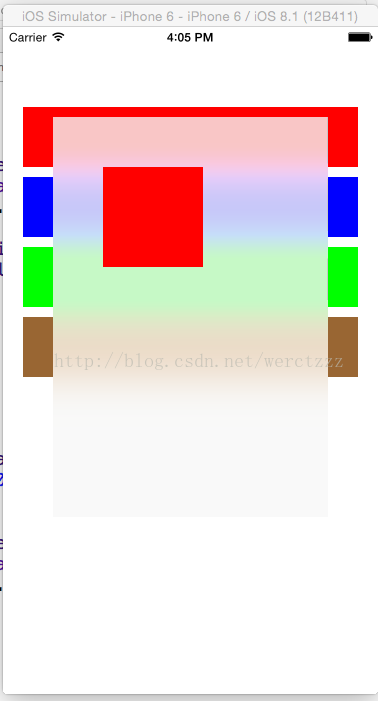
效果是枚举,有三种:
UIBlurEffectStyleExtraLight UIBlurEffectStyleLight UIBlurEffectStyleDark
之后还有你想把你的图片模糊也可以这样添加:
// 定义需要毛玻璃化的图片
- UIImageView * image = [[UIImageViewalloc]initWithImage:[UIImageimageNamed:@"2.png"]];
- image.frame =CGRectMake(100,100, 100,100);
// 定义毛玻璃效果
- UIBlurEffect * blur = [UIBlurEffecteffectWithStyle:UIBlurEffectStyleDark];
- UIVisualEffectView * effe = [[UIVisualEffectViewalloc]initWithEffect:blur];
- effe.frame =CGRectMake(50,90, self.view.frame.size.width - 100, 400);
- [image addSubview:effe];
- [self.viewaddSubview:image];
声明:本文内容由网友自发贡献,不代表【wpsshop博客】立场,版权归原作者所有,本站不承担相应法律责任。如您发现有侵权的内容,请联系我们。转载请注明出处:https://www.wpsshop.cn/w/小小林熬夜学编程/article/detail/419073
推荐阅读

相关标签

