- 1基于3D机器视觉的零件尺寸检测应用_基于机器视觉的零件尺寸测量
- 2当你即会java又会python 的时候,面试官会问,python和java的区别。_java与python的区别面试
- 3自监督学习论文、代码汇总_dcl 和 byol 技术
- 4【数据结构】中缀表达式转换为后缀表达式_数据结构中缀表达式转后缀表达式
- 5配置变量/配置数组/比较配置文件/多环境配置/服务器笔记_配置文件 为数组
- 6边缘计算与人工智能:结合与机器学习
- 7Linux系统进入单用户模式_linux进单用户模式
- 8Spring boot 注解Annotation大全【持续更新】_springboot的指定配置文件的注解
- 9基于LLaMA-Factory的微调记录_llama-factory微调的参数
- 10linux替换某个文件夹下所有文件,Linux 批量查找并替换文件夹下所有文件的内容...
poi-tl简介与文本/表格和图片渲染
赞
踩
一、poi-tl简介
下面简介来自官方文档。
1、简介
poi-tl(poi template language)是Word模板引擎,使用Word模板和数据创建很棒的Word文档。
poi-tl是一个基于Apache POI的Word模板引擎,也是一个免费开源的Java类库,你可以非常方便的加入到你的项目中,并且拥有着让人喜悦的特性。
V1.12.x版本作了一个不兼容的改动,升级的时候需要注意:
- 重构了PictureRenderData,改为抽象类,建议使用Pictures工厂方法来创建图片数据
2、poi-tl与poi区别
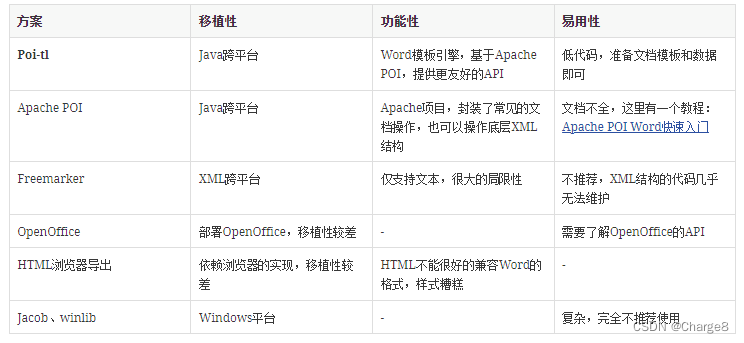
poi-tl与poi区别:

3、快速入门
poi-tl使用的通用步骤:
- 引入依赖
<dependency>
  <groupId>com.deepoove</groupId>
  <artifactId>poi-tl</artifactId>
  <version>1.12.1</version>
</dependency>
- 1
- 2
- 3
- 4
- 5
- 定义模板
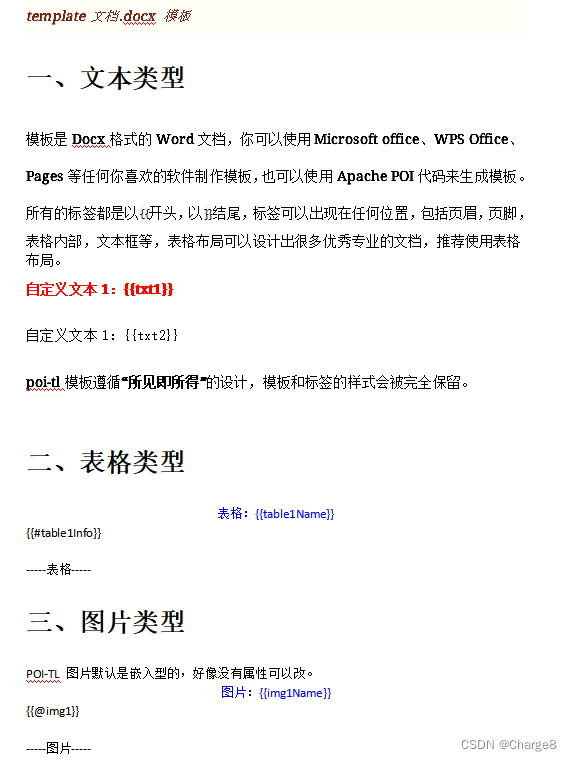
模板是Docx格式的Word文档,你可以使用Microsoft office、WPS Office、Pages等任何你喜欢的软件制作模板,也可以使用Apache POI代码来生成模板。
模板即样式,同时代码也可以设置样式。
所有的标签都是以{{开头,以}}结尾,标签可以出现在任何位置,包括页眉,页脚,表格内部,文本框等,表格布局可以设计出很多优秀专业的文档,推荐使用表格布局。
标签由前后两个大括号组成,{{title}}是标签,{{?title}}也是标签,title是这个标签的名称,?问号标识了标签类型,比如表格,图片或者自定义标签等。
一般我们线下定义好模板格式。比如:新建Word文档 template.docx,文件内容如下:

- 填充数据
数据类似于哈希或者字典,可以是Map结构(key是标签名称),也可以是对象(属性名是标签名称)。
- 输出模板
输出模板的方式有很多种,比如:
- 以输出流|文件流等方式进行输出。最后不要忘记关闭这些流。
入门示例demo:
XWPFTemplate template = XWPFTemplate.compile("template.docx").render(
  new HashMap<String, Object>(){{
    put("title", "Hi, poi-tl Word模板引擎");
}});
template.writeAndClose(new FileOutputStream("output.docx"));
- 1
- 2
- 3
- 4
- 5
二、文本/表格和图片渲染
下面进行文本、表格和图片的渲染简介。
1、文本
文本标签:{{var}}
数据模型:
- String :文本
- TextRenderData :有样式的文本
- HyperlinkTextRenderData :超链接和锚点文本
- Object :调用 toString() 方法转化为文本
put("name", "Sayi");
put("author", new TextRenderData("000000", "Sayi"));
put("link", new HyperlinkTextRenderData("website", "http://deepoove.com"));
put("anchor", new HyperlinkTextRenderData("anchortxt", "anchor:appendix1"));

// 还提供了更加优雅的工厂 Texts 和链式调用的方式轻松构建文本模型。
put("author", Texts.of("Sayi").color("000000").create());
put("link", Texts.of("website").link("http://deepoove.com").create());
put("anchor", Texts.of("anchortxt").anchor("appendix1").create());
- 1
- 2
- 3
- 4
- 5
- 6
- 7
- 8
- 9
POI-TL模板即样式,一般模板文档能设置好的样式,代码就不要处理啦。
2.表格
表格标签以#开始:{{#var}}
数据模型:
- TableRenderData
推荐使用工厂 Tables 、 Rows 和 Cells 构建表格模型。
// 第0行居中且背景为蓝色的表格
RowRenderData row0 = Rows.of("姓名", "学历").textColor("FFFFFF")
      .bgColor("4472C4").center().create();
RowRenderData row1 = Rows.create("李四", "博士");
put("table1", Tables.create(row0, row1));
- 1
- 2
- 3
- 4
- 5
3、图片
图片标签以@开始:{{@var}}
数据模型:
- String :图片url或者本地路径,默认使用图片自身尺寸
- PictureRenderData
- ByteArrayPictureRenderData
- FilePictureRenderData
- UrlPictureRenderData
推荐使用工厂 Pictures 构建图片模型。
// 指定图片路径
put("image", "logo.png");
// svg图片
put("svg", "https://img.shields.io/badge/jdk-1.6%2B-orange.svg");

// 设置图片宽高
put("image1", Pictures.ofLocal("logo.png").size(120, 120).create());

// 图片流
put("streamImg", Pictures.ofStream(new FileInputStream("logo.jpeg"), PictureType.JPEG)
  .size(100, 120).create());

// 网络图片(注意网络耗时对系统可能的性能影响)
put("urlImg", Pictures.ofUrl("http://deepoove.com/images/icecream.png")
  .size(100, 100).create());

// java图片
put("buffered", Pictures.ofBufferedImage(bufferImage, PictureType.PNG)
  .size(100, 100).create());
- 1
- 2
- 3
- 4
- 5
- 6
- 7
- 8
- 9
- 10
- 11
- 12
- 13
- 14
- 15
- 16
- 17
- 18
- 19
4、示例模板demo
示例demo,进行文本、表格和图片的渲染。
1)新建模板文档 template文档.docx

2)完整代码如下:
public class PoiWordTest1 {


    private static void createTemplateData() throws IOException {
        String dirName = "D:\\TempFiles\\poitl";
        String templateFileName = "template文档.docx";
        String outFileName = "output文档.docx";

        // 模板数据
        Map<String, Object> templateData = new HashMap<>();

        // 1.文本
        templateData.put("txt1", "测试文本1");
        templateData.put("txt2", "测试文本2");
        templateData.put("table1Name", "测试table1Name");
        templateData.put("img1Name", "测试img1Name");

        // 2.表格
        List<TableInfo> tableInfoList = new ArrayList<>();
        tableInfoList.add(new TableInfo("类型1", 3001, new BigDecimal("19.484")));
        tableInfoList.add(new TableInfo("类型2", 180, new BigDecimal("1.10")));
        tableInfoList.add(new TableInfo("类型3", 2000, new BigDecimal("19.485")));
        tableInfoList.add(new TableInfo("类型4", 180, new BigDecimal("1.100")));

        tableInfoList = tableInfoList.stream().sorted(Comparator.comparingInt(TableInfo::getInfoCount).reversed()).collect(Collectors.toList());
        String[] tableHeader = new String[]{"序号", "类型", "数量", "百分比"};
        createTable(templateData, tableHeader, tableInfoList);

        // 3.图片
        String fileName = "b1.jpg";
        FileInputStream inputStream = new FileInputStream(dirName + File.separator + fileName);
        templateData.put("img1", Pictures.ofStream(inputStream, PictureType.PNG)
                .size(200, 220)
                .create());

        // 4. 创建模板,输出模板
        XWPFTemplate template = XWPFTemplate.compile(dirName + File.separator + templateFileName)
                .render(templateData);
        template.writeAndClose(new FileOutputStream(dirName + File.separator + outFileName));
    }

    private static void createTable(Map<String, Object> templateData, String[] tableHeader, List<TableInfo> tableInfoList) {
        // 表格
        RowRenderData tableHeaderRow = Rows.of(tableHeader).bgColor("BDDCE6").center().create();

        RowRenderData[] rowRenderData = new RowRenderData[tableInfoList.size() + 1];
        rowRenderData[0] = tableHeaderRow;
        for (int i = 0; i < tableInfoList.size(); i++) {
            TableInfo tableInfo = tableInfoList.get(i);
            String type = tableInfo.getType();
            Integer infoCount = tableInfo.getInfoCount();
            BigDecimal ratio = tableInfo.getRatio();

            String infoCountStr = infoCount == null ? "" : String.valueOf(infoCount);
            // 保留两位小数
            String ratioStr = bigDecimal2Str(ratio, 2);
            if (StringUtils.isNotBlank(ratioStr)) {
                ratioStr = ratioStr + "%";
            }

            RowRenderData rowData = Rows.create(String.valueOf(i + 1), type, infoCountStr, ratioStr);
            rowRenderData[i + 1] = rowData;
        }

        // 一个几行4列的表格
        templateData.put("table1Info", Tables.create(rowRenderData));

    }

    /**
     * 转string,四舍五入
     *
     * @param value
     * @param newScale - 保留几位小数,默认2
     * @return
     */
    private static String bigDecimal2Str(BigDecimal value, Integer newScale) {
        if (value == null) {
            return "";
        }
        newScale = newScale == null ? 2 : newScale;
        BigDecimal bigDecimal = value.setScale(newScale, BigDecimal.ROUND_HALF_UP);
        return bigDecimal.toString();
    }

    public static void main(String[] args) throws IOException {
        createTemplateData();
    }

}
- 1
- 2
- 3
- 4
- 5
- 6
- 7
- 8
- 9
- 10
- 11
- 12
- 13
- 14
- 15
- 16
- 17
- 18
- 19
- 20
- 21
- 22
- 23
- 24
- 25
- 26
- 27
- 28
- 29
- 30
- 31
- 32
- 33
- 34
- 35
- 36
- 37
- 38
- 39
- 40
- 41
- 42
- 43
- 44
- 45
- 46
- 47
- 48
- 49
- 50
- 51
- 52
- 53
- 54
- 55
- 56
- 57
- 58
- 59
- 60
- 61
- 62
- 63
- 64
- 65
- 66
- 67
- 68
- 69
- 70
- 71
- 72
- 73
- 74
- 75
- 76
- 77
- 78
- 79
- 80
- 81
- 82
- 83
- 84
- 85
- 86
- 87
- 88
- 89
- 90
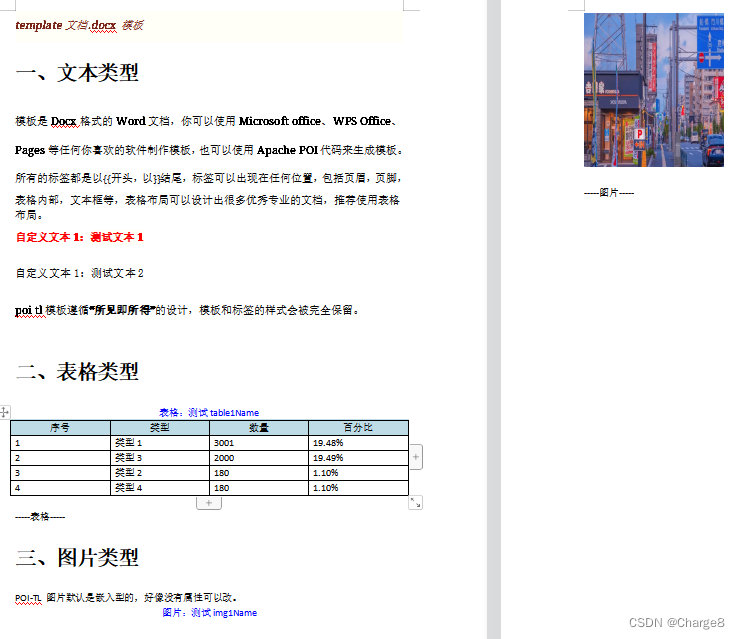
3)输出文档:

注意:
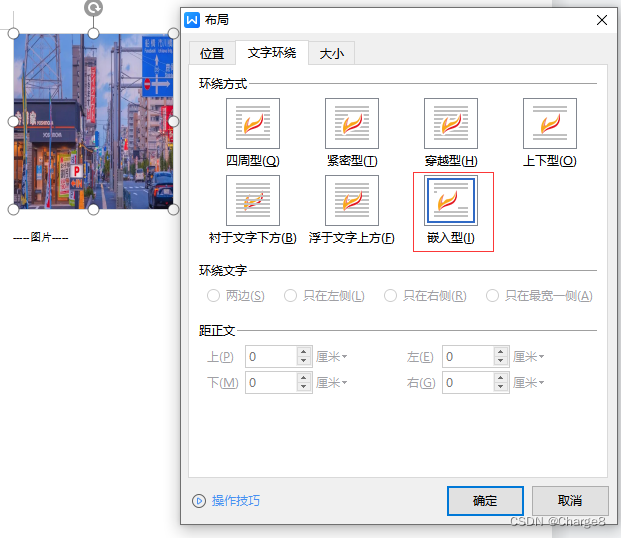
- 图片默认是嵌入型的,如果你想使用浮于文字之上,目前博主还没找到方法。

上面文件都是本地的。下面写一个常用的方法。模板流,输出生成模板流,保存到文件系统中。
        // 4. 创建模板,输出模板
        InputStream templateInput = getTemplateInputStream("文件ID"); //通过文件系统获取定义好的文件模板流
        XWPFTemplate template = XWPFTemplate.compile(templateInput).render(templateData);
        // 输出生成的模板流
        ByteArrayOutputStream byteArrayOutputStream = new ByteArrayOutputStream();
        template.writeAndClose(byteArrayOutputStream);

        // 保存生成的模板流文件到文件系统
        byte[] buffer = byteArrayOutputStream.toByteArray();
        InputStream saveInputStream = new ByteArrayInputStream(buffer);
        String outFileName = "output文档.docx";
        saveGenerateTemplateFile(saveInputStream, outFileName);
- 1
- 2
- 3
- 4
- 5
- 6
- 7
- 8
- 9
- 10
- 11
- 12
更多使用参见官方文档。
– 求知若饥,虚心若愚。


