- 1基于区块链的不动产登记电子证照应用服务系统设计方案---3.总体设计_基于区块链的可信电子证照方案设计
- 2Qt Design Studio使用场景
- 3Qt Quick QML 与 C++ 交互系列之二
- 4自然语言处理在智能客服中的实践与优化
- 5元学习Meta-Learning_元学习的情景训练
- 6一切皆是映射:AI的去中心化:区块链技术的融合
- 7macOS系统安装pycharm社区版本_pycharm社区版本下载mac
- 8火车票预售系统(JavaGUI)_网上购票系统java+gui界面
- 9快速查询的秘籍 —— B+索引的建立_索引 b+ 页中查询
- 10骨架算法(skeleton)的实现_skeleton3d函数图示
xp虚拟服务器设置,VMWare的XP虚拟机网络设置
赞
踩
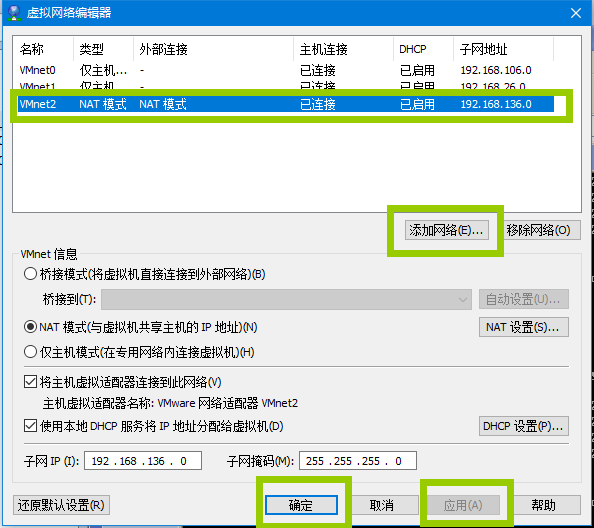
1.首先在VMWare虚拟机主界面-菜单-编辑-虚拟网络编辑器,添加网络(NAT模式)并应用确认:

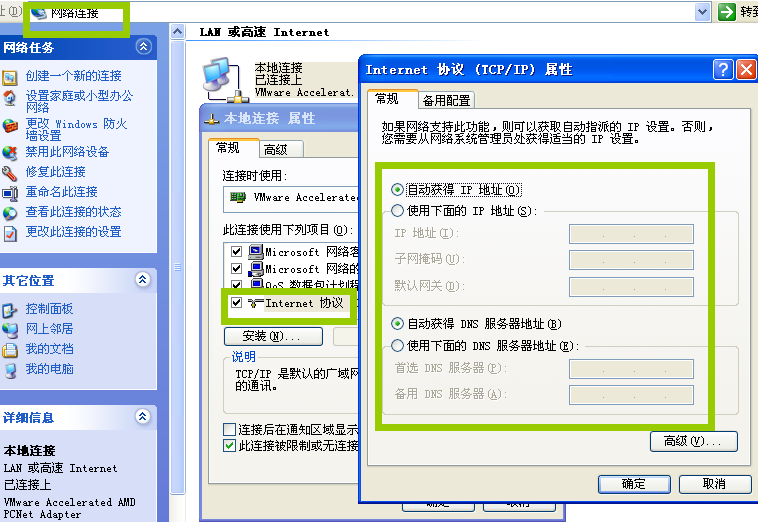
2.在xp虚拟机-控制面板-网络连接-本地连接-属性-internet设置-选择自动获取IP地址、DBS服务器地址:

3.重启本地连接,显示连接上,ping www.baidu.com 得到返回,即网络设置成功:
C:\Documents and Settings\winxp>ipconfig
Windows IP Configuration
Ethernet adapter 本地连接:
Connection-specific DNS Suffix . : localdomain
IP Address. . . . . . . . . . . . : 192.168.136.128
Subnet Mask . . . . . . . . . . . : 255.255.255.0
Default Gateway . . . . . . . . . : 192.168.136.2
C:\Documents and Settings\winxp>ping www.baidu.com
Pinging www.a.shifen.com [61.135.169.125] with 32 bytes of data:
Reply from 61.135.169.125: bytes=32 time=15ms TTL=128
Reply from 61.135.169.125: bytes=32 time=16ms TTL=128
Reply from 61.135.169.125: bytes=32 time=16ms TTL=128
Reply from 61.135.169.125: bytes=32 time=16ms TTL=128
Ping statistics for 61.135.169.125:
Packets: Sent = 4, Received = 4, Lost = 0 (0% loss),
Approximate round trip times in milli-seconds:
Minimum = 15ms, Maximum = 16ms, Average = 15ms


