
- 1百度发布文心一言!对比GPT-4实测!百度顶住压力,背水一战
- 2全局数组怎么定义_c++数组使用——配套测试记录
- 3深度学习 - 16.TF x Keras Losses 常见损失函数_mean_absolute_percentage_error
- 4SpringBoot 自定义拦截器_boot定义cache拦截器
- 5基于TableAgent实现IT职位招聘数据分析—以传统机器学习与TableAgent 数据分析方式相对比以凸显TableAgent 特性
- 6国产化的接口测试、接口自动化测试工具apifox的介绍及使用_apifox离线使用
- 7【无标题】_a new release of pip available: 22.2.1 -> 23.2.1
- 8ChatGPT研究报告:AIGC带来新一轮范式转移_aigc影響下的設計新範式
- 9四种基础时间序列模型的应用与结果分析【AR、MA、ARMA、ARIMA】_时间序列的应用案例
- 10遇到:PytorchStreamReader failed reading zip archive: failed finding central 错误应该如何解决
Windows10下使用Intel SGX功能(一):环境搭建_intelsgxaesm
赞
踩
参考文献
- 哪些平台支持英特尔® Software Guard Extensions (英特尔® SGX) 数据中心标记基元 (DCAP
- 官方文档一:Install the Open Enclave SDK NuGet Package
- 官方文档二:Using the Open Enclave SDK on Windows
- 官方文档三: Building and Running the Samples on Windows
- Win10安装Intel SGX环境并执行一个基础demo
- windows10下使用Intel SGX编程初体验
系统要求
- x86-64。
- Windows Server 2019 or Windows 10 (1709 or newer)。
- 支持SGX1(+FLC),如果不支持FLC,则只能使用simulation mode。
一、安装Open Enclave SDK 环境
(一)什么是Open Enclave SDK
Open Enclave SDK提供了对Open Portable TEE OS(OP-TEE OS)的预览支持。OP-TEE是一个用于实现传统内核模式和用户模式执行环境的TEE的操作系统。它在支持ARM TrustZone的A-profile ARM系统上运行。因此,Open Enclave SDK 也可以被用来针对这些系统。
原文链接请参考Open Enclave SDK for OP-TEE OS。
(二)启动SGX功能
启动SGX功能的前提条件时:Windows® 10 is booted in Legacy or UEFI Mode。如果是Legacy mode,则需要修改为UEFI mode,并重装windows 10。
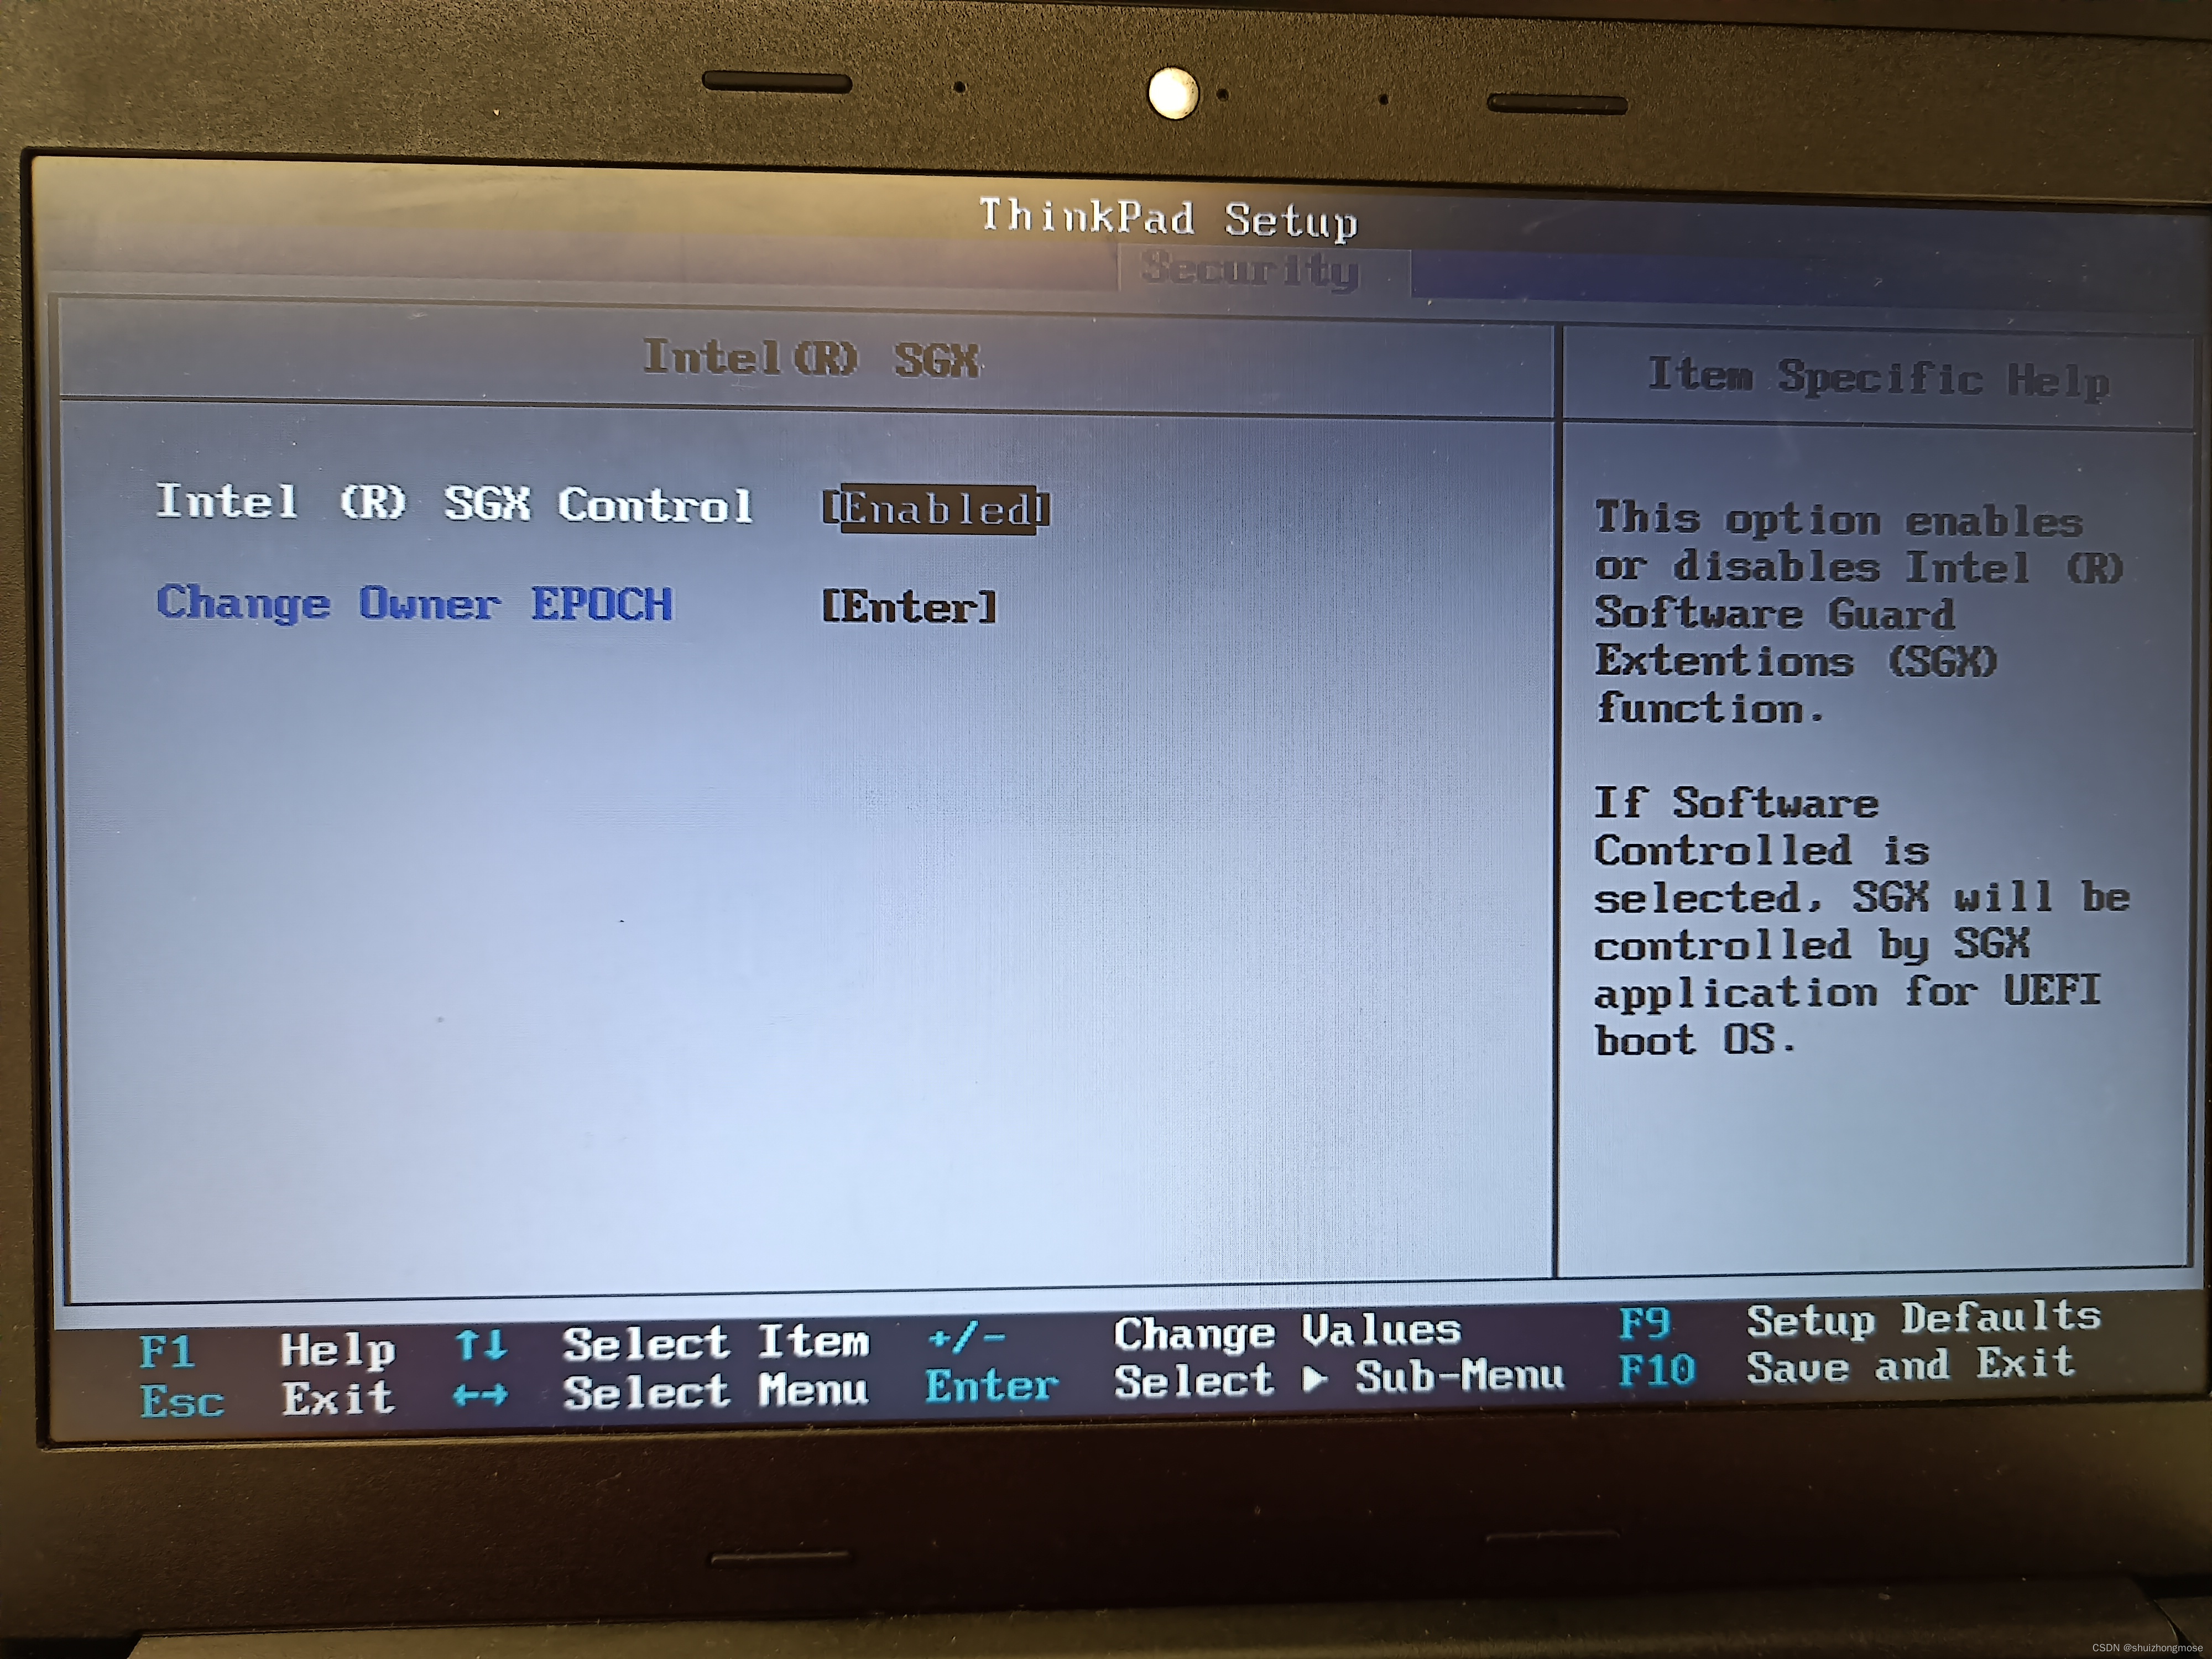
方法一: BIOS启动

- 如果电脑支持SGX,则重启电脑进入【BIOS->Security】下启动SGX。如果BIOS无法设置,则不支持使用Intel SGX功能。
方法二:软件方式启动
在 Microsoft Store 中下载安装Intel(R) Software Guard Extensions Activation APP。并以 Admin 方式打开 Intel(R) Software Guard Extensions Activation APP,单击 【Activate】启动SGX。
(三)安装必要环境
安装Open Enclave SDK的环境要求如下:
- Git v2.31.1
- OpenSSL 1.1.1
- Visual Studio Build Tools
- Clang 10.0.0
- ShellCheck v0.7.0
- Nuget 3.4.3
- Python 3
- Python pip
- Intel SGX PSW v2.13.100.2
下面根据自己电脑上缺失工具进行安装。
(1)安装编译工具:Visual Studio 2017(64位)
-
Visual Studio Build 2017下载地址在这儿。记住一定选择64位。在安装 enclave 开发环境过程中,使用2019、2022都出现了蓝屏。

-
安装时选择【C++ build tools】,中文是【使用C++的桌面开发】进行安装;
-
Visual Studio Build Tools 2017支持CMake 3.12版(构建Open Enclave SDK需要CMake 3.12版或以上)。
(2)安装Git环境
- 如果有git、git bash等环境,则跳过。
- 下载地址在这儿,按步骤安装即可。
- 将
C:\Program Files\Git\bin和C:\Program Files\Git\mingw64\bin添加到PATH。
(3)安装Clang环境
- 下载地址在这儿
- 安装Clang 8.0.1并将LLVM文件夹添加到路径中.
(4)安装OpenSSL
- 安装Git之后,在Git Bash中可以使用openssl了。
- 记住,电脑中一定只能有一个openssl。不然ninja 编译的时候会出错,参考这儿
(5)安装ME
windows10的ME下载地址在这儿。下载后直接安装,安装文件为\ME_SW_2216.16.0.2805\ME_SW_DCH\SetupME.exe。
(6.1)自动安装Guard Extension SDK for windows(PSW)
实验中这种方式总是提示版本不对,即使在 SGX 已经激活的状态下。
下载地址在这儿。下载后直接安装。
(6.2)手动安装PSW(Intel Platform Software for Windows)
官方文档说SGX1+FLC才安装PSW,但是所有支持SGX的都需要安装PSW。
-
查看windows版本。在
cmd或powershell中输入:winver,查看版本。1709是指2017年9月第一版windows10。所以一般都是使用above版本安装。

-
解压
Intel SGX PSW v2.13.100.2,下载地址在这儿。下载之后,解压。 -
进入
\Intel SGX PSW for Windows v2.13.100.2\PSW_INF_RS3_and_above目录,command(Admin)下执行:
pnputil /add-driver sgx_psw.inf /install
- 1
注:官方文档使用devcon.exe update安装总是出错,使用pnputil没有问题。
-
检查PSW是否安装成功:检查
C:\Windows\System32下是否有sgx_urts.dll,【右键->属性->详细信息】查看版本。 -
查看PSW是否启动。command(Admin)下执行
sc query aesmservice,输出如下信息表示已经启动。启动命令Start-Service "AESMService",重启命令Restart-Service "AESMService"。
SERVICE_NAME: aesmservice
    TYPE               : 10  WIN32_OWN_PROCESS
    STATE              : 4  RUNNING
                            (STOPPABLE, NOT_PAUSABLE, IGNORES_SHUTDOWN)
    WIN32_EXIT_CODE    : 0  (0x0)
    SERVICE_EXIT_CODE  : 0  (0x0)
    CHECKPOINT         : 0x0
    WAIT_HINT          : 0x0
- 1
- 2
- 3
- 4
- 5
- 6
- 7
- 8
(7)安装openenclave SDK
- 下载 openenclave nupkg
代码在这儿,下载最新版本。我下载的是v0.18.5。 - 安装
nuget工具。- 下载nuget工具,无需安装。下载地址在这儿。
- 下载之后将nuget存放地址加入到
PATH。 - 在Powershell(Admin)中测试nuget是否可用。
3.安装openenclave nupkg。打开Powershell(Admin),执行以下命令:
nuget.exe install open-enclave -Source D:\software\windows\SGX -OutputDirectory C:\oe -ExcludeVersion -pre
- 1
- 安装完成后,Open Enclave SDK将被放置在
C:\oe路径下。使用下面的命令来复制SDK到C:\openenclave。
xcopy /E C:\oe C:\openenclave\
- 1
- 查看当前SGX
// Powershell或者cmd下输入:
> oesgx.exe
CPU supports Software Guard Extensions:SGX1
MaxEnclaveSize_64: 2^(36)
CPU supports Key Sharing & Separation (KSS): false
EPC size on the platform: 98041856
- 1
- 2
- 3
- 4
- 5
- 6
| oesgx output | SGX support level |
|---|---|
| CPU supports SGX_FLC:Flexible Launch Control CPU supports Software Guard Extensions:SGX1 | SGX1+FLC |
| CPU supports Software Guard Extensions:SGX1 | SGX1 |
| CPU does not support SGX | None |
所以本系统支持SGX1。
(8)安装Intel SGX DCAP for Windows
-
安装WDK(Windows Driver Kit),获取
devcon.exe等工具。- 关闭visual studio。
- 安装Windows SDK,下载地址在这儿。下载之后安装,安装目录默认是
C:\Program Files (x86)\Windows Kits\10\WindowsSDK,其他选项根据需要进行修改。(Windows SDK 貌似不支持家庭版,因为在安装WDK的时候总是提示Windows SDK未安装。) - Windows SDK安装完成之后,将
C:\Program Files (x86)\Windows Kits\10添加到PATH。 - 安装WDK,下载地址在这儿。默认安装路径,安装之后将
C:\Program Files (x86)\Windows Kits\10\Tools\x64添加到PATH。
-
安装Intel SGX DCAP for Windows。
- DCAP的下载地址在这儿。下载DCAP到存放路径。
- 运行
Intel SGX DCAP for Windows v1.11.100.2.exe,解压到C:。 - 允许SGX启动配置驱动程序运行: command(Admin)下执行:
reg add HKEY_LOCAL_MACHINE\SYSTEM\CurrentControlSet\Services\sgx_lc_msr\Parameters /v "SGX_Launch_Config_Optin" /t REG_DWORD /d 1 reg query HKEY_LOCAL_MACHINE\SYSTEM\CurrentControlSet\Services\sgx_lc_msr\Parameters /v "SGX_Launch_Config_Optin"- 1
- 2
- 安装和升级驱动。进入
C:\Intel SGX DCAP for Windows v1.11.100.2目录,在command(Admin)下执行如下安装命令:
devcon.exe update dcap\WindowsServer2016\sgx_dcap_dev.inf "SWC\VEN_INT&DEV_0E0C_DCAP" devcon.exe update base\WindowsServer2019_Windows10\sgx_base.inf *INT0E0C // 或 pnputil /add-driver base\WindowsServer2019_Windows10\sgx_base.inf /install pnputil /add-driver dcap\WindowsServer2016\sgx_dcap_dev.inf /install- 1
- 2
- 3
- 4
- 5
- 6
- 安装
DCAP_Components。command(Amind)执行如下命令。
// 安装 DCAP_Components nuget.exe install DCAP_Components -Source "C:\Intel SGX DCAP for Windows v1.11.100.2\nuget\DCAP_Components" -OutputDirectory C:\oe_prereqs -ExcludeVersion // 安装 EnclaveCommonAPI > nuget.exe install EnclaveCommonAPI -Source "C:\Intel SGX DCAP for Windows v1.11.100.2\nuget\EnclaveCommonAPI" -OutputDirectory C:\oe_prereqs -ExcludeVersion- 1
- 2
- 3
- 4
- 5
如果安装
EnclaveCommonAPI提示错误Unable to resolve dependency 'SgxHeaders'. Source(s) used: 'nuget.org'.或错误Unable to find package 'DCAP_Components'. Existing packages must be restored before performing an install or update.。则不指定源,使用所有源安装EnclaveCommonAPI。nuget.exe install EnclaveCommonAPI -OutputDirectory C:\oe_prereqs -ExcludeVersion- 1
(9.1)安装 visual studio 下开发 enclave 开发环境
Intel® Software Guard Extensions SDK for Windows*下载地址在这儿,通过邮箱免费注册。
注册成功后,Intel 会给你的邮箱发一个邮件。通过邮件链接进入下载页面:
-
注册成功邮件

-
下载页面

注意:试了QQ、163 邮箱,QQ连注册成功的消息都无法收到。163邮箱收到了,但是通过链接都无法进入到下载界面,每次进入都会提示未注册。后来尝试了gmail邮箱就ok了(也是尝试了多次)。所以,大家多尝试下吧,我因为这个搞了好久。 不知道大家有没有这个问题。
下载之后,将 exe 修改为 zip,运行SEWizardVS2017.vsix,SEConfigureVS2017.vsix, SGXDebugLauncher.vsix,等待各自安装成功。安装成功之后,打开 visual studio 2017 新建项目即可看到 【Intel® SGX Enclave Project】 选项了。

(9.2)也可以通过插件方式安装开发环境
从 visual studio 2019 开始,可以在插件中直接安装 sgx 开发环境,由于测试电脑在 visual studio 2019 上安装 sgx 开发插件时总是蓝屏(可能安装到32位),所以没有成功测试过。 搭建安装的时候注意即可。
二、使用Open Enclave SDK
注意:目前该SDK仅支持64bit的程序。
(一)Open Enclave SDK目录文件说明
| Path | 说明 |
|---|---|
| bin | Developer tools such as oedebugrt.dll for debugging and oesign for signing your enclaves. |
| include\openenclave | Open Enclave runtime headers for use in your enclave (enclave.h) and its host (host.h). |
| include\openenclave\3rdparty | Headers for libc, libcxx and mbedlts libraries for use inside the enclave. See the API Reference section for supported functions. |
| lib\openenclave\cmake | Open Enclave SDK CMake Package for integration with your CMake projects. See README.md for more details. |
| lib\openenclave\enclave | Libraries for linking into the enclave, including the libc, libcxx and mbedtls libraries for Open Enclave. |
| lib\openenclave\host | Library for linking into the host process of the enclave. |
| lib\openenclave\debugger | Libraries used by the gdb plug-in for debugging enclaves. |
| share\openenclave\samples | Sample code showing how to use the Open Enclave SDK. |
(二)配置 Open Enclave SDK
在环境变量中增加CMAKE_PREFIX_PATH,值为C:\openenclave\lib\openenclave\cmake。或者:
set CMAKE_PREFIX_PATH=%CMAKE_PREFIX_PATH%;C:\openenclave\lib\openenclave\cmake
- 1
(三)运行测试例子(helloworld)
Open Enclave SDK的测试例相关文档:
- 拷贝所有测试示例到本地地址
// 示例
xcopy /E C:\openenclave\share\openenclave\samples E:\codes\MPC\oe-tee
- 1
- 2
- 在菜单栏展开Visual Studio 2017,以 Admin 的方式打开
适用于 VS 2017 的 x64 本机工具命令提示编译(如果选择其他,则会提示find_package The following configuration files were considered but not accepted的错误)。进入到程序目录。
注:visual studio的各个shell工具说明在这儿。

- 编译
helloworld测试代码
mkdir build
cd build
> cmake .. -G Ninja -DNUGET_PACKAGE_PATH=C:\oe_prereqs
// 等待无错误输出

> ninja
[1/1] Generating enclave/enclave.signed
Created E:/codes/MPC/oe-samples/helloworld/build/enclave/enclave.signed

> ninja run
[1/1] cmd.exe /C "cd /D E:\codes\MPC\oe-samples\helloworld...es/MPC/oe-samples/helloworld/build/enclave/enclave.signed"
Hello world from the enclave
Enclave called into host to print: Hello World!
- 1
- 2
- 3
- 4
- 5
- 6
- 7
- 8
- 9
- 10
- 11
- 12
- 13

