构建nas
One of the things I’ve wanted to do for a long time is to consolidate all my NAS and NAS-ish devices into one clean box. There are three main reasons behind it.
我长期以来一直想做的一件事就是将所有NAS和类似NAS的设备整合到一个干净的盒子中。 其背后有三个主要原因。
- I wanted a cleaner setup 我想要更清洁的设置
- I wanted better performance and better drive space utilization 我想要更好的性能并更好地利用空间
- I wanted the dopamine surge from buying a ton of new toys to power me through my PhD qualification exam study during the quarantine life of the pandemic 我希望在大流行隔离期间购买大量新玩具来推动我的博士资格考试研究,从而使多巴胺激增
So here we go.
所以我们开始。
第0部分-我现有设置的问题 (Part 0 — issues with my existing setups)

- Synology DS218j 2-bay NAS running RAID 1 (4TB *2) 运行RAID 1的Synology DS218j 2托架NAS(4TB * 2)
- WD My Cloud EX2 2-bay NAS running RAID 1 (2TB *2) WD My Cloud EX2 2托架NAS运行RAID 1(2TB * 2)
- WD My Book Live NAS (2TB) WD My Book Live NAS(2TB)
- Some external hard drives connected to the Synology NAS via USB 一些通过USB连接到Synology NAS的外部硬盘驱动器
Right off the bat, there are two issues. First, having four separate (and very different) devices makes the whole setup really messy. I started with one NAS and then bought another after another after i run out of space on the existing ones. In some way, it is like having a bunch of external hard drives laying around, and buy new bigger drives when old ones are filled, only ends up with more clutters. Ironically, this is actually one of the problem that a NAS is intended to help. The problem is that I wasn’t making any plan back when i made those purchase decisions, and always thought that it is not worth the cost to go full out on a DIY NAS server for my needs.
马上,有两个问题。 首先,拥有四个单独的(且非常不同)的设备会使整个设置非常混乱。 我从一个NAS开始,然后在现有NAS的空间用完后又买了另一个。 从某种意义上讲,这就像是在堆放一堆外部硬盘驱动器,然后在旧驱动器装满后购买新的更大的驱动器,只会导致混乱。 具有讽刺意味的是,这实际上是NAS旨在解决的问题之一。 问题是当我做出这些购买决定时,我没有重新制定任何计划,并且一直认为在DIY NAS服务器上完全满足我的需求是不值得的。
The second issue is that rather than having big merged storage pool, the spaces are fragmented across all these devices. Even worse, the only way to have some levels of redundancy is to run RAID 1 in both of my 2-bay systems, leaving more space-efficient RAID configurations off of the table even if the number of drives that I owned would allow it. Maybe, just maybe, it would also be nice to have some performance upgrade and move to an open source platform so that I can have some fun with VMs, containers and other stuff to play with. After-all, these devices’ ARM-based processors are quite weak, with the oldest one dating all the way back to the year of 2011, and all of them running their proprietary software.
第二个问题是,空间没有大型合并的存储池,而是分散在所有这些设备上。 更糟糕的是,具有某种程度的冗余的唯一方法是在我的两个2托架系统中都运行RAID 1,即使我拥有的驱动器数量允许它,也无法在桌面上使用更多节省空间的RAID配置。 也许,也许也许,将性能进行一些升级并迁移到开放源代码平台也将是一件很不错的事,这样我就可以在虚拟机,容器和其他可玩的东西上找到乐趣。 毕竟,这些设备的基于ARM的处理器非常薄弱,最古老的处理器可以追溯到2011年,并且所有处理器都运行其专有软件。
第1部分-规划 (Part 1 — planning)
During the planing phase of this project, i run into some super awesome blog posts by Brian Cmoses on DIY NAS. In particular, his EconoNAS 2019 build and his mentioning of the @Sam010Am’s Node 304 build gave me lots of inspirations.
在该项目的计划阶段,我遇到了Brian Cmoses在DIY NAS上发布的一些超赞博客文章。 特别是,他的EconoNAS 2019版本和提到@ Sam010Am的Node 304版本给了我很多启发。
There are many objectives that i would like to achieve, but the majors ones i have here are: An attractive case, recycle parts as possible, price-performance ratio.
我想实现许多目标,但是我要实现的主要目标是:一个有吸引力的案例,尽可能地回收零件,性价比。
Case:
案件:
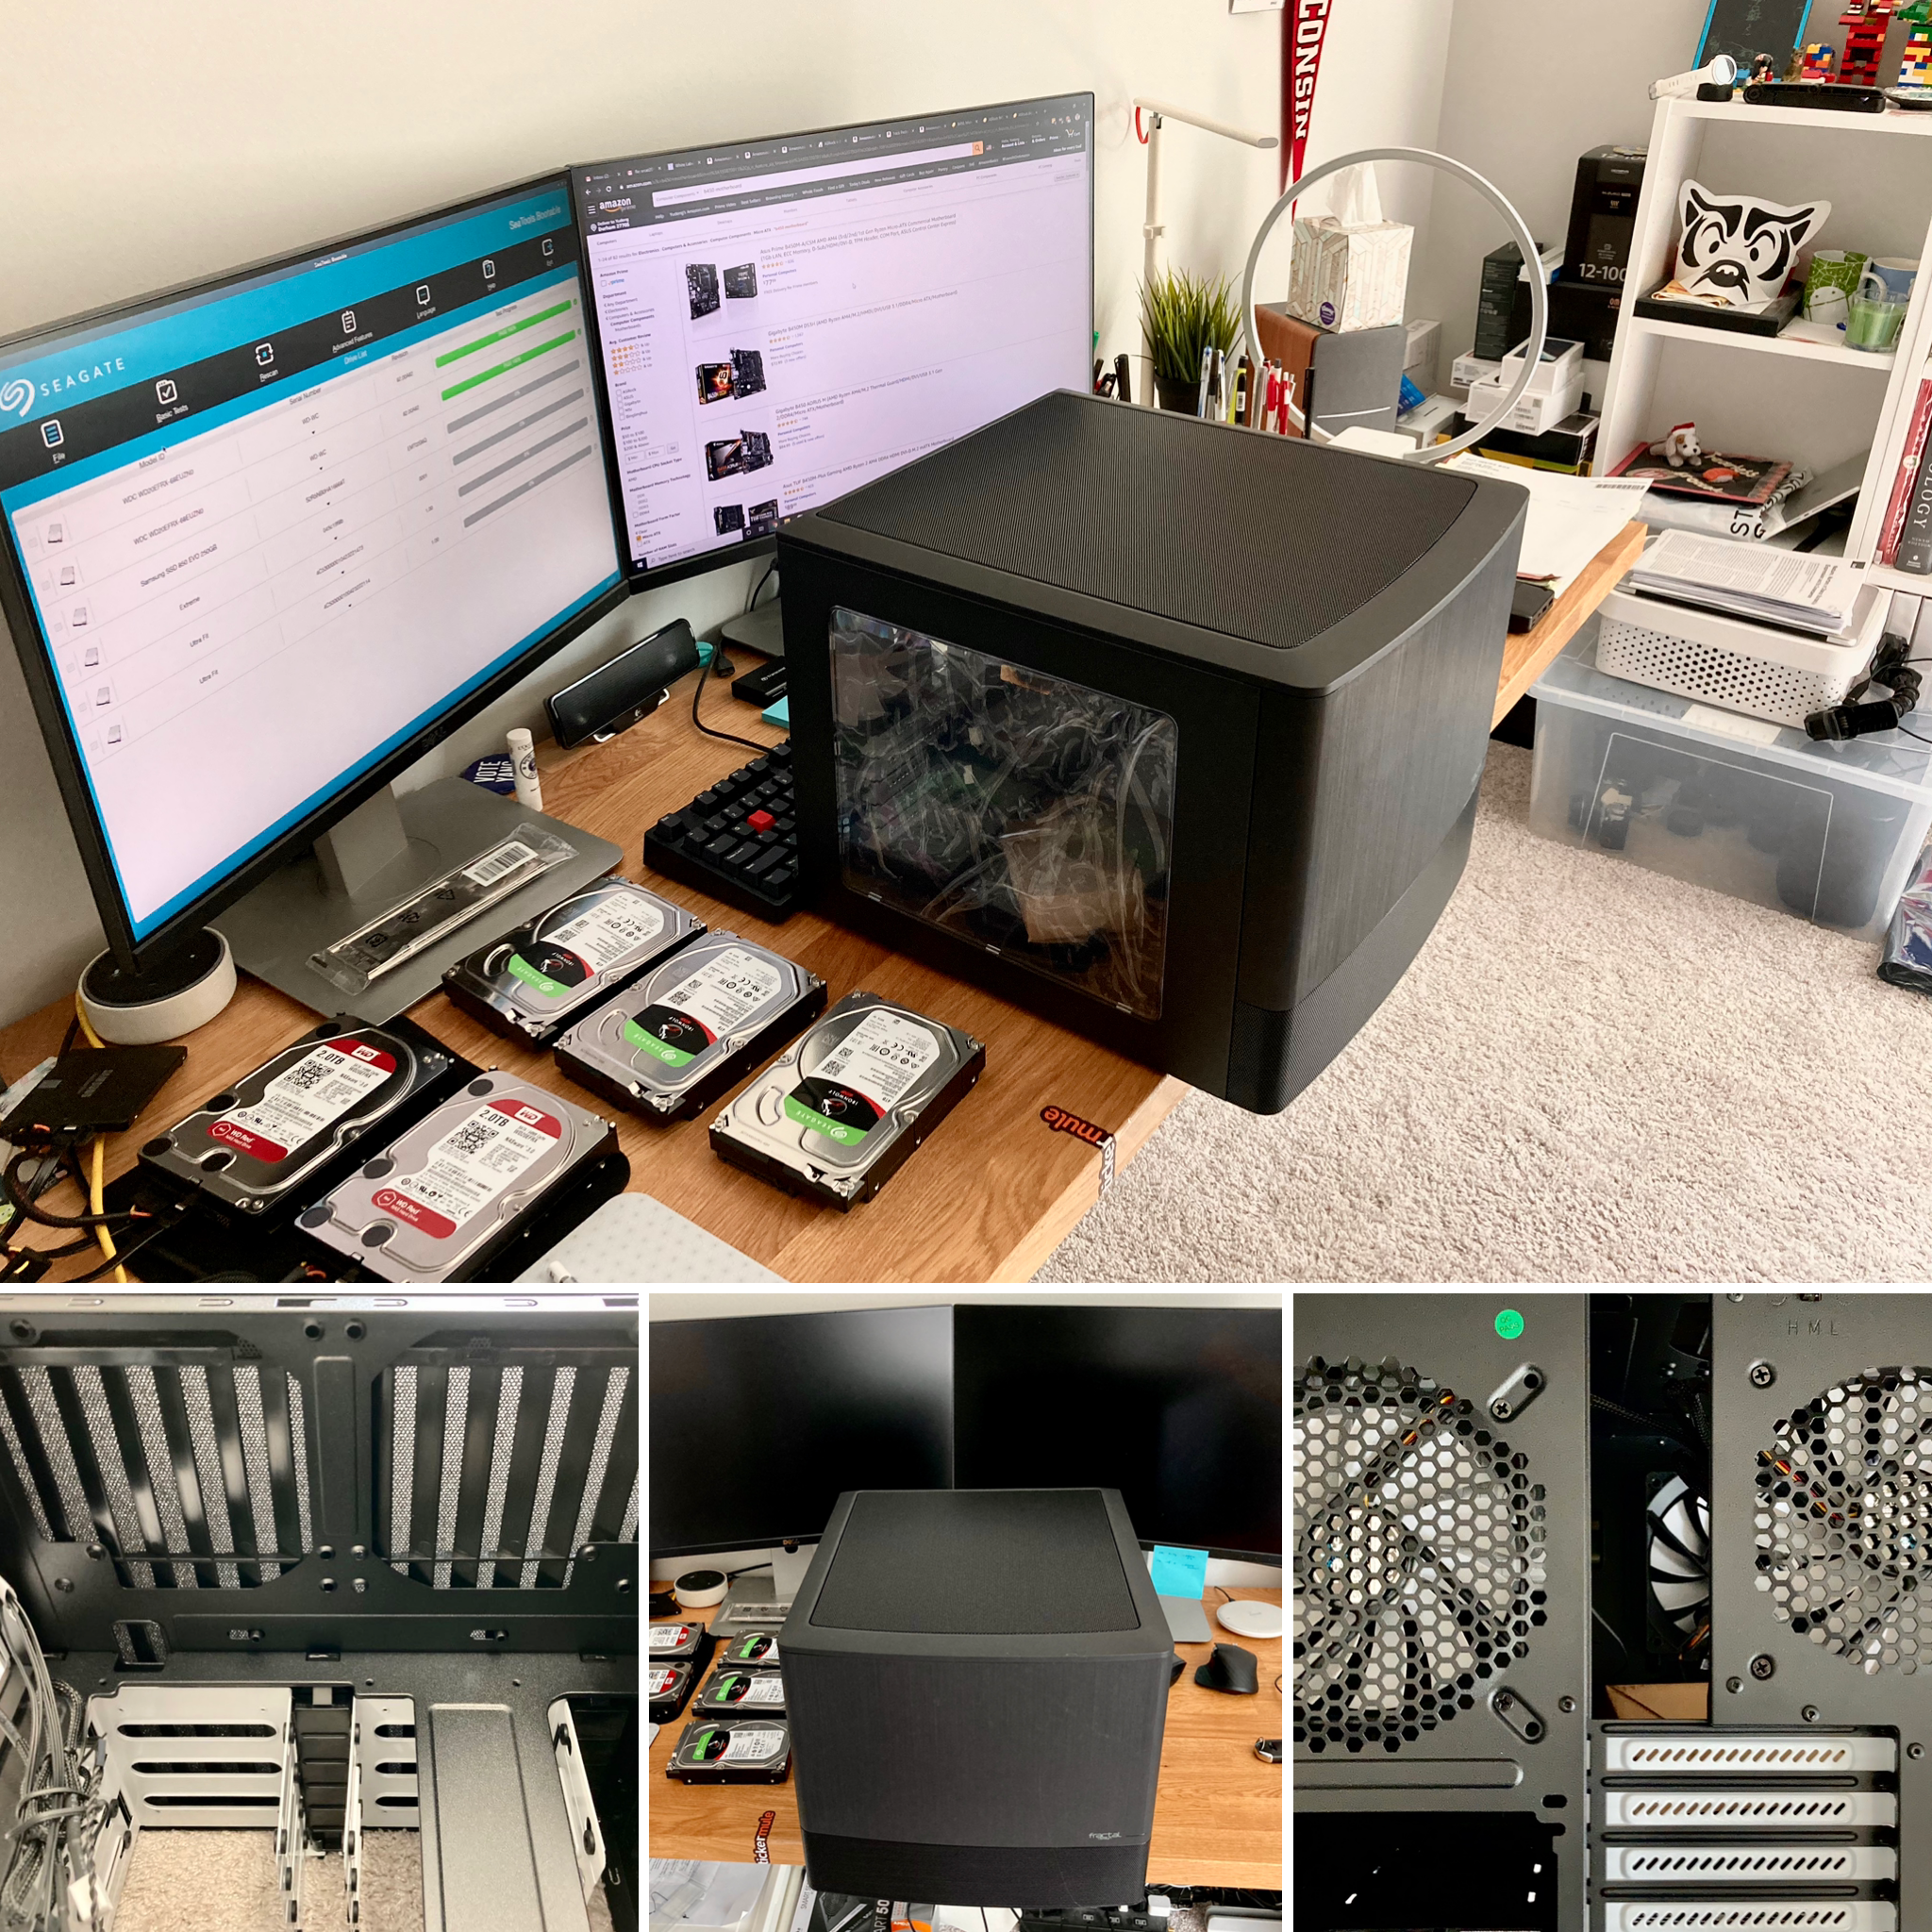
It make a lot of sense to me to start the planing around the case. The choice of case is the limiting factor for the entire build, as it determines what size of motherboard you can fit and how many drives you can put into your system, and obviously the beautiness of the build is also determined by the case. I want something that is not too bulky and that lead me to look for the mATX or mini-ITX form factor case. At the same time, I want to “recycle” all my existing five hard drives while also adding some new drives to the system, which adds up to roughly 8–10 drives that need to be fitted into the case. These two criteria land me on the Fractal Design Node 804. At the ~$110 price, it gives me the space to fit ten 3.5'’ drive and two 2.5" drive, which are not only plenty for now, but also leaves a lot of flexibility down the road for any upgrades. Despite being capable of accommodating 12 hard drives, an mATX motherboard and six 120 mm fans, it still manage to be a very compact and sleek looking case.
对我而言,开始围绕案件进行计划很有意义。 外壳的选择是整个构建的限制因素,因为它决定了您可以安装哪种主板以及可以在系统中放入多少驱动器,显然构建的美观程度也取决于外壳。 我想要的东西不太笨重,导致我需要寻找mATX或mini-ITX尺寸的保护套。 同时,我想“回收”所有现有的五个硬盘驱动器,同时还要向系统中添加一些新驱动器,这总共需要安装大约8-10个驱动器。 这两个标准使我进入了分形设计节点804 。 以约$ 110的价格,它为我提供了容纳十个3.5英寸驱动器和两个2.5英寸驱动器的空间,这些驱动器不仅现在足够用,而且在升级时还留出了很大的灵活性。它可以容纳12个硬盘驱动器,一个mATX主板和六个120毫米风扇,但仍然是一个非常紧凑和时尚的外壳。
Motherboard, CPU & RAM:
主板,CPU和RAM:
It took me a little while to settle down the final choice for the motherboard, CPU and RAM. Initially, I sticked to the EconoNAS 2019 build’s AMD Ryzen APU + B450 motherboard combo to try to achieve the most bang per buck. However, I soon run into some of the limitations of the combo and eventually decided to go down the route of eBay used parts with Intel Xeon E3 CPU and Supermicro server motherboard for the following two reasons:
我花了一些时间来确定主板,CPU和RAM的最终选择。 最初,我坚持使用EconoNAS 2019内部版本的AMD Ryzen APU + B450主板组合,以尝试实现最高性价比 。 但是,我很快遇到了该组合的一些限制,最终出于以下两个原因,决定沿用eBay的部件使用Intel Xeon E3 CPU和Supermicro服务器主板:
- I figured it might be a good idea to use ECC RAM for a storage server as almost all modern file systems heavily use RAM as the write buffer. Newer Ryzen and some Core i3 CPUs do come with ECC supports, but the additional costs for motherboards with proper ECC supports (and in the case of Ryzen, a dGPU) would made the build incompatible with “good value” 我认为将ECC RAM用于存储服务器可能是一个好主意,因为几乎所有现代文件系统都大量使用RAM作为写缓冲区。 较新的Ryzen和某些Core i3 CPU确实具有ECC支持,但是具有适当的ECC支持的主板(以及在Ryzen的情况下,dGPU)的额外成本将使该版本与“物有所值”不兼容。
- I also realized that i need some decent amount of PCIe slots for things like HBA card, 10G Ethernet, and NVMe SSDs, and most of the good value B450 mATX boards come only with one x16 slot and some x1 slots. 我还意识到,我需要一定数量的PCIe插槽来放置HBA卡,10G以太网和NVMe SSD,并且大多数物有所值的B450 mATX板仅配备一个x16插槽和一些x1插槽。
So I ended up with
所以我最终
Never dealt a server board before, I was quite surprised by the “enterprise features” on the Supermicro board. The IPMI + iKVM comes in really handy for accessing and managing the machine without connecting to a monitor and there are more than enough fan headers and decent numbers of wide PCIe slots available. The board is compatible with both Xeon E3 v3 and v4 generation CPUs. I choose the E3–1285L v4 mainly for the hyper threading and potential lower power consumption (Hey! it is on the 14 nm node! The state of art manufacturing node from Intel even in 2020 :D). In retrospect, The 4-Core 4-Thread E3–1220 v3 would probably also be a fine choice, and there are plenty of them selling around $30 on eBay. As for choice of RAM, there are some alternatives from other smaller brands, but I figured that i can’t go wrong with the one listed in the official supported RAM model on the Supermicro website. Plus, it is not expensive either, for about $35 each, I bought four of them to populate all the RAM slots on my board.
从未处理过服务器主板,我对Supermicro主板上的“企业功能”感到非常惊讶。 IPMI + iKVM非常方便,无需连接显示器即可访问和管理计算机,并且风扇接头和足够数量的可用宽PCIe插槽可用。 该板与Xeon E3 v3和v4代CPU兼容。 我选择E3–1285L v4主要是为了实现超线程和潜在的更低功耗(嘿!它位于14纳米节点上!即使在2020年,英特尔也是最先进的制造节点:D)。 回顾一下 ,4核4线程E3–1220 v3可能也是一个不错的选择,其中有很多在eBay上的售价约为30美元。 至于RAM的选择,还有其他一些较小品牌的选择,但我认为Supermicro网站上官方支持的RAM模型中列出的RAM不会出错。 另外,它也不便宜,我每个人花了大约35美元购买了其中的四个来填充板上的所有RAM插槽。
OS, Hard drives & HBA Card:
操作系统,硬盘驱动器和HBA卡:
These three things go hand in hand when making purchase decisions. The OS and its underlying file systems determines how the drives will be used and arranged, which, in turn, determines how many drives needed to be connected and whether an Host Bus Adaptor (HBA) card is needed. In choosing the OS, FreeNAS (now TrueNAS Core) and Unraid seem to be the most popular NAS-oriented OSes out there, each with their own perks and quirks.
这三件事在做出购买决定时是齐头并进的。 操作系统及其底层文件系统确定如何使用和排列驱动器,进而确定需要连接多少个驱动器以及是否需要主机总线适配器(HBA)卡。 在选择操作系统时, FreeNAS (现为TrueNAS Core)和Unraid似乎是最流行的面向NAS的操作系统,每个都有自己的优势和怪癖。
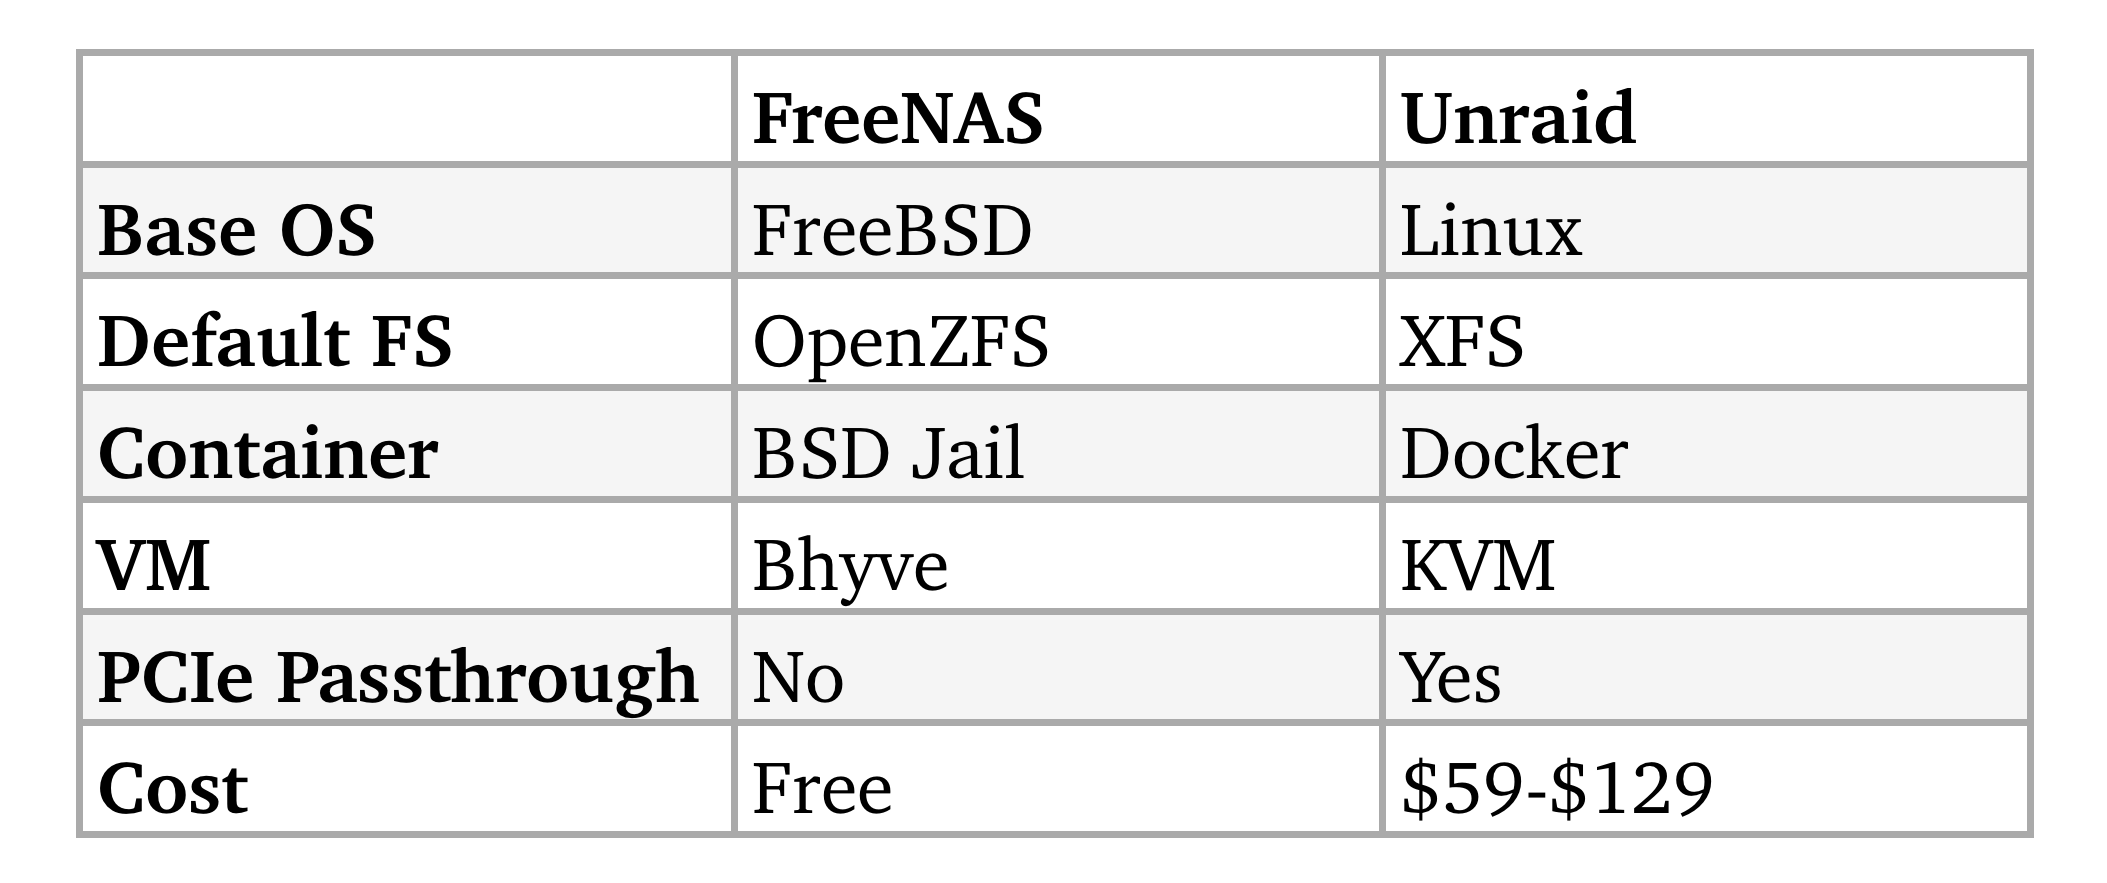
For me, it boils down to that FreeNAS is open-sourced, and I like the FreeNAS community forum a bit more, and besides all the fancy features that come with ZFS, i am also okay with ZFS’ quirky way (or, shall I say, the enterprise way?) on expanding the storage pool. Plus there are news that a better way is coming in the future.
对我来说,这可以归结为FreeNAS是开源的,我更喜欢FreeNAS社区论坛,除了ZFS附带的所有精美功能外,我也对ZFS的古怪方式还可以(或者,我应该例如,企业方式?)扩展存储池。 另外,有消息称将来会出现更好的方法 。
Cost is really not the reason here, and it turns out that I think the way Unraid handles expansion will save your money in the long run as a home user. Also, if you really cares about VM (in particular, PCIe passthrough for graphic cards), then you probably should also go with Unraid, or other Linux based systems such as OpenMediaVault, as KVM is a much more mature system compare to BSD Bhyve.
成本确实不是这里的原因,事实证明,我认为Unraid处理扩展的方式从长远来看将成为家庭用户节省资金。 另外,如果您真的很在乎VM(特别是图形卡的PCIe直通),那么您可能还应该选择Unraid或其他基于Linux的系统(例如OpenMediaVault) ,因为与BSD Bhyve相比,KVM是一个更为成熟的系统。
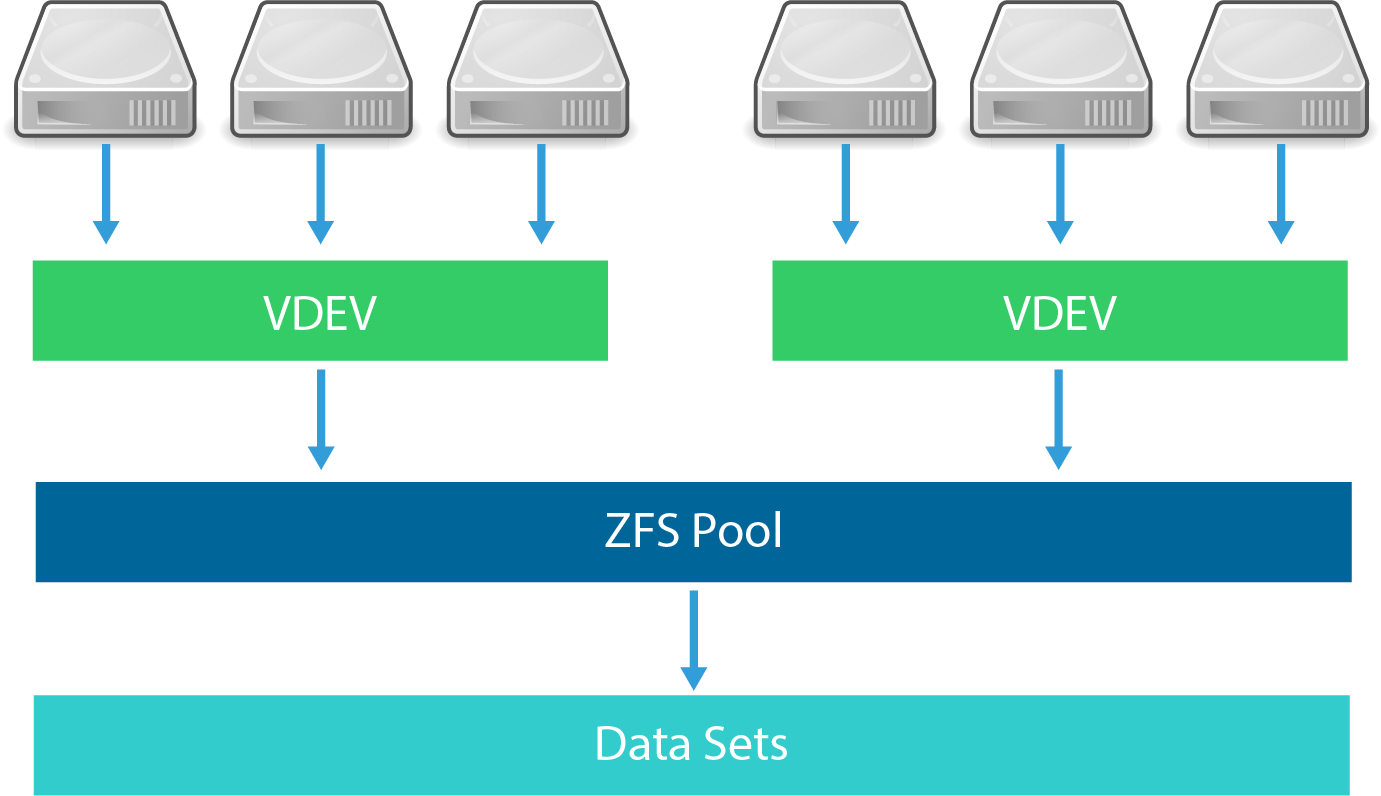
Okay, let’s talk about drives! the physical drives! I have two 2 TB and two 4 TB WD Red Drive that i’m going to recycle into the new server. I decided to put them into two separate pools. So one pool will be made from exclusively 2 TB drives and another pool made from exclusively 4 TB drives. For the 2 TB drive pools, i felt like three disks running RAID-z1 (RAID-5 equivalent) should be okay. And for the 4 TB drive pools, I decided to put five disks into a RAIZ-z2 (RAID-6 equivalent) configuration. So, in total, I need one more 2 TB drive and three more 4 TB drives.
好吧,让我们谈谈驱动器! 物理驱动器! 我有两个2 TB和两个4 TB WD Red Drive,我打算将它们回收到新服务器中。 我决定将它们放入两个单独的池中。 因此,一个池将仅由2 TB驱动器组成,而另一个池将仅由4 TB驱动器组成。 对于2 TB的驱动器池,我觉得运行RAID-z1(相当于RAID-5)的三个磁盘应该可以。 对于4 TB驱动器池,我决定将5个磁盘放入RAIZ-z2(相当于RAID-6)配置中。 因此,总共我需要一个以上的2 TB驱动器和三个以上的4 TB驱动器。
For the new drives, I went with 3 * Seagate IronWolf 4 TB drives and a 2 TB HGST UltraStar. (PSA: don’t buy the WD Red SMR drive. They are very ill-suited for RAID-z, and other parity based RAID configurations).
对于新驱动器,我选择了3个Seagate IronWolf 4 TB驱动器和2 TB HGST UltraStar 。 (PSA:不要购买WD Red SMR驱动器 。它们非常不适合RAID-z和其他基于奇偶校验的RAID配置。)
So that’s eight drives already. But then i decided to also “shuck” my external drives that are connect the existing NAS into the new case as well, which means, I’m going to need an HBA card for more SATA lanes. I went with an used LSI SAS 9210 8i for ~$20 on eBay, but there are lots of similar choices. It is a PCIe 2.0 x8 card, but the 600 MB/s per lane bandwidth should be plenty for spinning hard drive or even SATA SSD for that matter. One thing to note is that many of these LSI cards are essentially hardware RAID cards, and ZFS doesn’t like that extra layer of abstract. So what you want is to flash the firmware on the card to “turn off” the hardware RAID functionality, and expose the physical drive interface to ZFS. Some eBay seller will have the cards firmware flashed already, marketing them as FreeNAS and Unraid ready card and charge for a premium. But you can easily flash the firmware yourself.
因此,已经有八个驱动器。 但是后来我决定也将与现有NAS相连的外部驱动器也“拆开”,这意味着我将需要HBA卡才能使用更多SATA通道。 我选择了二手的LSI SAS 9210 8i 在eBay上只要20美元左右,但也有很多类似的选择。 它是PCIe 2.0 x8卡,但对于这种情况而言,每通道600 MB / s的带宽对于旋转硬盘驱动器或SATA SSD应该足够了。 需要注意的一件事是,这些LSI卡中的许多实际上都是硬件RAID卡,ZFS不喜欢这种额外的抽象层。 因此,您想要的是刷新卡上的固件以“关闭”硬件RAID功能,并将物理驱动器接口公开给ZFS。 一些eBay卖家将已经烧写了卡固件,将它们作为FreeNAS和Unraid就绪卡进行销售,并收取额外费用。 但是您可以自己轻松地刷新固件 。
Network:
网络:
When thinking about network system for a NAS, i find it useful to look at relative bandwidth of network interfaces and speed of the storage devices. I left 2.5 Gb Ethernet out of here because most of the cheap 2.5 GbE NIC doesn’t play well with FreeNAS and the price of an used SolarFlare 10 GbE NIC is probably on par with that of a 2.5 GbE NIC if not cheaper.
在考虑NAS的网络系统时,我发现查看网络接口的相对带宽和存储设备的速度非常有用。 我将2.5 Gb以太网留在这里,是因为大多数便宜的2.5 GbE NIC不能与FreeNAS一起很好地使用,而且二手Solflare 10 GbE NIC的价格可能比2.5 GbE NIC的价格低廉。
Gb Ethernet < hard drive < SATA SSD < 10 Gb Ethernet < NVMe SSD
Gb以太网<硬盘<SATA SSD <10 Gb以太网<NVMe SSD
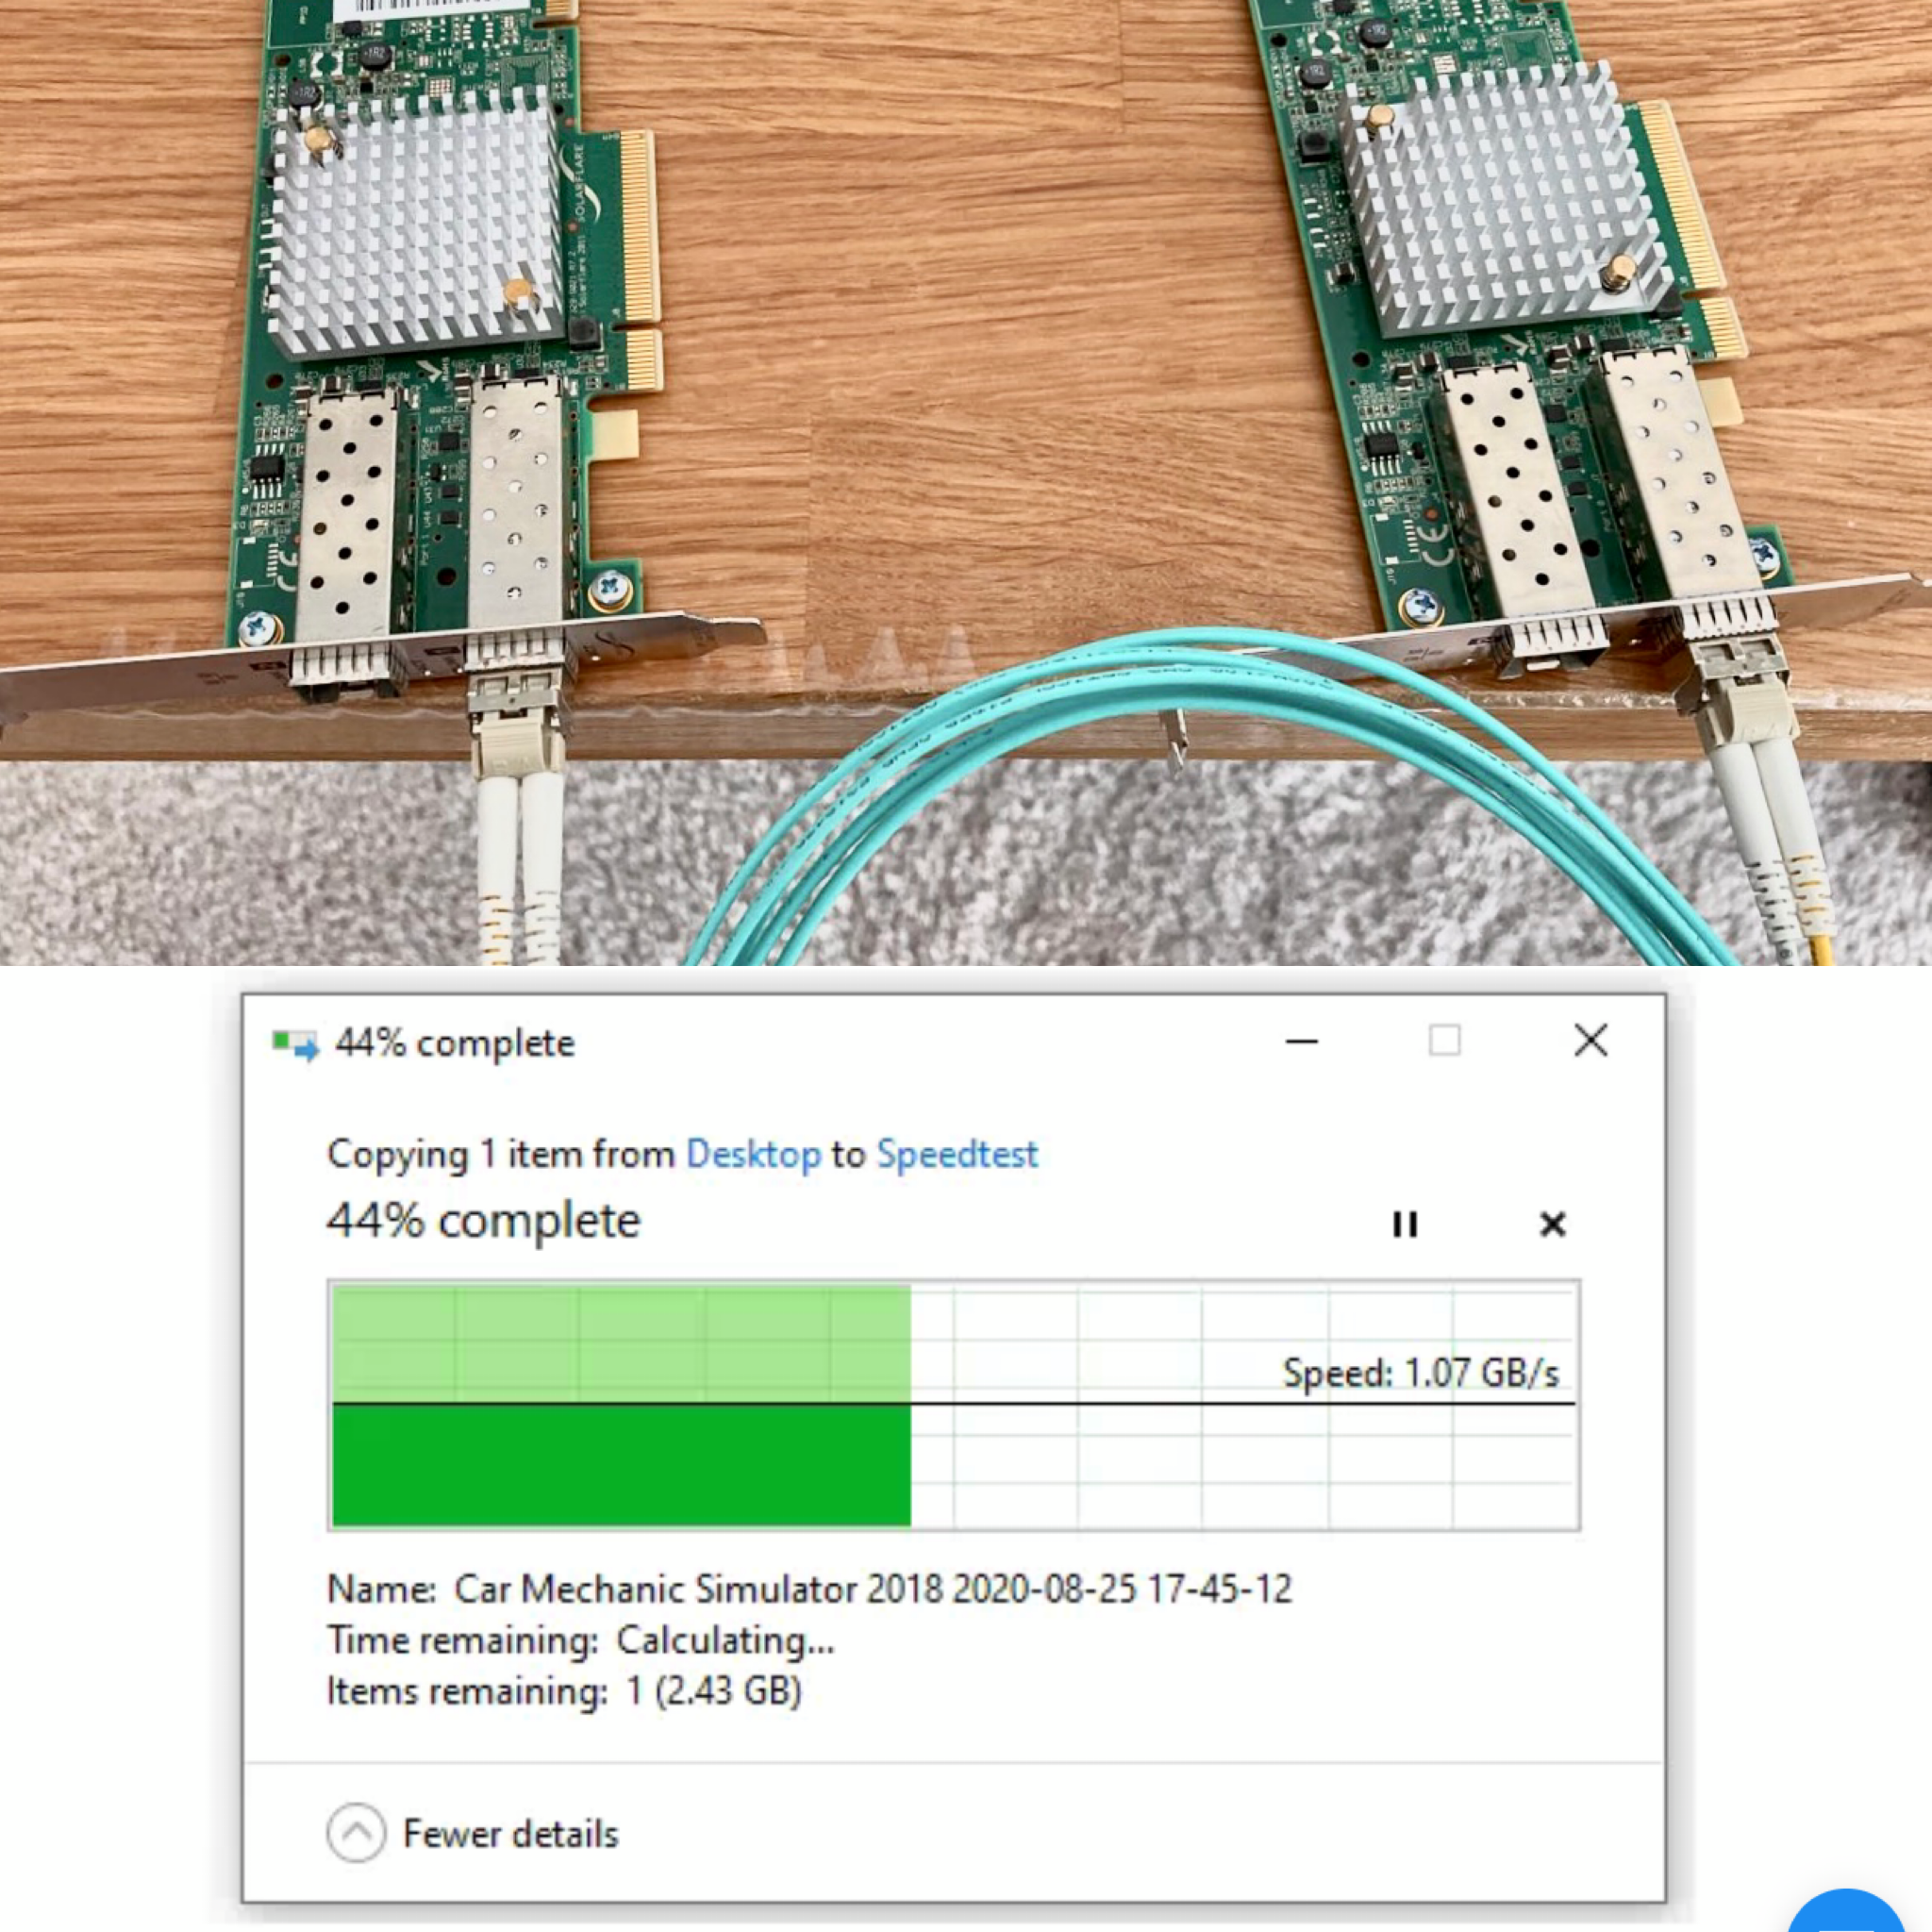
So, depending on your needs, you can just go with the GbE that comes on the motherboard, or go a little extra fancy to make it 10 Gb or partially 10 Gb. I went with a partially 10 Gb plan to run a point to point 10 Gb connection between the NAS and my main computer, and the communication of the NAS and the rest of the networks runs on Gb Ethernet. After reading this amazing post from the FreeNAS forum regarding 10 GbE, I settled down on a pair of Solarflare 6122F, Finisar SFP+ SR transceivers, and a OM3 fiber cable, mostly because this seems to be the cheapest combo (~$65 in total). SFP+ 10GBASE with Passive Direct Attach Copper cable might be a cheaper solution than OM3 fiber if you run very short distance, but in my case, a 3-meter OM3 cable with a pair of SR transceivers is about the same price as a 3-meter Direct Attach Copper cable.
因此,根据您的需求,您可以只使用主板上的GbE,也可以花一点儿钱使其制成10 Gb或部分10 Gb。 我采用了部分10 Gb的计划,以在NAS和我的主计算机之间运行点对点10 Gb连接,并且NAS和其余网络的通信在Gb以太网上运行。 在阅读了来自FreeNAS论坛的有关10 GbE的精彩文章之后,我选择了一对Solarflare 6122F, Finisar SFP + SR收发器和OM3光纤电缆,主要是因为这似乎是最便宜的组合产品(总计约65美元)。 如果您的距离很短,则带有无源直接连接铜缆的SFP + 10GBASE可能比OM3光纤便宜,但是在我的情况下,带有一对SR收发器的3米OM3电缆与3米的价格大致相同直接连接铜缆。
Power supply:
电源供应:
For PSU, all I was thinking is to just get a “reputable” brand that is cheap enough with an 80 Plus certification. A spinning drive could peak at about 10 watts during write/read operations, So you can do the math and add some spares to figure out how many watts you would need. In my case, I don’t have a dGPU or a power-hunger CPU, so maybe ~400W should be plenty for me. and the Thermaltake Smart 500W fits me perfectly. For an extra peace of mind, I also hunted an used CyberPower 1500 VA / 1000 W pure sinewave UPS for my system. The power capacity of this UPS is sufficient enough so that I also attached my main desktop onto it.
对于PSU,我一直在想的只是获得一个“信誉良好”的品牌,该品牌通过80 Plus认证就足够便宜了。 在写/读操作期间,旋转驱动器的峰值功率可能约为10瓦 。因此,您可以进行数学计算并添加一些备件,以找出所需的瓦数。 就我而言,我没有dGPU或大功率CPU,因此〜400W对我来说应该足够了。 而Thermaltake Smart 500W非常适合我。 为了更加省心,我还为系统购买了二手的CyberPower 1500 VA / 1000 W正弦波UPS。 该UPS的电源容量足够,因此我也将主台式机连接到了它。
Miscellaneous:
杂:
Besides the major components mentioned above, there are also a few items that are easy to forget but are essential or beneficial for the build.
除了上面提到的主要组件外,还有一些易于忘记但对构建至关重要或有益的项目。
OS drive: Sandisk UltraFit 16 Gb * 2 (I choose two here so that i can run them mirroring mode to compensate the “unreliable” nature of the thumb drive)
操作系统驱动器 :Sandisk UltraFit 16 Gb * 2(我在这里选择两个,以便我可以以镜像模式运行它们以补偿拇指驱动器的“不可靠”性质)
Mini SAS to SATA cable: (Note: different HBA card might use different mini-SAS connectors, make sure you get the right cable)
Mini SAS转SATA电缆 :(注意:不同的HBA卡可能使用不同的mini-SAS连接器,请确保使用正确的电缆)
Molex 4-pin to SATA power cable: My PSU only came with 6 SATA power connectors, so I turned some of the 5V 4-pin Molex connectors into SATA power connectors.
Molex 4针至SATA电源线 :我的PSU仅带有6个SATA电源连接器,因此我将一些5V 4针Molex连接器变成了SATA电源连接器。
Fan for your PCIe expansion cards: many of these components use passive cooling, but they are designed to be used in a rack-mounted server environment that has fans blowing at jet engine speed with optimal airflow. So you might want to mount a small fan on to some of them. I find the LSI HBA card gets hot really easy (after-all, there’s a PowerPC processor under its heatsink), so I attached a Noctua A4x10 PWM Fan onto it.
PCIe扩展卡的风扇 :这些组件中的许多组件使用被动冷却,但它们设计用于在机架安装的服务器环境中使用,该环境中的风扇以喷气发动机速度吹动并具有最佳气流。 因此,您可能需要在其中一些风扇上安装一个小风扇。 我发现LSI HBA卡非常容易变热(毕竟,散热器下有一个PowerPC处理器),因此我在其上连接了Noctua A4x10 PWM风扇 。
Additional case fan: I added another case fan so that my 8 drives are sandwiched between a push-pull case fan configuration. You will probably be totally fine without this. (but Hey! isn’t spending money the main goal of building a server!)
额外的机箱风扇 :我添加了另一个机箱风扇,以便将8个驱动器夹在一个推挽式机箱风扇配置之间。 没有这个,您可能会很好。 (但是,嘿!这不是花钱建造服务器的主要目标!)
CPU cooler: ok, don’t judge me and don’t learn from me. You should just go with the $30 Xeon E3–1220 v3 and a $10 intel stock cooler. (but Hey Hey Hey! The 128 MB embedded DRAM L4 cache on the 1285L-v4 Broadwell processor is worth the every penny! It gives you 0.000000001% performance gain on cache heavy workload! So does the Iris Pro iGPU in it, totally worth the money on my storage server running FreeBSD with no monitors attached! It even has a fancy codename called Crystal Well!)
CPU散热器 :好的,不要判断我,也不要向我学习。 您应该只购买30美元的Xeon E3-1220 v3和10美元的英特尔库存冷却器。 (但嘿,嘿!! 1285L-v4 Broadwell处理器上的128 MB嵌入式DRAM L4缓存值得每一分钱!它在缓存繁重的工作量上为您提供0.000000001%的性能提升!Iris Pro iGPU也是如此,完全值得在没有连接监视器的运行FreeBSD的存储服务器上赚了钱!它甚至有一个奇特的代号,叫做Crystal Well !)
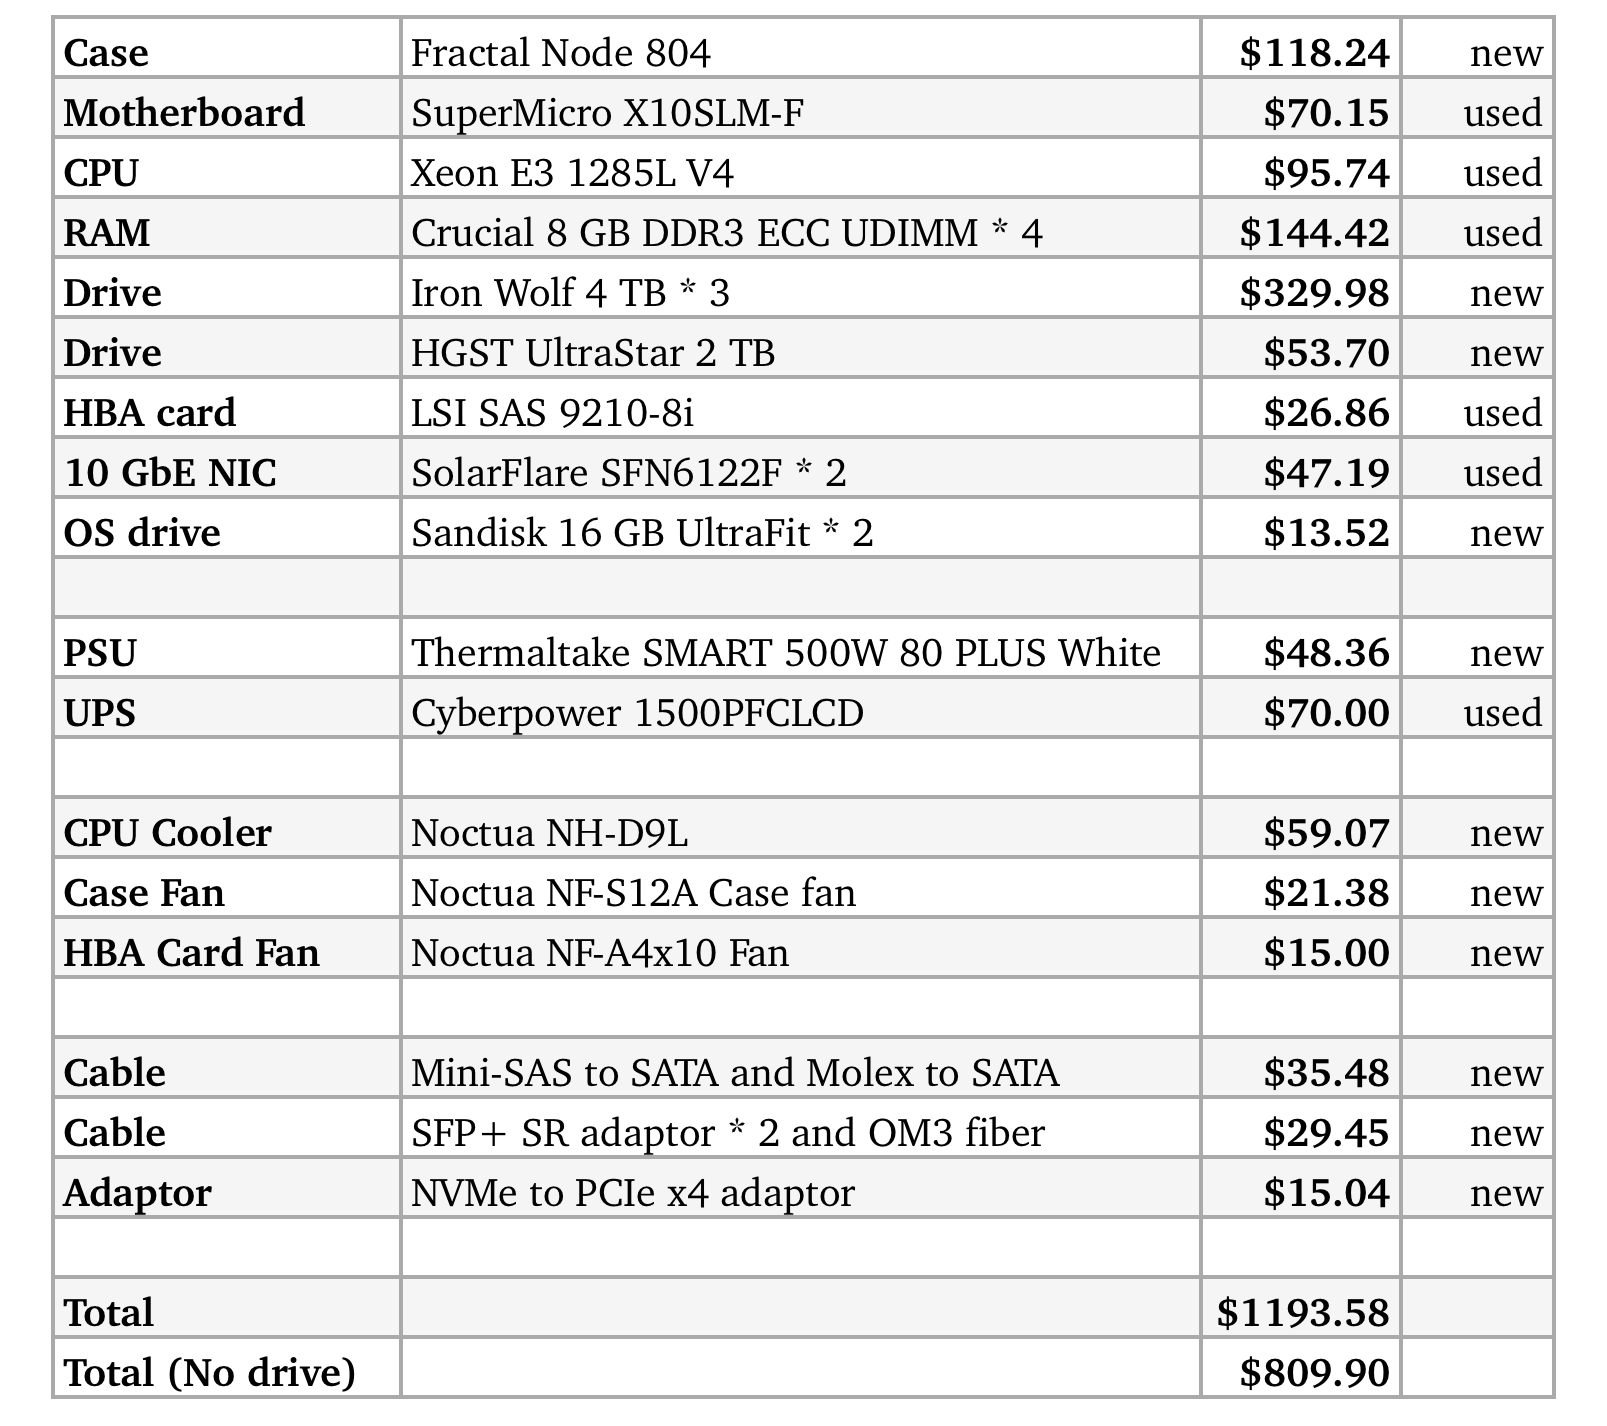
Final List:
最终名单:
第2部分-设置技巧 (Part 2— tips for setup)
VM is your friend: You can try to get a taste of the features and flavors of different NAS OSes by setting up virtual machines with how ever many virtual disks you want. Play with different RAID configurations. Simulate a failure and see how the system response. Or try out the new version of the OS before you upgrade it on your real server. Not sure about the consequences of a risk setting? Try it in a VM. There are endless of possibilities. For example, in my case, I simulated how to create a ZFS pool with drives that are different sizes and swap in the same sizes disk one by one later. (there are some important data on the two 4 TB drives that I want to re-use in the new system, but I don’t wanted to risk to copy TBs files around without a redundancy copy, so I created the pool with 2 * 2 TB and 3 * 4 TB drives, and swapped in the old 4 TB drives one by one as I copied the data into the pool)
VM是您的朋友 :通过设置具有所需虚拟磁盘数量的虚拟机,您可以尝试了解不同NAS OS的功能和风格。 玩不同的RAID配置。 模拟故障并查看系统如何响应。 或者在实际服务器上升级操作系统之前,先试用新版本的操作系统。 不确定风险设置的后果? 在VM中尝试。 有无穷的可能性。 例如,以我的情况为例,我模拟了如何创建具有不同大小的驱动器的ZFS池,并在以后一次交换相同大小的磁盘。 (我想在新系统中重复使用两个4 TB驱动器上的一些重要数据,但是我不想冒险在没有冗余副本的情况下复制TBs文件,因此我创建了带有2 *的池2 TB和3 * 4 TB驱动器,并在我将数据复制到池中时一一更换旧的4 TB驱动器)
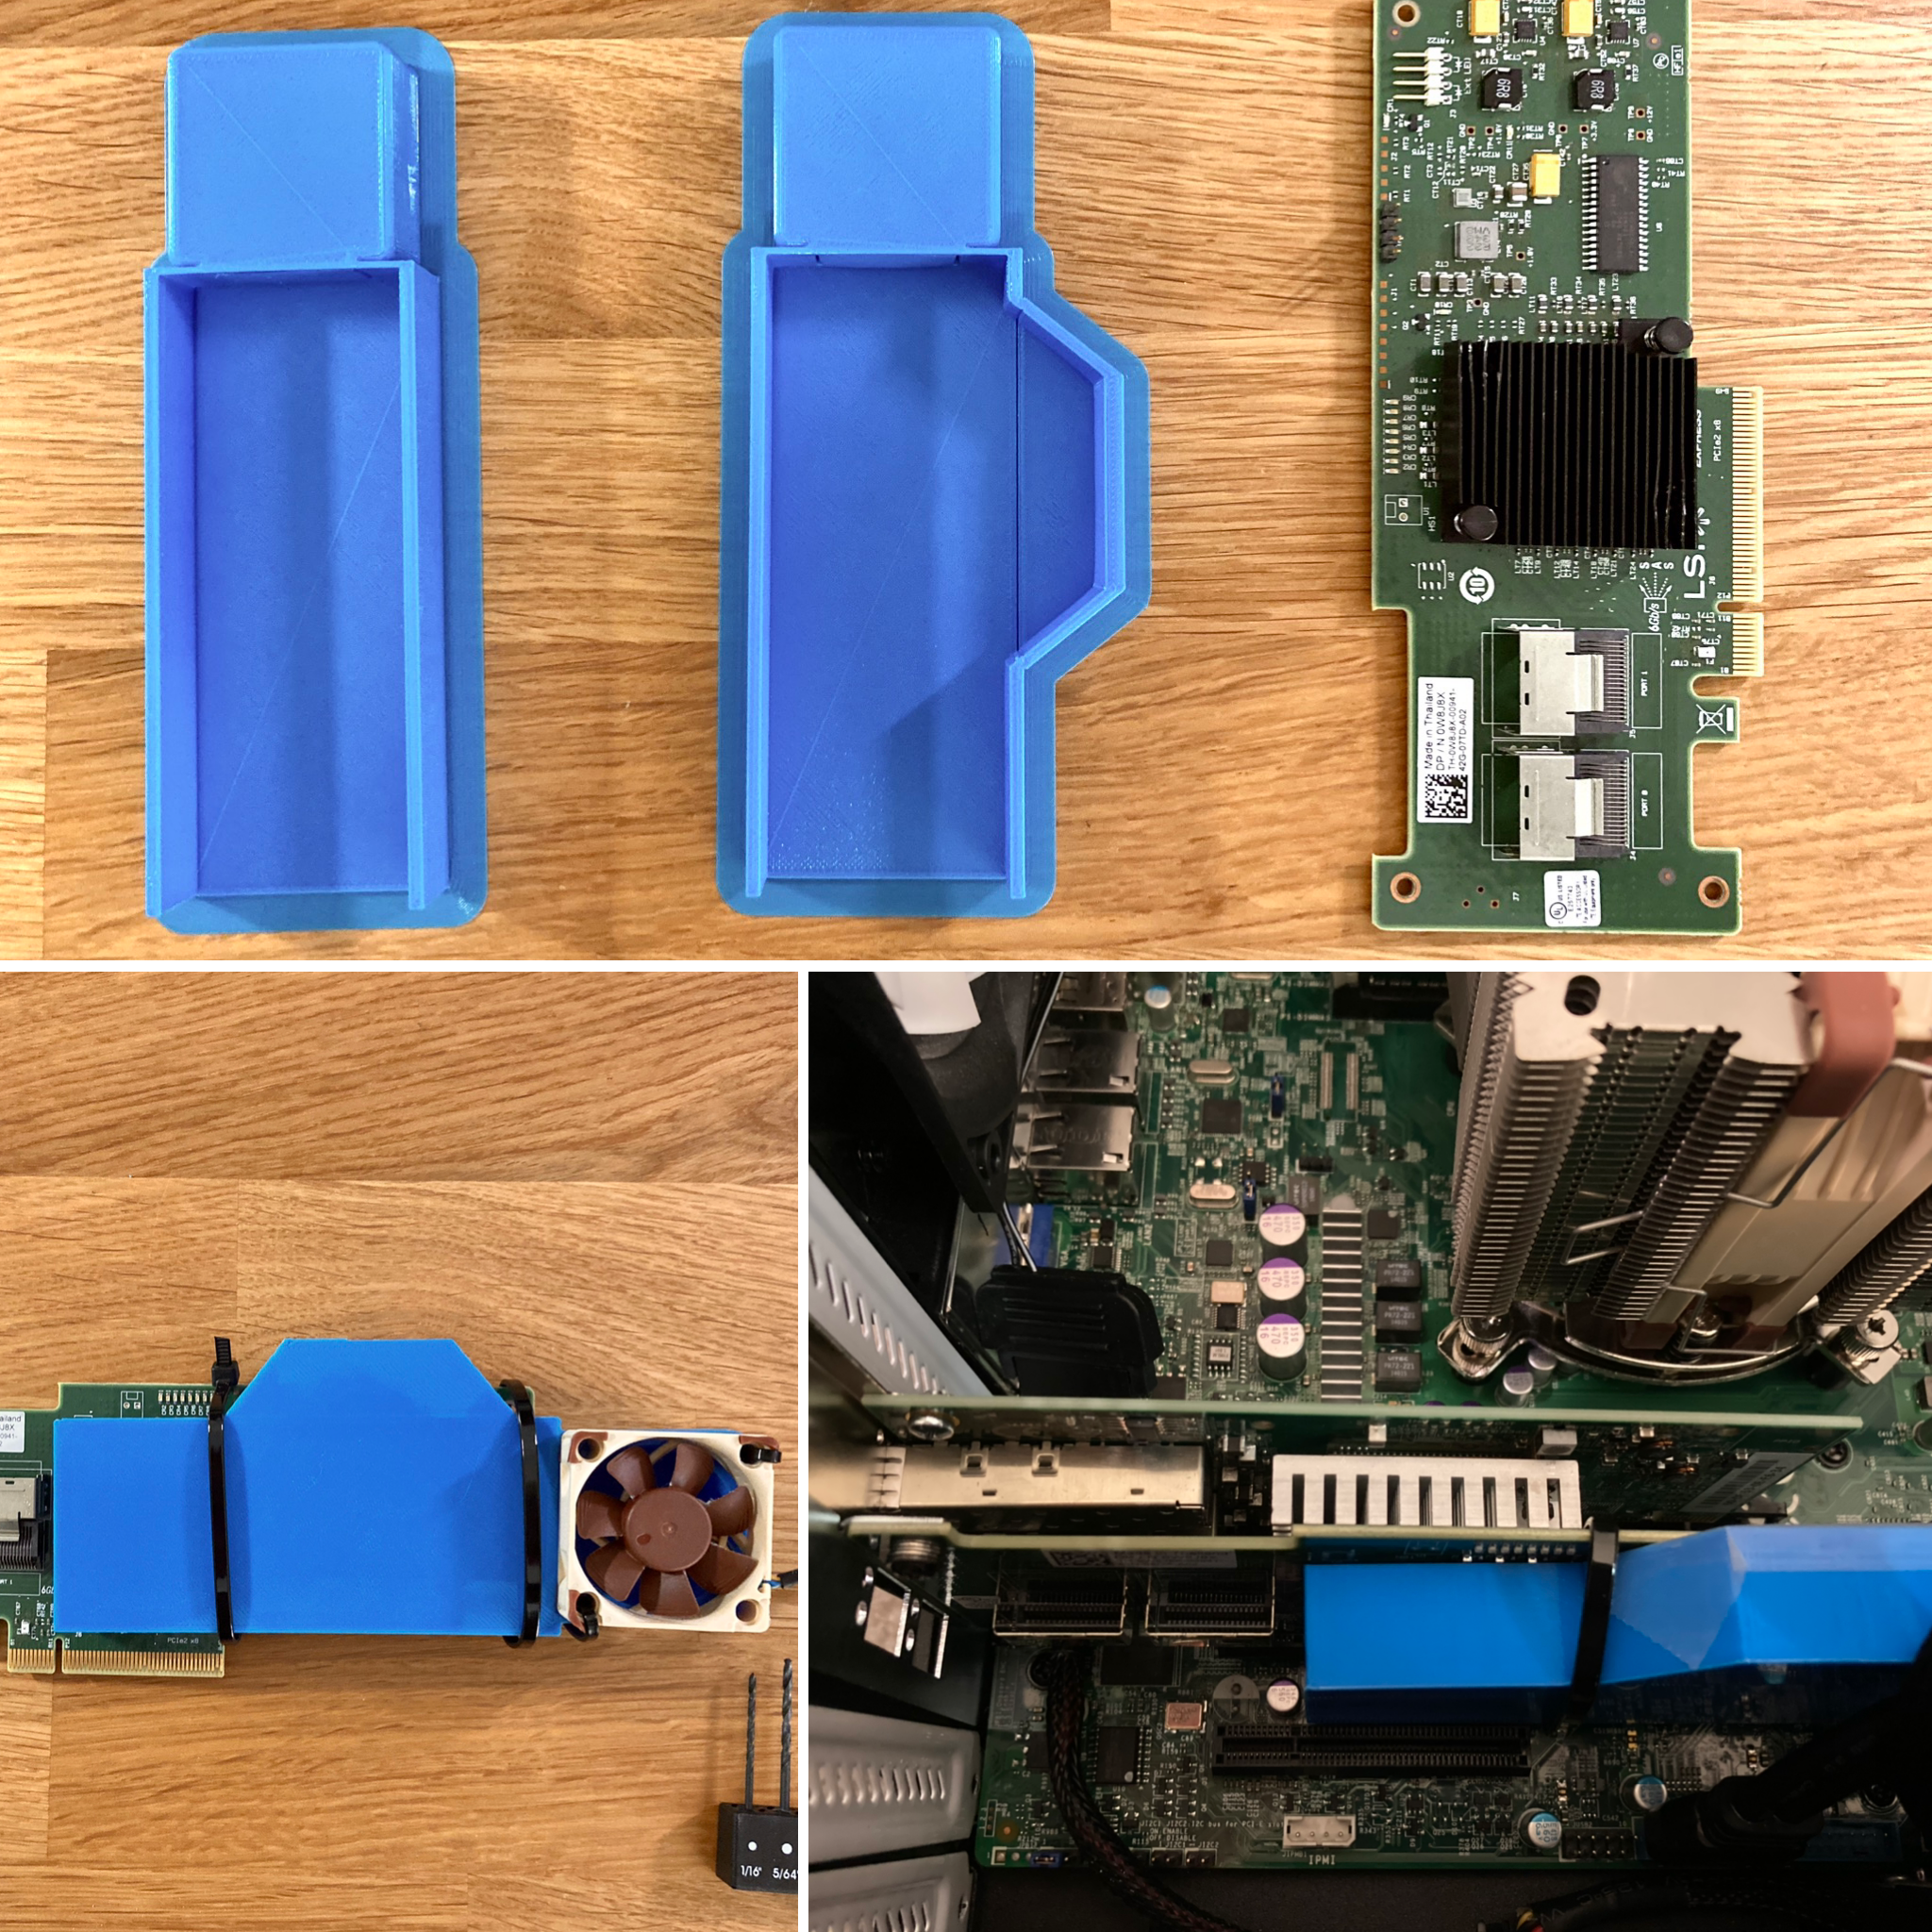
PCIe card fan mod: As I mentioned before, you might want add some active cooling on your hot HBA card. But this turns your HBA card into a dual slots height card, and might block the precious PCIe slots below it. I run into this issue when I try to put a NMVe to PCIe adaptor into my box. My solution is to a print a tunnel that’s just tiny higher than the heatsink, and mount the fan on the side.
PCIe卡风扇模块:如前所述,您可能希望在热的HBA卡上增加一些主动散热。 但这会将您的HBA卡变成双插槽高度卡,并且可能会阻塞其下方的宝贵PCIe插槽。 当我尝试将NMVe到PCIe适配器放入盒子时,我遇到了这个问题。 我的解决方案是打印一个比散热片略高的通道,并将风扇安装在侧面。
Used vs. new parts: You saw that I put in lots of used part into the build. Because I think many of the used “enterprise products” gives quite a lot bangs per buck. The Xeon CPUs, 10 GbE NIC or the HBA cards probably costs hundreds in their original price, but you can easily get them in super nice condition at a fraction of the cost (maybe because the enterprise customers upgrade their system quite frequently and don’t really care that much about recovering $ from these parts). Some people might recommend against such practice, but i personally am very comfortable with it. After-all, I’m not running a mission-critical system, and i’m okay with waiting a bit for a replacement if something unfortunately broke down.
二手零件与新零件:您看到我在构建中放入了很多二手零件。 因为我认为许多使用过的“企业产品”会给每块钱很多钱。 Xeon CPU,10 GbE NIC或HBA卡的原始价格可能在数百美元左右,但您可以轻松地以极好的价格获得它们的超好状态(也许是因为企业客户相当频繁地升级系统,而不必真的很在意从这些部分中恢复$)。 有人可能会建议您反对这种做法,但我个人对此非常满意。 毕竟,我没有运行关键任务系统,如果不幸发生故障,我可以稍等片刻。
Don’t use all the same drives in your home build NAS: If you put identical drives in to an array configurations, there’s probably a good chance that they will encounter similar amount of workloads and fail at roughly the same time if not failed in the same fashion. Or, unfortunately, a batch of drives had some manufacturing defects. Then the last thing you want is that all your drives are from this batch and three of them failed the same time in your RAID-z2/RAID-6 array. (enterprise users buy batches after batches of identical drives because they operate on the budget, scale, and tech support that are totally different from us home users)
请勿在家庭内部NAS中使用所有相同的驱动器 :如果将相同的驱动器放入阵列配置中,则很有可能它们将遇到类似的工作量,并且如果在磁盘驱动器中没有发生故障,则它们大致会同时发生故障。同样的时尚。 或者,不幸的是,一批驱动器存在一些制造缺陷。 然后,您想要的最后一件事是所有驱动器都来自该批次,并且其中三个在RAID-z2 / RAID-6阵列中同时发生故障。 (企业用户会在一批相同的驱动器之后分批购买,因为他们的预算,规模和技术支持与我们的家庭用户完全不同)
Small price adds up quickly: If you are on a budget, just give it some extra thoughts when planning on adding a seemingly cheap additions to your system. I give you the example of my HBA card. On itself, the cards only costs $25, which sounds amazing for the added capability to connect to eight more SATA drives. However, that’s just the first part of the story, you will soon finding yourself in the situation of adding [$15 fan for cooling, $20 for two mini SAS to SATA cable, $15 for some additional SATA power cable, $10 for a full-height PCIe bracket]. Now, your totally price is more than triple of the seemingly cheap $25 HBA card.
小价格很快就会累加:如果您的预算有限,那么在计划向系统中添加看似便宜的附件时,请多加考虑。 我以您的HBA卡为例。 这些卡本身仅售25美元,对于连接到另外八个SATA驱动器的附加功能而言,这听起来真是太神奇了。 但是,这只是故事的第一部分,您很快就会发现自己处于以下情况:[$ 15风扇散热,$ 20迷你SAS到SATA电缆$ 20,$ 15额外的SATA电源线,$ 10整高PCIe支架]。 现在,您的总价格是看似便宜的25美元HBA卡的三倍多。
There are definitely more tips to write about, but I’m tired. So no more tips! I will probably add more later 声明:本文内容由网友自发贡献,转载请注明出处:【wpsshop博客】


