
- 1机器人在线“偷懒”怎么办?阿里研究出了这两套算法_multi-agent path finding算法代码
- 2stable diffusion上安装数字人sadtalker插件
- 3LightGBM 简单实现_lightgbm示例
- 4web前端知识总结(上) 非常适合小白入手
- 5深度学习中的epochs、batch_size、iterations详解_batch_size和epochs
- 6Python Flask 封装ChatGPT流式输出接口_flask流式输出
- 7flutter 软键盘挤压页面导致变形溢出_flutter 键盘弹出再收起后屏幕显示变形
- 8vue打包后直接打开文件index.html_vue3 打开 file:///d:/
- 9Python 定义函数_定义函数find_consecutive_prime_sum(),它接受一个整数limit作为参数。
- 10VBA提高篇_ 31 VBA调用正则表达式_RegExp.Pattern/Global/Execute(s)/Replace(s,r)_createobject("vbscript.regexp").pattern
Realsense D435i 通过YOLOv5、YOLOv8输出目标三维坐标_yolov5+d435i
赞
踩
目录
效果图
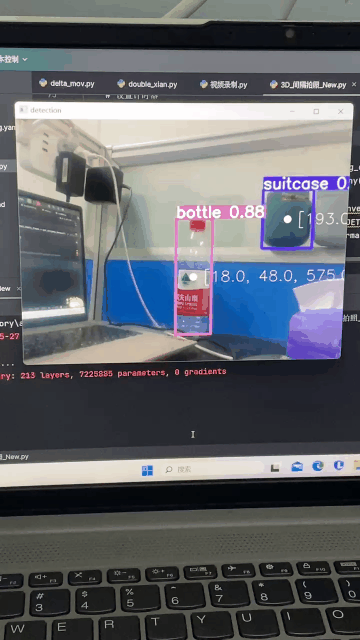
手上有深度相机realsense,怎么去通过YOLO识别出目标,并获取三维坐标呢?怎么把目标三维坐标发给机械臂?
这里我只介绍下通过深度相机去获取三维坐标,因为每个人机械臂的通讯方式不同,所以第二个问题就不多介绍了(你都获取到了三维坐标,发给机械臂指令这还不简简单单)
平时在YOLO里使用相机,一般都是修改下detect.py中去修改source的参数,就能够实现视频流预测目标了
parser.add_argument('--source', type=str, default='0', help='file/dir/URL/glob/screen/0(webcam)')但如果你想通过realsense深度相机去获取深度信息,从而获得三维坐标的话,上边这种方法是不可行的,即便你修改了source参数,深度相机也只会和普通相机一样,获得的是目标的二维坐标,也就是像素坐标。
2024.1.27 yolov8新思路
之前好多小伙伴出现了“ImportError: cannot import name 'MyLoadImages' from 'utils.dataloaders' ”报错,前段时间一直在忙,没再解决,现在放假手上又没相机,只能暂时搁置下了,等回学校再解决这个问题。这里我提供一个新的思路--使用YOLOv8,这样就不需要进行封装了,而是直接调用YOLOv8的函数就行,多说无益,直接上代码。
还得再多说一嘴,这里我只是提供了一个替换YOLOv5封装报错的方法,对于获取三维信息的代码还得需要小伙伴们结合下面的代码自己去整合一下,如果感兴趣的小伙伴多且不太明白如何改代码的话,评论区留言,后续我会再继续完善。
- import time
- import cv2
- import numpy as np
- import pyrealsense2 as rs
-
- from ultralytics import YOLO # 将YOLOv8导入到该py文件中
-
-
-
-
- ''' 深度相机 '''
- pipeline = rs.pipeline() # 定义流程pipeline,创建一个管道
- config = rs.config() # 定义配置config
- config.enable_stream(rs.stream.color, 1280, 720, rs.format.bgr8, 30) # 配置color流
- pipe_profile = pipeline.start(config) # streaming流开始
- align = rs.align(rs.stream.color)
-
- def get_aligned_images():
- frames = pipeline.wait_for_frames() # 等待获取图像帧,获取颜色和深度的框架集
- aligned_color_frame = frames.get_color_frame() # 获取对齐帧中的的color帧
- img_color = np.asanyarray(aligned_color_frame.get_data()) # RGB图
- return img_color
-
- if __name__ == '__main__':
- model = YOLO(r"E:\Deep learning\YOLOv8\yolov8n.pt") # 加载权重文件,如需要更换为自己训练好的权重best.pt即可
-
- # 设置计时器
- start_time = time.time()
- interval = 6 # 间隔时间(秒)
- try:
- while True:
- img_color = get_aligned_images() # 获取对齐图像与相机参数
- # 检查是否达到间隔时间
- if time.time() - start_time >= interval:
- start_time = time.time() # 重置计时器
- source = [img_color]
-
- # 调用YOLOv8中的推理,还是相当于把d435i中某一帧的图片进行detect推理
- results = model.predict(source,save=True,show_conf=False)
-
- key = cv2.waitKey(1)
- # Press esc or 'q' to close the image window
- if key & 0xFF == ord('q') or key == 27:
- cv2.destroyAllWindows()
- pipeline.stop()
- break
- finally:
- # Stop streaming
- pipeline.stop()

一、realsense 包
在detect.py中不行,那就换种思路,首先你得了解如何使用python代码去打开深度相机,需要去了解下深度相机的SDK(也就是软件开发工具包),这里我用D435i为例(d415好像也一样适用),如何去使用代码去打开深度相机
安装SDK
pip install pyrealsense怎么单独使用SDK包的代码打开深度相机,我就不多解释了,CSDN中一搜一堆
二、间隔拍照
我们都知道视频流实际上就是一帧帧图片组成的,所以我们每隔几帧就拍一次照,有人可能会问,为什么要这么做?问的好!你想想,如果要给机械臂传目标的三维坐标时,你哐哐的一直给他实时的传,他反应的过来吗,所以才使用间隔拍照,为的就是让机械臂完成一次指令后,再去拍照。
三、YOLOv5封装
为什么叫YOLOv5封装呢,其实目的就是咱通过间隔拍照得到了一张图片,这时只需要将这个图片传到YOLO的detect.py中,就好比用detect.py去预测一张图片,平时我们只需要修改下source参数就行,运行的话就能完成预测。现在呢,我们把YOLOv5封装成一个类,当建个拍完照后,将图片经过这个类去处理预测。不知道这样说能理解吗
四、代码实现
话不多说,直接上代码
这是主文件main.py,目的是实现D435i间隔拍照
- import time
- import cv2
- import torch
- import numpy as np
- import pyrealsense2 as rs
- import W_detectAPI
-
-
- pipeline = rs.pipeline() # 定义流程pipeline,创建一个管道
- config = rs.config() # 定义配置config
- # config.enable_stream(rs.stream.depth, 1280, 720, rs.format.z16, 6) # 配置depth流
- # config.enable_stream(rs.stream.color, 1280, 720, rs.format.bgr8, 15) # 配置color流
- config.enable_stream(rs.stream.depth, 640, 480, rs.format.z16, 30) # 配置depth流
- config.enable_stream(rs.stream.color, 640, 480, rs.format.bgr8, 30) # 配置color流
-
- pipe_profile = pipeline.start(config) # streaming流开始
- # device = pipe_profile.get_device()
- # device.hardware_reset()
-
- align = rs.align(rs.stream.color)
-
- def get_aligned_images():
- frames = pipeline.wait_for_frames() # 等待获取图像帧,获取颜色和深度的框架集
- aligned_frames = align.process(frames) # 获取对齐帧,将深度框与颜色框对齐
-
- aligned_depth_frame = aligned_frames.get_depth_frame() # 获取对齐帧中的的depth帧
- aligned_color_frame = aligned_frames.get_color_frame() # 获取对齐帧中的的color帧
-
- #### 获取相机参数 ####
- depth_intrin = aligned_depth_frame.profile.as_video_stream_profile().intrinsics # 获取深度参数(像素坐标系转相机坐标系会用到)
- color_intrin = aligned_color_frame.profile.as_video_stream_profile().intrinsics # 获取相机内参
-
- # 相机参数
- # 左右相机的基线是50mm,相机焦距为2.1mm
- # camera_parameters = {'fx': intr.fx, 'fy': intr.fy,
- # 'ppx': intr.ppx, 'ppy': intr.ppy,
- # 'height': intr.height, 'width': intr.width,
- # 'depth_scale': profile.get_device().first_depth_sensor().get_depth_scale()
- # }
-
- img_color = np.asanyarray(aligned_color_frame.get_data()) # RGB图
- img_depth = np.asanyarray(aligned_depth_frame.get_data()) # 深度图(默认16位)
-
- depth_colormap = cv2.applyColorMap \
- (cv2.convertScaleAbs(img_depth, alpha=0.008)
- , cv2.COLORMAP_JET)
-
- return color_intrin, depth_intrin, img_color, img_depth, aligned_depth_frame
-
-
- '''
- 获取随机点三维坐标
- '''
-
- def get_3d_camera_coordinate(depth_pixel, aligned_depth_frame, depth_intrin):
- x = depth_pixel[0]
- y = depth_pixel[1]
- dis = aligned_depth_frame.get_distance(x, y) # 获取该像素点对应的深度
- camera_coordinate = rs.rs2_deproject_pixel_to_point(depth_intrin, depth_pixel, dis)
- return dis, camera_coordinate
-
- if __name__ == '__main__': # 入口
-
- a = W_detectAPI.DetectAPI(weights='yolov5s.pt')
- # 设置计时器
- start_time = time.time()
- interval = 1 # 间隔时间(秒)
- try:
- while True:
- color_intrin, depth_intrin, img_color, img_depth, aligned_depth_frame = get_aligned_images() # 获取对齐图像与相机参数
- if not img_color.any() or not img_depth.any():
- continue
- depth_colormap = cv2.applyColorMap(cv2.convertScaleAbs(
- img_depth, alpha=0.03), cv2.COLORMAP_JET)
- images = np.hstack((img_color, depth_colormap))
-
- # 检查是否达到间隔时间
- if time.time() - start_time >= interval:
-
- start_time = time.time() # 重置计时器
-
- canvas, class_id_list, xyxy_list, conf_list = a.detect([img_color])
-
- camera_xyz_list = []
- if xyxy_list:
- for i in range(len(xyxy_list)):
- ux = int((xyxy_list[i][0] + xyxy_list[i][2]) / 2) # 计算像素坐标系的x
- uy = int((xyxy_list[i][1] + xyxy_list[i][3]) / 2) # 计算像素坐标系的y
- dis = aligned_depth_frame.get_distance(ux, uy)
- camera_xyz = rs.rs2_deproject_pixel_to_point(
- depth_intrin, (ux, uy), dis) # 计算相机坐标系的xyz
- camera_xyz = np.round(np.array(camera_xyz), 3) # 转成3位小数
- camera_xyz = np.array(list(camera_xyz)) * 1000
- camera_xyz = list(camera_xyz)
-
-
- cv2.circle(canvas, (ux, uy), 4, (255, 255, 255), 5) # 标出中心点
- cv2.putText(canvas, str(camera_xyz), (ux + 20, uy + 10), 0, 1,
- [225, 255, 255], thickness=1, lineType=cv2.LINE_AA) # 标出坐标
- # cv2.putText(canvas,"X1:" + str(camera_xyz[0]) + "m",(40,60), cv2.FONT_HERSHEY_SIMPLEX, 0.5,[255,0,0] )
- camera_xyz_list.append(camera_xyz)
-
-
-
- cv2.namedWindow('detection', flags=cv2.WINDOW_NORMAL |
- cv2.WINDOW_KEEPRATIO | cv2.WINDOW_GUI_EXPANDED)
- cv2.resizeWindow('detection',640,480)
-
- cv2.imshow('detection', canvas)
- cv2.waitKey(2000)
-
-
- key = cv2.waitKey(1)
- # Press esc or 'q' to close the image window
- if key & 0xFF == ord('q') or key == 27:
- cv2.destroyAllWindows()
- pipeline.stop()
- break
- finally:
- # Stop streaming
- pipeline.stop()
需要新建个 W_detactAPI.py 文件,目的是封装yolo为类
- import argparse
- import os
- import platform
- import random
- import sys
- from pathlib import Path
-
-
- import torch
- from torch.backends import cudnn
-
- FILE = Path(__file__).resolve()
- ROOT = FILE.parents[0] # YOLOv5 root directory
- if str(ROOT) not in sys.path:
- sys.path.append(str(ROOT)) # add ROOT to PATH
- ROOT = Path(os.path.relpath(ROOT, Path.cwd())) # relative
- from models.common import DetectMultiBackend
- from utils.dataloaders import IMG_FORMATS, VID_FORMATS, MyLoadImages, LoadScreenshots, LoadStreams
- from utils.general import (LOGGER, Profile, check_file, check_img_size, check_imshow, check_requirements, colorstr, cv2,
- increment_path, non_max_suppression, print_args, scale_boxes, strip_optimizer, xyxy2xywh)
- from utils.plots import Annotator, colors, save_one_box
- from utils.torch_utils import select_device, smart_inference_mode, time_sync
-
-
- """
- 使用面向对象编程中的类来封装,需要去除掉原始 detect.py 中的结果保存方法,重写
- 保存方法将结果保存到一个 csv 文件中并打上视频的对应帧率
- """
-
-
- class YoloOpt:
- def __init__(self, weights='weights/last.pt',
- imgsz=(640, 640), conf_thres=0.25,
- iou_thres=0.45, device='cpu', view_img=False,
- classes=None, agnostic_nms=False,
- augment=False, update=False, exist_ok=False,
- project='/detect/result', name='result_exp',
- save_csv=True):
- self.weights = weights # 权重文件地址
- self.source = None # 待识别的图像
- if imgsz is None:
- self.imgsz = (640, 640)
- self.imgsz = imgsz # 输入图片的大小,默认 (640,640)
- self.conf_thres = conf_thres # object置信度阈值 默认0.25 用在nms中
- self.iou_thres = iou_thres # 做nms的iou阈值 默认0.45 用在nms中
- self.device = device # 执行代码的设备,由于项目只能用 CPU,这里只封装了 CPU 的方法
- self.view_img = view_img # 是否展示预测之后的图片或视频 默认False
- self.classes = classes # 只保留一部分的类别,默认是全部保留
- self.agnostic_nms = agnostic_nms # 进行NMS去除不同类别之间的框, 默认False
- self.augment = augment # augmented inference TTA测试时增强/多尺度预测,可以提分
- self.update = update # 如果为True,则对所有模型进行strip_optimizer操作,去除pt文件中的优化器等信息,默认为False
- self.exist_ok = exist_ok # 如果为True,则对所有模型进行strip_optimizer操作,去除pt文件中的优化器等信息,默认为False
- self.project = project # 保存测试日志的参数,本程序没有用到
- self.name = name # 每次实验的名称,本程序也没有用到
- self.save_csv = save_csv # 是否保存成 csv 文件,本程序目前也没有用到
-
-
- class DetectAPI:
- def __init__(self, weights, imgsz=640):
- # 初始化参数,加载模型
- self.opt = YoloOpt(weights=weights, imgsz=imgsz)
- weights = self.opt.weights # 传入的权重
- imgsz = self.opt.imgsz # 传入的图像尺寸
-
- # Initialize 初始化
- # 获取设备 CPU/CUDA
- self.device = select_device(self.opt.device)
- # 不使用半精度--半精度只支持CUDA
- self.half = self.device.type != 'cpu' # # FP16 supported on limited backends with CUDA
-
- # Load model 加载模型
- self.model = DetectMultiBackend(weights, self.device, dnn=False)
- self.stride = self.model.stride
- self.names = self.model.names
- self.pt = self.model.pt
- self.imgsz = check_img_size(imgsz, s=self.stride)
-
- # 不使用半精度
- if self.half:
- self.model.half() # switch to FP16
-
- # read names and colors
- # names是类别名称字典;colors是画框时用到的颜色
- self.names = self.model.module.names if hasattr(self.model, 'module') else self.model.names
- self.colors = [[random.randint(0, 255) for _ in range(3)] for _ in self.names]
-
- # 当自动拍照时会调用这个函数
- def detect(self, source):
- # 输入 detect([img])
- if type(source) != list:
- raise TypeError('source must a list and contain picture read by cv2')
-
- # DataLoader 加载数据
- # 直接从 source 加载数据
- dataset = MyLoadImages(source)
- # 源程序通过路径加载数据,现在 source 就是加载好的数据,因此 LoadImages 就要重写
- bs = 1 # set batch size
-
- # 保存的路径
- vid_path, vid_writer = [None] * bs, [None] * bs
-
- # Run inference
- result = []
- if self.device.type != 'cpu':
- self.model(torch.zeros(1, 3, self.imgsz, self.imgsz).to(self.device).type_as(
- next(self.model.parameters()))) # run once
- dt, seen = (Profile(), Profile(), Profile()), 0
-
- for im, im0s in dataset:
- with dt[0]:
- im = torch.from_numpy(im).to(self.model.device)
- im = im.half() if self.model.fp16 else im.float() # uint8 to fp16/32
- im /= 255 # 0 - 255 to 0.0 - 1.0
- if len(im.shape) == 3:
- im = im[None] # expand for batch dim
-
- # Inference
- pred = self.model(im, augment=self.opt.augment)[0]
-
- # NMS
- with dt[2]:
- # max_det=2 最多检测两个目标,如果图片中有3个目标,需要修改
- pred = non_max_suppression(pred, self.opt.conf_thres, self.opt.iou_thres, self.opt.classes, self.opt.agnostic_nms, max_det=2)
-
- # Process predictions
- # 处理每一张图片
- # 原来的情况是要保持图片,因此多了很多关于保存路径上的处理。
- # 另外,pred其实是个列表。元素个数为batch_size
- det = pred[0] # API 一次只处理一张图片,因此不需要 for 循环
- # copy 一个原图片的副本图片,不拷贝会对原图片造成影响
- im0 = im0s.copy()
- # 一张图片可能会有多个检测到的目标,标签也会有多个
- # result_txt = [] # 储存检测结果,每新检测出一个物品,长度就加一。
- # # 每一个元素是列表形式,储存着 类别,坐标,置信度
- xyxy_list = []
- conf_list = []
- class_id_list = []
- # 设置图片上绘制框的粗细,类别名称
- annotator = Annotator(im0, line_width=3, example=str(self.names))
- if len(det):
- # Rescale boxes from img_size to im0 size
- # 映射预测信息到原图
- det[:, :4] = scale_boxes(im.shape[2:], det[:, :4], im0.shape).round()
-
- #
- for *xyxy, conf, cls in reversed(det):
- # 只输出dog的信息,不用了就删除这个if语句
- # if self.names[int(cls)] == "dog":
- class_id = int(cls)
- xyxy_list.append(xyxy)
- conf_list.append(conf)
- class_id_list.append(class_id)
-
- line = (int(cls.item()), [int(_.item()) for _ in xyxy], conf.item()) # label format
- # result_txt.append(line)
- label = f'{self.names[int(cls)]} {conf:.2f}'
- # 跳入Annotator函数中,打印目标坐标和机械臂坐标
- x0, y0 = annotator.box_label(xyxy, label, color=self.colors[int(cls)])
-
- return im0, class_id_list, xyxy_list, conf_list
-
-
这里需要提示下,你得在 annotator.box_label 添加上我这篇文章的代码,然后直接运行就ok了,有啥问题报错可以在评论区留言
如果有大佬有更好的方法,还请分享出来咱们一块交流交流!

