
- 1蓝桥杯-阿坤老师的魔方挑战
- 2如何用python做自然语言处理
- 3故障诊断和故障预测数据集汇总并附下载方式_故障诊断数据集
- 4手把手教你将Flask应用封装成Docker服务_flask应用和数据库打包成docker容器
- 5Spring Boot 入门指南:轻松上手图文教程
- 6python安装nltk遇到的punkt问题_attempted to load tokenizers/punkt/english.pickle
- 7Python获取微信公众号文章数据_python分析 公众号数据
- 8Apache MINA SSHD
- 9Python实用教程系列——推导式和Lambda表达式_python 推导式和lambda
- 102024】前端,该卷什么呢?_2024-02-16
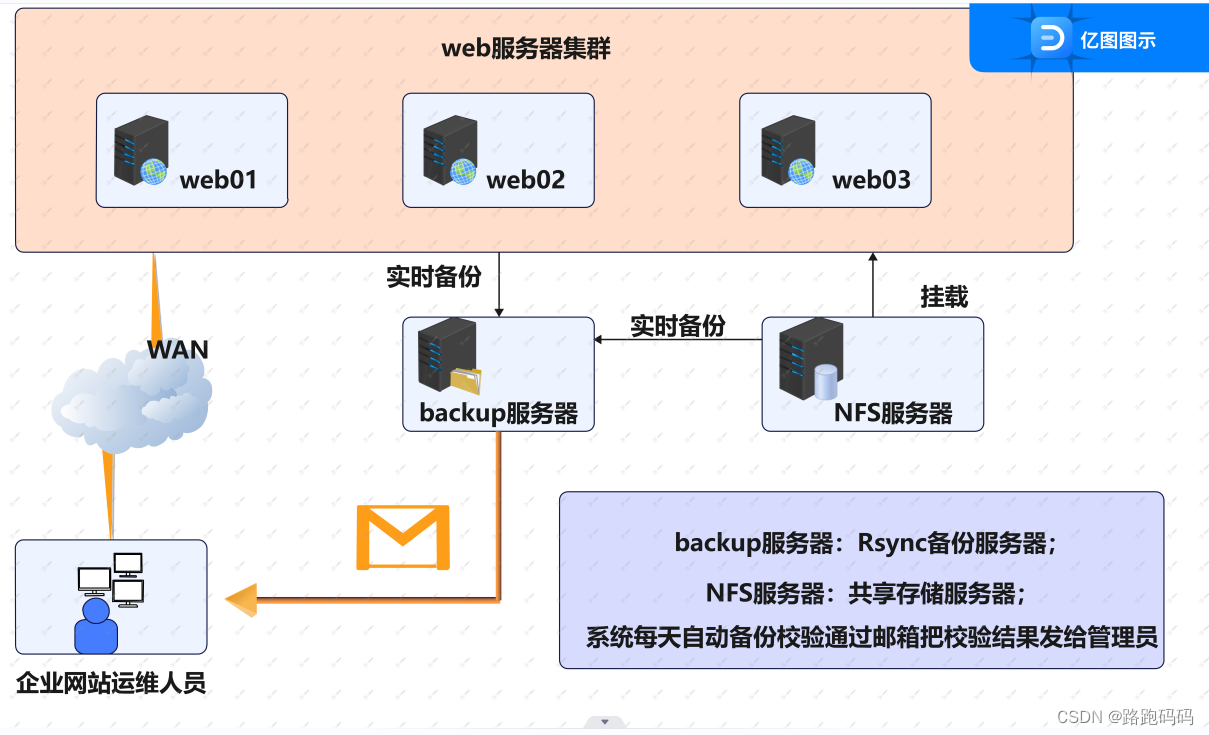
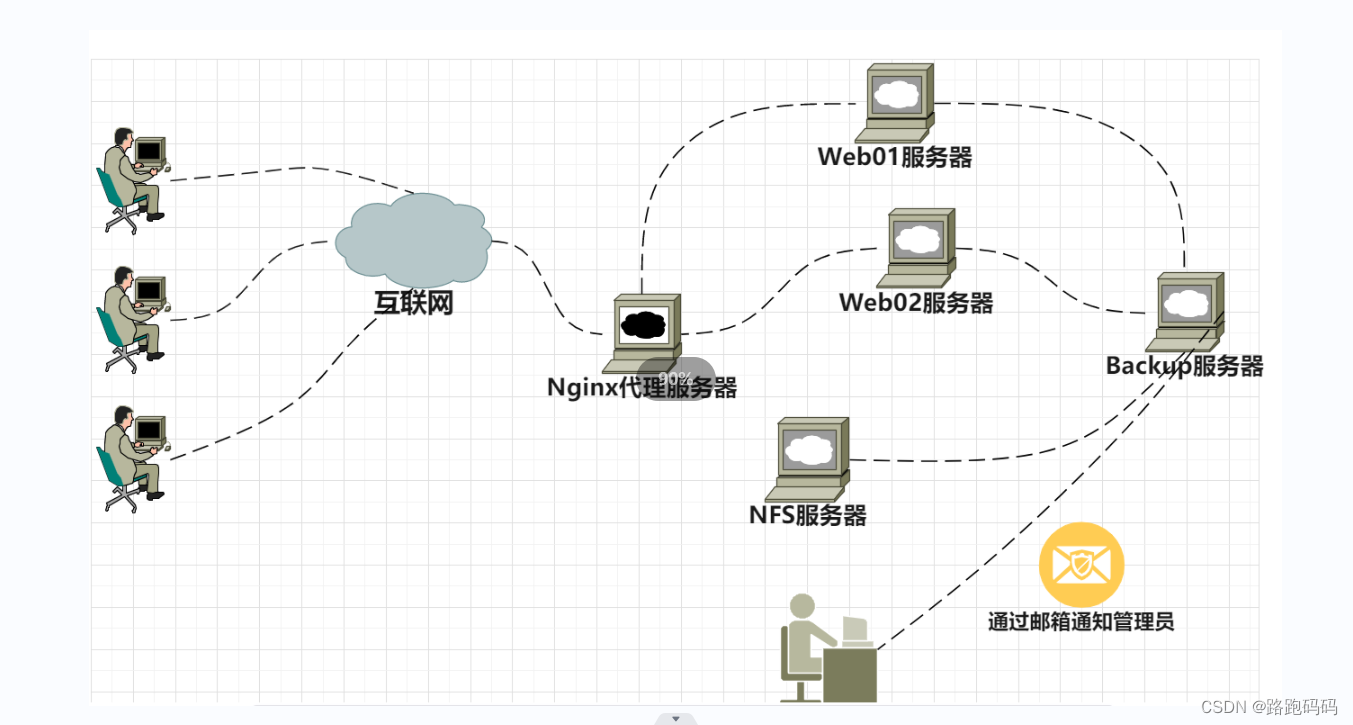
Linux系统企业级备份_企业怎么自己搭建备份服务器
赞
踩
企业级备份
备份环境部署
| 扮演角色 (客户/服务端) | 任务 | 主机名称 | 主机IP(NAT) | 外网IP(NAT) |
|---|---|---|---|---|
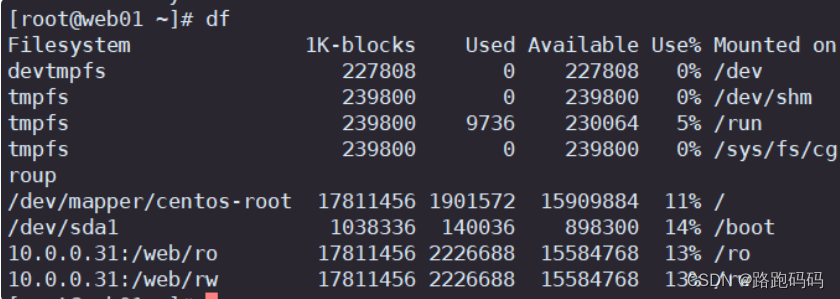
| NFS存储服务器(客户) | 收集存储的文件和目录,归档后进行推送至Server端 | nfs | 10.0.0.31 | |
| Nginx web服务器(客户) | 收集需要备份相关文件和目录,归档后进行推送至Server端 | web01 | 10.0.0.41 | 172.16.1.5 |
| Rsync 备份服务器(服务端) | 部署好rsync服务,等待客户端推送就行了,验证客户端传输过来的归档文件是完整的,验证完之后,发送邮件将验证结果告知我 | backup | 10.0.0.7 |
企业环境拓扑图
项目需求
要求:
每天晚上 01 点整在 Web 服务器打包备份系统文件,网站程序目录及访问日志并通过 rsync 命令推送到备份服务器 backup 上备份保留(备份思路可以是先在本地按日期打包,然后再推到备份服务器 backup 上),nfs 存储服务器 同 web 服务器,实际工作中就是全部服务器
具体要求:
1)所有服务器的备份目录必须都为 /backup
2)要备份的系统配置文件包括但不限于:
a.定时任务服务的配置文件(/var/spool/cron/root)(适合web 和 nfs 服务器)
b.开机自启动的配置文件(/etc/rc.local)(适合web 和 nfs 服务器)
c.日常脚本的目录(/server/scripts)
d.防火墙 iptables 的配置文件(/etc/sysconfig/iptables)
e.自己思考下还有什么需要备份呢?
3)Web 服务器站点目录假定为(/var/html/www)
4)Web 服务器访问日志路径假定为(/app/logs)
5)Web服务器保留打包后的 7 天的备份数据即可(本地留存不能多于 7 天,因为太多硬盘会满)
6)备份服务器上,保留每周一的所有数据副本,其它的要保留6个月的数据副本
客户端需求
1.客户端每天凌晨01点在服务器本地打包备份(系统配置文件、日志文件、其他目录、应用配置等 文件)
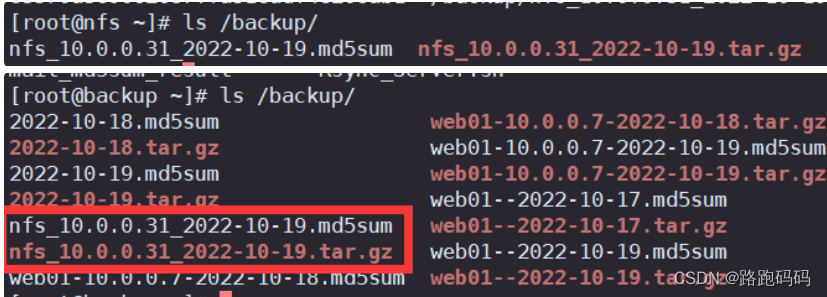
2.客户端备份的数据必须存放至以主机名IP地址当前时间命名的目录中, 例 /backup/nfs_10.0.0.31_2018-09-26
3.客户端最后通过 rsync 推送本地已打包好的备份文件至 backup 服务器
4.客户端服务器本地保留最近7天的数据, 避免浪费磁盘空间
服务端需求
1.服务端部署rsync,用于接收客户端推送过来的备份数据
2.服务端需要每天校验客户端推送过来的数据是否完整
3.服务端需要每天校验的结果通知给管理员
4.服务端仅保留6个月的备份数据,其余的全部删除
验证数据完整性:MD5
校验:客户端推送时将校验文件一起推过来,然后使用md5sum -c md5file来校验,如果没有丢失数据会提示ok,要注意md5sum校验时源端数据要和目标端数据路径要保持一致
企业名词解释
- 什么是项目?类似于手机app,每一个app都可以算作一个项目
- 什么是架构?维护一个项目使用的一组服务器
- 什么是集群?为解决某个特定问题将多台计算机组合起来形成的单个系统
- 什么是高可用?当一台服务器不可用时,另一台服务器自动接管,保证业务不down机
- 什么是负载均衡?将用户的请求,分摊到多个操作单元上执行,保证服务器的稳定性
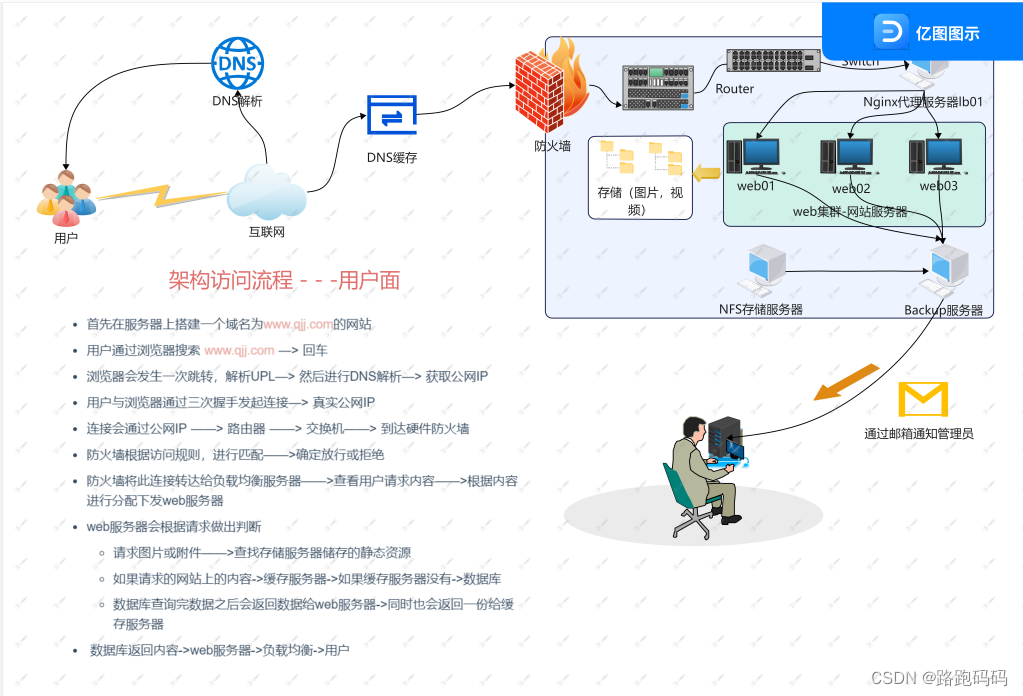
架构访问流程 - - -用户面
- 首先在服务器上搭建一个域名为www.qjj.com的网站
- 用户通过浏览器搜索 www.qjj.com —> 回车
- 浏览器会发生一次跳转,解析UPL—> 然后进行DNS解析—> 获取公网IP
- 用户与浏览器通过三次握手发起连接—> 真实公网IP
- 连接会通过公网IP ——> 路由器 ——> 交换机——> 到达硬件防火墙
- 防火墙根据访问规则,进行匹配——>确定放行或拒绝
- 防火墙将此连接转达给负载均衡服务器——>查看用户请求内容——>根据内容进行分配下发web服务器
- web服务器会根据请求做出判断
- 请求图片或附件——>查找存储服务器储存的静态资源
- 如果请求的网站上的内容->缓存服务器->如果缓存服务器没有->数据库
- 数据库查询完数据之后会返回数据给web服务器->同时也会返回一份给缓存服务器
- 数据库返回内容->web服务器->负载均衡->用户
流程图
架构访问流程 - - -运维面
- 用户通过公网连接(NAT)VPN服务器,这样方便管理内部主机,
- 自动化配置管理,节省人力成本,便于后期维护。统一环境,标准化
- 自动化监控服务,监控系统的运行状态,事前预警,事后追溯。
建议备份数据内容
| 1)配置文件 |
|---|
| 开机自启动配置文件:/etc/rc.local |
| 设备挂载配置文件:/etc/fstab |
| 本地内网配置文件:/etc/hosts |
| 2)重要目录 |
|---|
| crontab 定时任务:/var/spool/cron/ |
| firewalld防火墙:/etc/firewalld |
| 脚本目录:/server/scripts |
| 3)系统日志文件 |
|---|
| /var/log/ |
| 记录Linux内核消息及各种应用程序的公共日志信息:/var/log/messages |
| 记录crond计划任务产生的事件信息:/var/log/cron |
| 记录Linux操作系统在引导过程中的各种事件信息:/var/log/dmesg |
| 记录进入或发出系统的电子邮件活动:/var/log/maillog |
| 记录每个用户最近的登录事件:/var/log/lastlog |
| 记录用户认证相关的安全事件信息:/var/log/secure |
| 记录每个用户登录、注销以及系统启动和停机事件:/var/log/wtmp |
| 记录失败的、错误的登录尝试以及验证事件:/var/log/btmp |
| 4)应用程序日志 |
|---|
| nginx中经常把正确的错误的日志文件存放在:/etc/nginx/conf/logs |
| php默认存放在:/var/log |
项目开始前的基础环境准备
-
为lb01服务器增加网卡,搭建Nginx负载均衡
1)添加硬件网卡 2)新增网卡配置文件:cp /etc/sysconfig/network-scripts/ifcfg-ens3{3,7} 3)修改相关网卡配置信息:(172.16.1.5设为外网IP 网卡名称ens37) sed -i 's#ens33#ens36#' /etc/sysconfig/network-scripts/ifcfg-ens37 sed -i 's#10.0.0.5#172.16.1.5#' /etc/sysconfig/network-scripts/ifcfg-ens37 sed -ri '/^(GATE|DNS)/d' /etc/sysconfig/network-scripts/ifcfg-ens37 4)重启网卡或网络服务 ifdown ens36 && ifup ens36 systemctl restart network- 1
- 2
- 3
- 4
- 5
- 6
- 7
- 8
- 9
- 10
- 11
- 12
-
优化操作系统
-
yum源优化 将yum源修改为阿里云 并安装常用软件
-
关闭selinux:sed -i ‘7c SELINUX=disabled’ /etc/selinux/config
-
关闭iptables并且禁止启动:
systemctl stop firewalld systemctl disable firewalld- 1
- 2
-
关闭NetworkManager 禁止开机启动:
systemctl stop NetworkManager systemctl disable NetworkManager- 1
- 2
-
修改SSH配置文件禁止DNS解析(提高连接虚拟机的速度):
vim /etc/ssh/sshd_config # 修改第115行 DNS解析改为 no- 1
-
重启服务:systemctl restart sshd
-
时间同步:
yum install -y ntpdate 加入定时任务: crontab -e */5 * * * * ntpdate ntp1.aliyun.com &>/dev/null- 1
- 2
- 3
- 4
-
关闭防火墙firewalld
systemctl disable firewalld systemctl stop firewalld- 1
- 2
-
项目实施
Client部署
1)收集需要备份相关文件和目录,归档后进行推送至Server端
2)创建对应的目录结构,收集相关的重要文件,打包归档
3)配置服务端完成校验
4)备份情况下的客户端有web01以及NFS
步骤
1)创建对应的目录结构
mkdir -p /backup/web01-10.0.0.7-2022-10-17/{confs,logs.scripts,others}
2)收集对应的文件,存放至目录中
cp -r /etc/{passwd,fstab,hosts,nginx/conf.d/} /backup/web01-10.0.0.7-2022-10-17/confs
cp -r /var/log /etc/nginx/logs/ /backup/web01-10.0.0.7-2022-10-17/logs/
cp -r /etc/rsync.password /backup/web01-10.0.0.7-2022-10-17/others/
3)打包归档
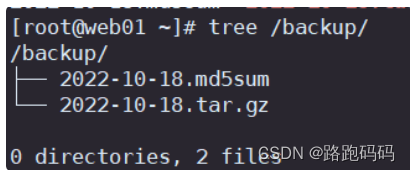
tar czf /backup/web01-10.0.0.7-2022-10-17.tar.gz /backup/web01-10.0.0.7-2022-10-17 --remove-files
4)推送至服务端
rsync -avz /backup/ rsync_user@10.0.0.41::backup
编写脚本Client
vim /server/scripts/rsync_Client.sh
#!/bin/bash
##时间同步
yum -y install ntp ntpdate
ntpdate times.aliyun.com
dir=/backup/
host=$(hostname)
ip=$(ip add show ens33 | sed -nr '/inet /s#.*t (.*)/(.*)#\1#p')
#实时时间
Date=$(date +%F)
##路径格式: /backup/主机名-ip-时间
bak_dir=$dir$host\_$ip\_$Date
#对路径进行判断是否存在路径 || 不存在则直接创建
[ -d $bak_dir ] || mkdir -p $bak_dir
##需要进行备份的文件至$bak_dir
conf_bak="/etc/passwd /etc/fstab /etc/hosts /etc/nginx/conf.d/"
log_bak="/var/log /etc/nginx/logs/"
other_bak="/etc/rsync.password"

##创建对应结构目录
mkdir -p $bak_dir/{confs,logs,scripts,others}
##收集对应的文件,存放至目录中
cp -r $conf_bak $bak_dir/confs &>/dev/null
cp -r $log_bak $bak_dir/logs &>/dev/null
cp -r $other_bak $bak_dir/others &>/dev/null

##压缩备份文件
tar czf $bak_dir.tar.gz $bak_dir --remove-files &> /dev/null

##保留本地最近7天文件
find $dir -type d -mtime +7 -exec rm -rf {} \;

##Server主机
rsync_srv=10.0.0.41
##Server用户
rsync_user=rsync_user
##Server存放目录
rsync_dir=backup
##rsync备份
rsync_cmd="rsync -avz"
##设置验证用户密码(必须与服务端验证用户密码相同)
export RSYNC_PASSWORD=111

###增加客户端的md5校验
md5sum $dir*.tar.gz > $bak_dir.md5sum
##使用rsync同步数据
$rsync_cmd $dir ${rsync_user}@${rsync_srv}::${rsync_dir} &>/dev/null
- 1
- 2
- 3
- 4
- 5
- 6
- 7
- 8
- 9
- 10
- 11
- 12
- 13
- 14
- 15
- 16
- 17
- 18
- 19
- 20
- 21
- 22
- 23
- 24
- 25
- 26
- 27
- 28
- 29
- 30
- 31
- 32
- 33
- 34
- 35
- 36
- 37
- 38
- 39
- 40
- 41
- 42
- 43
- 44
- 45
- 46
- 47
Client编写定时任务
###每天凌晨1点进行备份
crontab -e
#分 时 日 月 周
 00 01 *  *  *  /bin/bash  /server/scripts/rsync_Client.sh &>/dev/null
- 1
- 2
- 3
- 4
Client - - NFS部署
基于NFS环境部署
| 角色 | 主机 | 主机名 |
|---|---|---|
| NFS(Server) | 10.0.0.31 | nfs |
| web01(Client) | 10.0.0.7 | web01 |
| backup(Client) | 10.0.0.41 | backup |
挂载
1)搭建nfs环境
2)部署只读及读写的NFS共享
3)安装软件包,创建共享目录,启动nfs服务
4)客户机挂载
备份
1)搭建rsync服务器
2)将归档的文件或目录推送到rsync服务器上
注意事项:
- nfs是基于rpc协议实现数据传输
- CentOS7:rpcbind服务
CentOS6:portmap服务 - 确保先启动rpc,再启动nfs , 如果rpc没启动,就启动nfs,怎么解决?
- 关闭nfs,再启动rpcbind和nfs
步骤
挂载NFS
配置NFS-Server端
1)
-
先搭建NFS服务:
yum install -y nfs-utils- 1
-
部署只读及读写的NFS共享:
web01 10.0.0.7 nfs 10.0.0.31- 1
2)
方法一
-
修改配置文件:
vim /etc/exports /web/rw *(rw)- 1
- 2
-
创建对应共享文件夹
mkdir -p /web/rw- 1
方法二
-
设置客户端访问nfs共享的身份为root
-
修改配置文件 /etc/exports
vim /etc/exports /web/rw *(rw,no_root_squash)- 1
- 2
-
创建共享文件夹
mkdir -p /web/rw- 1
方法三
-
自定义nfs程序用户,需要和其他的程序用户统一
-
创建nfs程序用户
groupadd -g677 nfs useradd -u677 -g677 -M -s /sbin/nologin nfs- 1
- 2
-
修改配置文件
vim /etc/exports /web/rw *(rw,all_squash,anonuid=677,anongid=677)- 1
- 2
-
创建配置文件
mkdir -p /web/rw chown -R nfs.nfs /web- 1
- 2
3)
-
启动nfs
#开启nfs systemctl start nfs #将nfs加入开机自启动中 systemctl enable nfs- 1
- 2
- 3
- 4
配置NFS-Client端
-
安装软件包
yum install -y nfs-utils- 1
-
查看服务器的共享资源
showmount -e 10.0.0.31- 1
-
挂载nfs共享
mkdir -p /rw mount 10.0.0.31:/rw /rw- 1
- 2
注意:如果安装方法三,需要创建自定义程序用户
roupadd -g677 nfs useradd -u677 -g677 -M -s /sbin/nologin nfs- 1
- 2
-
验证权限
Read-only file system nfs没给写权限 Permission denied 本地权限没给写权限- 1
- 2
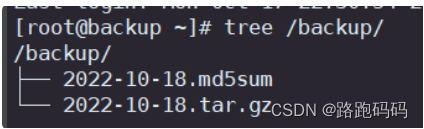
备份NFS服务器
步骤
-
对挂载的文件或目录进行备份
##创建备份目录 mkdir -p /backup ##对需要备份的文件或目录进行备份 cp -r /web /backup/- 1
- 2
- 3
- 4
-
推送到Rsync服务器
$rsync_cmd /backup rsync_user@10.0.0.41::backup- 1
-
进行md5校验
md5sum /backup/*.tar.gz > backup.md5sum- 1
-
备份NFS一站式脚本
vim /server/scripts/rsync_Client_nfs.sh
#!/bin/bash
##时间同步
yum -y install ntp ntpdate
ntpdate times.aliyun.com
dir=/backup/
host=$(hostname)
ip=$(ip add show ens33 | sed -nr '/inet /s#.*t (.*)/(.*)#\1#p')
#实时时间
Date=$(date +%F)
##路径格式: /backup/主机名-ip-时间
bak_dir=$dir$host\_$ip\_$Date
#对路径进行判断是否存在路径 || 不存在则直接创建
[ -d $bak_dir ] || mkdir -p $bak_dir
##需要进行备份的文件至$bak_dir
web="/web "
##创建对应结构目录
mkdir -p $bak_dir/web
##收集对应的文件,存放至目录中
cp -r $web $bak_dir/web &>/dev/null


##压缩备份文件
tar czf $bak_dir.tar.gz $bak_dir --remove-files &> /dev/null

##保留本地最近7天文件
find $dir -type d -mtime +7 -exec rm -rf {} \;

##Server主机
rsync_srv=10.0.0.41
##Server用户
rsync_user=rsync_user
##Server存放目录
rsync_dir=backup
##rsync备份
rsync_cmd="rsync -avz"
##设置验证用户密码(必须与服务端验证用户密码相同)
export RSYNC_PASSWORD=111

###增加客户端的md5校验
md5sum $dir*.tar.gz > $bak_dir.md5sum
##使用rsync同步数据
$rsync_cmd $dir ${rsync_user}@${rsync_srv}::${rsync_dir} &>/dev/null
- 1
- 2
- 3
- 4
- 5
- 6
- 7
- 8
- 9
- 10
- 11
- 12
- 13
- 14
- 15
- 16
- 17
- 18
- 19
- 20
- 21
- 22
- 23
- 24
- 25
- 26
- 27
- 28
- 29
- 30
- 31
- 32
- 33
- 34
- 35
- 36
- 37
- 38
- 39
- 40
- 41
- 42
- 43
-
定时任务
###每天凌晨2点进行备份 crontab -e #分 时 日 月 周 00 02 * * * /bin/bash /server/scripts/rsync_Client.sh &>/dev/null- 1
- 2
- 3
- 4
Servert部署
1)服务端部署rsync,用于接收客户端推送过来的备份数据
2)服务端需要每天校验客户端推送过来的数据是否完整
3)服务端需要每天校验的结果通知给管理员
4)服务端仅保留6个月的备份数据,其余的全部删除
步骤
1)创建存放上所需的目录 - - -所有服务器备份目录都为/backup
mkdir -p /backup
2)对客户端上传存放的文件进行md5校验
编写校验脚本:sh rsync_Server.sh
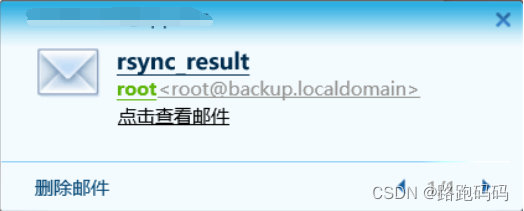
3)设定邮箱报警功能,当客户端定时上传存放文件并校验,发送信息给管理员核对
sh mailx_Server.sh
下载的环境:yum install -y mailx
4)设置定时任务,服务端每天凌晨3点对客户端数据进行校验
crontab -l
00 05 * * * /bin/bash /opt/rsync_Server.sh
5)编写配置文件
vim /etc/rsyncd.conf
uid = rsync
gid = rsync
port = 873
fake super = yes
use chroot = no
max connections = 200
timeout = 600
ignore errors
read only = false
list = false
auth users = rsync_user
secrets file = /etc/rsync.password
log file = /var/log/rsyncd.log

[backup]
comment = welcome to softeem backup!
path = /backup
- 1
- 2
- 3
- 4
- 5
- 6
- 7
- 8
- 9
- 10
- 11
- 12
- 13
- 14
- 15
- 16
- 17
- 18
编写Server脚本
##部署邮箱报警功能
vim /server/scripts/mailx_Server.sh
#!/bin/bash
set from=927791665@qq.com
set smtp=smtps://smtp.qq.com:465
set smtp-auth-user=(927791665@qq.com)
##客户端授权码
set smtp-auth-password=ezjwkzgdrcfqbeci
set smtp-auth=login
set ssl-verify=ignore
set nss-config-dir=/etc/pki/nssdb/
###################################
vim /server/scripts/rsync_Server.sh
#!/bin/bash
##时间同步
yum -y install ntp ntpdate
ntpdate tames.aliyun.com
dir=/backup/
#设置当前时间变量
date=$(date +%F)
mail_file="/root/mail_md5sum_result"
adm_email="927791665@qq.com"
##校验数据
find $dir -name "*$date.md5sum" | xargs md5sum -c > $mail_file
##通知管理员
mail -s "rsync_result" $adm_email < $mail_file &> /dev/null

#md5sum保留最近3天的数据
find $dir -type f -name "result*" -mtime +3 -exec rm -f {} \;
##backup目录文件只保留3个月的数据
find $dir -type d -mtime +90|xargs rm -rf
- 1
- 2
- 3
- 4
- 5
- 6
- 7
- 8
- 9
- 10
- 11
- 12
- 13
- 14
- 15
- 16
- 17
- 18
- 19
- 20
- 21
- 22
- 23
- 24
- 25
- 26
- 27
- 28
- 29
- 30
- 31
Server编写定时任务
###每天凌晨3点进行备份
crontab -e
#分 时 日 月 周
 00 03 *  *  *  /bin/bash  /server/scripts/rsync_Client.sh &>/dev/null
- 1
- 2
- 3
- 4
拓展- -邮箱服务
原理
现在用网易邮箱来演示
-
首先打开163邮箱首页

-
然后打开设置,找到POP3/SMTP/IMAP
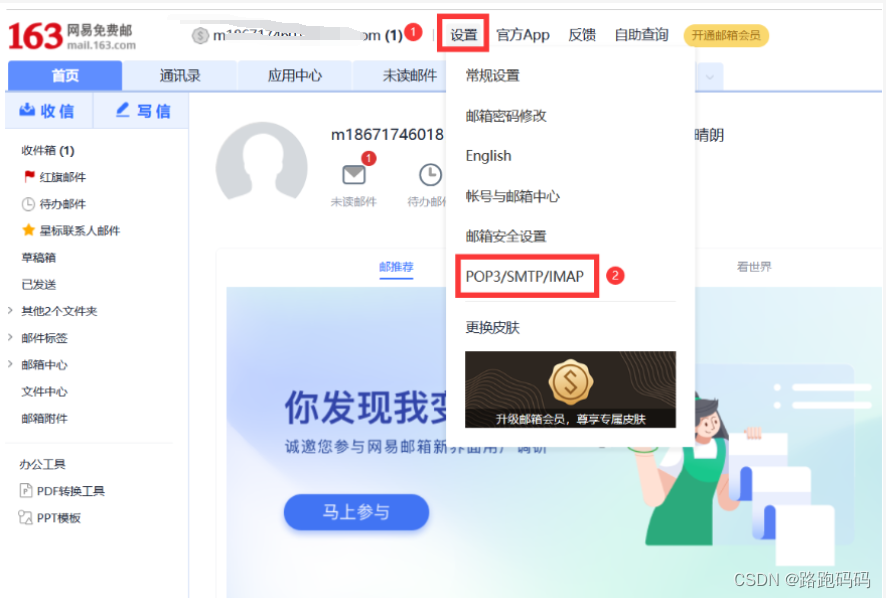
-
开启IMAP/SMTP服务
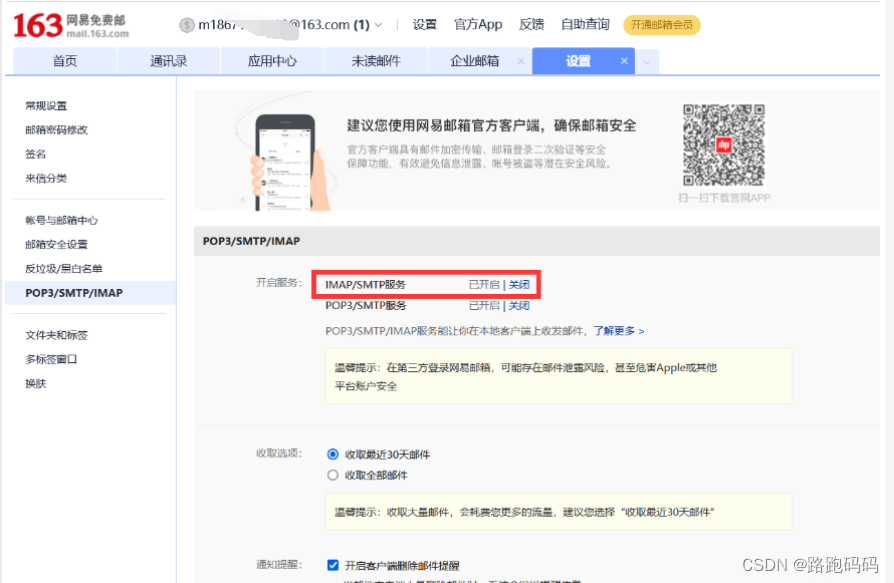
-
然后会有一个授权码,保存这个授权码
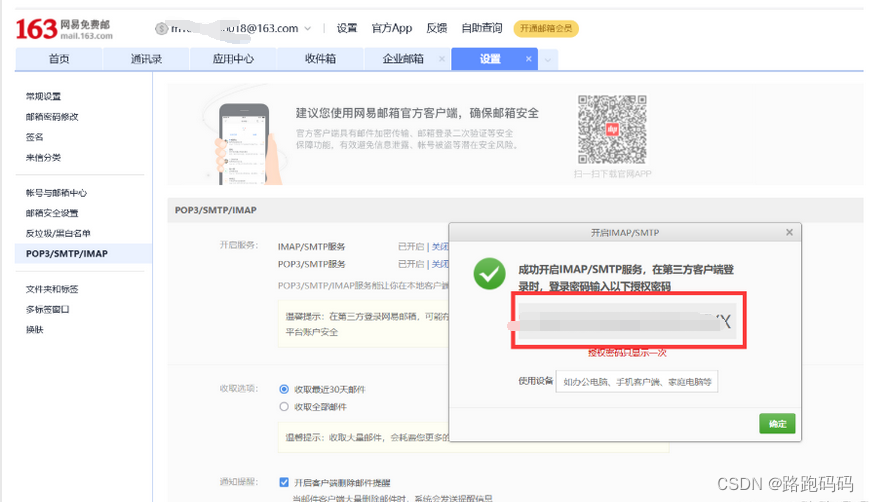
-
在CentOS系统下安装mailx进行邮件的发送
yum -y install mailx- 1
-
配置 /etc/mail.rc配置文件
vim /etc/mail.rc ##下面填写自己的163邮箱账号 set from=xxxxxxxxxxx@163.com ##接收方的邮箱账号 set smtp-auth-user=xxxxxxxxxxx@163.com smtp-auth-password=CAWCOGFAWPWWYZXX set smtp-auth=login- 1
- 2
- 3
- 4
- 5
- 6
echo "The mail's content." | mail -s "The mail's Subject." xxxxxxxxxxx@163.com mail -s "The mail's Subject." xxxxxxxxxxx@163.com- 1
- 2
项目验收
客户端
服务端
客户端定时任务

服务端定时任务

邮箱服务
NFS挂载
NFS上传备份
NFS定时任务

项目中出现的问题
1)Linux自动定时备份文件遇到报错
解决办法:
#在 /etc/postfix目录下,找到 main.cf 文件

vi /etc/postfix/main.cf

将:

inet_interfaces = localhost
inet_protocols = all

改为:

inet_interfaces = all
inet_protocols = all
- 1
- 2
- 3
- 4
- 5
- 6
- 7
- 8
- 9
- 10
- 11
- 12
- 13
2)在维护Linux服务器时总有不小心的遇到文件系统变成只读(Read Only System),即文件系统变成只读的情况
解决办法:
原因可能有两种,一种是多机写入时同步机制出现问题;另一种方式是单机写入时出现服务器掉电的。

按提示进入只读系统,打开/etc/fstab,先将受损的文件系统注释掉。如果发现/etc/fstab无法读写,则先执行mount -o remount rw , / 将文件系统改成读写模式。
- 1
- 2
- 3
3)@错误:模块备份时身份验证失败
解决办法:
出现的原因有两种:
	客户端验证用户与服务器端验证用户不匹配
	客户端与服务器端密码不一致
将Server中的 /etc/rsync.passwd的用户与密码修改和客户端相匹配
- 1
- 2
- 3
- 4

