
热门标签
热门文章
- 1算法基础 |【01】K-近邻算法_n neighbours参数
- 2Spring Boot 3.0 升级小指南_springboot3升级
- 3vue前端直接使用element-ui的upload组件上传到阿里云OSS存储_elemtui上传文件到阿里oss
- 4【数学模型】层次分析_数学建模层次分析法例题及答案
- 5推荐开源项目: Nuxt-Auth —— 安全便捷的Nuxt 3认证解决方案
- 6stable diffusion如何下载模型?_stable diffusion模型下载
- 7【2024最新华为OD-C/D卷试题汇总】[支持在线评测] 最小配对和(100分) - 三语言AC题解(Python/Java/Cpp)
- 8二次封装 element-plus的Table 表格组件,减少代码臃肿_tableplus 二次封装
- 9Python教程:读取文件有三种方法:(read、readline、readlines)详细用法_简述读文件的三种方式
- 10腾讯优图NCNN详细分析及实践操作(含Yolov5实践)
当前位置: article > 正文
Node.js环境调用百度智能云(百度云)api鉴权认证三步走_百度云api
作者:小蓝xlanll | 2024-06-12 00:18:41
赞
踩
百度云api
方式一 :Postman脚本的方式生成v1版本的认证字符串
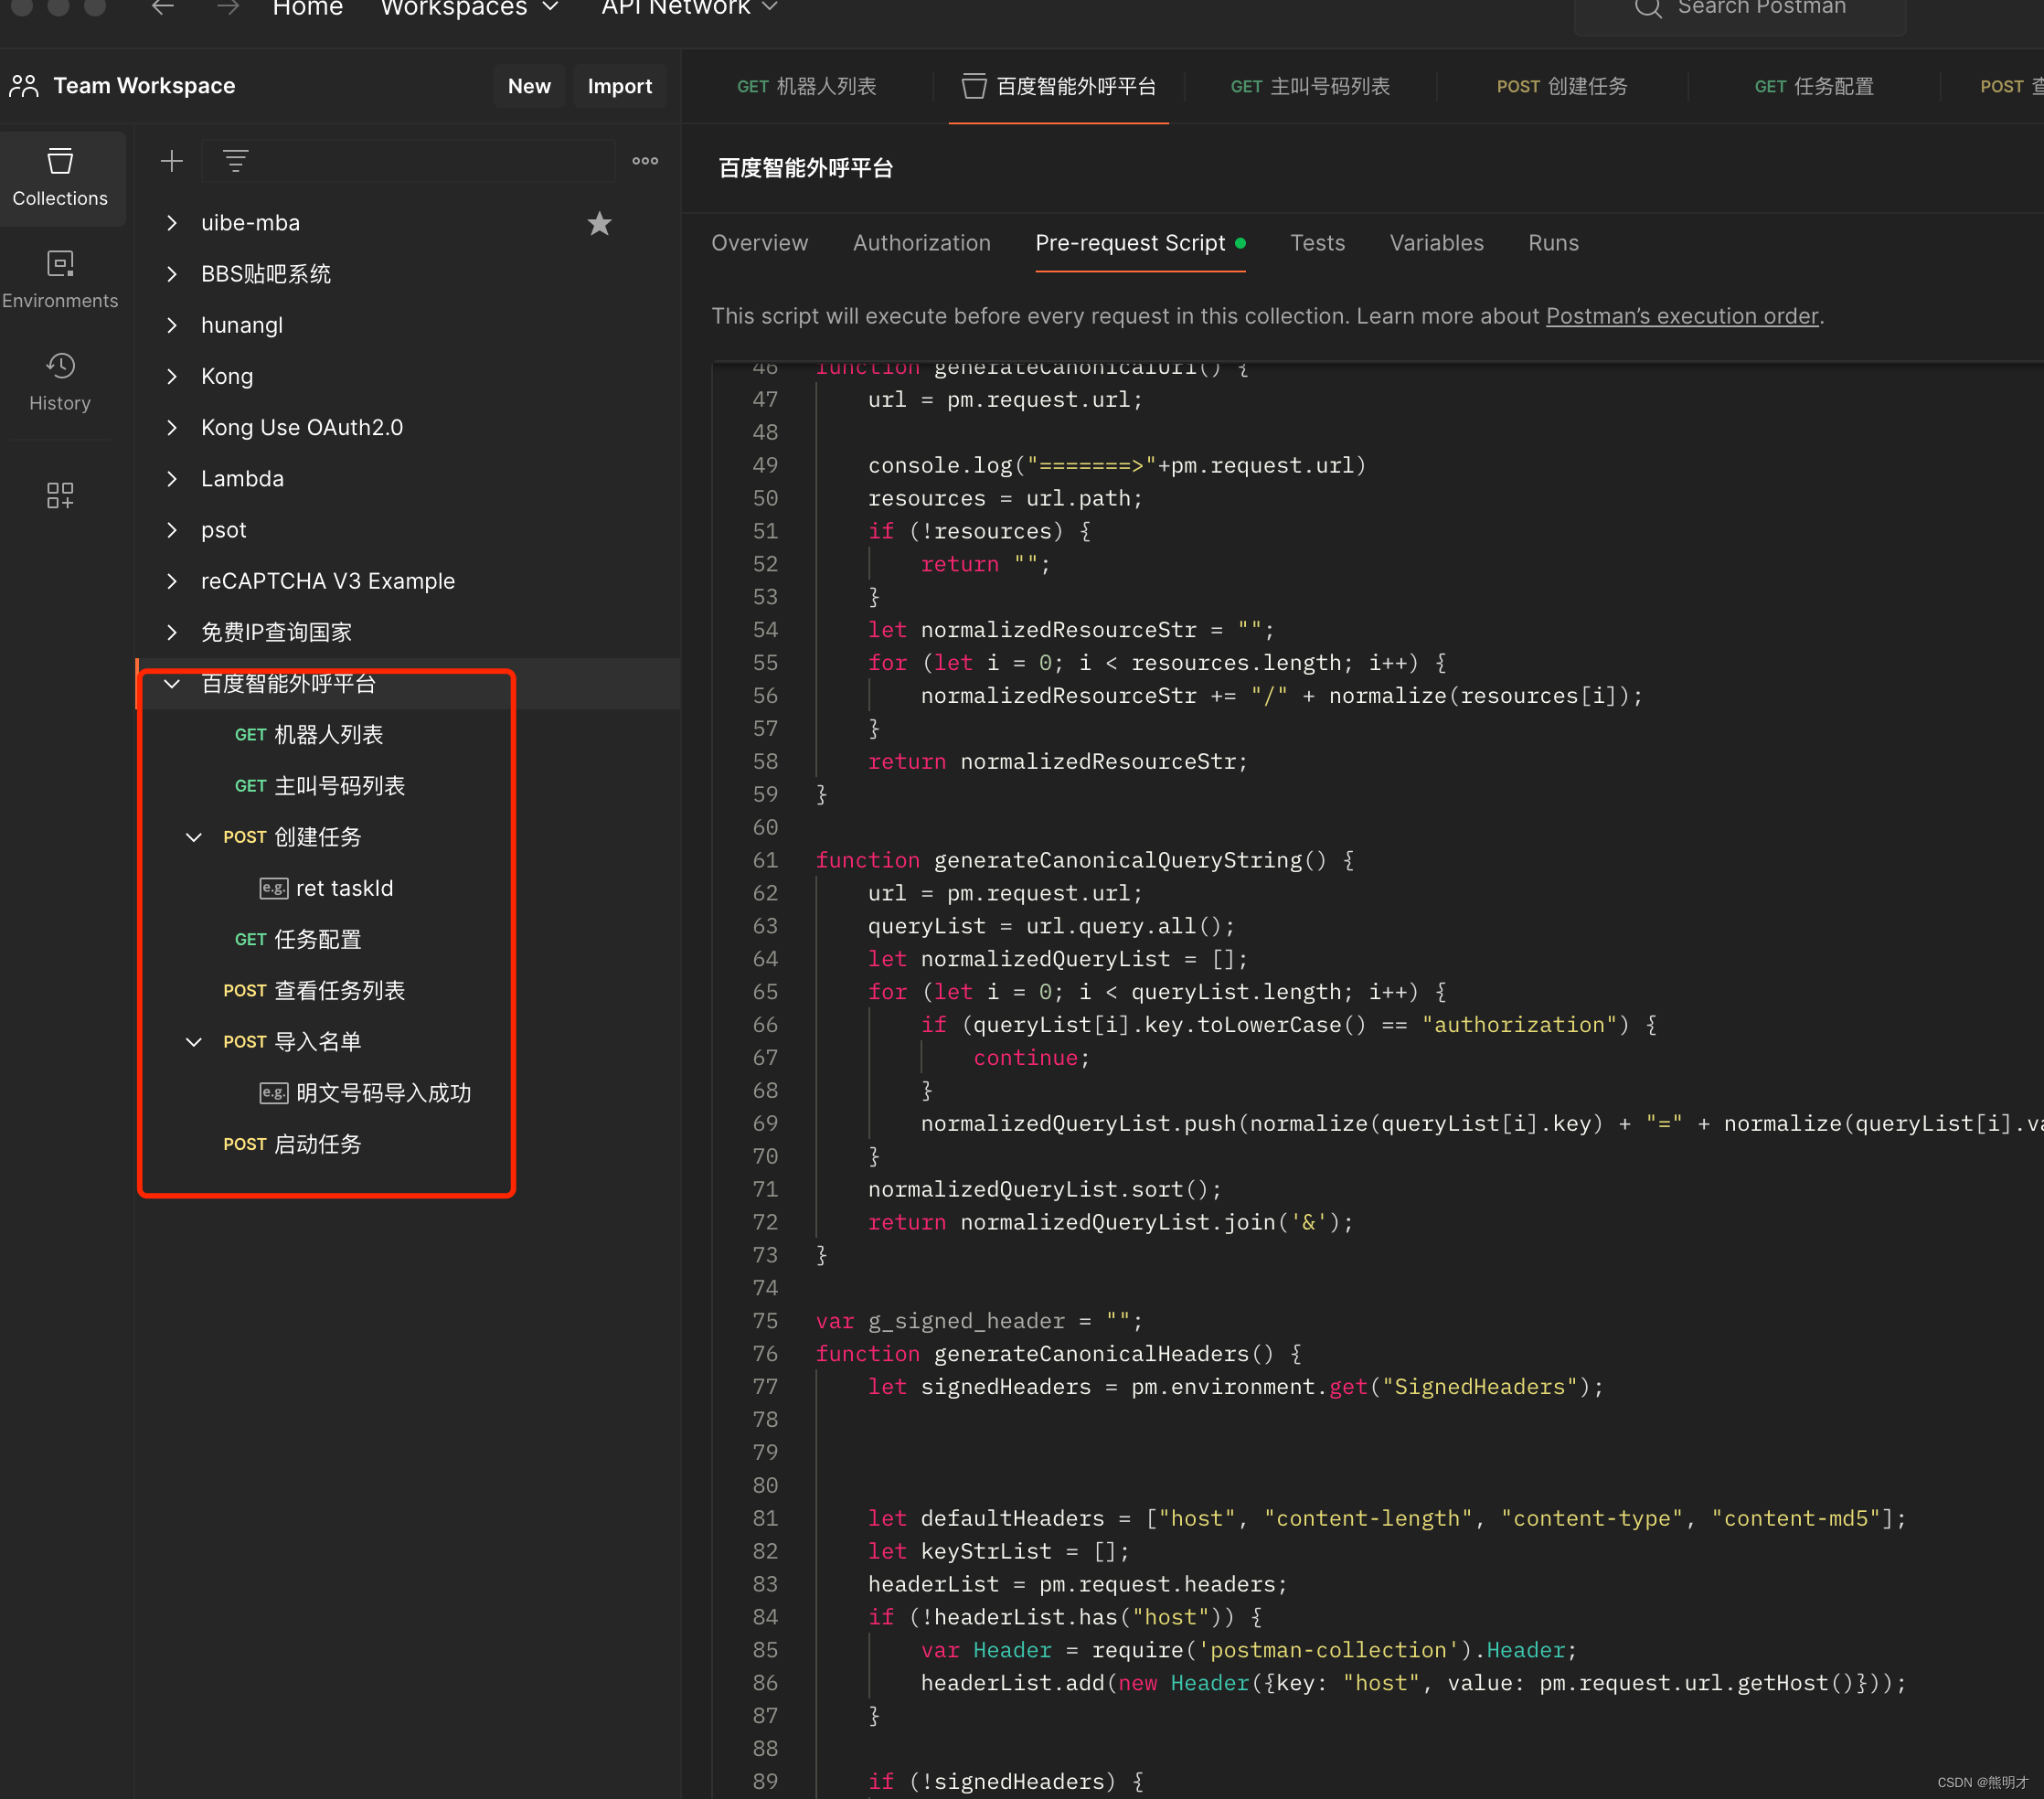
Postman脚本下载
下载Postman pre-request Script 设置 Authorization 示例脚本
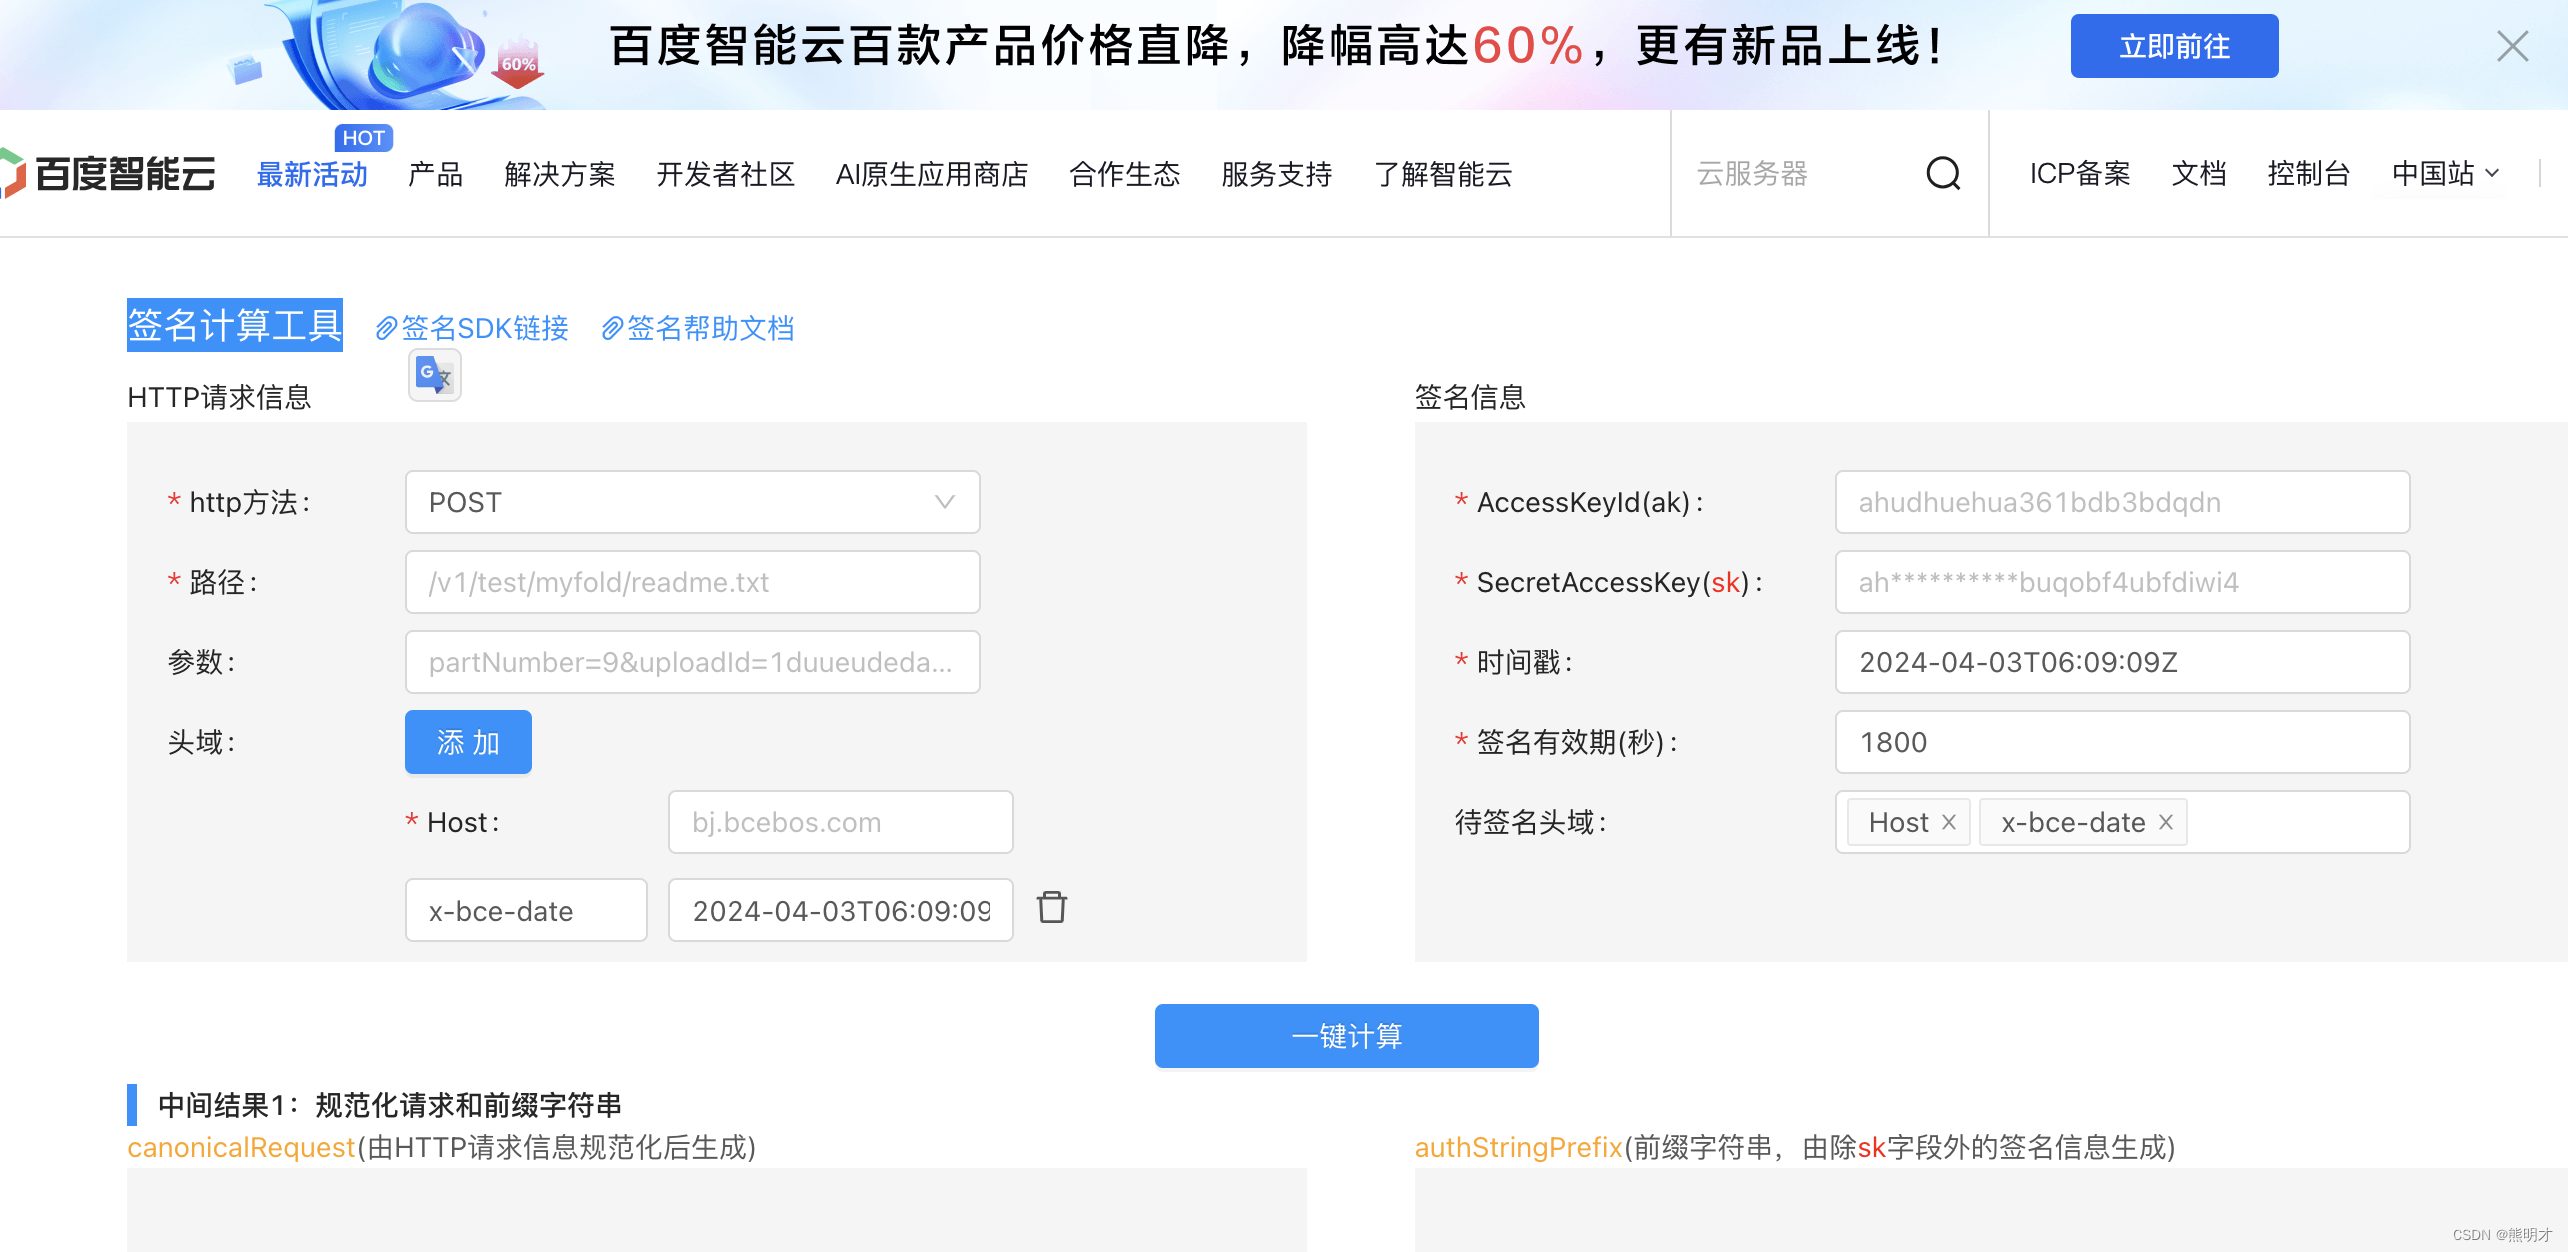
方式二:在线签名工具生成 (试用于验证编程字符串签名是否有错误)
签名计算工具 https://cloud.baidu.com/signature/index.html
百度智能云提供了在线生成签名工具,用户仅需填写必要请求信息、访问密钥(包含访问密钥ID(AK)和秘密访问密钥(SK)),可快速生成认证字符串。
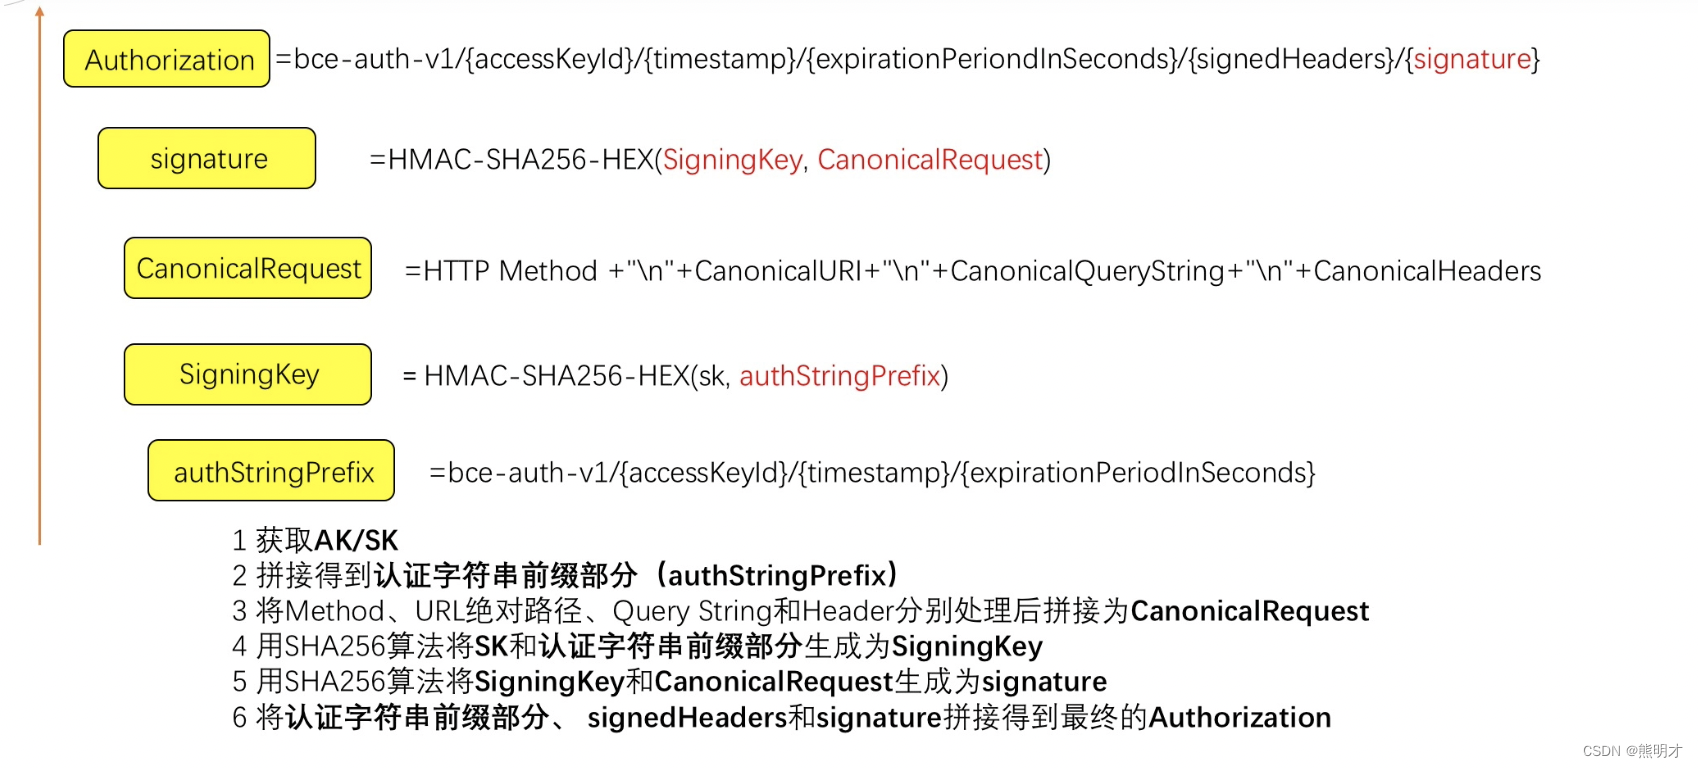
方式三 编程生成认证字符串(适合最终集成自己系统)
文档地址 https://cloud.baidu.com/doc/Reference/s/njwvz1yfu go
你可以运行下面的命令来安装所有依赖:
npm install crypto axios
- 1
客悦·智能外呼平台 AIOB 获取机器人列表接口node.js示例代码
// robotList.js
// npm install crypto axios
const crypto = require('crypto');
const axios = require('axios');
const url = require('url');
const util = require('util');

function getUTC() {
  const date = new Date();

  const year = date.getUTCFullYear();
  const month = String(date.getUTCMonth() + 1).padStart(2, '0');
  const day = String(date.getUTCDate()).padStart(2, '0');
  const hours = String(date.getUTCHours()).padStart(2, '0');
  const minutes = String(date.getUTCMinutes()).padStart(2, '0');
  const seconds = String(date.getUTCSeconds()).padStart(2, '0');

  return `${year}-${month}-${day}T${hours}:${minutes}:${seconds}Z`;
}
function generateCanonicalUri(urlString) {
  let parsedUrl = url.parse(urlString, true);
  return parsedUrl.path;
}

/**
 * 获取机器人列表接口
 * GET https://aicc.bce.baidu.com/api/v1/robot/list
 * 文档地址 https://cloud.baidu.com/doc/CCC/s/skt9hds4y
 */
function main() {
  //  1).AK/SK、host、method、URL绝对路径、querystring
  let AK = '<管理后台AccessKey>'; //用户的AK(AccessKey)
  let SK = '<管理后台SecretKey>'; //用户的SK(SecretKey)
  let ccApiAuthV1 = 'cc-api-auth-v1' // Authorization 前缀(bce-auth-v1/cc-api-auth-v1 具体看文档)

  let host = 'aicc.bce.baidu.com';
  let URL = 'api/v1/robot/list';
  let query = '';
  let method = 'GET';

  // 拼接完整的 URL
  let fullURL = `https://${host}/${URL}${query}`;

  const signedHeaders = 'host';
  //  2).x-bce-date
  let x_bce_date = getUTC();
  console.log('UTC 时间:' + x_bce_date);
  //  3).header和signed Headers
  let headers = {
    Host: host,
    'content-type': 'application/json;charset=utf-8',
    'x-bce-date': x_bce_date,
  };
  //  4).认证字符串前缀
  let authStringPrefix = ccApiAuthV1 + '/' + AK + '/' + x_bce_date + '/' + '1800';
  //  5).生成Canonical Request

  //  5).1生成Canonical URL
  let canonicalUri = generateCanonicalUri(fullURL);
  console.log('Canonical Uri: ' + canonicalUri);
  //  5).2生成Canonical QueryString
  let canonicalQueryString = query;
  //  5).3生成Canonical Headers
  // 遍历对象的键值对,并获取键和对应的值
  const canonicalHeaders = `host:${host}`;

  console.log(`Canonical Headers:[${JSON.stringify(canonicalHeaders)}]`);
  //  5).4拼接得到Canonical Request
  const canonicalRequest = method + '\n' + canonicalUri + '\n' + canonicalQueryString + '\n' + canonicalHeaders;
  console.log(`Canonical Request:[${JSON.stringify(canonicalRequest)}]`
  );
  //	6).生成signing Key
  // 生成signingKey
  const signingKey = crypto
    .createHmac('sha256', SK)
    .update(authStringPrefix)
    .digest('hex');
  console.log(`signingKey: ${signingKey}`);
  // 生成Signature
  const signature = crypto
    .createHmac('sha256', signingKey)
    .update(canonicalRequest)
    .digest('hex');
  console.log(`Signature: ${signature}`);
  //	8).生成Authorization并放到header里
  headers['Authorization'] = `${authStringPrefix}/${signedHeaders}/${signature}`;
  console.log(headers['Authorization']);
  //	9).发送API请求并接受响应
  // 发送 Axios 请求

  axios
    .request({
      method: method,
      url: fullURL,
      headers: headers,
    })
    .then(response => {
      console.log('Response:', util.inspect(response.data, false, null, true));
    })
    .catch(error => {
      console.error('Error:', error.response.data);
    });
}

main();

- 1
- 2
- 3
- 4
- 5
- 6
- 7
- 8
- 9
- 10
- 11
- 12
- 13
- 14
- 15
- 16
- 17
- 18
- 19
- 20
- 21
- 22
- 23
- 24
- 25
- 26
- 27
- 28
- 29
- 30
- 31
- 32
- 33
- 34
- 35
- 36
- 37
- 38
- 39
- 40
- 41
- 42
- 43
- 44
- 45
- 46
- 47
- 48
- 49
- 50
- 51
- 52
- 53
- 54
- 55
- 56
- 57
- 58
- 59
- 60
- 61
- 62
- 63
- 64
- 65
- 66
- 67
- 68
- 69
- 70
- 71
- 72
- 73
- 74
- 75
- 76
- 77
- 78
- 79
- 80
- 81
- 82
- 83
- 84
- 85
- 86
- 87
- 88
- 89
- 90
- 91
- 92
- 93
- 94
- 95
- 96
- 97
- 98
- 99
- 100
- 101
- 102
- 103
- 104
- 105
- 106
声明:本文内容由网友自发贡献,不代表【wpsshop博客】立场,版权归原作者所有,本站不承担相应法律责任。如您发现有侵权的内容,请联系我们。转载请注明出处:https://www.wpsshop.cn/w/小蓝xlanll/article/detail/705290
推荐阅读
相关标签

