- 1【Java.Web】JSP —— HTML, Servlet,JSP比较, JSP基础_jsp servlet html
- 2更改计算机用户文件夹,win10系统怎么自定义C盘用户文件夹名称
- 3python上海空气质量数据可视化大屏全屏系统设计与实现(django框架)_空气质量可视化
- 4python重复抽奖_详解用python写一个抽奖程序
- 5无法启动此程序,因为计算机中丢失 的解决办法_无法启动此程序,因为计算机中丢失 api-ms-win-core-kernel32-legacy-l
- 6Mac安装开发环境(Java)_mac 命令行安装软件
- 7ubuntu系统的安装及基本配置_ubuntu安装基本功能包
- 8Unity as a Library into Android Project_unity as library
- 9Python 文本词频统计中英文_python词频统计输入移除词汇
- 10jdbc: WARN: Establishing SSL connection without server's identity verification is not recommended. A_jdbc sat feb 04 15:08:00 cst 2023 warn: establishi
【Windows】使用Nexus搭建npm私库,管理npm包,并在项目中下载_npm 配置nexus下包
赞
踩
一、Nexus在Windows环境下的安装与启动
1.下载安装包
官网下载地址,进去后直接下载window系统的,需要挂VPN。
2.配置环境变量
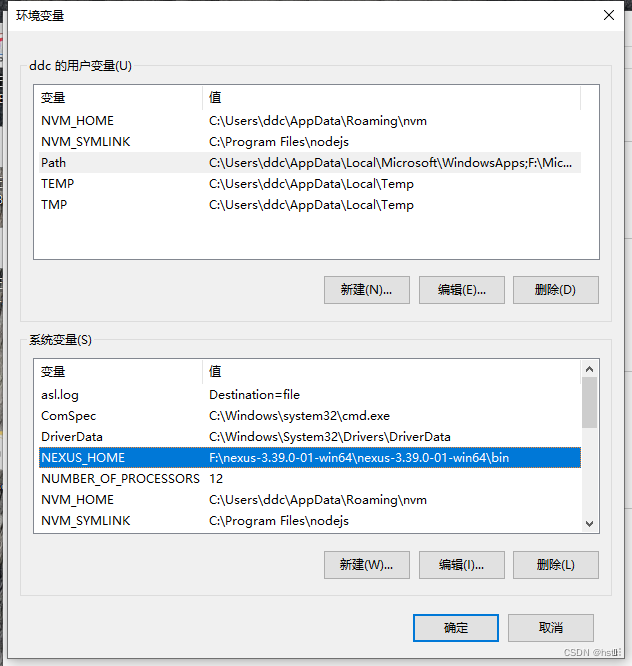
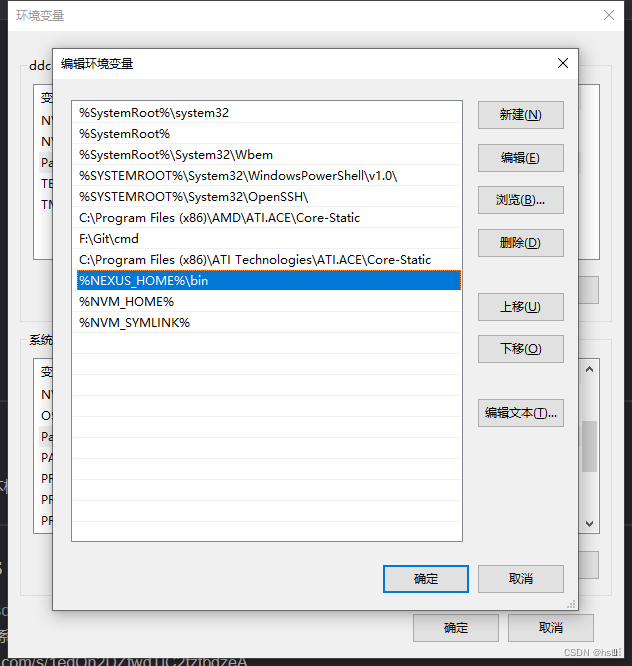
3.启动Nexus

- 切换到nexus解压目录的bin文件夹下;
- 执行安装命令
nexus.exe /install; - 执行运行命令
nexus.exe /run(前台运行,直接关闭命令行窗口可停止运行)或nexus.exe /start(关闭cmd后仍在后台运行,使用nexus.exe /stop停止后台运行)。
4.访问网页
打开浏览器输入localhost:8081/即可访问(如果无法访问,输入127.0.0.1:8081/,或者使用本机ip地址+8081端口号)。
二、Nexus使用
1.登录
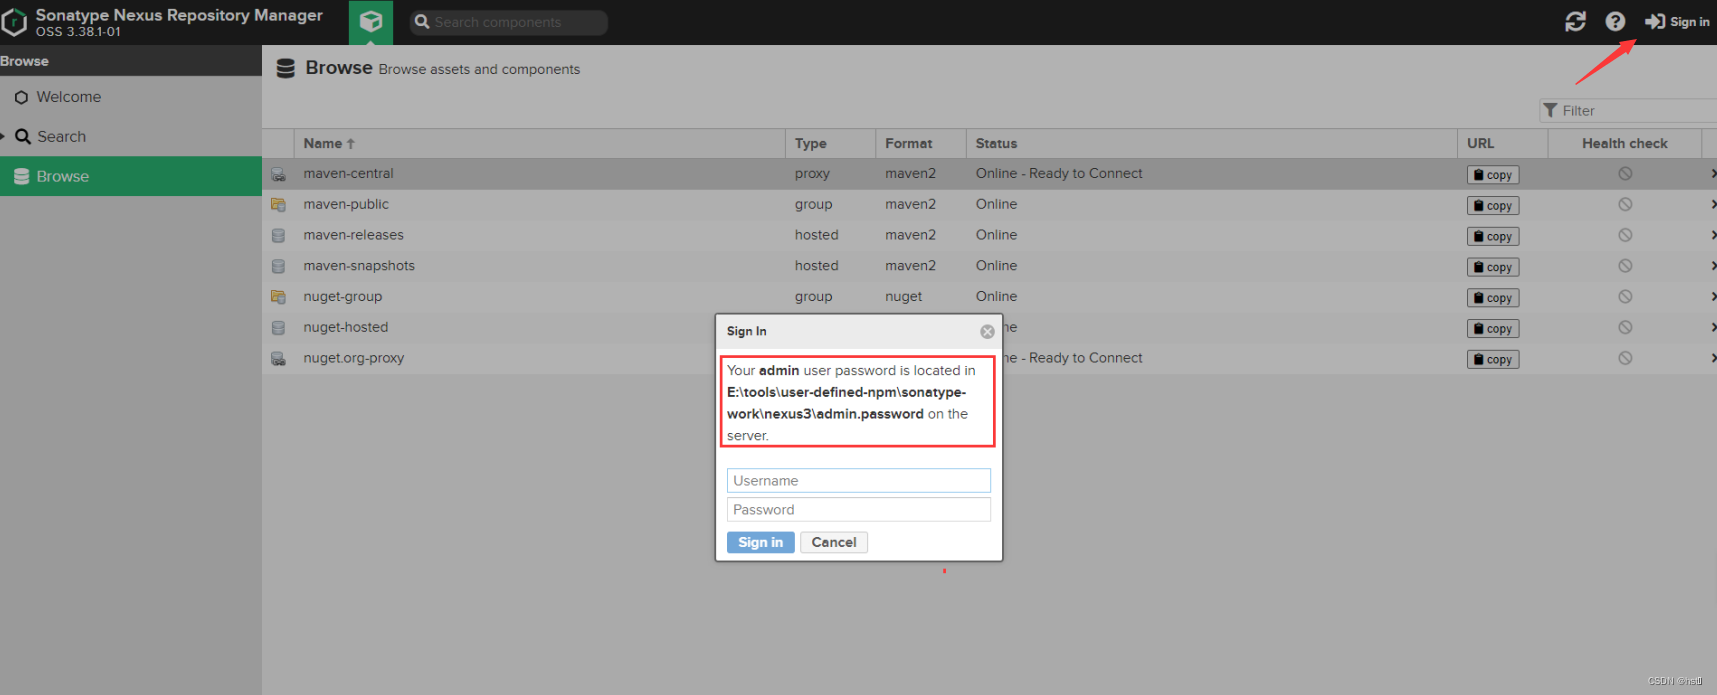
首次使用点击右上角Sign in。点击后,会提示用户名为admin,密码就在提示的文件内,登录成功后根据提示修改密码。
2.创建仓库


创建仓库,一共有3种类型。
(1) 创建npm(hosted)私有仓库
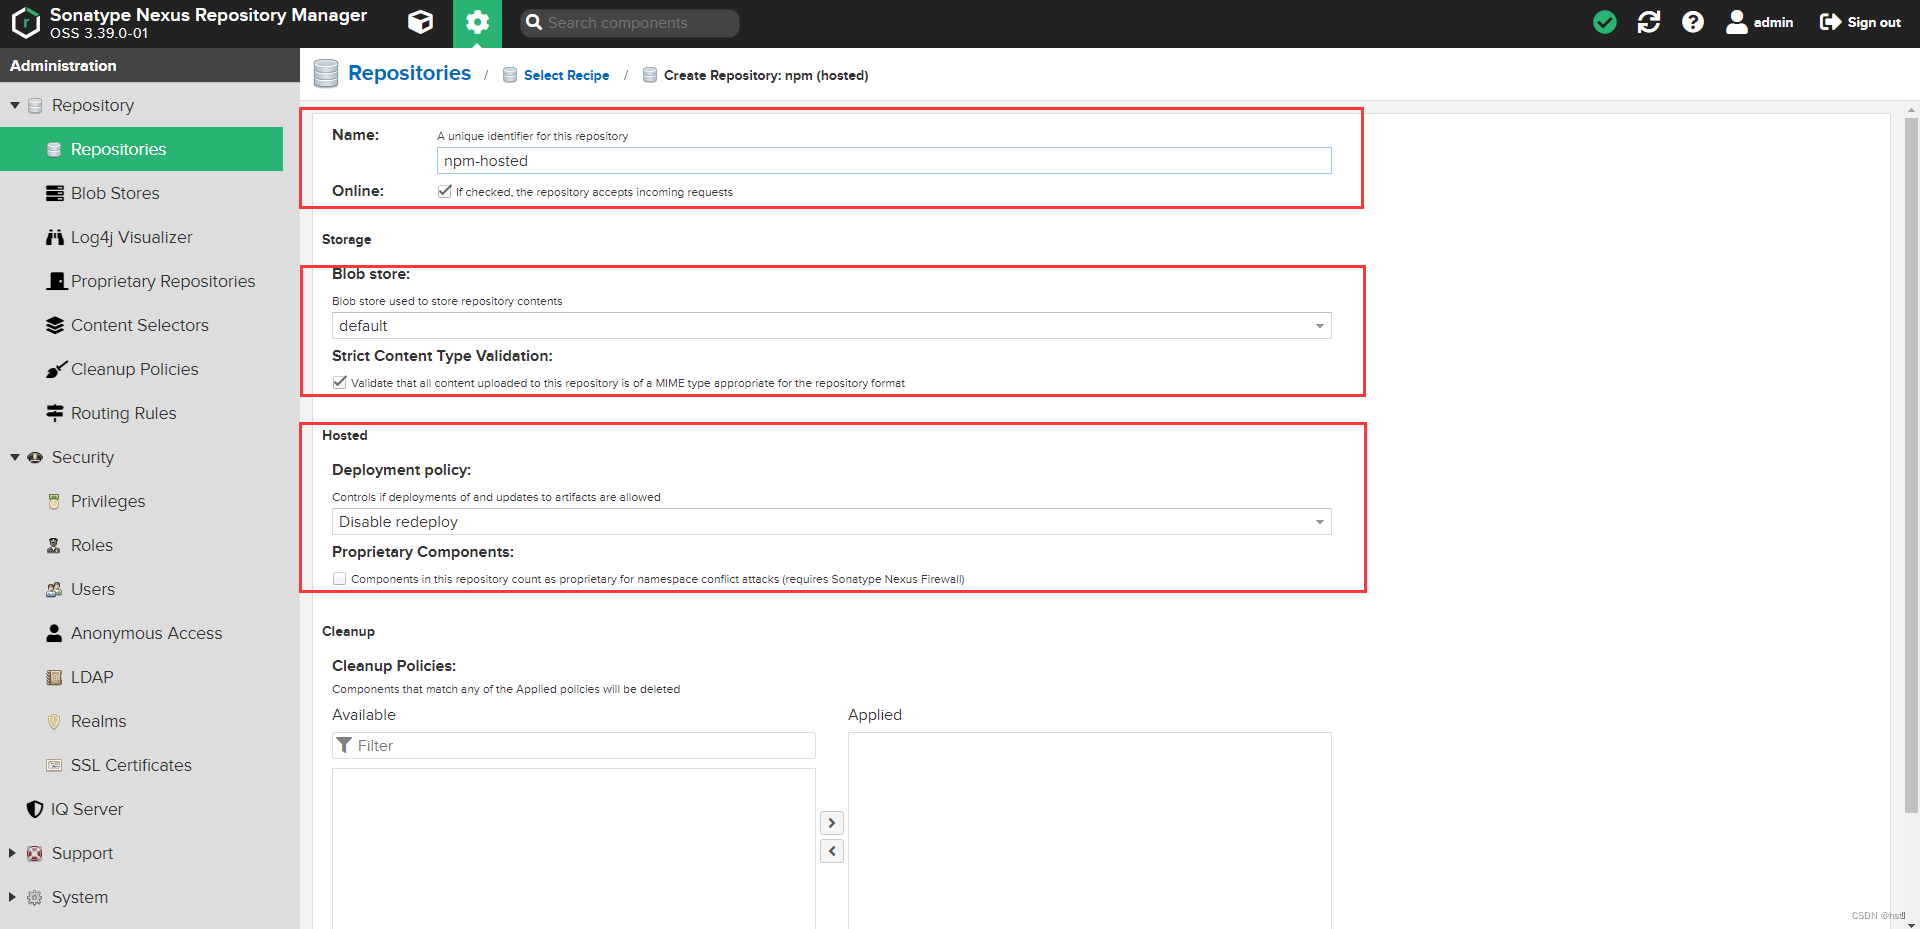
Name可以自定义填写,hosted下面的选项要切换成allow redeploy(上图截图忘记换了),这样才能运行重复上传一个包,不然会报400:bad request。点击 Create repository 即可。
(2) 创建npm(proxy)仓库
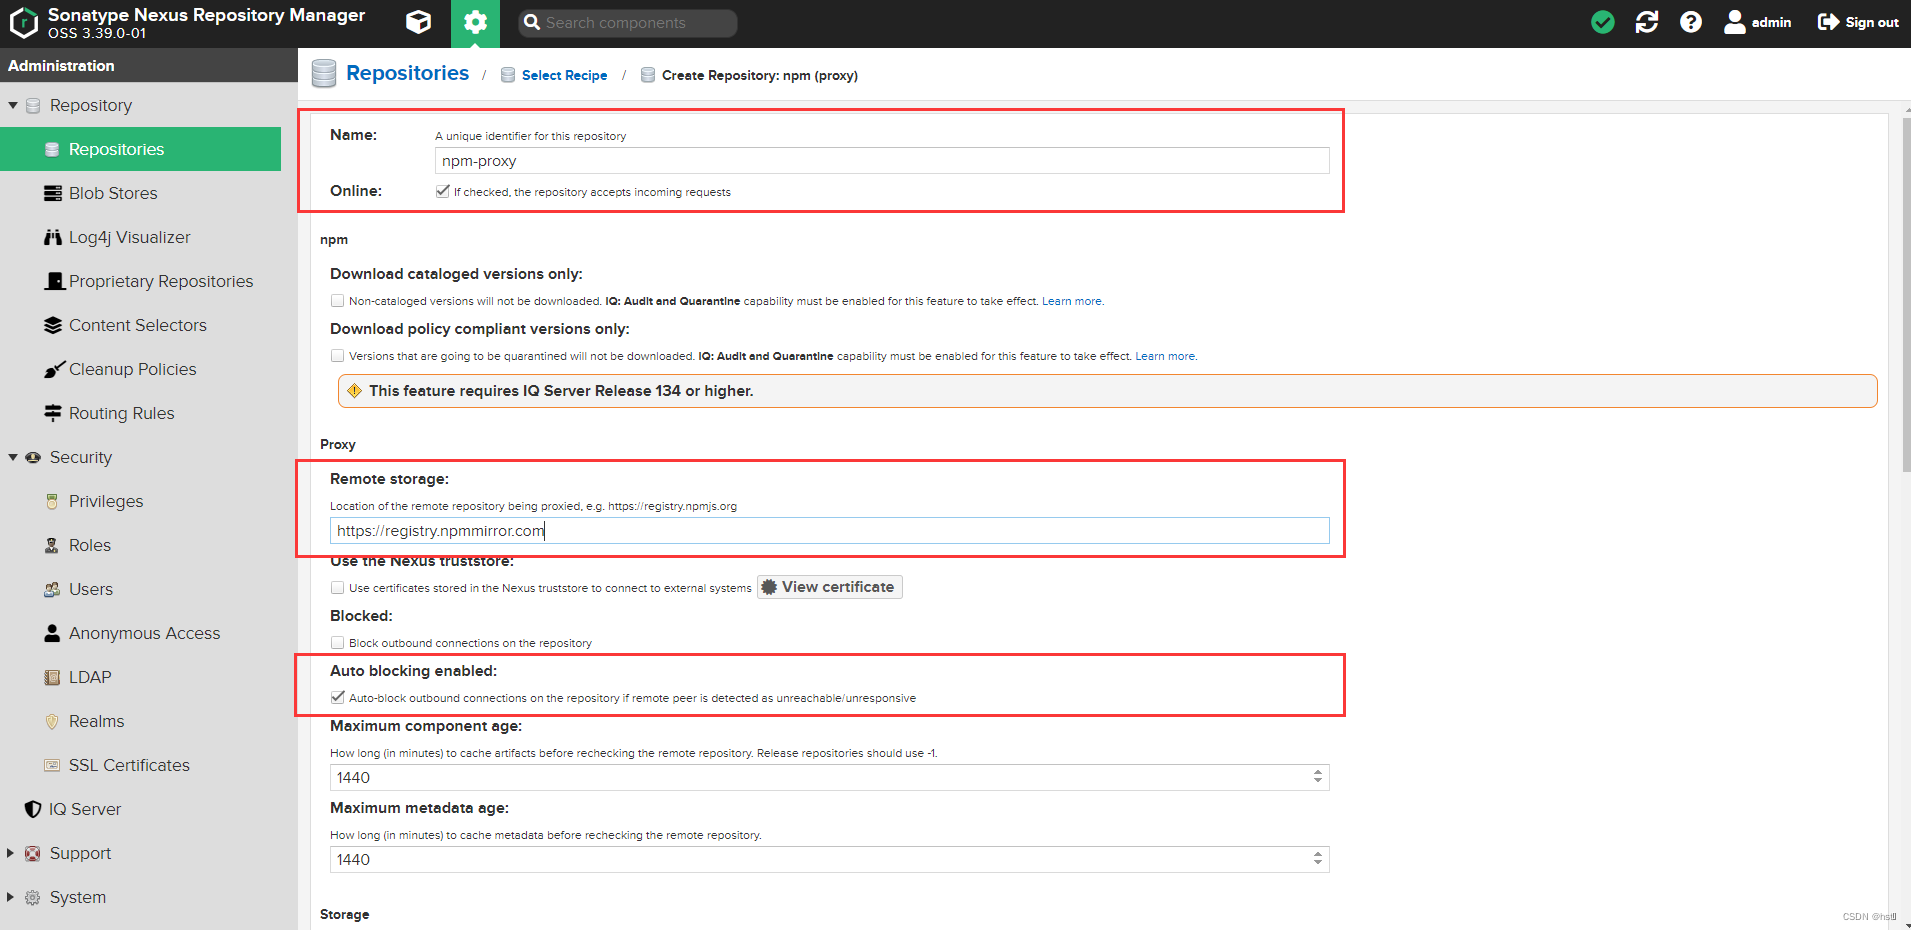
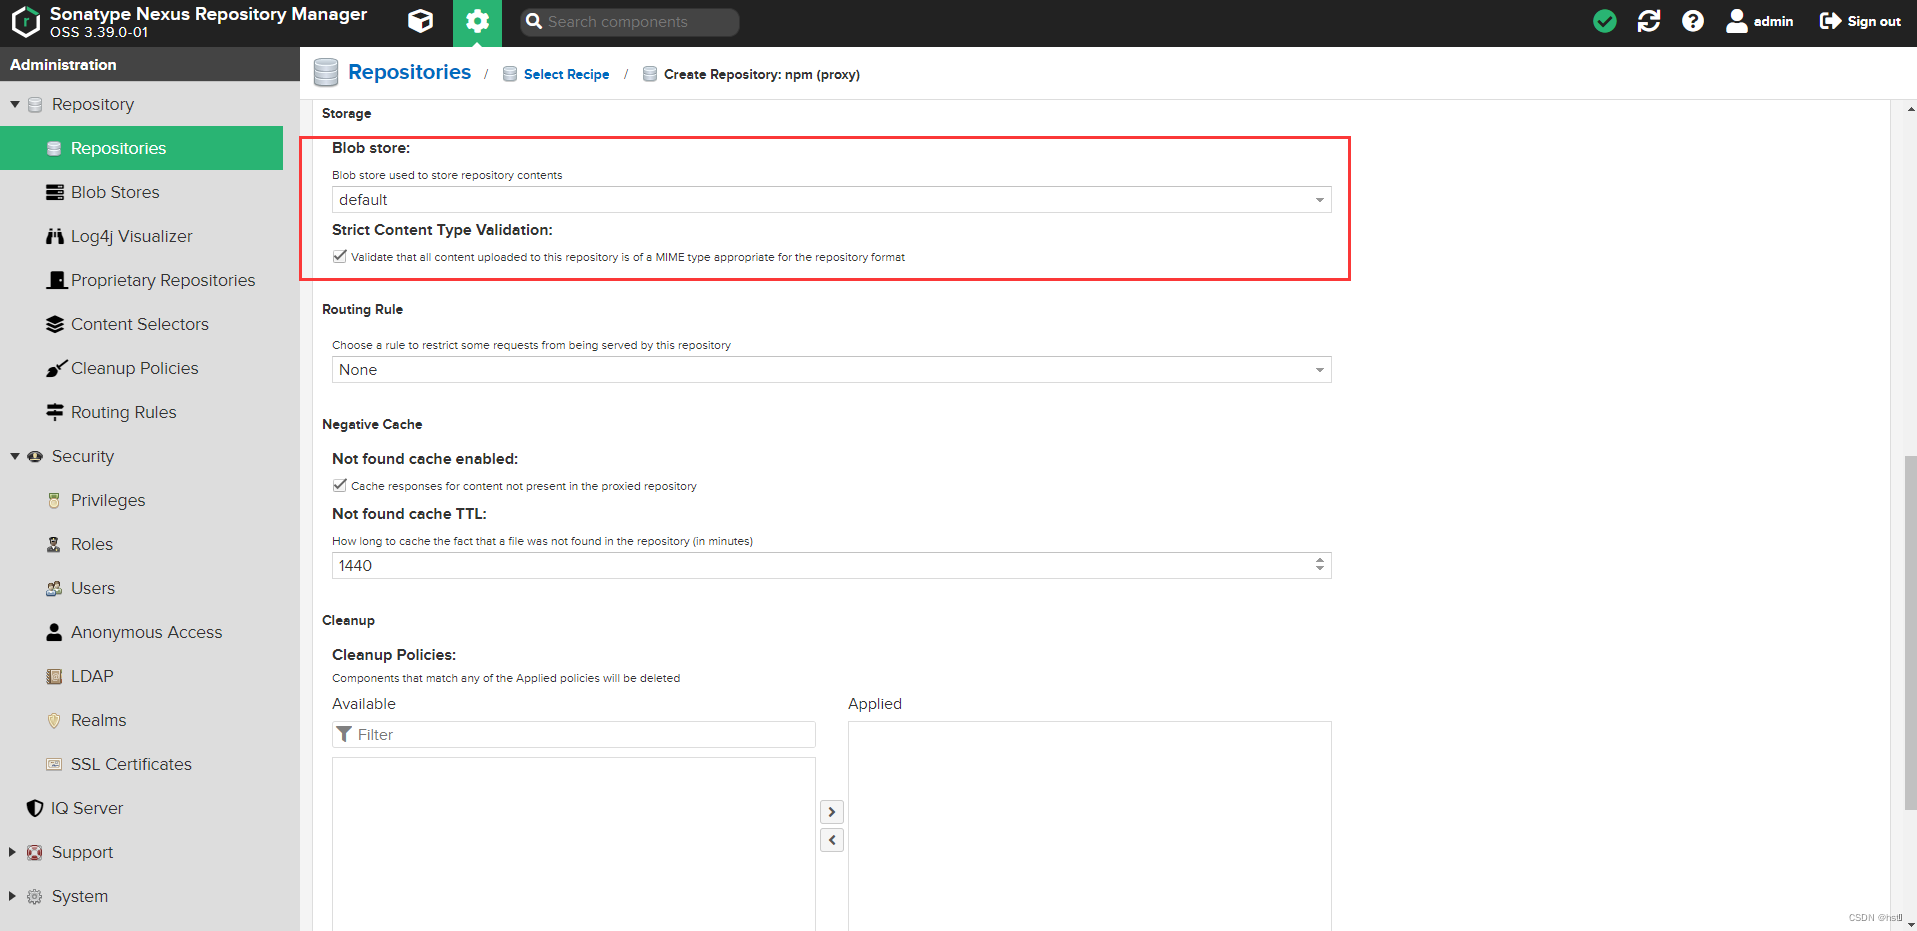
Name可以自定义填写,Proxy为公共镜像源地址,建议为淘宝镜像:https://registry.npmmirror.com。点击create repository即可。
(3) 创建npm(group)仓库
组仓库的设定是为了将私有库和代理库同时管理起来,在开发的时候就不需要不断的切换镜像源,只需要使用组仓库就可以了。
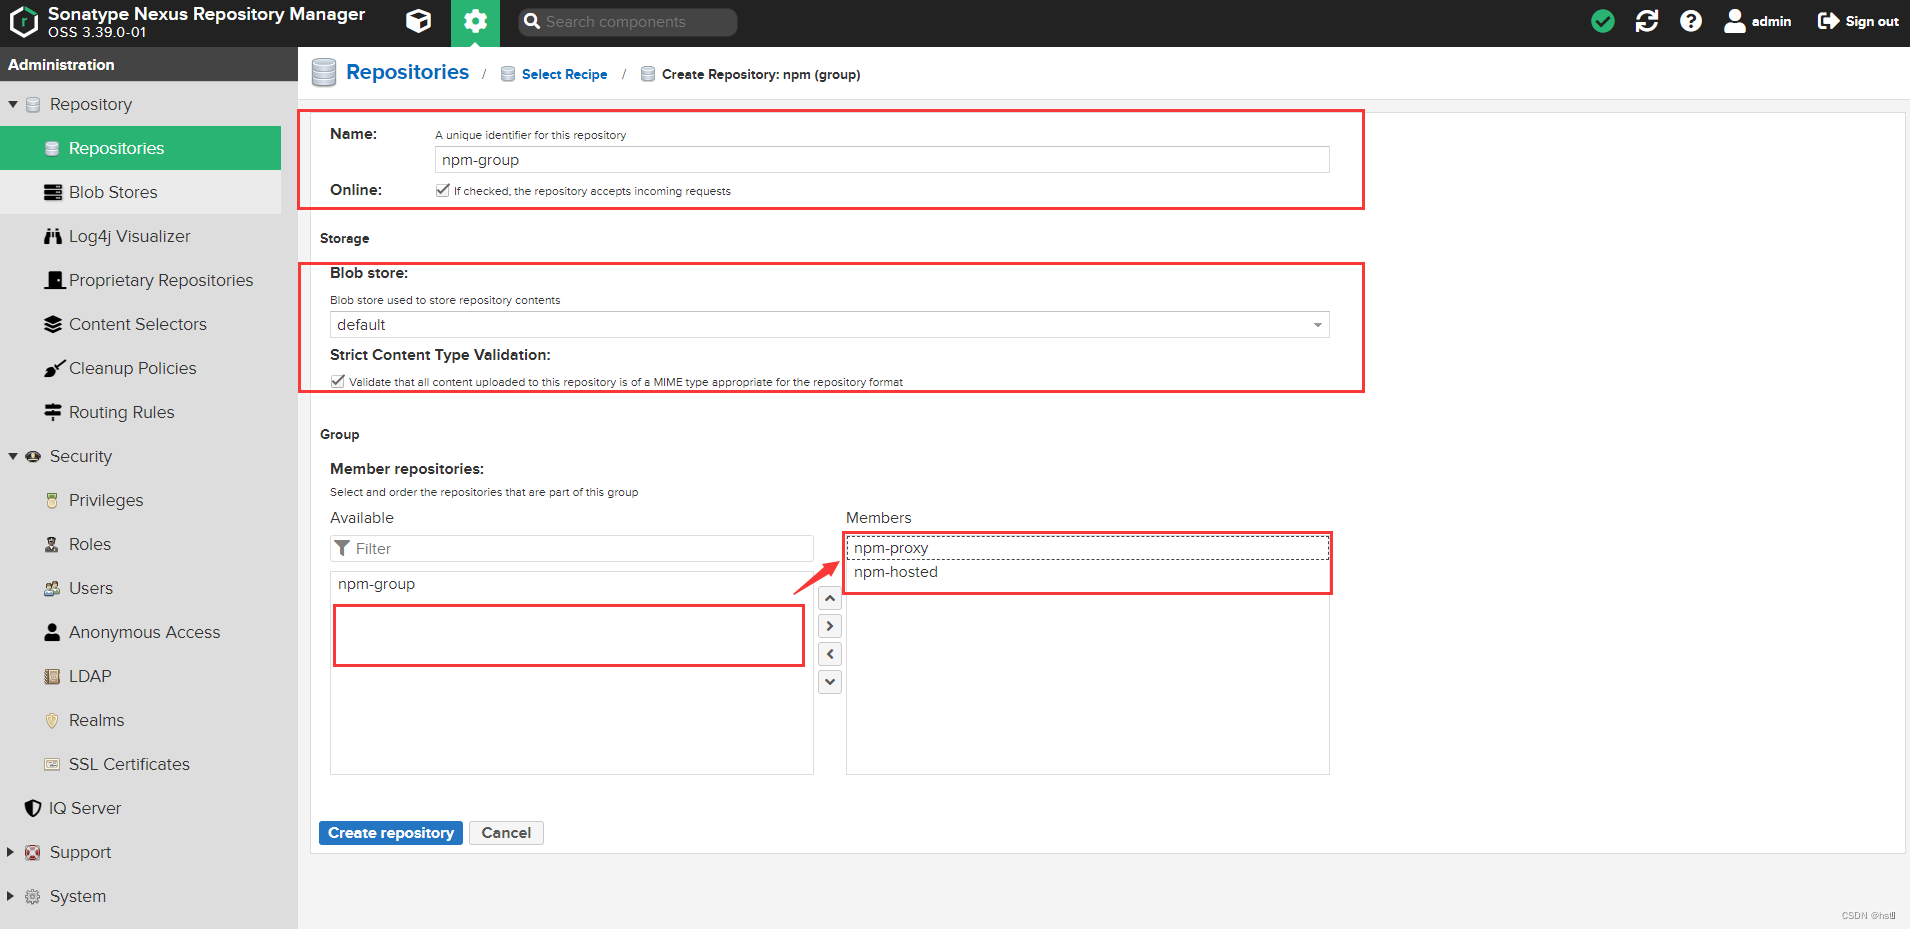
Name可以自定义填写,在Group处将之前设定的私有仓库(hosted)和代理仓库(proxy)从Available区移入Member区。点击create repository即可。

以上为已经完成的仓库区。
3.配置权限
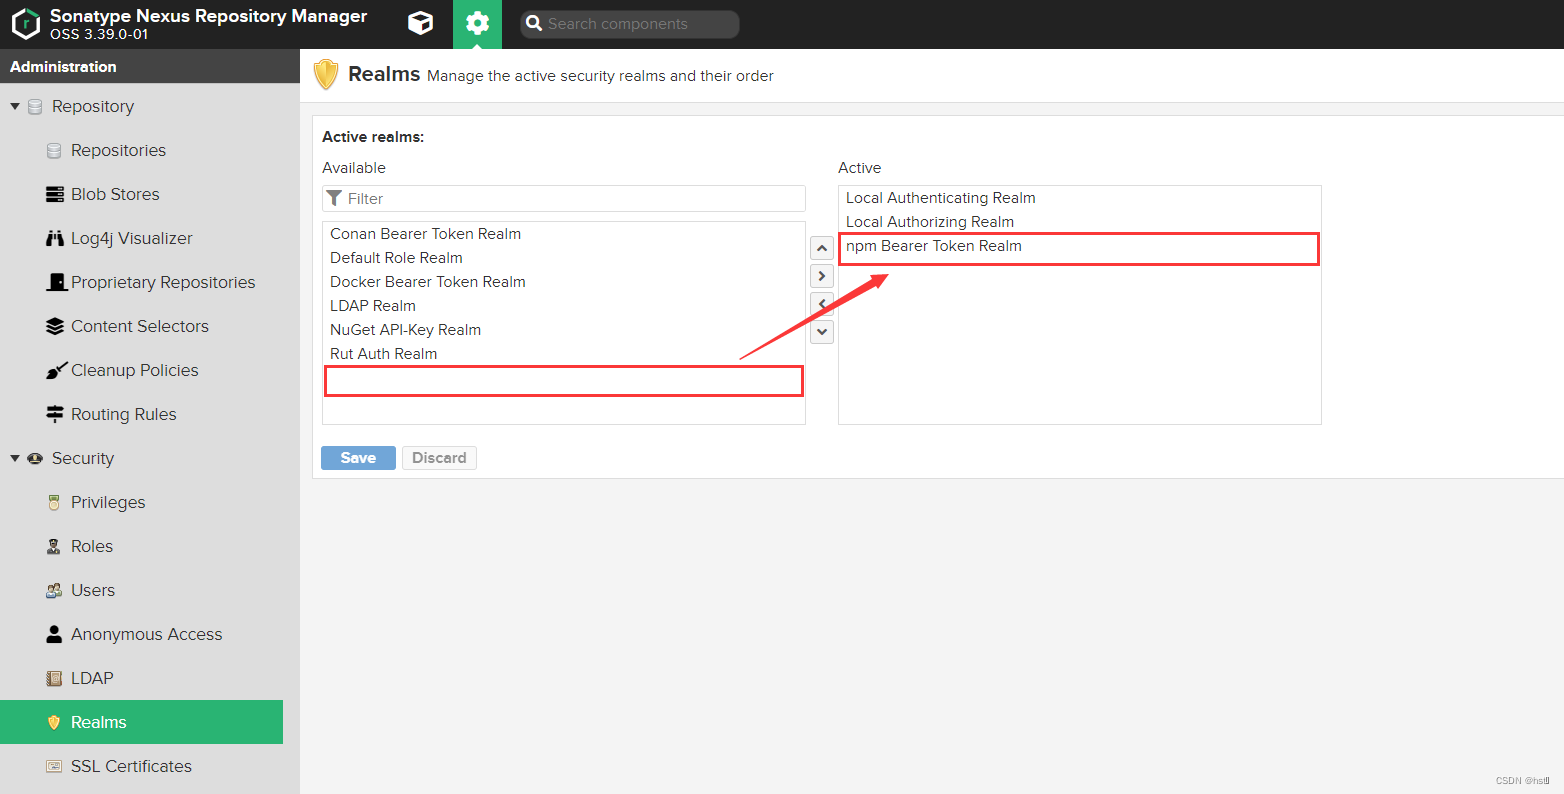
将npm Bearer Token Realm从Available区域移入Active区域,点击save保存。
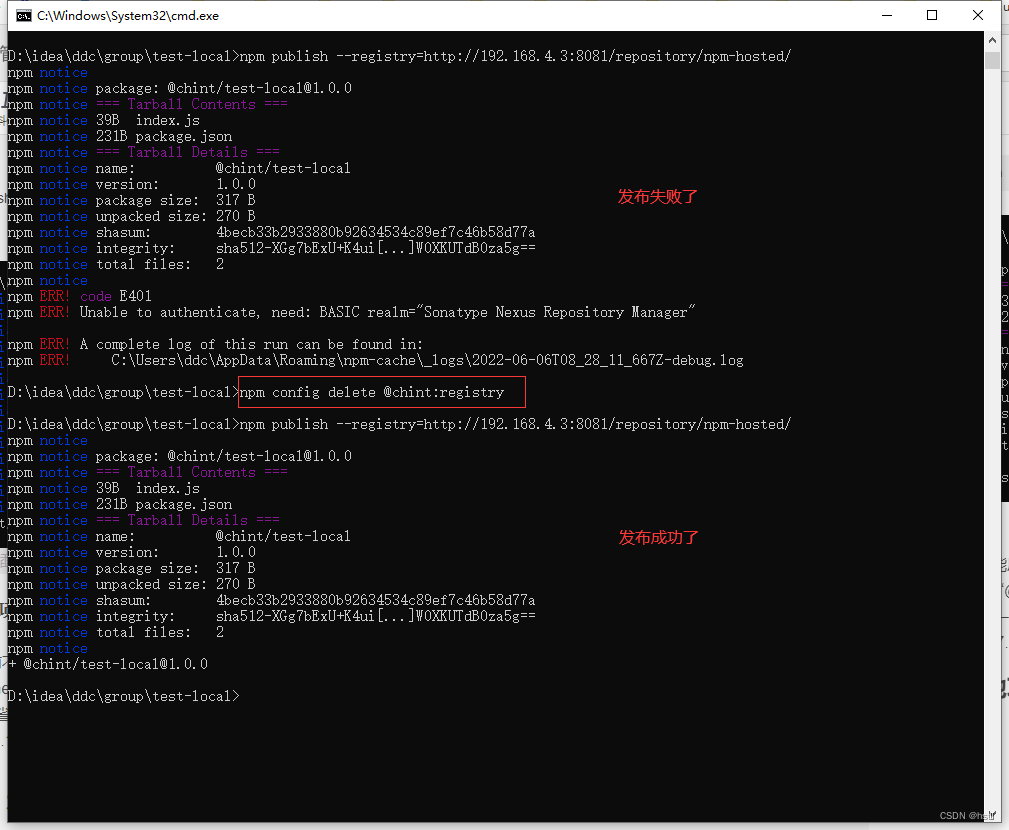
!该步骤非常重要,否则在adduser和publish会一直报错401:Unable to authenticate, need: BASIC realm=“Sonatype Nexus Repository Manager”。
三、发布npm包
1.创建一个测试包
新建一个测试目录使用npm init -y 初始化,并写入一个带有内容的index.js文件。

修改package.json文件,name是最终显示的包名。
name: "@chint/parkball"
- 1
index.js文件内容。
// index.js
module.exports = 123456;
- 1
- 2
2.注册登录hosted仓库
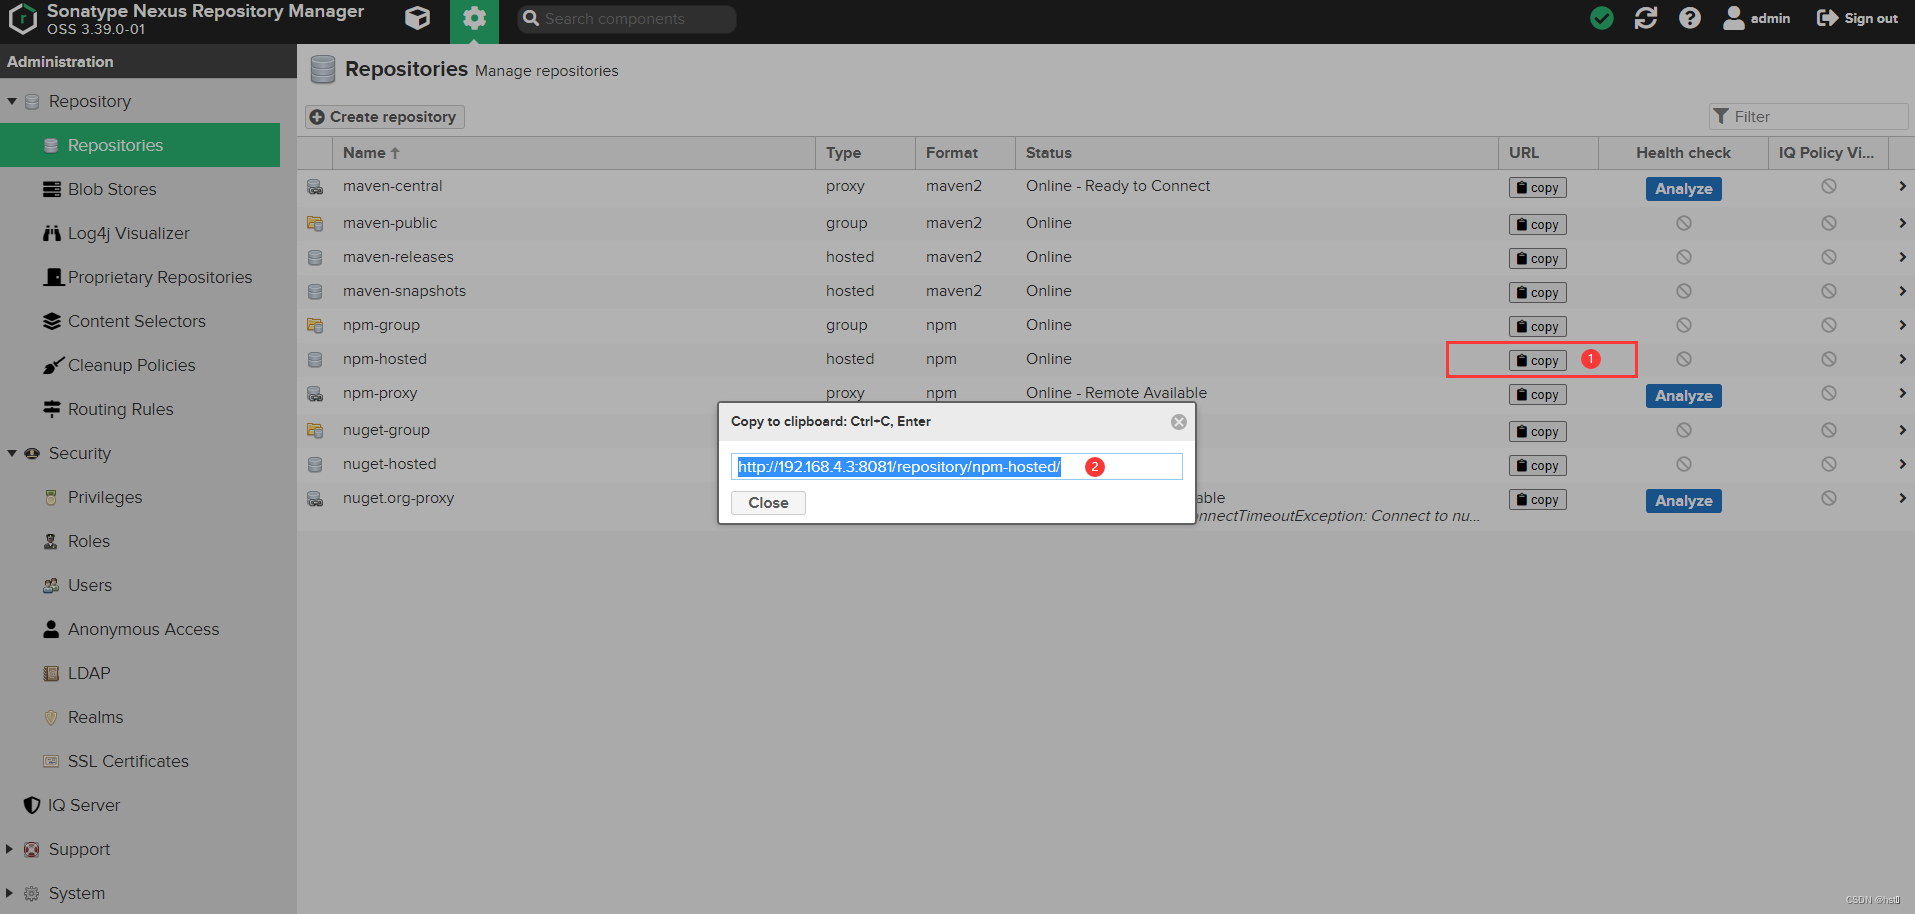
在上图该位置获取仓库地址。
注册hosted仓库。
npm adduser --registry=http://192.168.4.3:8081/repository/npm-hosted/
- 1

该操作会要求输入账号、密码和邮箱,账号、密码为nexus的账号密码,邮箱随意。
3.发布
进入包目录下。
npm publish --registry=http://192.168.4.3:8081/repository/npm-hosted/
- 1
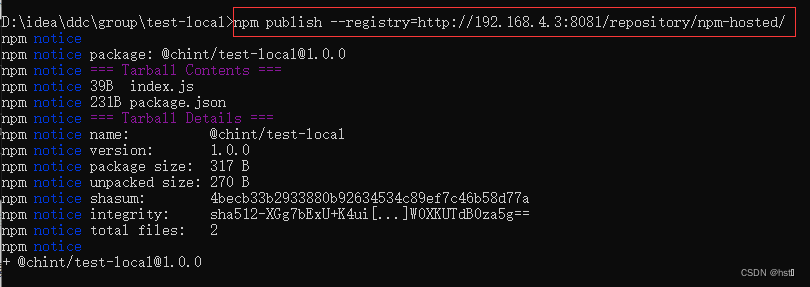
!注意事项:
上传之前不能执行npm config set @chint:registry http://192.168.4.3:8081/repository/npm-group/。
如果有@chint源,则需要使用 npm config delete @chint:registry 删除。
4.查看发布成功的包

5.更新包
| 命令 | 说明 |
|---|---|
| npm version prerelease | 升级预发布号 |
| npm version prepatch | 升级修订号,保留预发布号 |
| npm version preminor | 升级次版本号,保留预发布号 |
| npm version premajor | 升级主版本号,保留预发布号 |
| npm version patch | 升级修订号 |
| npm version minor | 升级次版本号 |
| npm version major | 升级主版本号 |
四、本地项目安装私库中的npm包
!准备工作:
用记事本打开系统当前用户下的 .npmrc 文件,把里面的内容备份。
清理 npm 缓存。
npm cache clean --force
- 1
1.设置npm包的源为私有库
npm config set registry http://192.168.4.3:8081/repository/npm-group/
- 1
2.注册登录hosted仓库
npm adduser --registry=http://192.168.4.3:8081/repository/npm-hosted/
- 1
3.npm配置私有库
npm config set @chint:registry http://192.168.4.3:8081/repository/npm-group/
- 1
4.设置npm包的源为npmjs官方地址
如果不设置其他npm包会找不到
npm config set registry https://registry.npmjs.org/
- 1
5.安装
执行 npm install 安装。


