- 1pytorch安装、环境搭建及在pycharm中的设置_pytorct在
- 2人工智能怎么入门好 Python编程开发如何学_python是如何开发人工智能
- 3DockerCompose的介绍以及使用docker-compose部署微服务_chmod +x /usr/local/bin/docker-compose
- 4【Java八股文总结】之面试题(一)_提供的实量数量(0)少于指定的占位符数(1) log.error
- 5Docker实战一 Docker部署微服务_docker部署微服务项目
- 6【Centos7搭建rustdesk-server】_rustdesk centos部署
- 7【SE】Week7 : Silver Bullet & Cathedral and Bazaar & Big Ball of Mud & Waterfall ...
- 8开发工具:推荐一款非常好用的SSH客户端WindTerm_windterm功能
- 9JVM虚拟机内存区域思维导图-------《深入理解Java虚拟机》2020第三版_深入理解jvm虚拟机第三版 思维导图
- 10MySQL left join、right join和join的区别_mysql left join 和join的区别
HarmonyOS 数据持久化 Preferences 如何在页面中对数据进行读写_hamoryos preferences使用
赞
踩
背景介绍
最近在了解并跟着官方文档尝试做一个鸿蒙app 小demo的过程中对在app中保存数据遇到些问题 特此记录下来
这里的数据持久化以 Preferences为例子展开
废话不多说 这里直接上节目(官方提供的文档示例:) 以Stage模型为例
1.明确preferences的类型
import data_preferences from '@ohos.data.preferences';

let preferences = null;

class EntryAbility extends UIAbility {
    onWindowStageCreate(windowStage) {
        try {
            data_preferences.getPreferences(this.context, 'mystore', function (err, val) {
                if (err) {
                    console.error("Failed to get preferences. code =" + err.code + ", message =" + err.message);
                    return;
                }
                //将val的值赋值给preferences
                preferences = val;
                console.info("Succeeded in getting preferences.");
            })
        } catch (err) {
            console.error("Failed to get preferences. code =" + err.code + ", message =" + err.message);
        }
    }
}

- 1
- 2
- 3
- 4
- 5
- 6
- 7
- 8
- 9
- 10
- 11
- 12
- 13
- 14
- 15
- 16
- 17
- 18
- 19
- 20
- 21
到这里 但是当我们使用preferences来调用 val->Preferences的数据进行 get/put操作时 会发现根本没有提示 并且preferences的类型显示的是any类型 不是val所对应的类型
所以这里我们就要在初始化的时候明确的指明preferences的具体类型 鼠标放在val的变量上 按住ctrl 就会发现 (parameter) val: data_preferences.Preferences 这一行 明确指出了val的具体类型
依葫芦画瓢
所以 我们的preferces变量的声明就可以写为:
export var preferences:data_preferences.Preferences = null;
- 1
这样我们就可以在当前类中进行随意的操作啦
当然这只是第一步 当我们进行sp操作的时候 往往都是在具体的页面中进行CRUD的 那如何在具体的页面中持有Sp呢?
2.在具体的页面中持有Preferences引用
首先第一步尝试在页面中引入EntryAbility中我们声明的变量
坑点:EntryAbility中的preferences一定要加 export不然外部引用不到
import {preferences} from '../entryability/EntryAbility'

TabContent() {
        Stack() {
          Image($r('app.media.guide_page_four_bg')).objectFit(ImageFit.Auto)
          RelativeContainer() {
            Column() {
              Image($r('app.media.guide_page_four_text')).objectFit(ImageFit.Contain).width('80%')
              Image($r('app.media.guide_page_four')).objectFit(ImageFit.Auto).width('100%').margin({ top: 10 })
              Image($r('app.media.guide_page_four_start'))
                .objectFit(ImageFit.Auto)
                .width(100)
                .height(45)
                .margin({ top: 10 })
                .onClick(()=>{
                  try {
                    preferences.put('first_splash', 'yes', (err) => {
                      if (err) {
                        console.error(`Failed to put first_splash data. Code:${err.code}, message:${err.message}`);
                        return;
                      }
                      console.info('Succeeded in putting first_splash data.');
                    })
                  } catch (err) {
                    console.error(`Failed to put data. first_splash Code: ${err.code},message:${err.message}`);
                  }

                  try {
                    preferences.flush((err) => {
                      if (err) {
                        console.error(`Failed to flush first_splash. Code:${err.code}, message:${err.message}`);
                        return;
                      }
                      console.info('Succeeded in flushing. first_splash');
                    })
                  } catch (err) {
                    console.error(`Failed to flush first_splash. Code:${err.code}, message:${err.message}`);
                  }

                  try {
                    preferences.get('first_splash', 'default', (err, val) => {
                      if (err) {
                        console.error(`Failed to get value of 'startup'. Code:${err.code}, message:${err.message}`);
                        return;
                      }
                      console.info(`Succeeded in getting value of 'startup'. val: ${val}.`);
                    })
                  } catch (err) {
                    console.error(`Failed to get value of 'startup'. Code:${err.code}, message:${err.message}`);
                  }

                })
            }
            .width('60%')
            .height('80%')
            .margin({ top: '20%' })
            .justifyContent(FlexAlign.SpaceBetween)
            .alignRules({
              top: { anchor: '__container__', align: VerticalAlign.Top },
              middle: { anchor: '__container__', align: HorizontalAlign.Center },
            })
            .id("centerCoverFour")

            Text("跳过").id("skipFour")
              .alignRules({
                left: { anchor: 'centerCoverFour', align: HorizontalAlign.End },
                bottom: { anchor: 'centerCoverFour', align: VerticalAlign.Bottom }
              }).fontSize(16)
              .fontColor(Color.White)

          }.width('100%')
          .height('100%')
        }
      }
- 1
- 2
- 3
- 4
- 5
- 6
- 7
- 8
- 9
- 10
- 11
- 12
- 13
- 14
- 15
- 16
- 17
- 18
- 19
- 20
- 21
- 22
- 23
- 24
- 25
- 26
- 27
- 28
- 29
- 30
- 31
- 32
- 33
- 34
- 35
- 36
- 37
- 38
- 39
- 40
- 41
- 42
- 43
- 44
- 45
- 46
- 47
- 48
- 49
- 50
- 51
- 52
- 53
- 54
- 55
- 56
- 57
- 58
- 59
- 60
- 61
- 62
- 63
- 64
- 65
- 66
- 67
- 68
- 69
- 70
- 71
- 72
- 73
- 74
sp的具体主要逻辑都在onClick中了
具体的操作Log如下:

ok 到这里就成功啦
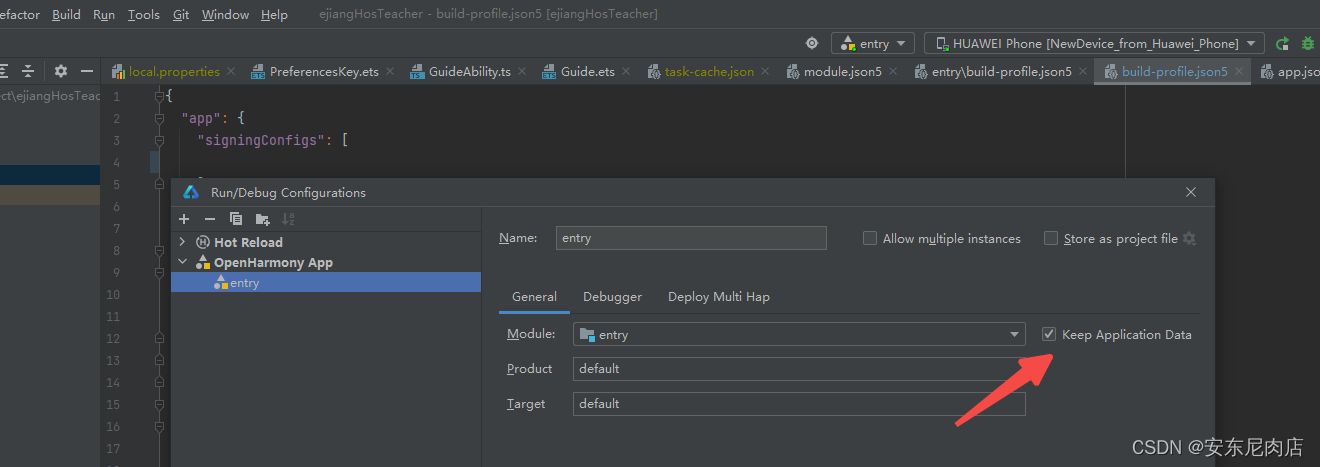
3.应用重新启动后持久化数据丢失
场景:在第一次启动后将数据保存完毕之后 清除后台任务重新进入 读取数据正常 deveco中点击重新运行 内存中保存的相应文件被删除
原因:DevEco每次重新启动应用时都是卸载了之前的应用后重新部署,因此相关信息会被清除。
解决方案:
Build->Edit Configurations->勾选 keep application data