
- 1【一个Python数据清洗文章,密恐勿入,本篇文章没有任何技术指导!】IGS电离层延迟ETC初步清洗结果_jul-923
- 2python计算iv值_大数据技术 python计算IV值及使用
- 3我的世界java版特别卡怎么办_我的世界卡顿延迟怎么办
- 4Linux ---各种yum源配置详解
- 5HomeAssistant系统添加HACS插件商店与远程控制家中智能家居_homeassistant安装hacs
- 6wazuh安装手册
- 7RxJava的使用与深入学习_rxjava 使用
- 8数据分析神经网络模型图,神经网络模型数据处理_数据自相关性神经网络解决方法有哪些
- 9c语言抢答器程序,单片机六路抢答器C语言程序
- 10华为机试 108 题(C 语言解答)_华为机考 c卷
nexus最全使用教程_nexus使用教程
赞
踩
1、简介
英[ˈneksəs] 奈克瑟斯
学习过程中可以参考一下链接
我所总结的只是个大概流程
文件下载可以参考百度网盘
最全-使用Nexus3搭建Maven私服+上传第三方jar包到本地maven仓库
https://blog.csdn.net/chenfei2341/article/details/80431700
Sonatype Nexus Repository Manager OSS仓库管理私服(一)——搭建私服
Sonatype Nexus Repository Manager OSS仓库管理私服(二)——仓库代理
Sonatype Nexus Repository Manager OSS仓库管理私服(三)——hosted仓库
Sonatype Nexus Repository Manager OSS仓库管理私服(四)——group仓库
Sonatype Nexus Repository Manager OSS仓库管理私服(五)——手动上传包
Sonatype Nexus Repository Manager OSS仓库管理私服(六)——Gradle自动上传包
Sonatype Nexus Repository Manager OSS仓库管理私服(七)——匿名访问
admin
root
- 1
- 2
2、下载
首先在Nexus Repository Manager OSS简介页面可以看到一些简介,在这里可以跳转到下载页面.
或者见百度网盘
hi,这是我用百度网盘分享的内容~复制这段内容打开「百度网盘」APP即可获
取链:https://pan.baidu.com/s/1u7qolfKyYZp_kM5EKyuyHw?pwd=pfr2
提取码:pfr2
- 1
- 2
- 3
3、运行
D:\Program\nexus-3.18.1-01-win64\nexus-3.18.1-01\bin>nexus -help
Usage: nexus.exe /install | /uninstall | /stop | /start | /status | /run | /run-redirect
- 1
- 2
/install:安装
/uninstall:卸载
/stop:后台运行(关闭cmd后仍在后台运行)
/start:停止后台运行
/status:查看运行状态
/run:前台运行(可在cmd命令行实时查看log,需用CTRL+C停止运行,直接关闭命令行窗口也可停止运行)
/run-redirect:这个也可以前台运行,具体和/run的区别我也不是很清楚,谁知道的评论里说下
默认访问端口是8081,当然我们也可以自定义端口,打开nexus-3.18.1-01\etc\nexus-default.properties文件,内容如下,修改application-port配置的值即可修改访问的端口
## DO NOT EDIT - CUSTOMIZATIONS BELONG IN $data-dir/etc/nexus.properties
##
# Jetty section
application-port=10086
application-host=0.0.0.0
nexus-args=${jetty.etc}/jetty.xml,${jetty.etc}/jetty-http.xml,${jetty.etc}/jetty-requestlog.xml
nexus-context-path=/

# Nexus section
nexus-edition=nexus-pro-edition
nexus-features=\
nexus-pro-feature

nexus.hazelcast.discovery.isEnabled=true
- 1
- 2
- 3
- 4
- 5
- 6
- 7
- 8
- 9
- 10
- 11
- 12
- 13
- 14
安装
必须用管理员进行命令操作
D:\Program\nexus-3.18.1-01-win64\nexus-3.18.1-01\bin>nexus /install
Installed service 'nexus'.
- 1
- 2
后台运行
D:\Program\nexus-3.18.1-01-win64\nexus-3.18.1-01\bin>nexus /start
Starting service 'nexus'.
- 1
- 2
配置
配置本地nexus仓库配置
<server>
    <id>nexus</id>
    <username>admin</username>
    <password>root</password>
</server>

<mirrors>
    <mirror>
        <id>nexus</id>
        <name>nexus repository</name>
        <url>http://localhost:10086/repository/myself_group/</url>
        <mirrorOf>central</mirrorOf>
    </mirror>
</mirrors>
- 1
- 2
- 3
- 4
- 5
- 6
- 7
- 8
- 9
- 10
- 11
- 12
- 13
- 14
4、预览
通过nexus /start或则nexus /run运行程序后,在浏览器输入http://localhost:10086就可以预览软件的界面及功能了
默认访问端口是8081,当然我们也可以自定义端口,打开nexus-3.18.1-01\etc\nexus-default.properties文件,内容如下,修改application-port配置的值即可修改访问的端口
application-port=10086
- 1
5、上传jar到私有仓库
1、手动上传
mvn deploy:deploy-file -DgroupId=com.zmf -DartifactId=kingUtils -Dversion=2.0.0 -Dpackaging=jar -Dfile=./kingUtils-2.0.0-SNAPSHOT.jar -Durl=http://localhost:10086/repository/myself_hosted/ -DrepositoryId=nexus
- 1
命令解释:
-DgroupId=com.zmf                           自定义
-DartifactId=kingUtils                         自定义
-Dversion=2.0.0                            自定义  三个自定义,构成pom.xml文件中的坐标
-Dpackaging=jar                             上传的类型是jar类型
-Dfile=./kingUtils-2.0.0-SNAPSHOT.jar                jar的本地磁盘位置
-Durl=http://localhost:10086/repository/myself_hosted/         hosted资源库的地址,下图中
-DrepositoryId=nexus                               setting.xml文件中配置的ID
- 1
- 2
- 3
- 4
- 5
- 6
- 7
- 8

2、IDE上传
pom 设置上传的路径
<!--    包依赖管理工具-->
<distributionManagement>
    <repository>
        <id>nexus</id>
        <name>Nexus Release Repository</name>
        <url>http://localhost:10086/repository/myself_hosted/</url>
    </repository>
</distributionManagement>
- 1
- 2
- 3
- 4
- 5
- 6
- 7
- 8

3、使用网页上传
选择 方块 > Upload > maven-releases
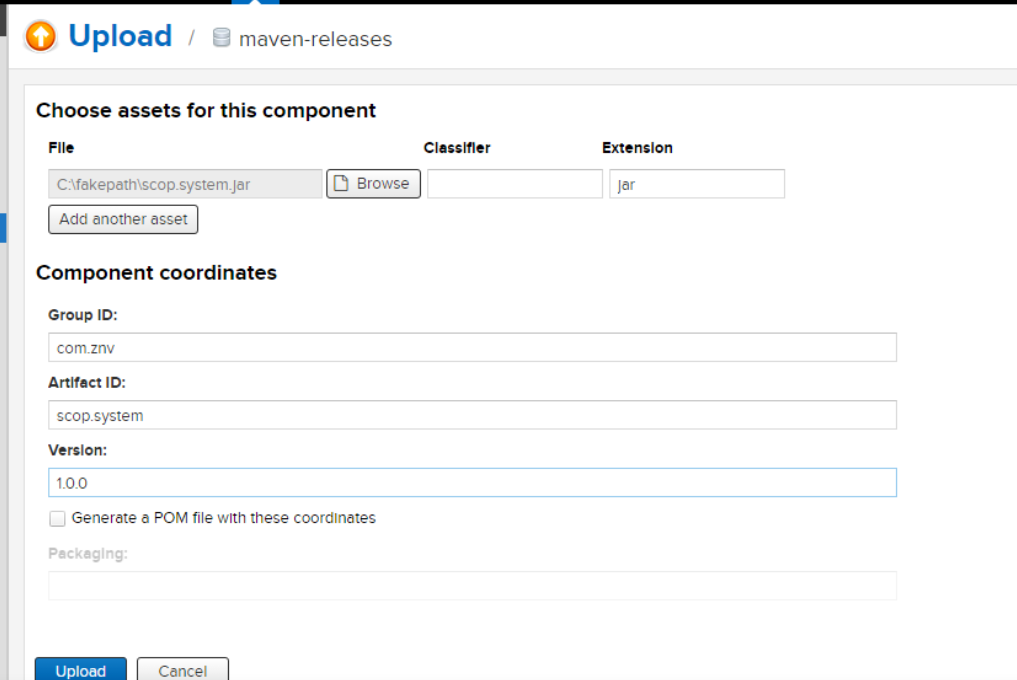
选择文件,输入对应信息,点击上传即可,上传成功即可查看。
附录:
自己用没有必要设置两个仓库
设置一个mix 就可以了也就是
    <repository>
        <id>nexus</id>
        <name>Nexus Release Repository</name>
        <url>http://localhost:8083/repository/maven-releases/</url>
    </repository>
- 1
- 2
- 3
- 4
- 5
<distributionManagement>
    <repository>
        <id>nexus</id>
        <name>Nexus Release Repository</name>
        <url>http://localhost:8083/repository/maven-releases/</url>
    </repository>
    <snapshotRepository>
        <id>nexus</id>
        <name>Nexus Snapshot Repository</name>
        <url>http://localhost:8083/repository/maven-snapshots/</url>
    </snapshotRepository>
</distributionManagement>
- 1
- 2
- 3
- 4
- 5
- 6
- 7
- 8
- 9
- 10
- 11
- 12
6、下载私有库jar
1、找到对应的文件

添加依赖

7、编辑第三方jar
把第三方的jar 保存到本地
aliyun-sdk-oss-3.1.0.jar
mvn install:install-file -Dfile=./aliyun-sdk-oss-3.1.0.jar -DgroupId=com.zmf -DartifactId=aliyun-oss -Dversion=1.0.0-SNAPSHOT -Dpackaging=jar
- 1

