
- 1appium测试ios应用遇到的问题_appium测试ios如何过去sessionid
- 2easyexcel与vue配合下载excel
- 3HTML圣诞节代码,圣诞节贺卡源代码,实现圣诞节雪花飘落效果_圣诞节雪花html
- 4中文核心论文实战:基于通道注意力cbam+lstm的工业用电功率预测时间序列_基于cbam通道注意力的工业用电量预测
- 5鸿蒙(HarmonyOS)项目方舟框架(ArkUI)之Swiper容器组件
- 6《安富莱嵌入式周报》第301期:ThreadX老大离开微软推出PX5 RTOS第5代系统,支持回流焊的自焊接PCB板设计,单色屏实现多级灰度播放视频效果_william e. lamie
- 7打造纯Lua组件化开发模式:Unity xLua框架详解_unity lua框架
- 8安全可信 | 天翼云算力调度平台通过信通院首批可信算力云服务评估!_算力调度中的转发安全
- 9GAN人脸修复--Generative Face Completion_使用celeba数据集进行基于gan的人脸图像修复
- 10Unity VisionOS开发流程
Python视频制作工具Manim入门,文本使用详细介绍
赞
踩
来源:Python数据之道 (ID:PyDataLab)
作者:阳哥
01写在前面
大家好,我是阳哥。
最近一段时间,我在微信视频号「价值前瞻」和「Python数据之道」发布了一些视频,有不少同学问到这些视频是怎么做的,用什么工具制作的。
在文章 用 python 制作高逼格的数学动画 中,我跟大家介绍了 Manim 这个视频制作工具,以及以及案例演示。
不少同学觉得这个工具不错,问到有没有完整的使用教程或者相关书籍。据我所知,目前应该是没有专门的书籍来介绍这个工具的。至于教程,不同版本的Manim有一部分文档,其中 Manim社区版的文档相对而言要完善些。
我将基于 Manim社区版(Manim Community)给大家分享Manim入门的内容,当前已有的教程包括:
说明:Manim 社区版,经常缩写为 manimce,英文全称是 Manim Community Edition
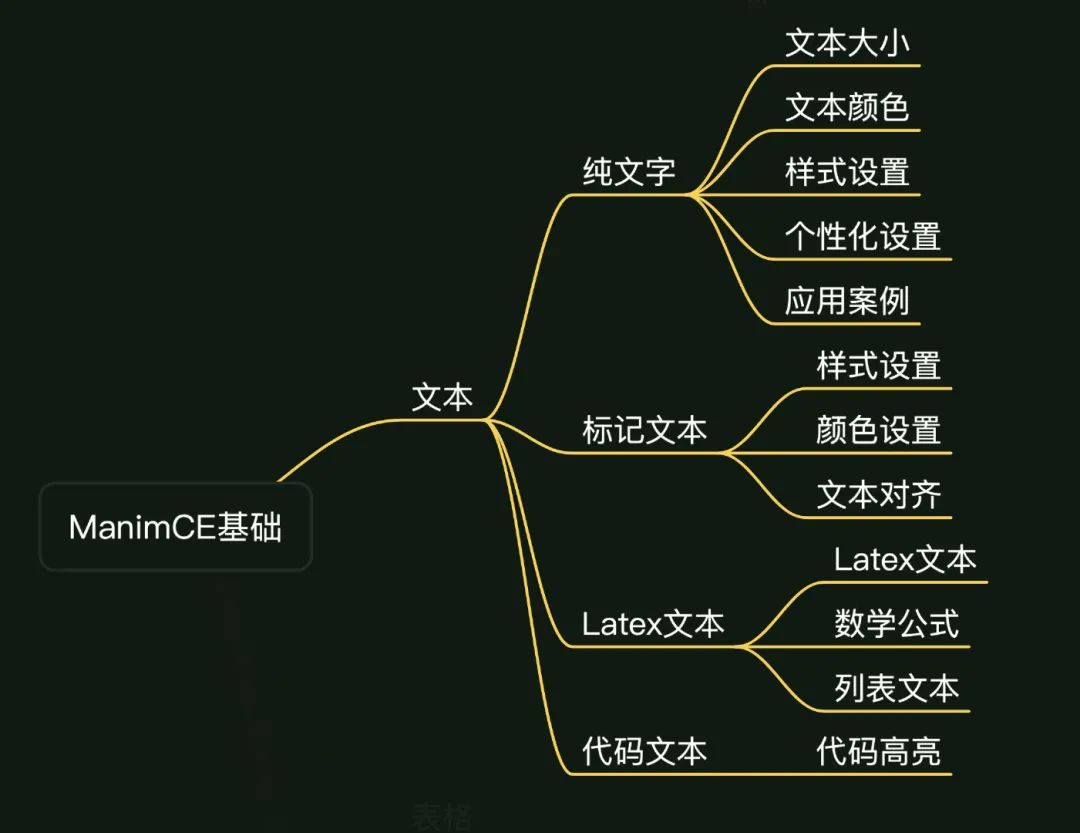
本次介绍 Manim 中 文本 的使用,使用的版本为 Manim Community v0.14.0,本文内容主要如下:
02Manim的安装与运行
安装
如何安装社区版Manim,参见下面的官方链接:
https://docs.manim.community/en/stable/installation.html
如何运行 Manim
用 Manim 绘制图形,首先需要引入 Manim 库,然后将需要绘制的内容封装到一个 类(class) 里面。
社区版的导入代码如下:
from manim import *对于 编辑好的程序文件( XXXX.py 文件),需要在同一个文件夹下运行命令来运行程序,命令格式如下:
manim -pql XXXX.py DemoSquare上面的命令行中:
manim是社区版Manim运行程序的主要标志用语;p表示程序运行后会进行预览(图片或视频);ql表示低质量(quality low), 其他的选项有-ql,-qm,-qh,-qk, 分别表示 低质量、正常质量、高质量、4K质量;XXXX.py是py代码文件;DemoSquare 是 py代码文件中的一个类;
演示过程录屏如下:

命令行中,还有其他许多参数可以设置,可以通过社区版的支持文档来进一步了解:
https://docs.manim.community/en/stable/tutorials/configuration.html#command-line-arguments
03文本使用介绍
在 Manim社区版中,文本的使用可以分为几个大类,分别是:
纯文本
标记文本
LaTex 文本
代码文本
3.1 纯文本
纯文本是最常见的一类文字,在视频中使用的标题、正文等,都可以使用纯文本,在Manim 中,纯文本可以通过 Text() 对象来实现。
比如要输出 文字 “Python数据之道”,核心代码如下:
Text("Python数据之道")效果如下:

设置文本大小
对于文本而言,设置文本在屏幕中显示的大小,是经常要做的一个事情,Text() 对象可以通过多种方法来实现:
设置
scale属性值;设置
set_width属性值;设置
font_size参数值;
- # 设置文本大小
- class Demo2(Scene):
- def construct(self):
- WaterMark.construct(self)
- s = "Python数据之道"
- t1 = Text(s)
- t1.to_edge(UP,buff=0.5)
- t2 = Text(s).scale(2)
- t2.next_to(t1,DOWN)
- t3 = Text(s).set_width(10)
- t3.next_to(t2,DOWN)
- t4 = Text(s,font_size=40)
- t4.next_to(t3,DOWN)
- self.add(t1)
- self.play(Write(t2))
- self.play(Create(t3))
- self.play(Write(t4))
- self.wait()

上述代码的实现效果如下:

设置文本颜色
文本颜色设置包括指定某种颜色以及渐变颜色设置,通常情况下,颜色通过 color 参数来设置,渐变颜色通过 gradient 参数来设置。
演示案例的代码如下:
- # 设置文本颜色
- class Demo3(Scene):
- def construct(self):
- WaterMark.construct(self)
- s = "Python数据之道"
- t1 = Text(s,color=BLUE)
- t1.to_edge(UP,buff=2)
- t2 = Text("一份价值,一份收获",gradient=[BLUE,YELLOW,RED]).next_to(t1,DOWN)
- t3 = Text("Hello World",gradient=[BLUE,YELLOW,RED]).next_to(t2,DOWN)
- t4 = Text("@Python数据之道",gradient=[BLUE,YELLOW,RED],font_size=30,fill_opacity=0.8)
- t4.next_to(t3,DOWN)
- t5 = Text("Python数据之道",gradient=[BLUE,YELLOW,RED]).next_to(t4,DOWN)
- # 当英文和汉字混合时, 当前的manim社区版,使用 gradient 时会出现 bug
- self.add(t1)
- self.play(Write(t2))
- self.play(Create(t3))
- self.play(Write(t4))
- self.play(Write(t5))
- self.wait()
上述代码的实现效果如下:

需要注意的是,当英文和汉字混合时, 当前的manim社区版,使用 gradient 时可能会出现 bug,没有渐变的效果,上述案例中的 变量 t5 实例 就没有实现渐变效果。
设置文本样式
文本样式的设置,包括文本加粗、斜体文本、文本字体设置、文本透明度设置、文本换行以及行距设置等。
演示案例的代码如下:
- # 设置字体样式
- class Demo4(Scene):
- def construct(self):
- WaterMark.construct(self)
- t1 = Text("Python数据之道",font="Alibaba PuHuiTi")
- t1.to_edge(UP,buff=0.5)
- t2 = Text("Python数据之道",color=BLUE,font="Times")
- t2.next_to(t1,DOWN)
- t3 = Text("Python数据之道", weight=BOLD)
- t3.next_to(t2,DOWN)
- t4 = Text("Python数据之道", slant=ITALIC)
- t4.next_to(t3,DOWN)
- t5 = Text("Python数据之道", fill_opacity=0.5)
- t5.next_to(t4,DOWN)
- t6 = Text("Hello\nPython", line_spacing=0.5)
- t6.next_to(t5,DOWN,buff=1).shift(LEFT)
- t7 = Text("Hello\nPython", line_spacing=2)
- t7.next_to(t6,RIGHT,buff=1)
- self.add(t1)
- self.play(Write(t2))
- self.play(Write(t3))
- self.play(Write(t4))
- self.play(Write(t5))
- self.add(t6,t7)
- self.wait()
上述代码的实现效果如下:

需要主要的是,在选择字体设置时,所选择的字体需要在自己的电脑中已经安装了对应的字体,才会有效果。
此外,在对于非英文字体的设置时,可能有些样式设置会不起作用,具体的需要自己去根据实际情况测试下。
对于咱们而言,一般就是英文和中文的使用,常用的字体加粗、斜体文字、透明度等,是有效的。对于字体,我一般是使用 "Alibaba PuHuiTi" 字体,这个字体可以免费使用。
个性化设置部分文本
在控制显示过程中,经常会遇到只需要显示一段文本中一部分文本的情况,可以通过以下几个参数来进行设置:
t2c,全称为 "text2color",用来设置部分文字的颜色;t2f,全称为 “text2font”,用来设置部分文字的字体;t2w,全称为 “text2weight”,用来设置部分文字加粗;t2s,全称为 “text2slant”,用来设置部分文字为斜体;t2g,全称为 “text2gradient”,用来设置部分文字的渐变颜色;
演示案例的代码如下:
- # 个性化设置部分文本的样式
- class Demo5(Scene):
- def construct(self):
- WaterMark.construct(self)
- t1 = Text("Python数据之道",t2c={"Python":RED,'[7:9]':YELLOW})
- t1.to_edge(UP,buff=0.5)
- t2 = Text("Python数据之道",t2s={"Python":ITALIC})
- t2.next_to(t1,DOWN)
- t3 = Text("Python数据之道", t2w={"Python":BOLD})
- t3.next_to(t2,DOWN)
- t4 = Text("Python数据之道", t2f={"Python":"Times"})
- t4.next_to(t3,DOWN)
- t5 = Text(
- "Hello,PyDataLab",
- t2g={
- 'PyData':[BLUE,YELLOW,RED],
- # 'offset':"1",
- },
- )
- t5.next_to(t4,DOWN)
- t6 = Text(
- "Hello,Python数据之道",
- t2g={
- 'Python':[BLUE,YELLOW,RED],
- },
- )
- t6.next_to(t5,DOWN)
- t7 = Text(
- "一份价值,一份收获",
- t2g={
- '一份价值':[BLUE,YELLOW,RED],
- },
- )
- t7.next_to(t6,DOWN)
- # "t2c"、"t2s"、"t2w"、"t2g"、"t2f" 参数设置,可以直接是 字符串,或者是 字符串的位置切片
- self.add(t1)
- self.play(Write(t2))
- self.play(Write(t3))
- self.play(Write(t4))
- self.play(Write(t5))
- self.play(Write(t6))
- self.play(Write(t7))
- self.wait()
上述代码的实现效果如下:

通过上面的代码可以看出,"t2c"、"t2s"、"t2w"、"t2g"、"t2f" 参数设置,可以直接是 字符串,或者是 字符串的位置切片。
需要注意的是,当英文和汉字混合或者全部是中文时, 当前的manim社区版,使用 t2g 对部分文字进行渐变设置 时可能会出现 bug,会出现部分文字渐变效果不完整,或者全部文字都有渐变效果。
纯文本应用案例
下面咱们来看一个用纯文本实现 “Google” 彩色 logo 的案例,如下:
- class Demo6(Scene):
- def construct(self):
- WaterMark.construct(self)
- text1 = Text(
- 'Google',
- t2c={'[:1]': '#3174f0', '[1:2]': '#e53125',
- '[2:3]': '#fbb003', '[3:4]': '#3174f0',
- '[4:5]': '#269a43', '[5:]': '#e53125'}, font_size=58).scale(3)
- self.play(Write(text1),run_time=3)
- self.wait()
- self.play(FadeOut(text1))
- t2 = Text('Google',font_size=120)
- colors = [BLUE, ORANGE, PURPLE, PINK, TEAL,DARK_BROWN, RED,LIGHT_BROWN,GOLD,BLUE_L_C,ORANGE_L_A,PURPLE_E]*10
- # for i in range(len(t2)):
- # t2[i].set_color(colors[i])
- for letter in t2:
- letter.set_color(np.random.choice(colors,size=1))
- self.play(Write(t2),run_time=3)
- self.wait()
上述代码的实现效果如下:

3.2 标记文本
Manim社区版使用 Pango 来渲染非 LaTex 文本。
Pango标记语言是一种类似 html 的标记语言,可以使用一系列的标记符号。
PangoMarkup is a small markup language like html and it helps you avoid using “range of characters” while coloring or styling a piece a Text. You can use this language with MarkupText.
标记文本的基础应用
一个简单的应用案例如下:
- class Markup01(Scene):
- def construct(self):
- WaterMark.construct(self)
- t1 = MarkupText('<span foreground="yellow" size="x-large">Hello, </span> <i>Welcome to </i>ValueLab !"')
- t1.to_edge(UP,buff=2)
- self.add(t1)
- self.wait()
-
- t2 = MarkupText('<span foreground="yellow" size="x-large">一份价值,</span> 一份 <i>收获</i>!"')
- t2.next_to(t1,DOWN,buff=1)
- self.add(t2)
- self.wait()
上述代码的实现效果如下:

可以看到,对于 Markup 标记语言,在应用于英文文字的时候,应用效果是挺好的,但对于中文字体,上面的文字中,斜体效果就没有体现出来。不知道是 Pango本身渲染的问题还是 Manim社区版存在一些瑕疵。
当前,Manim中进行文字渲染,支持以下标签:

标记文本的样式设置
标记文本的样式设置包括文字加粗、下划线、斜体、上标、下表、删除线等,演示案例的代码如下:
- # 样式设置,加粗、下划线、斜体等
- class Markup02(Scene):
- def construct(self):
- WaterMark.construct(self)
- text1 = MarkupText("<b>Hello</b> <i>welcome to</i> <b><i>ValueLab</i></b>")
- text2 = MarkupText("<s>foo</s> <u>bar</u> <big>big</big> <small>small</small>")
- text3 = MarkupText("H<sub>2</sub>O and H<sub>3</sub>O<sup>+</sup>")
- text4 = MarkupText("type <tt>help</tt> for help")
- text5 = MarkupText(
- '<span underline="double">foo</span> <span underline="error">bar</span>'
- )
- group = VGroup(text1, text2, text3, text4, text5).arrange(DOWN)
- self.add(group)
上述代码的实现效果如下:

标记文本的颜色设置
标记文本的颜色设置,主要是渐变色的设置比较复杂,仔细看下面案例中渐变色设置时的各个参数:
- # 颜色设置,设置不同的颜色、渐变色等
- class Markup03(Scene):
- def construct(self):
- text1 = MarkupText(
- f'all in red <span fgcolor="{YELLOW}">except this</span>', color=RED
- )
- text2 = MarkupText("nice gradient", gradient=(BLUE, GREEN))
- text3 = MarkupText(
- 'nice <gradient from="RED" to="YELLOW">intermediate</gradient> gradient',
- gradient=(BLUE, GREEN),
- )
- text4 = MarkupText(
- 'fl ligature <gradient from="RED" to="YELLOW">causing trouble</gradient> here'
- )
- text5 = MarkupText(
- 'fl ligature <gradient from="RED" to="YELLOW" offset="1">defeated</gradient> with offset'
- )
- text6 = MarkupText(
- 'fl ligature <gradient from="RED" to="YELLOW" offset="1">floating</gradient> inside'
- )
- text7 = MarkupText(
- 'fl ligature <gradient from="RED" to="YELLOW" offset="1,1">floating</gradient> inside'
- )
- group = VGroup(text1, text2, text3, text4, text5, text6, text7).arrange(DOWN)
- self.add(group)
上述代码的实现效果如下:

文字对齐
在书写英文文字时,为了排版效果好看,经常需要将文字进行对齐显示,这个在 Manim中,也可以实现。
演示案例的代码如下:
- # 文字对齐
- class Markup05(Scene):
- def construct(self):
- WaterMark.construct(self)
- ipsum_text = (
- "Lorem ipsum dolor sit amet, consectetur adipiscing elit."
- "Praesent feugiat metus sit amet iaculis pulvinar. Nulla posuere "
- "quam a ex aliquam, eleifend consectetur tellus viverra. Aliquam "
- "fermentum interdum justo, nec rutrum elit pretium ac. Nam quis "
- "leo pulvinar, dignissim est at, venenatis nisi. Quisque mattis "
- "dolor ut euismod hendrerit. Nullam eu ante sollicitudin, commodo "
- "risus a, vehicula odio. Nam urna tortor, aliquam a nibh eu, commodo "
- "imperdiet arcu. Donec tincidunt commodo enim a tincidunt."
- )
- justified_text = MarkupText(ipsum_text, justify=True).scale(0.4)
- not_justified_text = MarkupText(ipsum_text, justify=False).scale(0.4)
- just_title = Title("Justified")
- njust_title = Title("Not Justified")
- self.add(njust_title, not_justified_text)
- self.play(
- Transform(
- not_justified_text,
- justified_text,
- ),
- Transform(
- njust_title,
- just_title,
- ),
- run_time=2,
- )
- self.wait(1)
上述代码的实现效果如下:

3.3 LaTex 文本
LaTeX(LATEX,音译“拉泰赫”)是一种基于ΤΕΧ的排版系统,由美国计算机学家莱斯利·兰伯特(Leslie Lamport)在20世纪80年代初期开发,利用这种格式,即使使用者没有排版和程序设计的知识也可以充分发挥由TeX所提供的强大功能,能在几天、甚至几小时内生成很多具有书籍质量的印刷品。
对于生成复杂表格和数学公式,这一点表现得尤为突出。因此它非常适用于生成高印刷质量的科技和数学类文档。这个系统同样适用于生成从简单的信件到完整书籍的所有其他种类的文档。
在 Manim 中使用 latex 文本,需要你的电脑环境中已经安装了 latex的相关软件和支持工具。
在 Manim 中,可以通过以下几种方法来使用 latex 文本,如下:
Tex
MathTex
Title
BulletedList
文本型的 LaTex 可以通过 Tex、Title、BulletedList 来实现,数学公式类型的文本,可以通过 Tex 或 MathTex 来实现。
基础应用
先来看一个 latex 的基础应用案例,如下:
- class DemoTex01(Scene):
- def construct(self):
- WaterMark.construct(self)
- tex1 = Tex(r"\LaTeX", font_size=144)
- tex1.to_edge(UP,buff=1)
- self.add(tex1)
- self.wait()
-
- tex2 = Tex(r'$x^2 + y^2 = z^2$', font_size=144)
- tex2.next_to(tex1,DOWN,buff=0.5)
- tex3 = MathTex(r'x^2 + y^2 = z^2', font_size=144,color=BLUE)
- tex3.next_to(tex2,DOWN,buff=0.5)
- self.add(tex2)
- self.wait()
- self.add(tex3)
- self.wait()
上述代码的实现效果如下:

在 Tex 或 MathTex 中使用字符串时,一般会使用 r"..." 的形式,而不是 '...' 的形式,这是因为在 latex文本中,经常会涉及到一些特殊的字符,比如 \ 。
在进行数学公式的表达时,使用 Tex 时需要在字符串前后添加符号 $,形式为 r"$...$",使用 MathTex 时,形式为 r"..." 就可以了。两者之间的区别,需要注意下。
使用 latex 工具包
在 latex 中输出特殊符号时,可以通过 latex 工具包来实现。
当然,需要你的电脑中已经安装了对应的 latex 工具包。对于没有使用过 latex 的同学来说,这个确实会有些繁琐。
演示案例的代码如下:
- # 使用 latex 工具包
- class DemoTex02(Scene):
- def construct(self):
- WaterMark.construct(self)
- myTemplate = TexTemplate()
- myTemplate.add_to_preamble(r"\usepackage{mathrsfs}")
- tex = Tex(r'$\mathscr{H} \rightarrow \mathbb{H}$}', tex_template=myTemplate, font_size=144)
- self.add(tex)
上述代码的实现效果如下:

数学公式的颜色设置
在 Manim 中,对于数学公式中字符的颜色设置,可以通过参数 set_color_by_tex 和 substrings_to_isolate 的组合来实现不同的效果。
演示案例的代码如下:
- # 数学公式的颜色设置
- class DemoTex03(Scene):
- def construct(self):
- WaterMark.construct(self)
- eq1 = MathTex(
- r"e^x = x^0 + x^1 + \frac{1}{2} x^2 + \frac{1}{6} x^3 + \cdots + \frac{1}{n!} x^n + \cdots"
- )
- eq1.scale(1.2)
- eq1.set_color_by_tex("x", YELLOW)
- eq1.to_edge(UP,buff=2)
- self.add(eq1)
- self.wait()
- # self.play(FadeOut(eq1))
-
- eq2 = MathTex(
- r"e^x = x^0 + x^1 + \frac{1}{2} x^2 + \frac{1}{6} x^3 + \cdots + \frac{1}{n!} x^n + \cdots",
- substrings_to_isolate="x",
- )
- eq2.scale(1.2)
- eq2.set_color_by_tex("x", RED)
- eq2.next_to(eq1,DOWN,buff=1)
- self.add(eq2)
- self.wait()
上述代码的实现效果如下:

在 eq1 中,仅设置参数 set_color_by_tex 时,是对于包含 “x” 的整个公式进行颜色设置;而在 eq2 中,同时设置参数 set_color_by_tex 和 substrings_to_isolate 时,仅仅对公式中的 “x” 字符进行颜色设置;这两种是不一样的应用场景,大家选择合适的去使用。
我在微信视频号「价值前瞻」中发布的视频 “复利效应” 中就使用到类似的案例。
该视频中涉及数学公式的部分代码如下:
- class DemoTex04(Scene):
- def construct(self):
- WaterMark.construct(self)
- equations = VGroup(
- MathTex(
- r"1.01^{365} = 37.8",
- # size=80,
- ),
- MathTex(
- r"1.00^{365} = 1.00",
- # size=80,
- ),
- MathTex(
- r"0.99^{365} = 0.03",
- # size=80,
- ),
- )
-
- # 设置宽度
- # equations.set_width(FRAME_WIDTH-4)
- equations.set_width(8)
-
- for equation in equations:
- equation.set_color_by_tex_to_color_map({
- "1.01": BLUE,
- "0.99": RED,
- })
-
- equations.arrange(DOWN, buff=0.7, aligned_edge=LEFT)
- self.play(Write(equations[0]))
- self.wait()
-
- self.play(Write(equations[2]))
- self.wait()
-
- self.play(Write(equations[1]))
- self.wait()
-
- self.play(equations[1].animate.set_opacity(0.2))
- self.wait()
上述代码的实现效果如下:

tex 模板应用
在 LaTex 中,可以通过设置使用的模板,来设置使用的字体。此外,在使用中文字符时,经常需要设置中文的模板(一般使用 ctex)。
演示案例的代码如下:
- # tex 模板应用
- class DemoTex05(Scene):
- def construct(self):
- WaterMark.construct(self)
- tex1 = Tex(r'$x^2 + y^2 = z^2$', tex_template=TexFontTemplates.french_cursive, font_size=144)
- tex1.to_edge(UP,buff=1)
- self.add(tex1)
- self.wait()
-
- tex2 = Tex(r'Hello 你好 \LaTeX', tex_template=TexTemplateLibrary.ctex, font_size=144)
- tex2.next_to(tex1,DOWN,buff=0.5)
- self.add(tex2)
- self.wait()
上述代码的实现效果如下:

对于 TexFontTemplates,可以使用的模板说明如下:
A collection of TeX templates for the fonts described at http://jf.burnol.free.fr/showcase.html
公式换行
在数学公式中,可以实现换行效果,如下:
- # 公式换行
- class DemoTex06(Scene):
- def construct(self):
- WaterMark.construct(self)
- tex1 = MathTex(
- r'f(x) &= 3 + 2 + 1\\ &= 5 + 1 \\ &= 6',
- font_size=96,
- )
- self.add(tex1)
- self.wait()
- self.play(FadeOut(tex1))
-
- tex2 = MathTex(
- r'f(x) &= 3 + 2 + 1\\ &= 5 + 1 \\ &= 6',
- font_size=96,
- substrings_to_isolate=['5','3'],
- )
- tex2.set_color_by_tex_to_color_map({
- "5": BLUE,
- "3": RED,
- })
- self.add(tex2)
- self.wait()
上述代码的实现效果如下:

Title 对象应用
在视频中设置文字标题时,可以直接使用 Title 对象,需要说明的是,Title 对象是基于 Tex 来实现的,在涉及中文输出时,需要设置使用的模板为中文适用的模板。
演示案例的代码如下:
- # Title 对象应用
- class DemoTex07(Scene):
- def construct(self):
- WaterMark.construct(self)
- title1 = Title("Hello,title")
- self.add(title1)
- self.wait()
- self.play(FadeOut(title1))
-
- # 使用 “Title” 对象,当有中文时,需要设置中文字体模板(电脑中需要安装了 ctex)
- title2 = Title("你好,title",tex_template=TexTemplateLibrary.ctex)
- self.add(title2)
- self.wait()
上述代码的实现效果如下:

列表类型的文本
在文本的使用过程中,会时不时涉及到 列表型文本,目前,在 Manim 中,可以直接实现无序号型的列表文本,通过 BulletedList 对象来实现。
演示案例的代码如下:
- # 列表类型的文本
- class DemoTex08(Scene):
- def construct(self):
- blist = BulletedList("Python", "Java", "C++", height=2, width=2)
- blist.set_color_by_tex("Python", RED)
- blist.set_color_by_tex("Java", GREEN)
- blist.set_color_by_tex("C++", BLUE)
- self.add(blist)
上述代码的实现效果如下:

3.4 代码文本
在 IT编程领域,代码的高亮显示是一个常见的需求,在 Manim 制作的视频中,也可以实现代码高亮的效果,主要是通过 Code() 对象来实现。
下面以快速排序的Python代码为例,来演示如何在视频中进行代码高亮显示。
- class Code1(Scene):
- def construct(self):
- WaterMark.construct(self)
- code_str_1 = """
- def quickSort(Array):
- n = len(Array)
- if n <= 1:
- return Array
- baseline = Array[0]
- left = [Array[i] for i in range(1, len(Array)) if Array[i] < baseline]
- right = [Array[i] for i in range(1, len(Array)) if Array[i] >= baseline]
- return quickSort(left) + [baseline] + quickSort(right)
- """
- code1 = Code(
- code=code_str_1,
- tab_width=4,
- background="window",
- language="Python",
- font="Monospace",
- insert_line_no=False, # 是否显示代码行数
- style='monokai',
- )
-
- code1.scale(0.8).to_edge(UP,buff=1)
-
- self.play(Write(code1))
- self.wait()
代码高亮效果如下:

上述代码中,变量 code_str_1 是快速排序算法的Python实现代码, 变量 code1 是 Code() 对象的实例, Code() 有许多参数可以进行设置,这里只对部分参数进行设置:
background参数,可以选择 “rectangle” 或 “window”,默认是 “rectangle”,我自己一般喜欢用 “window”;language参数是所用的编程语言,支持常用的编程语言;font参数,代码字体,默认为 "Monospac821 BT",我一般用 “Monospace”;insert_line_no参数,是否显示代码行数,默认是True;需要注意的是,在显示代码行数时,有时行数与代码的对齐效果不一定完美;style参数,代码显示风格,有多种风格可以选择,其可选代码样式来源于 “pygments” (https://pygments.org/docs/styles/)。可在Python中运行代码来获取支持的样式。- from pygments.styles import get_all_styles
- styles = list(get_all_styles())
- style支持的样式如下:
['default', 'emacs', 'friendly', 'colorful', 'autumn', 'murphy', 'manni', 'monokai', 'perldoc', 'pastie', 'borland', 'trac', 'native', 'fruity', 'bw', 'vim', 'vs', 'tango', 'rrt', 'xcode', 'igor', 'paraiso-light', 'paraiso-dark', 'lovelace', 'algol', 'algol_nu', 'arduino', 'rainbow_dash', 'abap', 'solarized-dark', 'solarized-light', 'sas', 'stata', 'stata-light', 'stata-dark', 'inkpot'] 默认的样式为 'vim',我一般喜欢用 'monokai' 样式。
再选择一款浅色的样式('solarized-light'),并设置不同的参数值,来对比下效果,如下:
- class Code1(Scene):
- def construct(self):
- WaterMark.construct(self)
- code_str_1 = """
- def quickSort(Array):
- n = len(Array)
- if n <= 1:
- return Array
- baseline = Array[0]
- left = [Array[i] for i in range(1, len(Array)) if Array[i] < baseline]
- right = [Array[i] for i in range(1, len(Array)) if Array[i] >= baseline]
- return quickSort(left) + [baseline] + quickSort(right)
- """
- code1 = Code(
- code=code_str_1,
- tab_width=4,
- background="window",
- language="Python",
- font="Monospace",
- insert_line_no=False, # 是否显示代码行数
- style='monokai',
- )
-
- code1.scale(0.8).to_edge(UP,buff=1)
-
- self.play(Write(code1))
- self.wait()
-
- code2 = Code(
- code=code_str_1,
- tab_width=4,
- background="rectangle", # rectangle , window
- language="Python",
- font="Monospace",
- insert_line_no=True, # 是否显示代码行数
- style='solarized-light',
- # line_spacing=0.3,
- )
-
- code2.scale(0.8)
- code2.next_to(code1,DOWN,buff=0.5)
-
- self.play(Write(code2))
- self.wait()
代码高亮效果如下:

Code() 对象还有更多的参数可以进行设置,详细的参数设置说明,大家可以通过官方文档来了解。

官方文档地址:
https://docs.manim.community/en/stable/reference/manim.mobject.svg.code_mobject.Code.html#manim.mobject.svg.code_mobject.Code
04小结
文本的使用,是咱们最常见的领域,在使用文本时,从频率来看,纯文本 是用的最多的,标记文本是对纯文本的进一步拓展,而 latex 文本,则是 针对数学公式等特殊且频率较高的场景来使用的,至于 代码高亮,则是在IT编程特定领域进行应用。
对于涉及中文的使用,经常需要通过 latex 来实现一些效果,因此,对想进一步深入了解中文排版的同学来,可能需要有一些 latex 的基础知识。
熟练的使用文本,可以给视频的排版和外观带来不少好处,不要小看这些哦。
本文中所使用的源代码,大家可以在公众号「Python数据之道」回复 manim 来获取。
相关阅读:
大家读完顺手点下右下角的 “在看” ,就是最大的鼓励和支持了。

