- 1【机器学习-周志华】学习笔记-第十章_周志华第十章答案
- 2STM32开发之模拟I2C与MPU6050通信_模拟i2c delay.h
- 3ElasticSearch~ES索引操作~对索引的增删改查_es 修改索引配置
- 4基于eNSP的千人中型校园/企业网络设计与规划(可以自己按步骤实现)_ensp智能小区的网络规划与设计
- 5操作系统课程设计之处理机调度_编写并实现对n个进程使用动态优先权算法的进程调度c语言
- 6vue循环发起请求,等一个请求结束后,进行下一次请求
- 7VMware Horizon view 7 云桌面终端安全解决方案_view云桌面 内存计算容量
- 8通过docker在容器中通过Gunicorn运行flask
- 9mac 远程ftp服务器文件共享,mac远程连接ftp服务器配置
- 10Git之HEAD和origin_git head origin
第十六篇:springboot案例
赞
踩
一、准备工作
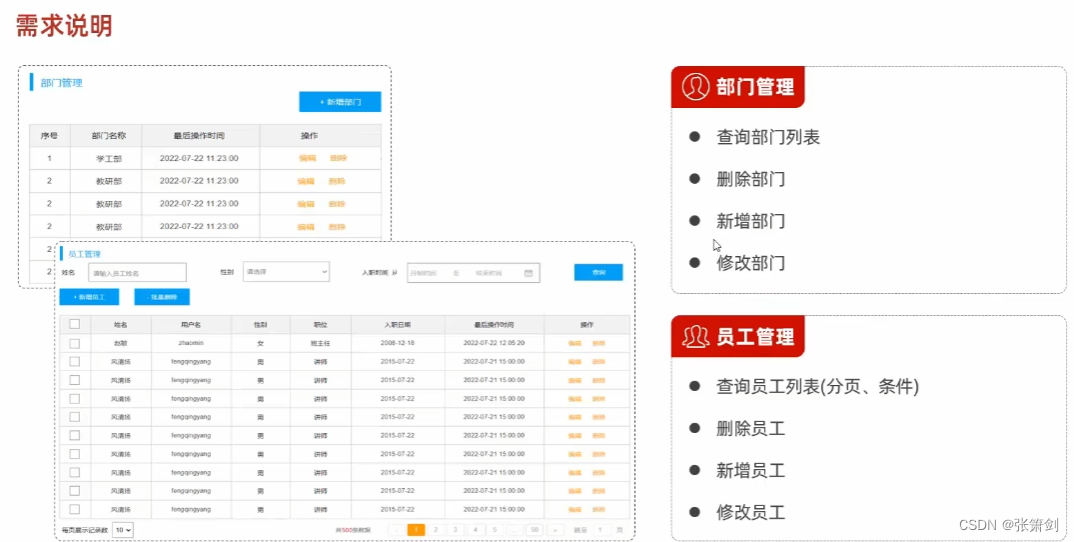
1.1 需求说明
部门管理:
- 查询部门列表
- 删除部门
- 新增部门
- 修改部门
员工部门:
- 查询员工列表(分页,条件)
- 删除员工
- 新增员工
- 修改员工
1.2 环境搭建
环境搭建:
- 准备数据表(emp,dept)
- 创建springboot工程,引入对应的起步依赖(web,mybatis,mysql驱动,lombok)
- 配置application.properties中引入mybatis配置信息,准备对应的实体类
- 准备对应的Mapper,Service(接口.实现类),Controller基础结构

1.3 开发规范
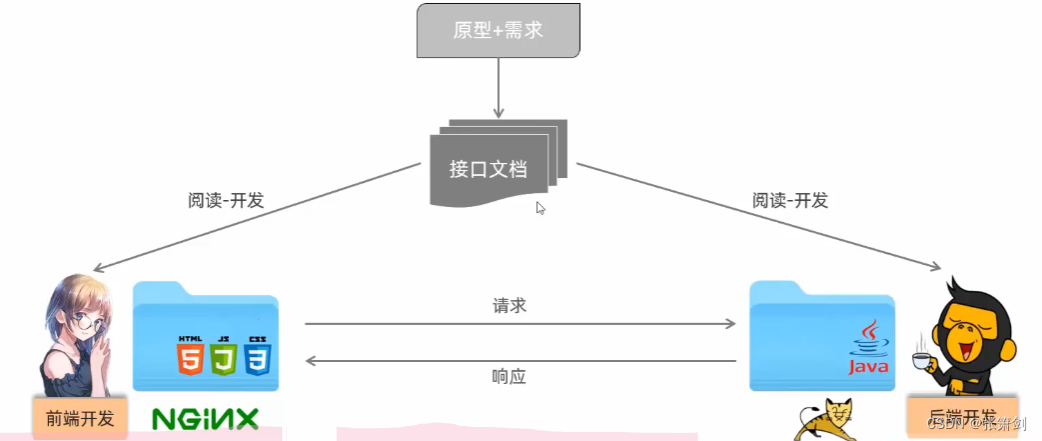
案例基于当前最主流的前后端分离模式进行开发
Restful
- REST(Representational State Transfer),表述性状态转换,是一种软件架构风格
传统风格没有一个固定的规范,而REST是一种风格,是默认的约定方式,约定不是规定,可以打破(但不建议)
描述模块的功能通常使用复数,也就是加s的格式来描述,表示此类资源,而非单个资源,如:users、emps、books、
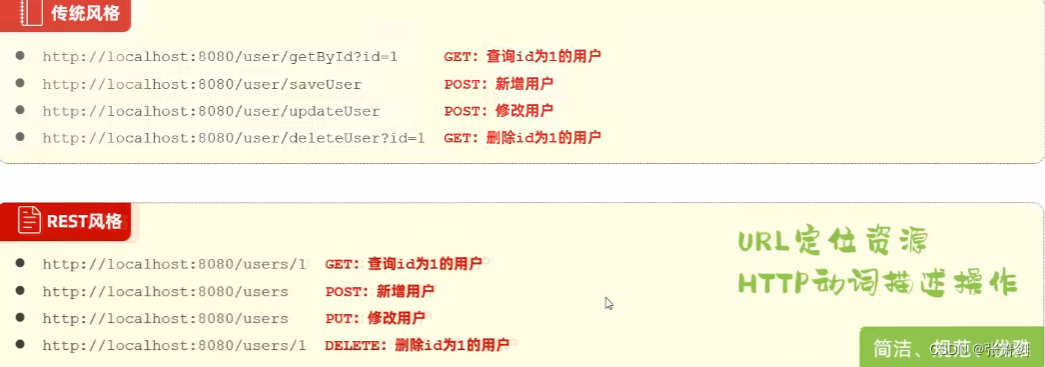
- GET:查询请求
- POST:新增请求
- PUT:修改请求
- DELETE:删除id用户
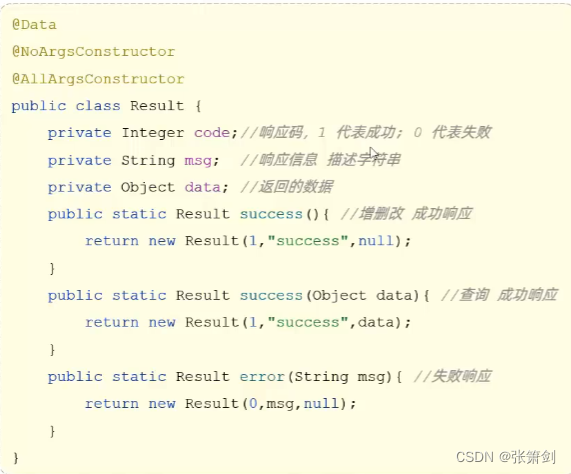
统一响应结果
前后端交互统一响应结果Result
开发流程以此从左到右

1.4 思路
思路:
使用三层架构的方式
Controller层:接收请求,并调用service层查询部门
Service层:调用mapper接口查询
Mapper层:使用SQL语句查询,并把查询的结果传给Service
Service层:接收到Mapper层,再传给Controller
Controller层:接收响应,并传给客户端

二、部门管理
2.1 查询部门
Controller层
代码如下:
/*
* 部门管理
* */
@Slf4j
@RestController
public class DeptController {
    @Autowired
    private DeptService deptService;
    @GetMapping ("/depts")
    public Result list(){
        log.info("查询全部部门");
        List<Dept> deptList=deptService.list();
        return Result.success(deptList);
    }
}
- 1
- 2
- 3
- 4
- 5
- 6
- 7
- 8
- 9
- 10
- 11
- 12
- 13
- 14
- 15
| 注解 | 含义 |
|---|---|
| @Slf4j | 日志注解,可以直接使用log.info输出日志 |
| @Autowired | 依赖注入注解 |
| @RestController | @ResponseBody+Conrtoller注解 |
| @GetMapping | 用于get请求的注解 |
Service层
Service层接口如下:
public interface DeptService {
    /*
    * 查询全部部门数据
    * */
    List<Dept> list();
}
- 1
- 2
- 3
- 4
- 5
- 6
Service层实现类如下:
@Service
public class DeptServiceImpl implements DeptService {
    @Autowired
    private DeptMapper deptMapper;

    /*
     * 查询全部部门数据
     * */
    @Override
    public List<Dept> list() {
        return deptMapper.list();
    }
}
- 1
- 2
- 3
- 4
- 5
- 6
- 7
- 8
- 9
- 10
- 11
- 12
- 13
Mapper层
mapper层代码如下:
public interface DeptMapper {
    /*
     * 查询全部部门数据
     * */

    @Select("select id, username, password, name, gender, image, job, entrydate, dept_id, create_time, update_time from tlias.emp ")

    List<Dept> list();
}
- 1
- 2
- 3
- 4
- 5
- 6
- 7
- 8
- 9
2.2 删除部门
Controller层
代码如下:
    /*
    * 删除部门
    * */
    @DeleteMapping("/depts/{id}")
    public Result deletc(@PathVariable Integer id){
        log.info("根据id删除部门:",id);
        deptService.delete(id);
        return Result.success();
    }
- 1
- 2
- 3
- 4
- 5
- 6
- 7
- 8
- 9
| 注解 | 含义 |
|---|---|
| @PathVariable | 用于接收路径参数的注解 |
Service层
Service层接口
    /*
     * 删除部门
     * */
    void delete(Integer id);
- 1
- 2
- 3
- 4
接口实现类
  /*
     * 删除部门
     * */
    @Override
    public void delete(Integer id) {
        deptMapper.deleteById(id);
    }
- 1
- 2
- 3
- 4
- 5
- 6
- 7
Mapper层
   /*
     * 根据ID删除部门
     * */
    @Delete("delete from tlias.dept where id = #{id} ")
    void deleteById(Integer id);
- 1
- 2
- 3
- 4
- 5
2.3 新增部门
Controller层
具体如下:
    /*
    * 新增部门
    * */
    @PostMapping("/depts")
    public Result add(@RequestBody Dept dept){
        log.info("新增部门:",dept);
        deptService.add(dept);
        return Result.success();
    }
- 1
- 2
- 3
- 4
- 5
- 6
- 7
- 8
- 9
Service层
Service层接口
/*
* 新增部门
* */
void add(Dept dept);
- 1
- 2
- 3
- 4
Service实现类
/*
* 新增部门
* */
@Override
public void add(Dept dept) {
dept.setCreateTime(LocalDateTime.now());
dept.setUpdateTime(LocalDateTime.now());
deptMapper.insert(dept);
    }
- 1
- 2
- 3
- 4
- 5
- 6
- 7
- 8
- 9
Mapper层
具体如下:
 /*
  * 新增部门
  * */
 @Insert("insert tlias.dept (name, create_time, update_time) " +
         "values(#{name},#{createTime},#{updateTime}) ")
 void insert(Dept dept);
- 1
- 2
- 3
- 4
- 5
- 6
2.4 修改部门
Controller层
为了得到修改时页面返回的部门名称,需要先根据ID进行一次查询,用于页面的回显
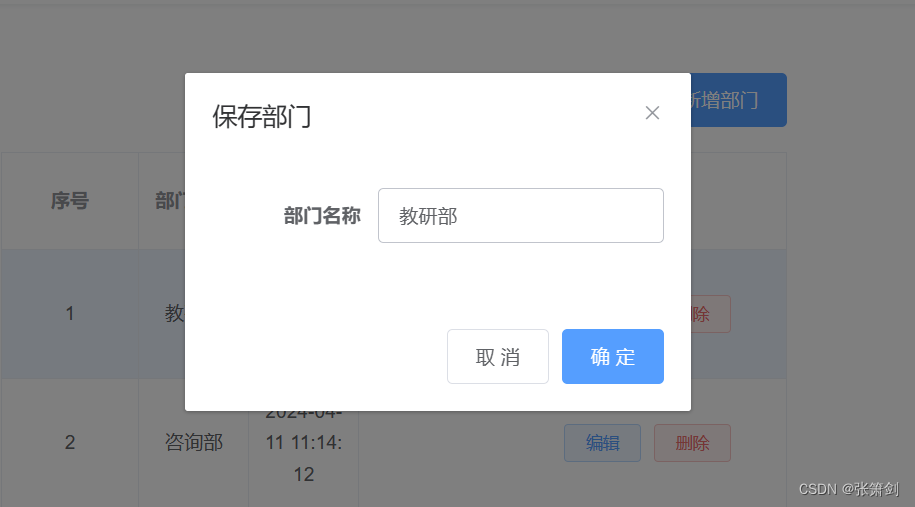
代码如下:
@GetMapping("/{id}")
  public Result getById(@PathVariable Integer id){
       log.info("获取部门ID:",id);
       Dept dept = deptService.getById(id);
       return Result.success(dept);
  }

@PutMapping
  public Result update(@RequestBody Dept dept) {
      log.info("修改部门:{}",dept);
      deptService.update(dept);
      return Result.success();
  }
- 1
- 2
- 3
- 4
- 5
- 6
- 7
- 8
- 9
- 10
- 11
- 12
- 13
Service层
Service层接口
    Dept getById(Integer id);

    void update(Dept dept);
- 1
- 2
- 3
Service实现类
@Override
  public Dept getById(Integer id) {
      Dept dept = deptMapper.getByID(id);
      return dept;
 }

@Override
  public void update(Dept dept) {
      dept.setUpdateTime(LocalDateTime.now());
      deptMapper.update(dept);
  }
- 1
- 2
- 3
- 4
- 5
- 6
- 7
- 8
- 9
- 10
- 11
Mapper层
代码如下:
@Select("select * from tlias.dept where id = #{id}")
 Dept getByID(Integer id);
@Update("update tlias.dept set name = #{name},update_time = #{updateTime} where id = #{id}")
void update(Dept dept);
- 1
- 2
- 3
- 4
- 5
2.5 RequestMapping
由于部门管理中所有的请求路径都是/depts开头,所以可以使用RequestMapping来简化请求的定义,直接抽取到类上
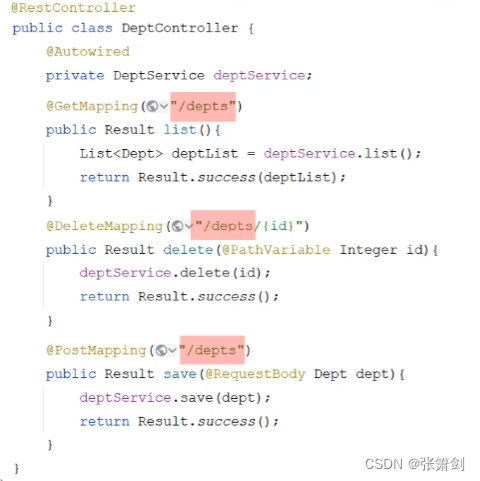
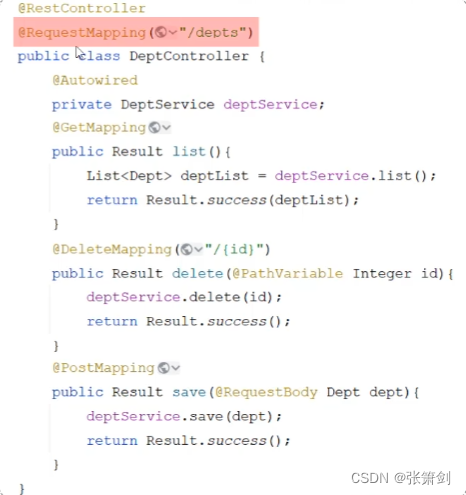
注意:一个完整的请求路径,应该是类上的@RequestMapping的value属性 + 方法上的@RequestMapping的value属性
三、员工管理
3.1 分页查询
Controller层
    @GetMapping("/emps")
    public Result     public Result page(@RequestParam(defaultValue = "1") Integer page,
                       @RequestParam(defaultValue = "10") Integer pageSize,
                        String name, Short gender,
                       @DateTimeFormat(pattern = "yyyy-MM-dd") LocalDate begin,
                       @DateTimeFormat(pattern = "yyyy-MM-dd") LocalDate end){
        log.info("分页查询,参数:{},{},{},{},{},{}",page,pageSize,name,gender,begin,end);

        PageBean pageBean = empService.page(page,pageSize,name,gender,begin,end);

        return Result.success(pageBean);
    }
- 1
- 2
- 3
- 4
- 5
- 6
- 7
- 8
- 9
- 10
- 11
- 12
Service层
Service层接口如下:
  /*
    * 分页查询
    * */
     PageBean page(Integer page, Integer pageSize, String name, Short gender, LocalDate begin, LocalDate end);
}
- 1
- 2
- 3
- 4
- 5
Service层实现类如下:
 @Override
    public PageBean page(Integer page, Integer pageSize , String name, Short gender, LocalDate begin, LocalDate end){
        // 1.设置分页参数
        PageHelper.startPage(page,pageSize);

        // 2.执行查询
        List<Emp> empList = empMapper.list(name, gender, begin, end);
        Page<Emp> p = (Page<Emp>) empList;

        // 3.封装pageBean对象
        PageBean pageBean = new PageBean(p.getTotal() ,p.getResult());

        return pageBean;
    }
- 1
- 2
- 3
- 4
- 5
- 6
- 7
- 8
- 9
- 10
- 11
- 12
- 13
- 14
Mapper层
   /*
    * 查询总记录数
    * */
        public List<Emp> list(String name, Short gender, LocalDate begin, LocalDate end);
- 1
- 2
- 3
- 4
XML:
    <select id="list" resultType="com.itzhangxx.pojo.Emp">
        select *
        from tlias.emp
        <where>
            <if test="name != null">
                name like concat('%',#{name},'%')
            </if>

            <if test="gender != null">
              and gender = #{gender}
            </if>

            <if test="begin != null and end != null">
              and entrydate between #{begin} and #{end}
            </if>
        </where>
        order by update_time desc
    </select>
- 1
- 2
- 3
- 4
- 5
- 6
- 7
- 8
- 9
- 10
- 11
- 12
- 13
- 14
- 15
- 16
- 17
- 18
PageHelper
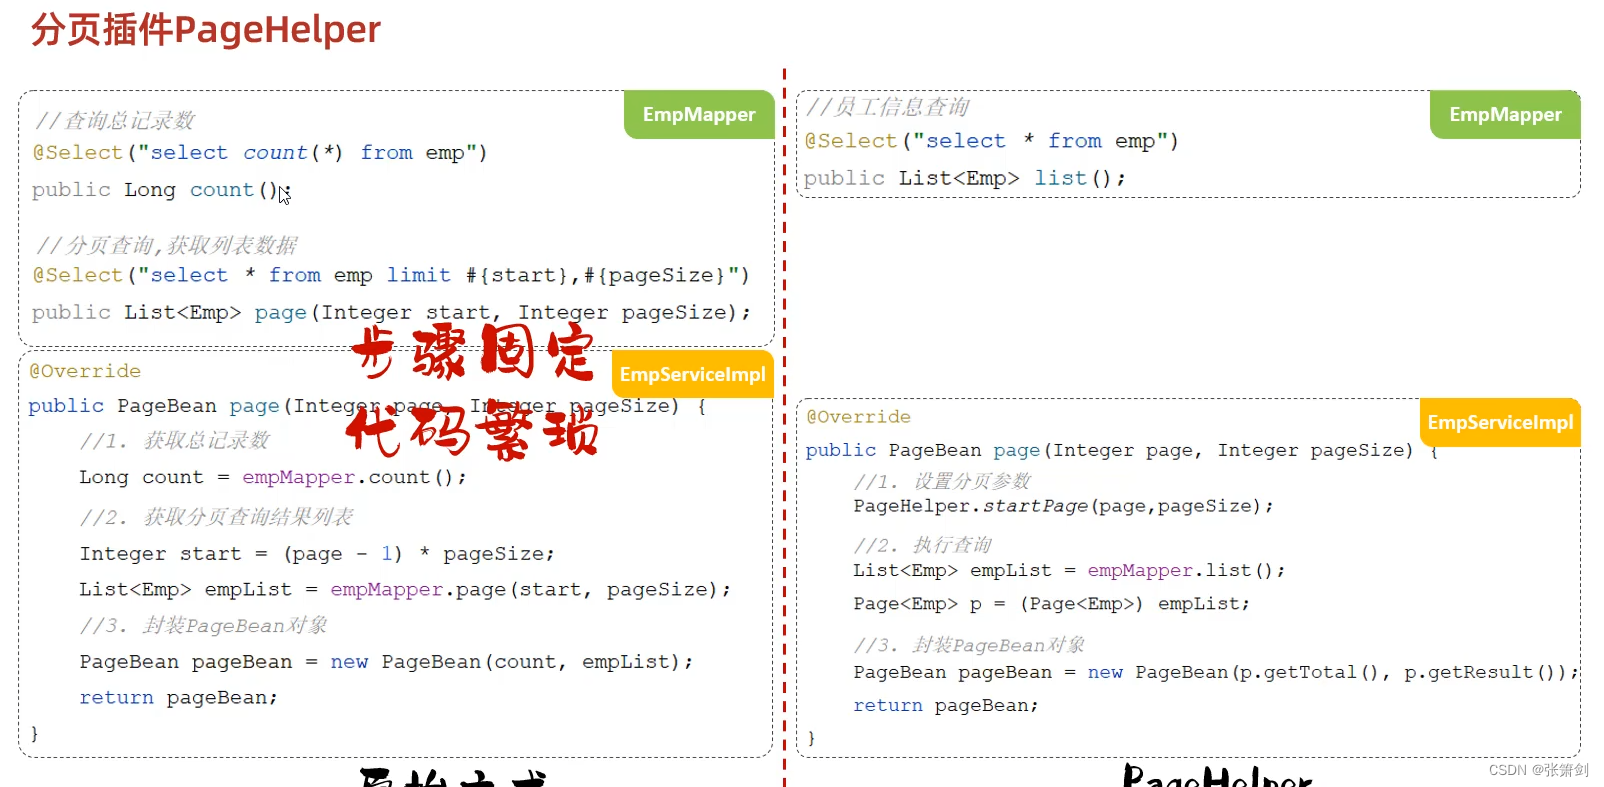
3.2 删除员工
Controller层
具体代码如下:
    /*
     * 批量删除
     * */
    @DeleteMapping("/{ids}")
    public Result delete(@PathVariable List<Integer> ids){
        log.info("批量删除:{}",ids);
        empService.delete(ids);
        return Result.success();
    }
- 1
- 2
- 3
- 4
- 5
- 6
- 7
- 8
- 9
Service层
Service层接口如下:
    /*
    * 批量删除
    * */
    void delete(List<Integer> ids);
- 1
- 2
- 3
- 4
Service层实现类如下:
   /*
     * 批量删除
     * */
    @Override
    public void delete(List<Integer> ids) {
        empMapper.delete(ids);
    }
- 1
- 2
- 3
- 4
- 5
- 6
- 7
Mapper层
mapper:
  /*
     * 批量删除
     * */
   void delete(List<Integer> ids);
- 1
- 2
- 3
- 4
xml:
   <!--
        批量删除
    -->
    <delete id="delete">
        delete
        from tlias.emp
        where id in
        <foreach collection="ids" item="id" separator="," open="(" close=")">
            #{id}
        </foreach>
    </delete>
- 1
- 2
- 3
- 4
- 5
- 6
- 7
- 8
- 9
- 10
- 11
3.3 新增员工
3.3.1 新增员工
Controller层
代码如下:
   /*
    * 新增员工
    * */
    @PostMapping()
    public Result save(@RequestBody Emp emp){
        log.info("新增员工:{}",emp);
        empService.save(emp);
        return Result.success();
    }
- 1
- 2
- 3
- 4
- 5
- 6
- 7
- 8
- 9
Service层
Service层接口如下:
    /*
     * 新增员工
     * */
    void save(Emp emp);
- 1
- 2
- 3
- 4
Service层实现类如下:
    /*
     * 新增员工
     * */
    @Override
    public void save(Emp emp) {
        emp.setCreateTime(LocalDateTime.now());
        emp.setUpdateTime(LocalDateTime.now());
        empMapper.save(emp);
    }
- 1
- 2
- 3
- 4
- 5
- 6
- 7
- 8
- 9
Mapper层
  /*
     * 新增员工
     * */
    @Insert("insert tlias.emp (username, name, gender, image, job, entrydate, dept_id, create_time, update_time)" +
            "value ( #{username},#{name},#{gender},#{image},#{job},#{entrydate},#{deptId},#{createTime},#{updateTime})")
    void save(Emp emp);
- 1
- 2
- 3
- 4
- 5
- 6
3.3.2 文件上传
创建一个utils工具类
/**
 * 阿里云 OSS 工具类
 */
@Component
public class AliOSSUtils {

    private String endpoint = "改为自己的" ;
    private String accessKeyId ="改为自己的" ;
    private String accessKeySecret = "改为自己的";
    private String bucketName = "改为自己的";

    /**
     * 实现上传图片到OSS
     */
    public String upload(MultipartFile file) throws IOException {
        // 获取上传的文件的输入流
        InputStream inputStream = file.getInputStream();

        // 避免文件覆盖 使用UUID  tostring后都是得到拓展名
        String originalFilename = file.getOriginalFilename();
        String fileName = UUID.randomUUID().toString() + originalFilename.substring(originalFilename.lastIndexOf("."));

        //上传文件到 OSS
        OSS ossClient = new OSSClientBuilder().build(endpoint, accessKeyId, accessKeySecret);
        ossClient.putObject(bucketName, fileName, inputStream);

        //文件访问路径
        String url = endpoint.split("//")[0] + "//" + bucketName + "." + endpoint.split("//")[1] + "/" + fileName;
        // 关闭ossClient
        ossClient.shutdown();
        return url;// 把上传到oss的路径返回
    }

}
- 1
- 2
- 3
- 4
- 5
- 6
- 7
- 8
- 9
- 10
- 11
- 12
- 13
- 14
- 15
- 16
- 17
- 18
- 19
- 20
- 21
- 22
- 23
- 24
- 25
- 26
- 27
- 28
- 29
- 30
- 31
- 32
- 33
- 34
Controller代码如下
    @Autowired
    private AliOSSUtils aliOSSUtils;

    @PostMapping("/upload")
    public Result upload(MultipartFile image) throws IOException {
        log.info("文件上传,文件名:{}",image.getOriginalFilename());

        //调用阿里云工具类进行文件上传
        String url = aliOSSUtils.upload(image);
        log.info("文件上传成功,文件访问的url:{}",url);

        return Result.success(url);
    }
- 1
- 2
- 3
- 4
- 5
- 6
- 7
- 8
- 9
- 10
- 11
- 12
- 13
3.4 修改员工
3.4.1 页面回显
Controller层
具体如下:
    /*
    * 页面回显,根据id查询
    * */
    @GetMapping("/{id}")
    public Result geyById(@PathVariable Integer id){

        log.info("根据id插叙信息:{}",id);
        Emp emp = empService.getById(id);
        return Result.success(emp);
    }
- 1
- 2
- 3
- 4
- 5
- 6
- 7
- 8
- 9
- 10
Service层
Service层接口如下:
  /*
     * 页面回显,根据id查询
     * */
    Emp getById(Integer id);
- 1
- 2
- 3
- 4
Service层实现类如下:
  /*
     * 页面回显,根据id查询
     * */
    @Override
    public Emp getById(Integer id) {

        return empMapper.getById(id);
    }
- 1
- 2
- 3
- 4
- 5
- 6
- 7
- 8
Mapper层
具体如下:
    /*
     * 页面回显,根据id查询
     * */
    @Select("select * from tlias.emp where id = #{id}")
    Emp getById(Integer id);
- 1
- 2
- 3
- 4
- 5
3.4.2 修改信息
Controller层
具体如下:
    /*
    * 修改员工
    * */
    @PutMapping
    public Result update(@RequestBody Emp emp){
        log.info("更新员工信息:{}",emp);

        empService.update(emp);
        return Result.success();
    }
- 1
- 2
- 3
- 4
- 5
- 6
- 7
- 8
- 9
- 10
Service层
Service层接口如下:
  /*
     * 修改员工
     * */
    void update(Emp emp);
- 1
- 2
- 3
- 4
Service层实现类如下:
  /*
     * 修改员工
     * */
    @Override
    public void update(Emp emp) {
        emp.setUpdateTime(LocalDateTime.now());
        empMapper.update(emp);
    }
- 1
- 2
- 3
- 4
- 5
- 6
- 7
- 8
Mapper层
    <!--
        修改员工
    -->
    <update id="update">
        update tlias.emp
        <set>
            <if test="username != null and username != '' ">
                username = #{username},
            </if>
            <if test="name != null and name != '' ">
                name = #{name},
            </if>
            <if test="gender != null">
                gender = #{gender},
            </if>
            <if test="image != null">
                image = #{image},
            </if>
            <if test="job != null">
                job = #{job},
            </if>
            <if test="entrydate != null">
                entrydate = #{entrydate},
            </if>
            <if test="deptId != null">
                dept_id = #{deptId},
            </if>
            <if test="updateTime != null">
                update_time = #{updateTime}
            </if>
        </set>
        where id = #{id}
    </update>
- 1
- 2
- 3
- 4
- 5
- 6
- 7
- 8
- 9
- 10
- 11
- 12
- 13
- 14
- 15
- 16
- 17
- 18
- 19
- 20
- 21
- 22
- 23
- 24
- 25
- 26
- 27
- 28
- 29
- 30
- 31
- 32
- 33
四、效果展示
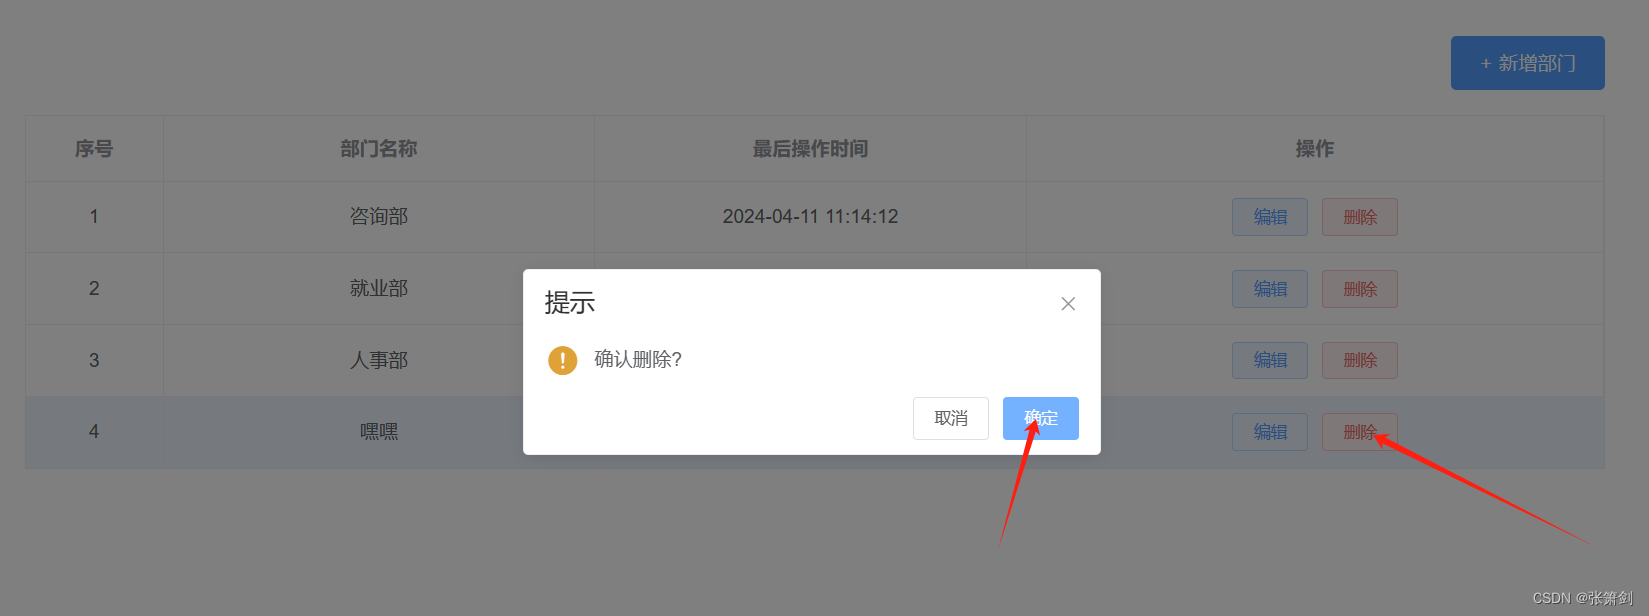
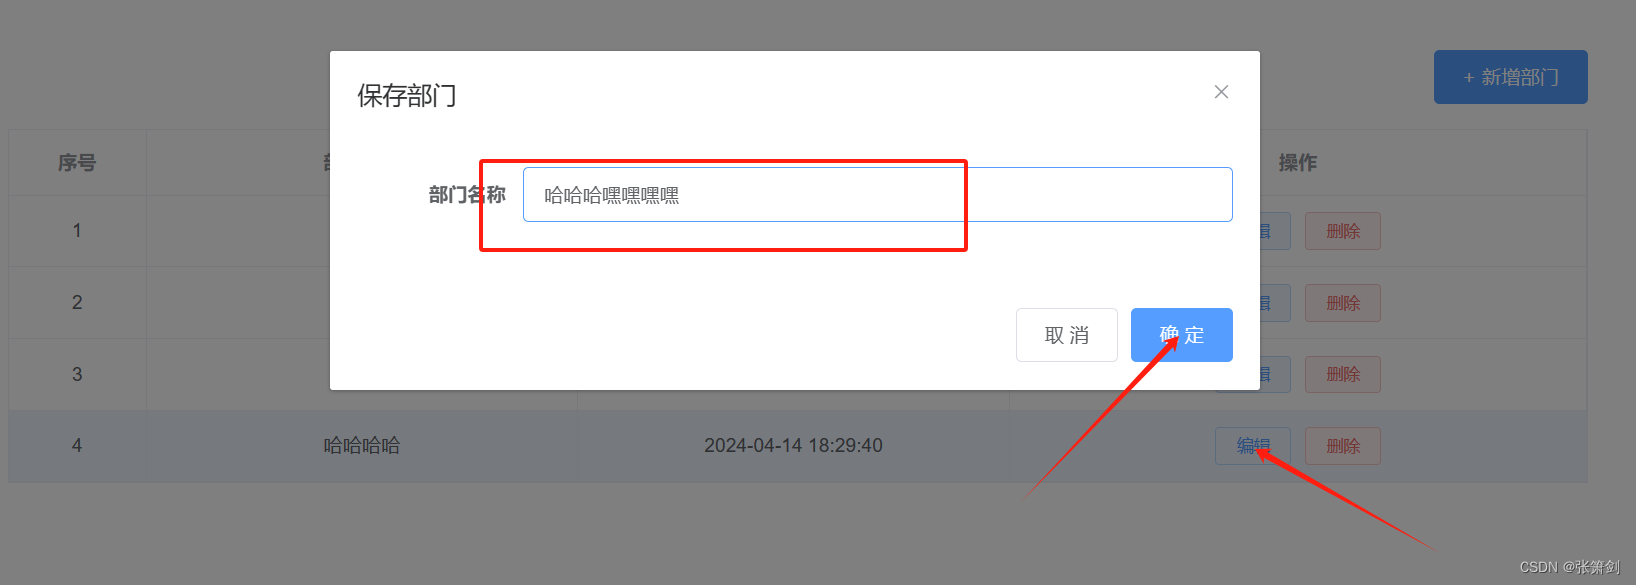
4.1 部门管理
主界面
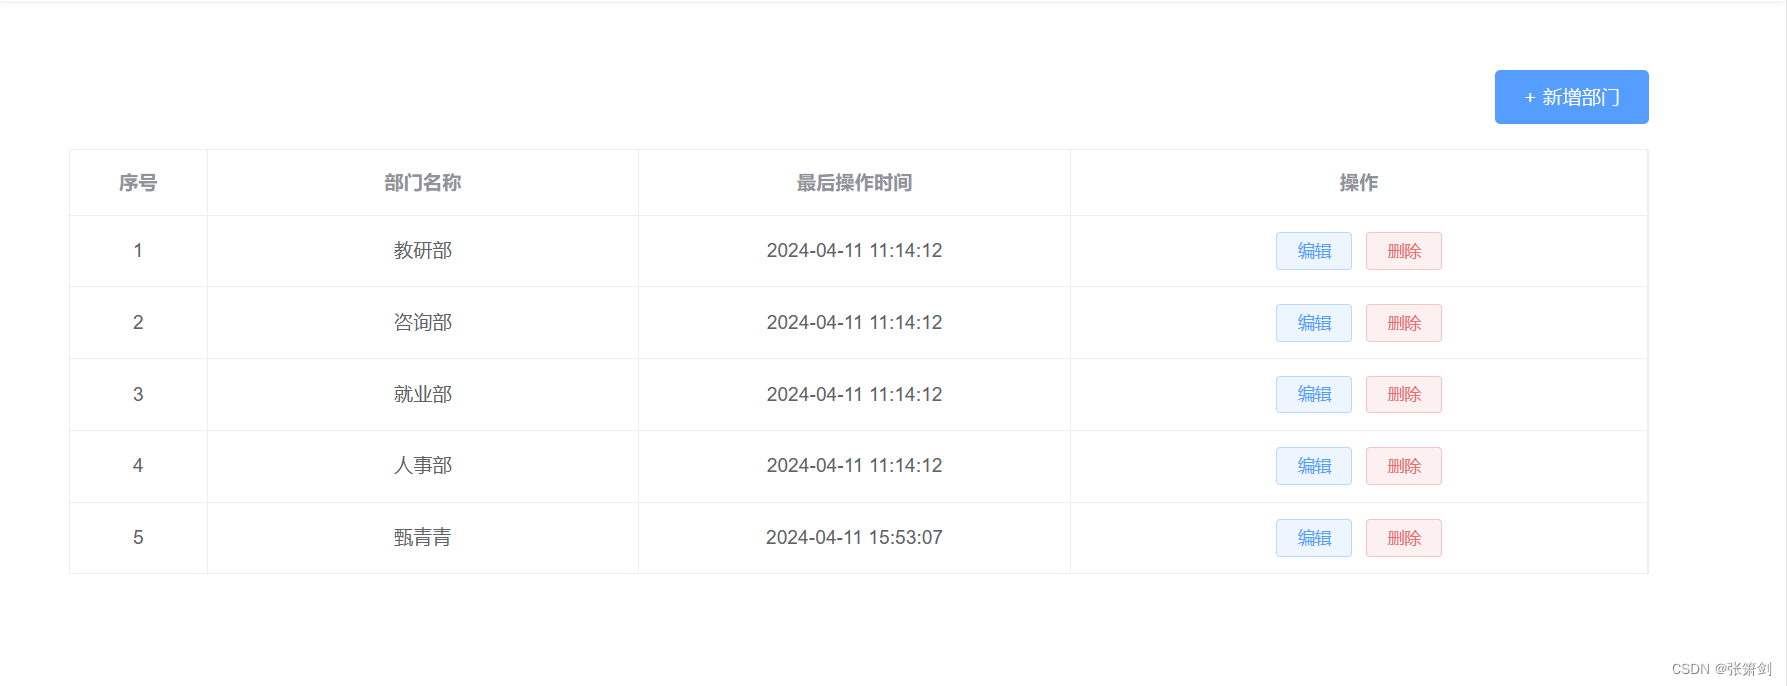
新增

删除
修改

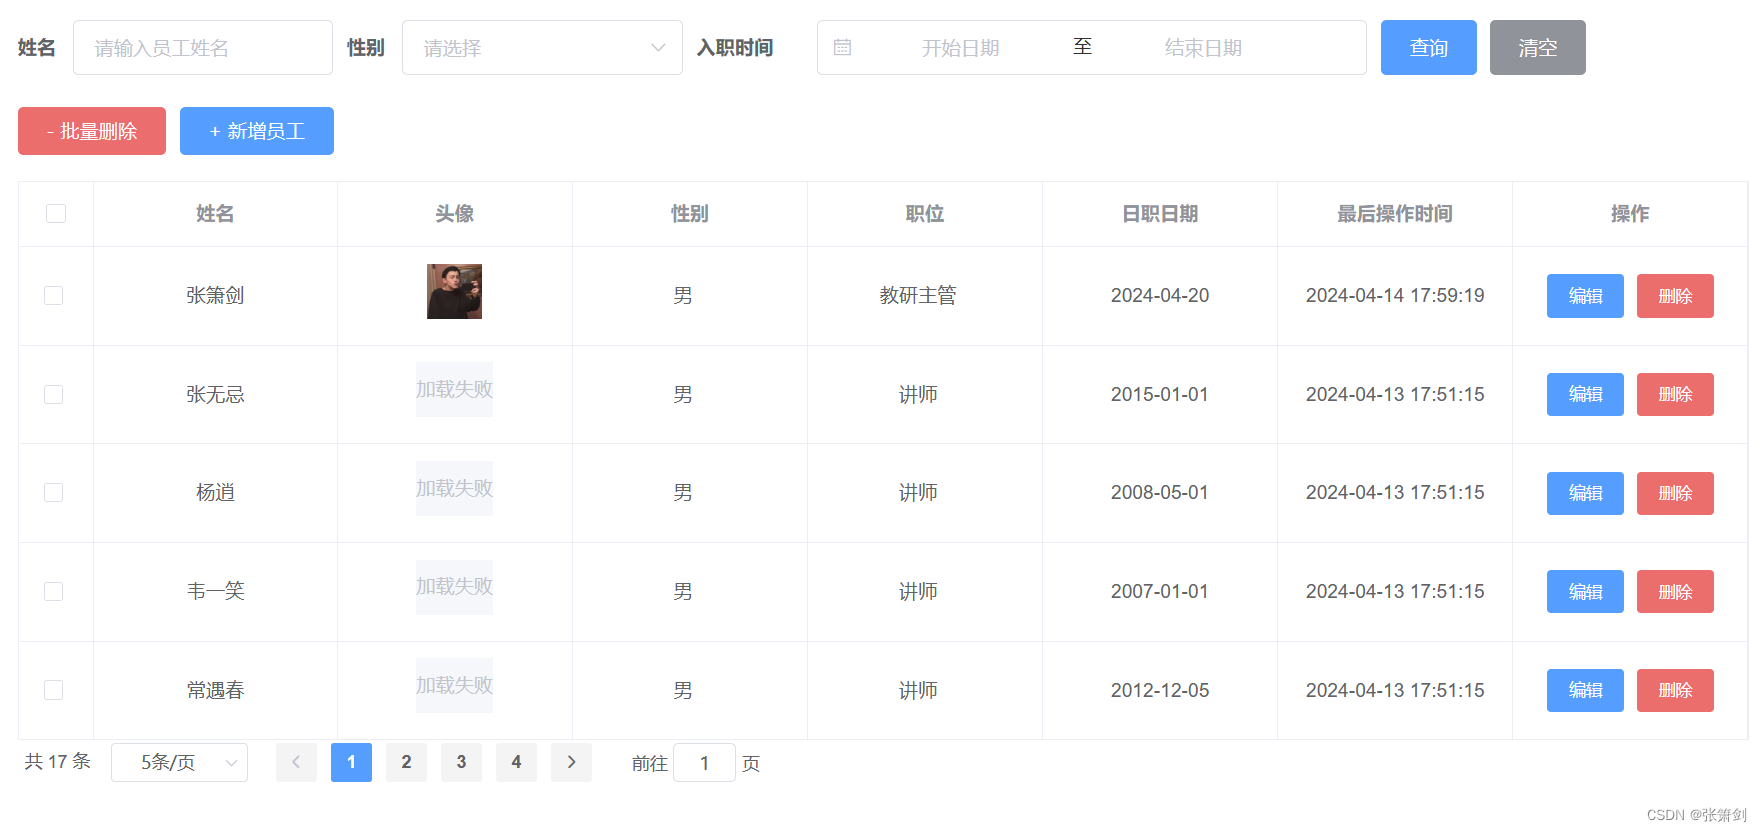
4.2 员工管理
主界面
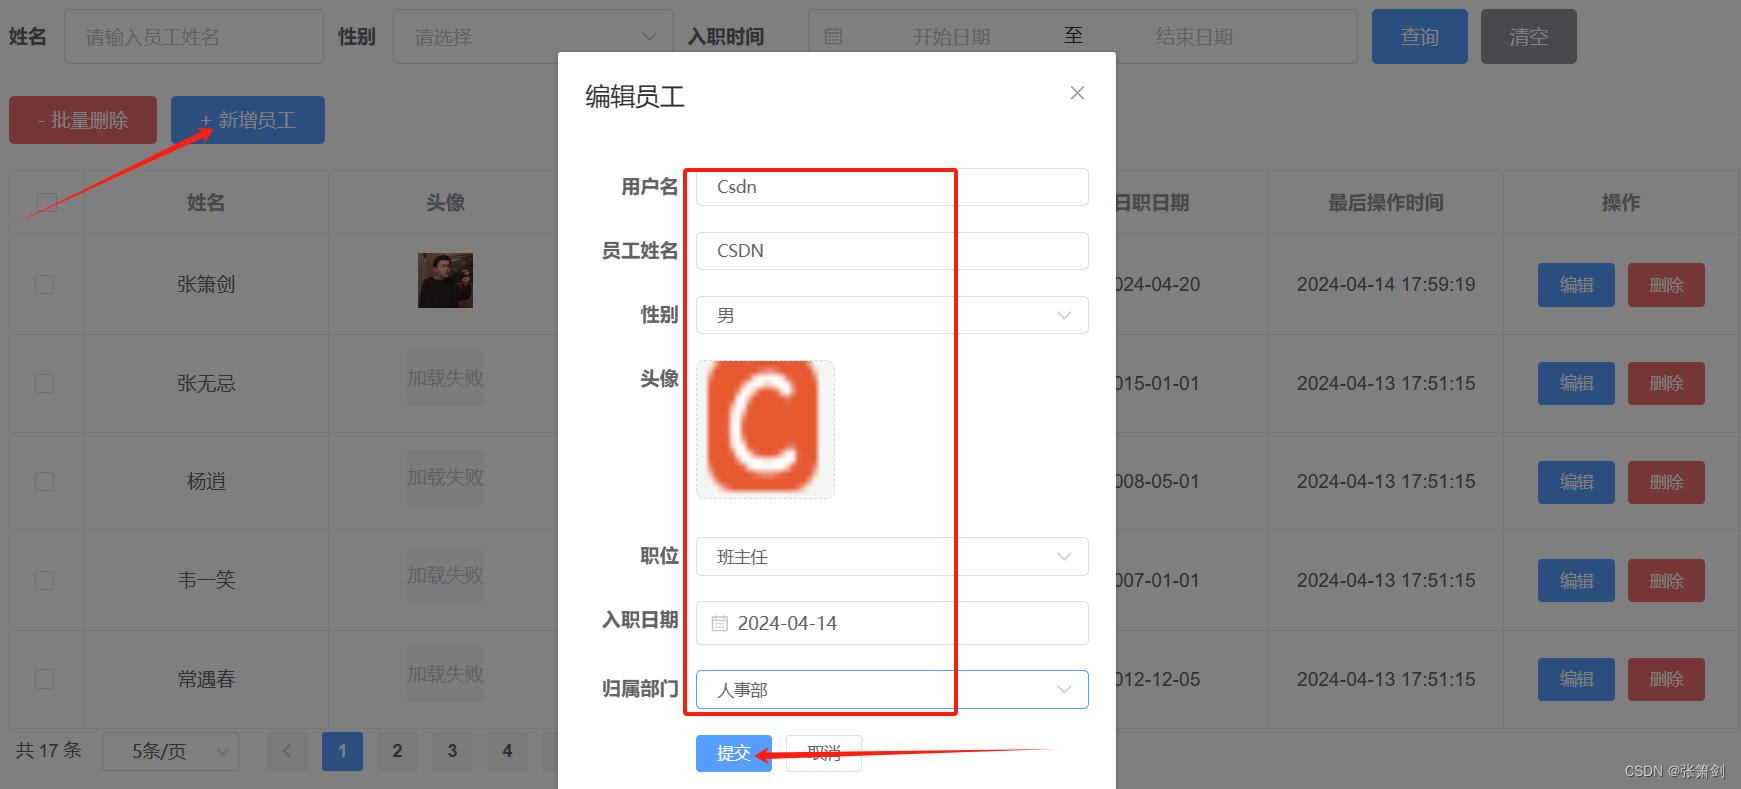
新增

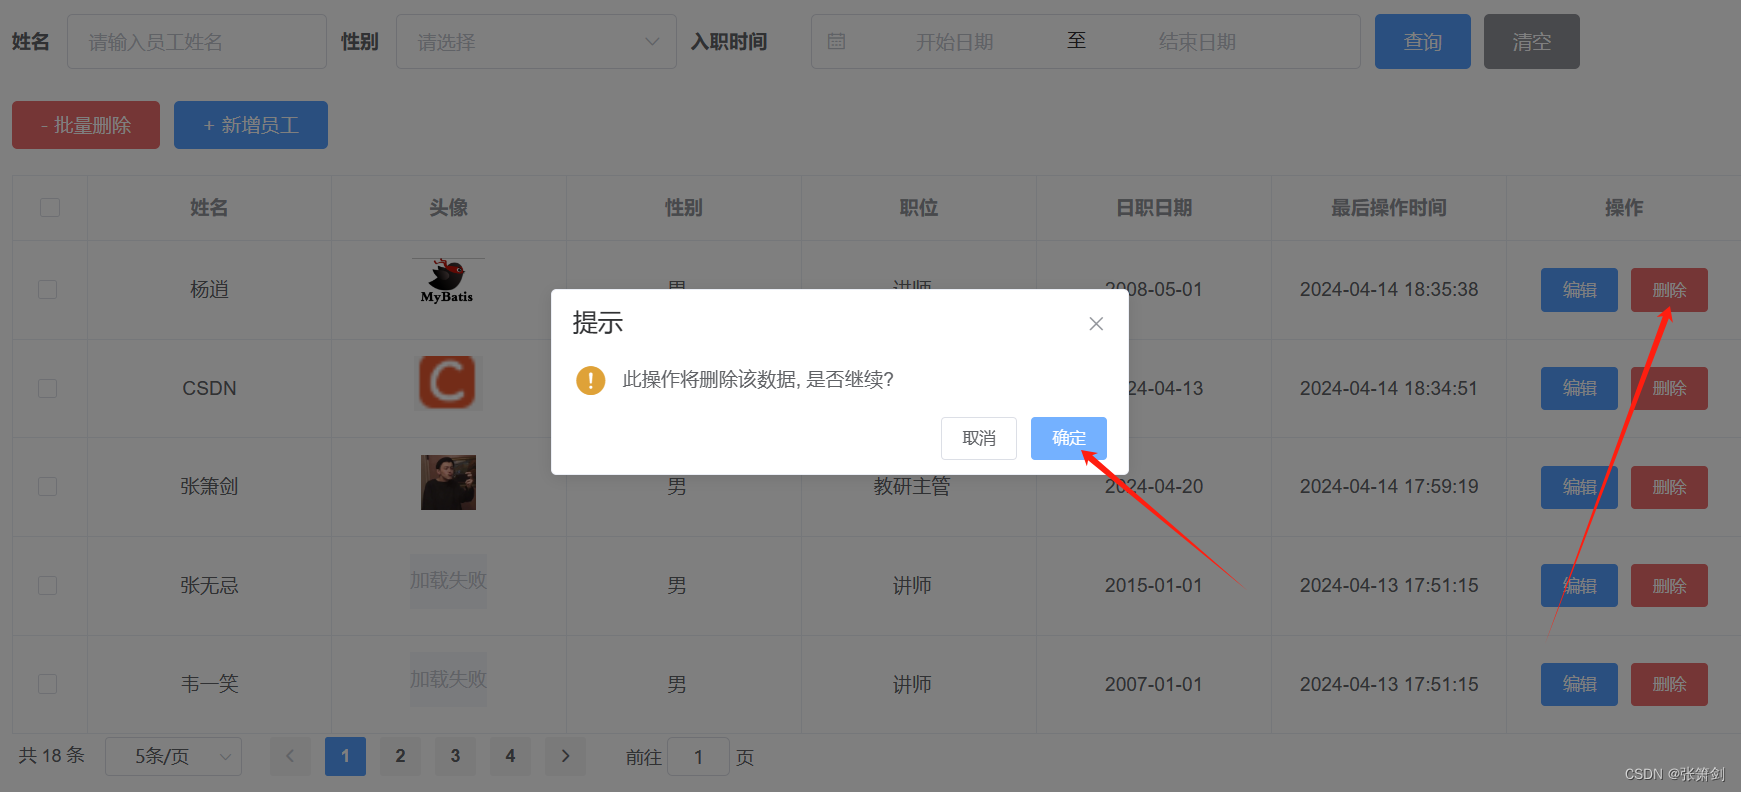
删除
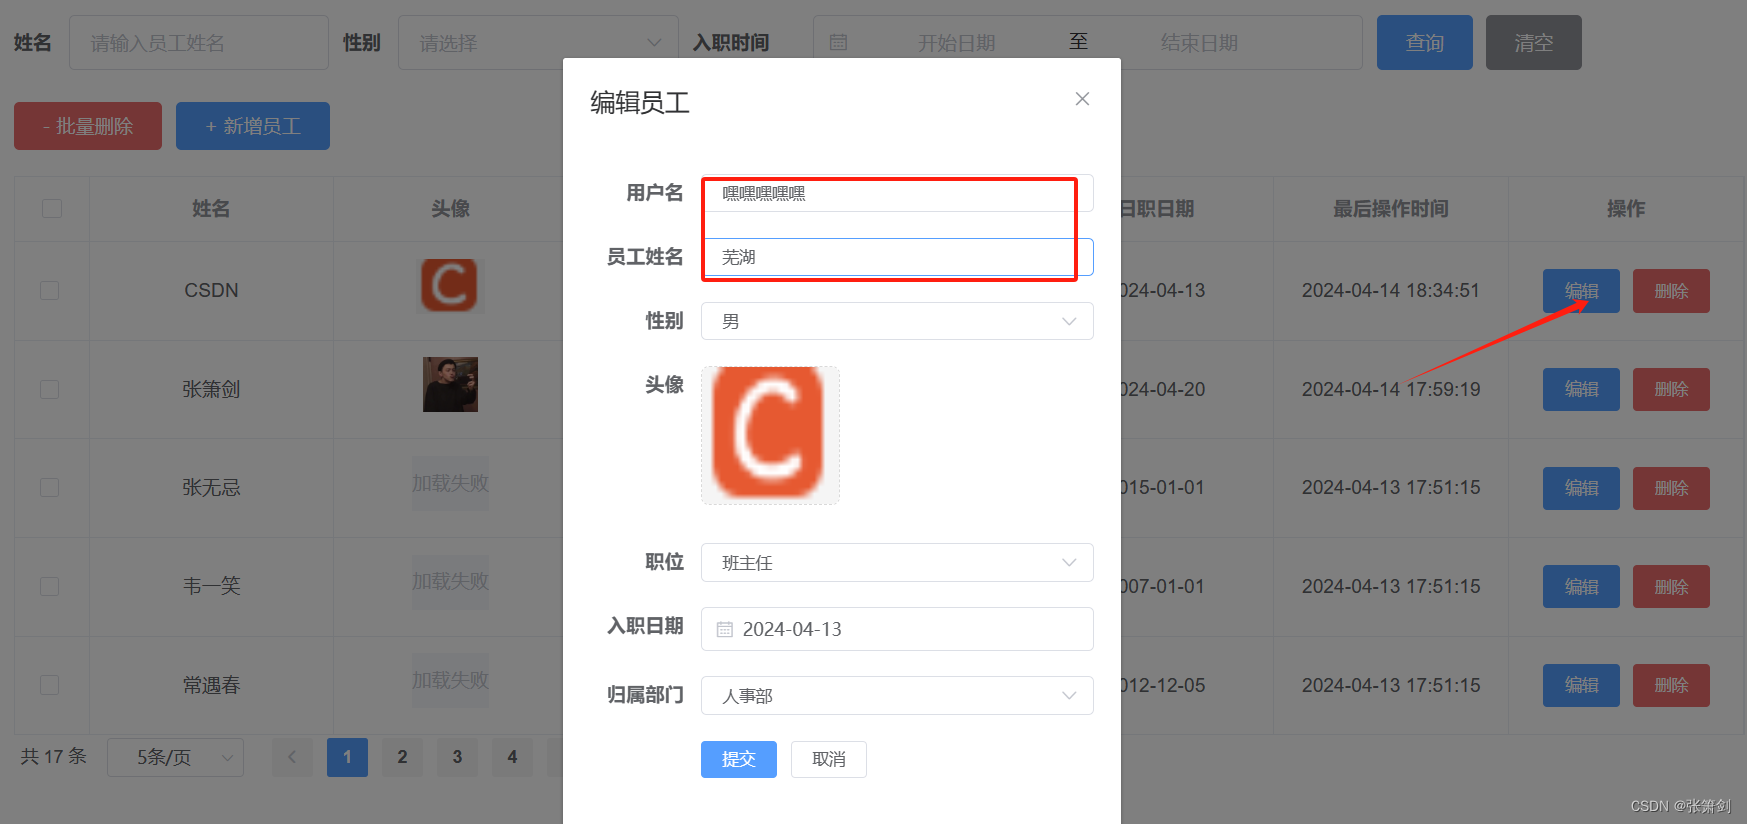
修改

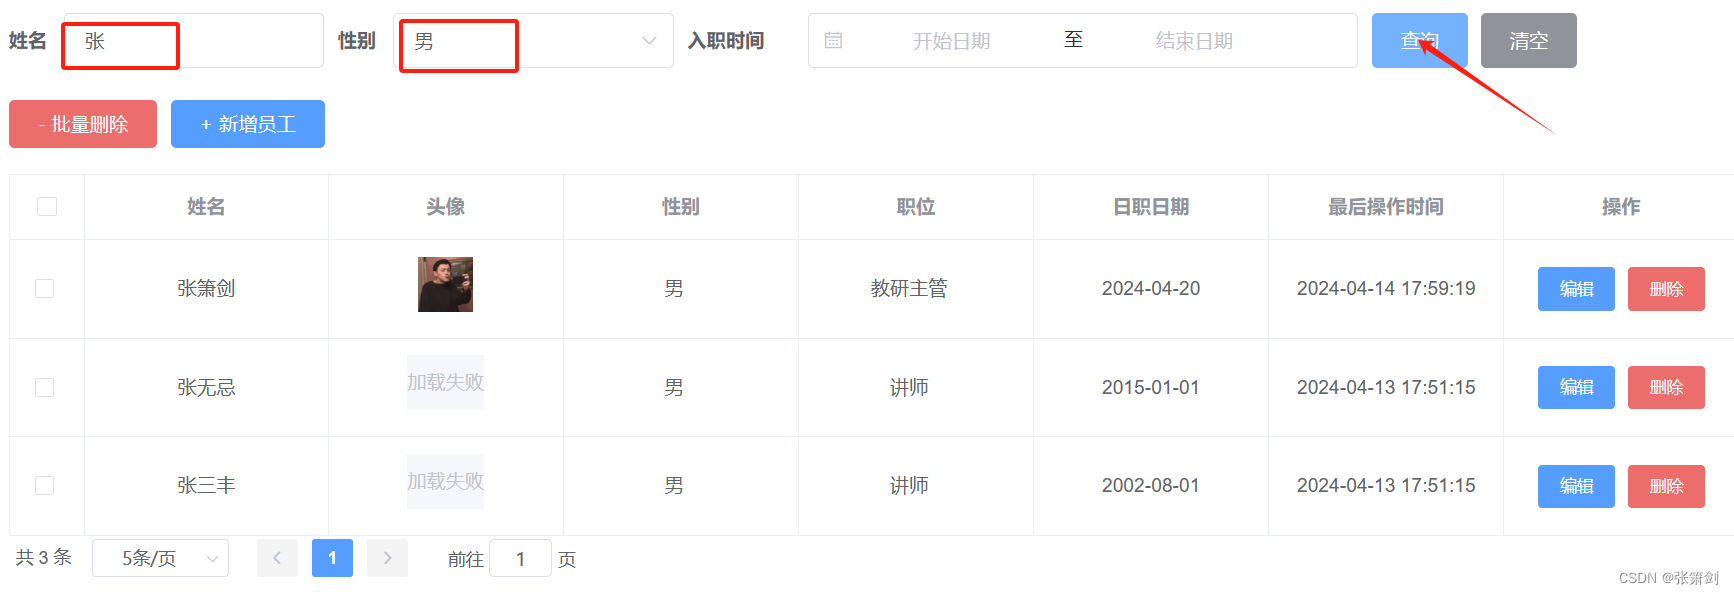
查询
五、小结
写本文主要是为了分享我的学习过程,也是给自己记个笔记,哪里忘记了,回来再看一眼,也可以很快的回想起来


