- 1Target-aware Transformer 知识蒸馏代码复现_crcd蒸馏代码复现
- 2《网络是怎样连接的》笔记整理
- 3LeetCode_Array_126. Word Ladder II单词接龙II(C++)【双向BFS构图+DFS寻找路径】_c++单词接龙dfs
- 4Spring Boot 邮件发送的 5 种姿势!
- 52024年Python最新万字博文教你python爬虫Beautiful Soup库【详解篇】(1),阿里巴巴面试算法题
- 6【MySQL】我必须得告诉大家的MySQL优化原理3(下)INNODB配置_unknown suffix 'i' used for variable 'innodb-log-f
- 7【web渗透思路】敏感信息泄露(网站+用户+服务器)_渗透测试,敏感信息泄露
- 8Python+VS Code+Selenium+EdgeDriver实现网页自动化_selenium edgedriver
- 9数字办公新纪元 :ONLYOFFICE 2.5重磅来袭_ficitx5 onlyoffice
- 10wordpress 通过域名无法访问_教你搭建Wordpress网站
Hadoop安装以及使用_安装了hadoop怎么使用
赞
踩
Hadoop介绍
Hadoop官方网站:http://hadoop.apache.org/
Hadoop是大数据组件。大数据是海量数据的处理和分析的技术,需要用分布式框架。分布式则是通过多个主机的进程协同在一起,构成整个应用。
Hadoop 是一个由 Apache 基金会所开发的分布式系统基础架构,它可以使用户在不了解分布式底层细节的情況下开发分布式程序,充分利用集群的威力进行高速运算和存储。Hadoop解決了两大问题:大数据存储、大数据分析。也就是 Hadoop 的两大核心:HDFS 和 MapReduce。
Hadoop主要基于java语言实现,由三个核心子系统组成:HDFS、YARN、MapReduce,其中HDFS是一套分布式文件系统;YARN是资源管理系统;MapReduce是运行在YARN上的应用,负责分布式处理管理.。从操作系统的角度来看的话,HDFS相当于Linnux的ext3/ext4文件系统,而yarn相当于Linux的进程调度和内存分配模块。
-
- HDFS(Hadoop Distributed File System)是可扩展、容错、高性能的分布式文件系统,异步复制,一次写入多次读取,主要负责存储。适合部署在大量廉价的机器上,提供高吞吐量的数据访问。
-
- YARN:资源管理器,可为上层应用提供统一的资源管理和调度,兼容多计算框架。
-
- MapReduce 是一种分布式编程模型,把对大规模数据集的处理分发给网络上的多个节点,之后收集处理结果进行规约。
Hadoop集群三种模式:本地模式、伪分布式、完全分布式
本地模式:单主机模式,不需要启动进程
伪分布模式:单主机进程
主机1: 进程1+进程2
完全分布式:多主机进程
主机1:进程1
主机2:进程2
hadoop:
分布式存储: hdfs
分布式计算:mapreduce
hadoop目录结构
Hadoop的目录结构
1)bin目录:存放对Hadoop相关的服务(HDFS,YARN)进行操作的脚本
2)etc目录:Hadoop的配置文件目录,存放Hadoop的配置文件
3)lib目录:存放Hadoop的本地库(对数据进行压缩解压功能)
4)sbin目录:存放启动或者停止Hadoop相关服务的脚本
5)share目录:存放Hadoop的依赖jar包、文档和官方案例
搭建hadoop
[root@hadoop101 ~]# hostnamectl set-hostname hadoop101
[root@hadoop101 ~]# systemctl status firewalld
[root@hadoop101 ~]# systemctl stop firewalld
[root@hadoop101 ~]# systemctl status firewalld
[root@hadoop101 hadoop]# systemctl disable firewalld
[root@hadoop101 ~]# mkdir /opt/{module,software}
安装jdk和hadoop
#下载jdk
http://www.oracle.com/technetwork/java/javase/downloads/jdk8-downloads-2133151.html
#下载hadoop-2.7.3.tar.gz
https://archive.apache.org/dist/hadoop/common/hadoop-2.7.3/hadoop-2.7.3.tar.gz
[root@hadoop101 hadoop]# ls /opt/software/
hadoop-2.7.3  hadoop-2.7.3.tar.gz  jdk1.8.0_251  jdk-8u251-linux-x64.rpm  jdk-8u251-linux-x64.tar.gz
[root@hadoop101 software]# tar -zxvf jdk-8u251-linux-x64.tar.gz
[root@hadoop101 software]# tar -zxvf hadoop-2.7.3.tar.gz
[root@hadoop101 ~]# cd /opt/software/
[root@hadoop101 software]# ll
total 574916
drwxr-xr-x. 9 root  root       4096 Aug 18  2016 hadoop-2.7.3
-rw-r--r--. 1 root  root  214092195 Aug 26  2016 hadoop-2.7.3.tar.gz
drwxr-xr-x. 7 10143 10143      4096 Mar 12  2020 jdk1.8.0_251
-rw-r--r--. 1 root  root  179472367 Mar 14  2020 jdk-8u251-linux-x64.rpm
-rw-r--r--. 1 root  root  195132576 Mar 14  2020 jdk-8u251-linux-x64.tar.gz
[root@hadoop101 software]# ln -s jdk1.8.0_251/ jdk
[root@hadoop101 software]# ln -s hadoop-2.7.3/ hadoop
[root@hadoop101 software]# ll
total 574916
lrwxrwxrwx. 1 root  root         13 Sep 11 23:33 hadoop -> hadoop-2.7.3/
drwxr-xr-x. 9 root  root       4096 Aug 18  2016 hadoop-2.7.3
-rw-r--r--. 1 root  root  214092195 Aug 26  2016 hadoop-2.7.3.tar.gz
lrwxrwxrwx. 1 root  root         13 Sep 11 23:33 jdk -> jdk1.8.0_251/
drwxr-xr-x. 7 10143 10143      4096 Mar 12  2020 jdk1.8.0_251
-rw-r--r--. 1 root  root  179472367 Mar 14  2020 jdk-8u251-linux-x64.rpm
-rw-r--r--. 1 root  root  195132576 Mar 14  2020 jdk-8u251-linux-x64.tar.gz
[root@hadoop101 software]#
- 1
- 2
- 3
- 4
- 5
- 6
- 7
- 8
- 9
- 10
- 11
- 12
- 13
- 14
- 15
- 16
- 17
- 18
- 19
- 20
- 21
- 22
- 23
- 24
- 25
- 26
- 27
- 28
- 29
- 30
- 31
- 32
- 33
- 34
- 35
配置环境信息:
[root@hadoop101 software]# vim /etc/profile
[root@hadoop101 software]# tail /etc/profile
done

unset i
unset -f pathmunge
#配置以下内容,配置文件最下面加上下面的内容
export JAVA_HOME=/opt/software/jdk
export PATH=$PATH:$JAVA_HOME/bin

export HADOOP_HOME=/opt/software/hadoop
export PATH=$PATH:$HADOOP_HOME/bin:$HADOOP_HOME/sbin#生效
[root@hadoop101 software]# source /etc/profile
[root@hadoop101 software]# env | grep JAVA
JAVA_HOME=/opt/software/jdk
[root@hadoop101 software]# env | grep HADOOP
HADOOP_HOME=/opt/software/hadoop
[root@hadoop101 software]#
- 1
- 2
- 3
- 4
- 5
- 6
- 7
- 8
- 9
- 10
- 11
- 12
- 13
- 14
- 15
- 16
- 17
- 18
查看安装版本:
[root@hadoop101 software]# java -version
java version "1.8.0_251"
Java(TM) SE Runtime Environment (build 1.8.0_251-b08)
Java HotSpot(TM) 64-Bit Server VM (build 25.251-b08, mixed mode)
[root@hadoop101 software]# hadoop version
Hadoop 2.7.3
Subversion https://git-wip-us.apache.org/repos/asf/hadoop.git -r baa91f7c6bc9cb92be5982de4719c1c8af91ccff
Compiled by root on 2016-08-18T01:41Z
Compiled with protoc 2.5.0
From source with checksum 2e4ce5f957ea4db193bce3734ff29ff4
This command was run using /opt/software/hadoop-2.7.3/share/hadoop/common/hadoop-common-2.7.3.jar
[root@hadoop101 software]#
- 1
- 2
- 3
- 4
- 5
- 6
- 7
- 8
- 9
- 10
- 11
- 12
- 13
1.本地模式
单主机模式,不需要启动进程
a. 创建在hadoop文件下面创建一个input文件夹
[root@hadoop101 ~]# cd /opt/software/hadoop
[root@hadoop101 hadoop]# ll
total 132
drwxr-xr-x. 2 root root  4096 Aug 18  2016 bin
drwxr-xr-x. 3 root root  4096 Aug 18  2016 etc
drwxr-xr-x. 2 root root  4096 Aug 18  2016 include
drwxr-xr-x. 3 root root  4096 Aug 18  2016 lib
drwxr-xr-x. 2 root root  4096 Aug 18  2016 libexec
-rw-r--r--. 1 root root 84854 Aug 18  2016 LICENSE.txt
-rw-r--r--. 1 root root 14978 Aug 18  2016 NOTICE.txt
-rw-r--r--. 1 root root  1366 Aug 18  2016 README.txt
drwxr-xr-x. 2 root root  4096 Aug 18  2016 sbin
drwxr-xr-x. 4 root root  4096 Aug 18  2016 share
[root@hadoop101 hadoop]#
[root@hadoop101 hadoop]# mkdir input
- 1
- 2
- 3
- 4
- 5
- 6
- 7
- 8
- 9
- 10
- 11
- 12
- 13
- 14
- 15
b.将Hadoop的xml配置文件复制到input
[root@hadoop101 hadoop]# cp etc/hadoop/*.xml input
[root@hadoop101 hadoop]# ll input
total 48
-rw-r--r--. 1 root root 4436 Sep 13 00:08 capacity-scheduler.xml
-rw-r--r--. 1 root root  774 Sep 13 00:08 core-site.xml
-rw-r--r--. 1 root root 9683 Sep 13 00:08 hadoop-policy.xml
-rw-r--r--. 1 root root  775 Sep 13 00:08 hdfs-site.xml
-rw-r--r--. 1 root root  620 Sep 13 00:08 httpfs-site.xml
-rw-r--r--. 1 root root 3518 Sep 13 00:08 kms-acls.xml
-rw-r--r--. 1 root root 5511 Sep 13 00:08 kms-site.xml
-rw-r--r--. 1 root root  690 Sep 13 00:08 yarn-site.xml
[root@hadoop101 hadoop]#
- 1
- 2
- 3
- 4
- 5
- 6
- 7
- 8
- 9
- 10
- 11
- 12
c.执行share目录下的MapReduce程序
[root@hadoop101 hadoop]# ll share/hadoop/mapreduce
total 4976
-rw-r--r--. 1 root root  537521 Aug 18  2016 hadoop-mapreduce-client-app-2.7.3.jar
-rw-r--r--. 1 root root  773501 Aug 18  2016 hadoop-mapreduce-client-common-2.7.3.jar
-rw-r--r--. 1 root root 1554595 Aug 18  2016 hadoop-mapreduce-client-core-2.7.3.jar
-rw-r--r--. 1 root root  189714 Aug 18  2016 hadoop-mapreduce-client-hs-2.7.3.jar
-rw-r--r--. 1 root root   27598 Aug 18  2016 hadoop-mapreduce-client-hs-plugins-2.7.3.jar
-rw-r--r--. 1 root root   61745 Aug 18  2016 hadoop-mapreduce-client-jobclient-2.7.3.jar
-rw-r--r--. 1 root root 1551594 Aug 18  2016 hadoop-mapreduce-client-jobclient-2.7.3-tests.jar
-rw-r--r--. 1 root root   71310 Aug 18  2016 hadoop-mapreduce-client-shuffle-2.7.3.jar
-rw-r--r--. 1 root root  295812 Aug 18  2016 hadoop-mapreduce-examples-2.7.3.jar
drwxr-xr-x. 2 root root    4096 Aug 18  2016 lib
drwxr-xr-x. 2 root root    4096 Aug 18  2016 lib-examples
drwxr-xr-x. 2 root root    4096 Aug 18  2016 sources
[root@hadoop101 hadoop]#
[root@hadoop101 hadoop]# hadoop jar share/hadoop/mapreduce/hadoop-mapreduce-examples-2.7.3.jar grep input/ output 'dfs[a-z.]+'
- 1
- 2
- 3
- 4
- 5
- 6
- 7
- 8
- 9
- 10
- 11
- 12
- 13
- 14
- 15
- 16
d.查看输出结果
[root@hadoop101 hadoop]# ll output/
total 4
-rw-r--r--. 1 root root 11 Sep 13 00:13 part-r-00000
-rw-r--r--. 1 root root  0 Sep 13 00:13 _SUCCESS
[root@hadoop101 hadoop]# cat output/*
1	dfsadmin
[root@hadoop101 hadoop]#
- 1
- 2
- 3
- 4
- 5
- 6
- 7
- 8
官方WordCount案例
[root@hadoop101 hadoop]# mkdir wcinput
[root@hadoop101 hadoop]# cd wcinput/
[root@hadoop101 wcinput]# touch wc.input
[root@hadoop101 wcinput]# cat >> wc.input << 'EOF'
hadoop yarn
hadoop mapreduce
docker
xixi
EOF
[root@hadoop101 wcinput]# cd ..
[root@hadoop101 hadoop]# hadoop jar share/hadoop/mapreduce/hadoop-mapreduce-examples-2.7.3.jar wordcount wcinput wcoutput
[root@hadoop101 hadoop]# ll wcoutput/
total 4
-rw-r--r--. 1 root root 44 Sep 13 00:19 part-r-00000
-rw-r--r--. 1 root root  0 Sep 13 00:19 _SUCCESS
[root@hadoop101 hadoop]# cat wcoutput/*
docker	1
hadoop	2
mapreduce	1
xixi	1
yarn	1
[root@hadoop101 hadoop]#
- 1
- 2
- 3
- 4
- 5
- 6
- 7
- 8
- 9
- 10
- 11
- 12
- 13
- 14
- 15
- 16
- 17
- 18
- 19
- 20
- 21
- 22
2. 伪分布式
单主机,需要启动进程,启动HDFS并运行MapReduce程序
[root@hadoop101 ~]# vim /etc/hosts
[root@hadoop101 ~]# echo 192.168.31.155 hadoop101 >>/etc/hosts
关闭防火墙
查看防火墙状态: systemctl status firewalld.service
执行关闭命令: systemctl stop firewalld.service
执行开机禁用防火墙自启命令 : systemctl disable firewalld.service
[root@hadoop101 ~]# cd /opt/software/hadoop/etc
- 1
a. 配置三种模式并存
- 1.拷贝hadoop文件夹
[root@hadoop101 etc]# cp -r hadoop local ##local文件不存在也可以复制,本地模式
[root@hadoop101 etc]# cp -r hadoop pseudo ##伪分布式,文件
[root@hadoop101 etc]# cp -r hadoop full  ##完全分布式
[root@hadoop101 etc]# rm -rf hadoop/
[root@hadoop101 etc]# rm -rf hadoop/
[root@hadoop101 etc]# ls
full  local  pseudo
[root@hadoop101 etc]# ln -s pseudo/ hadoop
[root@hadoop101 etc]# ll
total 12
drwxr-xr-x. 2 root root 4096 Sep 13 00:28 full
lrwxrwxrwx. 1 root root    7 Sep 13 00:29 hadoop -> pseudo/
drwxr-xr-x. 2 root root 4096 Sep 13 00:28 local
drwxr-xr-x. 2 root root 4096 Sep 13 00:28 pseudo
[root@hadoop101 etc]#
- 1
- 2
- 3
- 4
- 5
- 6
- 7
- 8
- 9
- 10
- 11
- 12
- 13
- 14
- 15
- 2.进入hadoop配置文件目录下,修改配置文件
[root@hadoop101 etc]# cd hadoop
[root@hadoop101 hadoop]# pwd
/opt/software/hadoop/etc/hadoop ##配置文件目录
[root@hadoop101 hadoop]# ls core-site.xml hdfs-site.xml mapred-site.xml.template yarn-site.xml ##修改4个配置文件
core-site.xml hdfs-site.xml mapred-site.xml.template yarn-site.xml
[root@hadoop101 hadoop]# ls core-site.xml hdfs-site.xml mapred-site.xml.template yarn-site.xml hadoop-env.sh
先备份
[root@hadoop101 hadoop]# cp core-site.xml{,.bak}
#配置core-site.xml
[root@hadoop101 hadoop]# vim core-site.xml
<configuration>   ##在cofiguration加下面内容
    <property>
        <name>fs.defaultFS</name>
        #<!-- 指定HDFS中NameNode的地址 -->
        <value>hdfs://localhost/</value> ##也可以配置本机IP
    </property>
</configuration>
- 1
- 2
- 3
- 4
- 5
- 6
- 7
#配置hdfs-site.xml
[root@hadoop101 hadoop]# cp hdfs-site.xml{,.bak}
[root@hadoop101 hadoop]# vim hdfs-site.xml
<!-- 指定HDFS副本的数量 -->
<configuration>
    <property>
        <name>dfs.replication</name>
        <value>1</value>
    </property>
</configuration>
- 1
- 2
- 3
- 4
- 5
- 6
- 7
配置历史服务器-----mapred-site.xml
为了查看程序的历史运行情况,需要配置一下历史服务器
#配置 mapred-site.xml
#配置 mapred-site.xml指定MapReduce程序应该放在哪个资源调度集群上运行。若不指定为yarn,那么MapReduce程序就只会在本地运行而非在整个集群中运行
[root@hadoop101 hadoop]# cp mapred-site.xml.template mapred-site.xml
[root@hadoop101 hadoop]# vim mapred-site.xml
<configuration>
    <property>
        <!-- 指定MR运行在YARN上 -->
        <name>mapreduce.framework.name</name>
        <value>yarn</value>
    </property>
</configuration>
- 1
- 2
- 3
- 4
- 5
- 6
- 7
#配置yarn-site.xml
[root@hadoop101 hadoop]# cp yarn-site.xml{,.bak}
[root@hadoop101 hadoop]# vim yarn-site.xml
<configuration>

<!-- Site specific YARN configuration properties -->
    <property>
        <!-- 指定YARN的ResourceManager的地址 -->
        <name>yarn.resourcemanager.hostname</name>
        <value>hadoop101</value>
    </property>
    <property>
        <!-- Reducer获取数据的方式 -->
        <name>yarn.nodemanager.aux-services</name>
        <value>mapreduce_shuffle</value>
    </property>
</configuration>
- 1
- 2
- 3
- 4
- 5
- 6
- 7
- 8
- 9
- 10
- 11
- 12
- 13
- 14
#配置hadoop-env.sh
[root@hadoop101 hadoop]# cp hadoop-env.sh{,.bak}
[root@hadoop101 hadoop]# vim hadoop-env.sh
[root@hadoop101 hadoop]# cat hadoop-env.sh |grep JAVA_HOME
# The only required environment variable is JAVA_HOME.  All others are
# set JAVA_HOME in this file, so that it is correctly defined on
#export JAVA_HOME=${JAVA_HOME}
export JAVA_HOME=/opt/software/jdk
[root@hadoop101 hadoop]#
[root@hadoop101 hadoop]# cat hadoop-env.sh| grep HADOOP_CONF_DIR
#export HADOOP_CONF_DIR=${HADOOP_CONF_DIR:-"/etc/hadoop"}
export HADOOP_CONF_DIR=/opt/software/hadoop/etc/hadoop/
[root@hadoop101 hadoop]# echo $JAVA_HOME
[root@hadoop101 hadoop]# source hadoop-env.sh
- 1
- 2
- 3
- 4
- 5
- 6
- 7
- 8
- 9
- 10
- 11
-
- 配置ssh免密登陆
[root@hadoop101 hadoop]# ssh-keygen -t rsa -P ‘’ -f ~/.ssh/id_rsa
[root@hadoop101 hadoop]# ssh-copy-id hadoop101
#执行完上面两条命令后,就可以实现免密码登录到本机
[root@hadoop102 hadoop]# ssh hadoop101
- 配置ssh免密登陆
-
- 启动集群
#格式化hdfs文件系统
[root@hadoop101 ~]# hdfs namenode -format 第一次启动时格式化,以后就不要总格式化
#启动进程:
[root@hadoop101 hadoop]# which start-all.sh
/opt/software/hadoop/sbin/start-all.sh
[root@hadoop101 hadoop]# start-all.sh 或者下面的命令
[root@hadoop101 hadoop]# hadoop-daemon.sh start namenode #启动NameNode
[root@hadoop101 hadoop]# hadoop-daemon.sh start datanode #启动DataNode
启动resourcemanager 和Nodemanager前必须保证NameNode和DataNode已经启动
[root@hadoop101 hadoop]# yarn-daemon.sh start resourcemanager #启动ResourceManager
[root@hadoop101 hadoop]# yarn-daemon.sh start nodemanager #启动NodeManager
- 启动集群
[root@hadoop101 hadoop]# stop-all.sh  ##关闭集群
[root@hadoop101 hadoop]# start-all.sh  #启动Hadoop所有进程
This script is Deprecated. Instead use start-dfs.sh and start-yarn.sh
Starting namenodes on [localhost]
localhost: starting namenode, logging to /opt/software/hadoop-2.7.3/logs/hadoop-root-namenode-hadoop101.out
localhost: starting datanode, logging to /opt/software/hadoop-2.7.3/logs/hadoop-root-datanode-hadoop101.out
Starting secondary namenodes [0.0.0.0]
0.0.0.0: starting secondarynamenode, logging to /opt/software/hadoop-2.7.3/logs/hadoop-root-secondarynamenode-hadoop101.out
starting yarn daemons
resourcemanager running as process 2014. Stop it first.
localhost: starting nodemanager, logging to /opt/software/hadoop-2.7.3/logs/yarn-root-nodemanager-hadoop101.out
- 1
- 2
- 3
- 4
- 5
- 6
- 7
- 8
- 9
- 10
- 11
查看集群:
[root@hadoop101 hadoop]# jps  #jps是JDK中的命令,不安装java不会有
2548 NameNode    #HDFS的老大,“仓库管理员
3174 Jps
3063 NodeManager
2651 DataNode   #HDFS的小弟,“具体的仓库”
2014 ResourceManager   #管理集群资源,负责全局资源的监控,分配和管理
2815 SecondaryNameNode   #NameNode的助理
[root@hadoop101 hadoop]# netstat -tnlup | grep 500
tcp        0      0 0.0.0.0:50010           0.0.0.0:*               LISTEN      9103/java
tcp        0      0 0.0.0.0:50075           0.0.0.0:*               LISTEN      9103/java
tcp        0      0 0.0.0.0:50020           0.0.0.0:*               LISTEN      9103/java
tcp        0      0 0.0.0.0:50090           0.0.0.0:*               LISTEN      9274/java
tcp        0      0 0.0.0.0:50070           0.0.0.0:*               LISTEN      8967/java
[root@hadoop101 hadoop]# netstat -tnlup | grep 80
tcp        0      0 127.0.0.1:8020          0.0.0.0:*               LISTEN      8967/java
tcp6       0      0 192.168.31.155:8088     :::*                    LISTEN      9433/java
tcp6       0      0 192.168.31.155:8030     :::*                    LISTEN      9433/java
tcp6       0      0 192.168.31.155:8031     :::*                    LISTEN      9433/java
tcp6       0      0 192.168.31.155:8032     :::*                    LISTEN      9433/java
tcp6       0      0 192.168.31.155:8033     :::*                    LISTEN      9433/java
tcp6       0      0 :::8040                 :::*                    LISTEN      9545/java
tcp6       0      0 :::8042                 :::*                    LISTEN      9545/java
[root@hadoop101 hadoop]#
8020端口在hadoop1.x中默认承担着namenode 和 datanode之间的心跳通信
9000端口是在hadoop2.x中将FileSystem通讯端口拆分出来了,默认为9000,在hadoop2.x中我们可以在hdfs-size.xml中进行配置
50070端口是httpService访问端口,供于浏览器进行访问namenode节点,监控其各个datanode的服务端口,同样在hadoop2.x中我们可以在hdfs-size.xml中进行配置<name>dfs.namenode.http-address.hadoop277ha.nn1</name>
<value>hadoop01:50070</value>
- 1
- 2
- 3
- 4
- 5
- 6
- 7
- 8
- 9
- 10
- 11
- 12
- 13
- 14
- 15
- 16
- 17
- 18
- 19
- 20
- 21
- 22
- 23
- 24
- 25
- 26
- 27
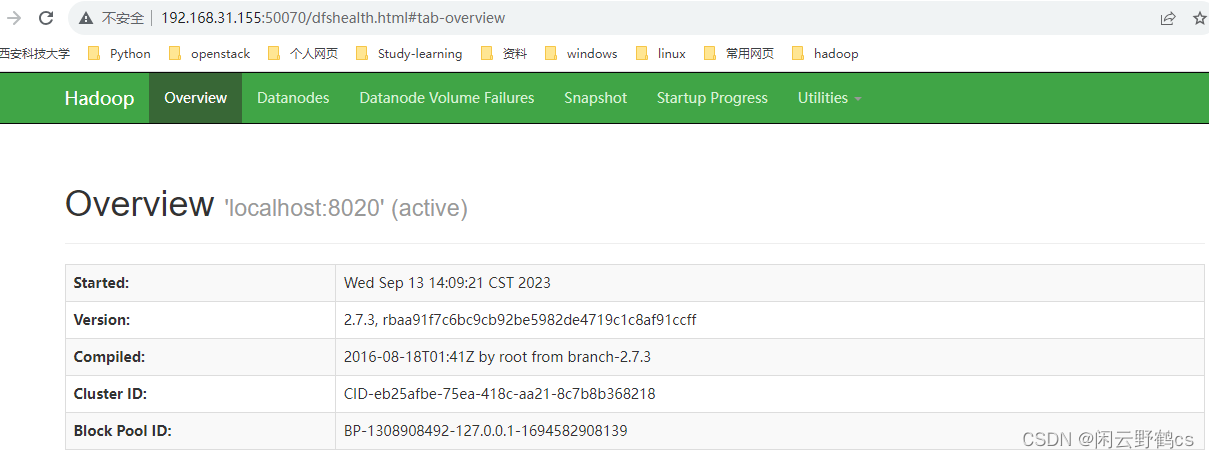
- 1.web端查看HDFS文件系统:
验证 HDFS 启动成功的web ui网址为:http://192.168.78.129:50070

点击Utilities,然后点击Browse the file system,可以查看HDFS上的目录:

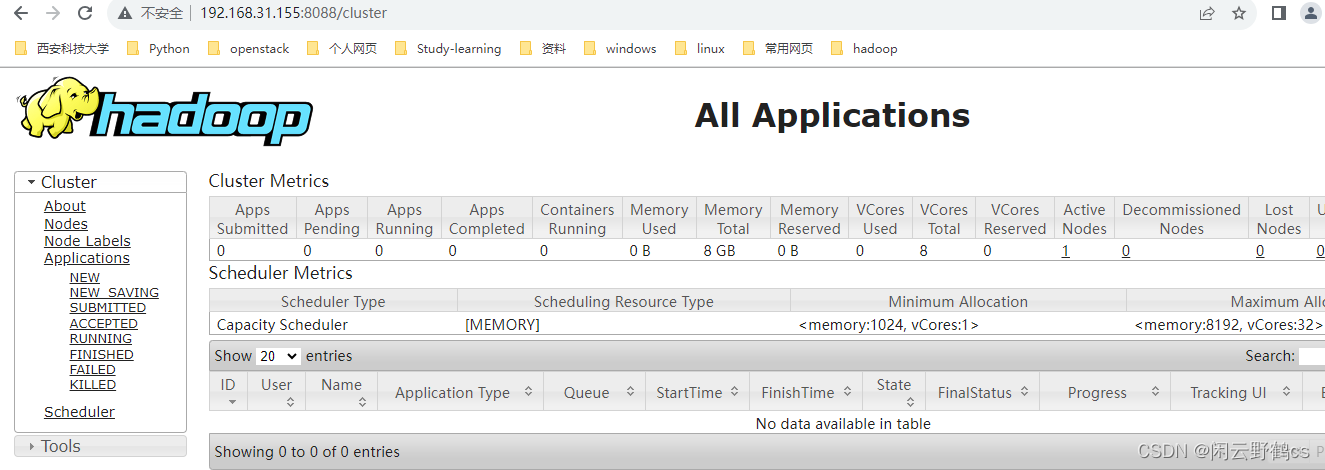
- 2.YARN的浏览器页面查看:
验证 YARN 启动成功的网址为:http://192.168.78.129:8088

查看产生的Log日志:
[root@hadoop101 hadoop]# echo $HADOOP_HOME
/opt/software/hadoop
[root@hadoop101 hadoop]# ls /opt/software/hadoop/logs/
操作指令
[root@hadoop101 hadoop]# hdfs dfs -ls /
[root@hadoop101 hadoop]# hdfs dfs -touchz /hadoop.txt  ##创建文件
[root@hadoop101 hadoop]# hdfs dfs -ls /
Found 1 items
-rw-r--r--   1 root supergroup          0 2023-09-13 14:49 /hadoop.txt
[root@hadoop101 hadoop]#
[root@hadoop101 hadoop]# hdfs dfs -mkdir /aaa/bbb/ ##递归创建目录

[root@hadoop101 hadoop]# hdfs dfs -put ./hadoop-env.sh.bak /aaa/bbb/
# ./hadoop-env.sh.bak为上传的本地文件路径,/aaa/bbb/为保存到HDFS上的路径
[root@hadoop101 hadoop]# hdfs dfs -ls /aaa/bbb/ #查看HDFS上/aaa/bbb/目录下
[root@hadoop101 hadoop]# hdfs dfs -cat /aaa/bbb/hadoop-env.sh.bak #查看/aaa/bbb/hadoop-env.sh.bak文件内容。
[root@hadoop101 hadoop]# hdfs dfs -get /aaa/bbb/hadoop-env.sh.bak ./ ##下载文件
[root@hadoop101 hadoop]# hdfs dfs -rm -r /user/rcs
- 1
- 2
- 3
- 4
- 5
- 6
- 7
- 8
- 9
- 10
- 11
- 12
- 13
- 14
#mapreduce:分布式计算
通过Mapreduce进行简单的单词统计统计词频,使用自带的demo
#在本地创建wordcount.txt文件,并将一段英文文档粘贴到文档中
[root@hadoop101 hadoop]# echo "hdfs dfs -put wordcount.txt /" > wordcount.txt
[root@hadoop101 hadoop]# cat wordcount.txt
hdfs dfs -put wordcount.txt /
[root@hadoop101 hadoop]#
[root@hadoop101 hadoop]# hdfs dfs -put wordcount.txt /
[root@hadoop101 hadoop]# hadoop jar /opt/software/hadoop/share/hadoop/mapreduce/hadoop-mapreduce-examples-2.7.3.jar wordcount /wordcount.txt /out
- 1
- 2
- 3
- 4
- 5
- 6
- 7
3. 完全分布式
- a.虚拟机准备
[root@hadoop-slave2 ~]# hostnamectl set-hostname hadoop-slave2
[root@hadoop-slave1 ~]# hostnamectl set-hostname hadoop-slave1
[root@hadoop101 ~]# hostnamectl set-hostname hadoop101 ----master
设置静态ip,在三台主机上设置静态ip: 最好设置为静态ip
[root@hadoop-slave1 ~]# vim /etc/sysconfig/network-scripts/ifcfg-ens32
[root@hadoop-slave1 ~]# cat /etc/sysconfig/network-scripts/ifcfg-ens32
TYPE="Ethernet"
BOOTPROTO="static"
NAME="ens32"
DEVICE="ens32"
ONBOOT="yes"
IPADDR=192.168.0.3
NETMASK=255.255.255.0
GATEWAY=192.168.0.2
DNS1=192.168.0.2
[root@hadoop-slave1 ~]# systemctl stop NetworkManager
[root@hadoop-slave1 ~]# systemctl disable NetworkManager
[root@hadoop-slave1 ~]# systemctl status NetworkManager
[root@hadoop-slave1 ~]# systemctl restart network
[root@hadoop-slave1 ~]# ip a s ens32

192.168.31.4    hadoop101
192.168.31.3    hadoop-slave1
192.168.31.5    hadoop-slave2
- 1
- 2
- 3
- 4
- 5
- 6
- 7
- 8
- 9
- 10
- 11
- 12
- 13
- 14
- 15
- 16
- 17
- 18
- 19
- 20
- 21
- 22
- b.设置host(每台主机都设置,三台主机都配置)
[root@hadoop101 ~]# vim /etc/hosts
[root@hadoop101 ~]# cat /etc/hosts
::1    localhost    localhost.localdomain    localhost6    localhost6.localdomain6
127.0.0.1    localhost    localhost.localdomain    localhost4    localhost4.localdomain4
192.168.0.4    hadoop101
192.168.0.3    hadoop-slave1
192.168.0.5    hadoop-slave2
- 1
- 2
- 3
- 4
- 5
- 6
- 7
- c.配置ssh免密登陆
在master 也就是101机器上配置
[root@hadoop101 ~]# ssh-keygen -t rsa -P '' -f ~/.ssh/id_rsa
[root@hadoop101 ~]# ssh-copy-id 192.168.0.4  或者ssh-copy-id hadoop101
[root@hadoop101 ~]# ssh-copy-id 192.168.0.3
[root@hadoop101 ~]# ssh-copy-id 192.168.0.5

验证:
[root@hadoop101 ~]# ssh 192.168.0.5
Last login: Wed Sep 13 23:20:26 2023 from 192.168.0.107
[root@hadoop-slave2 ~]#
[root@hadoop-slave2 ~]# logout
Connection to 192.168.0.5 closed.
[root@hadoop101 ~]# ssh 192.168.0.3
Last login: Wed Sep 13 22:45:24 2023 from 192.168.0.107
[root@hadoop-slave1 ~]#
[root@hadoop-slave1 ~]# logout
Connection to 192.168.0.3 closed.
[root@hadoop101 ~]#
- 1
- 2
- 3
- 4
- 5
- 6
- 7
- 8
- 9
- 10
- 11
- 12
- 13
- 14
- 15
- 16
- 17
- 18
- d. 修改符号链接,将hadoop指向full
[root@hadoop101 ~]# cd /opt/software/hadoop/etc
[root@hadoop101 etc]# ll
total 12
drwxr-xr-x. 2 root root 4096 Sep 13 00:28 full
lrwxrwxrwx. 1 root root    7 Sep 13 00:29 hadoop -> pseudo/
drwxr-xr-x. 2 root root 4096 Sep 13 00:28 local
drwxr-xr-x. 2 root root 4096 Sep 13 15:56 pseudo
[root@hadoop101 etc]# ln -sfT full/ hadoop  #更改hadoop链接
[root@hadoop101 etc]# ll
total 12
drwxr-xr-x. 2 root root 4096 Sep 13 00:28 full
lrwxrwxrwx. 1 root root    5 Sep 13 23:31 hadoop -> full/
drwxr-xr-x. 2 root root 4096 Sep 13 00:28 local
drwxr-xr-x. 2 root root 4096 Sep 13 15:56 pseudo
- 1
- 2
- 3
- 4
- 5
- 6
- 7
- 8
- 9
- 10
- 11
- 12
- 13
- 14
- 15
- d. 配置JAVA_HOME
[root@hadoop101 hadoop]# cd /opt/software/hadoop/etc/hadoop
[root@hadoop101 hadoop]# ls hadoop-env.sh yarn-env.sh mapred-env.sh
hadoop-env.sh  mapred-env.sh  yarn-env.sh
[root@hadoop101 hadoop]# echo $JAVA_HOME
/opt/software/jdk
都需要配置JAVA_HOME变量,全路径:
export JAVA_HOME=/opt/software/jdk

[root@hadoop101 hadoop]# vim mapred-env.sh
[root@hadoop101 hadoop]# grep JAVA_HOME mapred-env.sh
# export JAVA_HOME=/home/y/libexec/jdk1.6.0/
export JAVA_HOME=/opt/software/jdk

[root@hadoop101 hadoop]# vim hadoop-env.sh
[root@hadoop101 hadoop]# grep JAVA_HOME mapred-env.sh
# export JAVA_HOME=/home/y/libexec/jdk1.6.0/
export JAVA_HOME=/opt/software/jdk
[root@hadoop101 hadoop]#

[root@hadoop101 hadoop]# grep JAVA_HOME yarn-env.sh
# export JAVA_HOME=/home/y/libexec/jdk1.6.0/
if [ "$JAVA_HOME" != "" ]; then
  #echo "run java in $JAVA_HOME"
  JAVA_HOME=/opt/software/jdk   ###修改这个
if [ "$JAVA_HOME" = "" ]; then
  echo "Error: JAVA_HOME is not set."
JAVA=$JAVA_HOME/bin/java
- 1
- 2
- 3
- 4
- 5
- 6
- 7
- 8
- 9
- 10
- 11
- 12
- 13
- 14
- 15
- 16
- 17
- 18
- 19
- 20
- 21
- 22
- 23
- 24
- 25
- 26
- 27
[root@hadoop101 hadoop]# source yarn-env.sh hadoop-env.sh mapred-env.sh
- e.集群配置
[root@hadoop101 hadoop]# ls core-site.xml hdfs-site.xml mapred-site.xml.template  hadoop-env.sh yarn-site.xml
core-site.xml  hadoop-env.sh  hdfs-site.xml  mapred-site.xml.template  yarn-site.xml
[root@hadoop101 hadoop]# cp core-site.xml{,.bak}
[root@hadoop101 hadoop]# cp hdfs-site.xml{,.bak}
[root@hadoop101 hadoop]# cp mapred-site.xml.template mapred-site.xml
[root@hadoop101 hadoop]# cp yarn-site.xml{,.bak}
[root@hadoop101 hadoop]# cp hadoop-env.sh{,.bak}
- 1
- 2
- 3
- 4
- 5
- 6
- 7
#配置core-site.xml
[root@hadoop101 hadoop]# vim core-site.xml
<configuration>
    <property>
        <name>fs.defaultFS</name>
        <value>hdfs://hadoop101:8020</value> #HDFS的URI,文件系统://namenode标识:端口号
    </property>
    <property>
        <name>hadoop.tmp.dir</name>
        <value>/data/hadoop</value>  #namenode上本地的hadoop临时文件夹
    </property>
</configuration>
[root@hadoop101 hadoop]# mkdir -p /data/hadoop
- 1
- 2
- 3
- 4
- 5
- 6
- 7
- 8
- 9
- 10
- 11
#配置hdfs-site.xml
[root@hadoop101 hadoop]# vim hdfs-site.xml
<configuration>
    <property>
        <name>dfs.replication</name>
        <value>3</value>  #副本个数,配置默认是3,应小于datanode机器数量
    </property>
</configuration>
- 1
- 2
- 3
- 4
- 5
- 6
#配置mapred-site.xml
[root@hadoop101 hadoop]# vim mapred-site.xml
<configuration>
    <property>
        <name>mapreduce.framework.name</name>
        <value>yarn</value>
    </property>
</configuration>
- 1
- 2
- 3
- 4
- 5
- 6
#配置yarn-site.xml
[root@hadoop101 hadoop]# vim yarn-site.xml
<configuration>

<!-- Site specific YARN configuration properties -->
    <property>
        <name>yarn.resourcemanager.hostname</name>
        <value>hadoop101</value>
    </property>
    <property>
        <name>yarn.nodemanager.aux-services</name>
        <value>mapreduce_shuffle</value>
    </property>
</configuration>
- 1
- 2
- 3
- 4
- 5
- 6
- 7
- 8
- 9
- 10
- 11
- 12
- 13
#配置hadoop-env.sh
[root@hadoop101 hadoop]# vim hadoop-env.sh
[root@hadoop101 hadoop]# vim hadoop-env.sh
[root@hadoop101 hadoop]# cat hadoop-env.sh | grep software
# Unless required by applicable law or agreed to in writing, software
export JAVA_HOME=/opt/software/jdk
export HADOOP_CONF_DIR=/opt/software/hadoop/etc/hadoop/
[root@hadoop101 hadoop]# pwd
/opt/software/hadoop/etc/hadoop
[root@hadoop101 hadoop]# source hadoop-env.sh
- 1
- 2
- 3
- 4
- 5
- 6
- 7
- 8
[root@hadoop101 hadoop]# cat slaves
hadoop101
hadoop-slave1
hadoop-slave2
- f.分发配置文件
[root@hadoop101 hadoop]# scp -r /opt/software/hadoop/etc/hadoop/  root@hadoop-slave1:/opt/software/hadoop/etc/
[root@hadoop101 hadoop]# scp -r /opt/software/hadoop/etc/hadoop/  root@hadoop-slave2:/opt/software/hadoop/etc/

验证:
[root@hadoop-slave1 etc]# pwd
/opt/software/hadoop/etc
[root@hadoop-slave1 etc]# ls
hadoop
[root@hadoop-slave1 etc]#

[root@hadoop-slave2 etc]# pwd
/opt/software/hadoop/etc
[root@hadoop-slave2 etc]# ls -l
total 4
drwxr-xr-x. 2 root root 4096 Sep 14 00:19 hadoop
[root@hadoop-slave2 etc]#
- 1
- 2
- 3
- 4
- 5
- 6
- 7
- 8
- 9
- 10
- 11
- 12
- 13
- 14
- 15
- 16
- g.格式化,启动hadoop
在主节点操作
[root@hadoop101 hadoop]# pwd
/opt/software/hadoop
[root@hadoop101 hadoop]# rm -rf logs/*  ##格式化前先删除日志
[root@hadoop101 hadoop]# ls
bin  etc  include  input  lib  libexec  LICENSE.txt  logs  NOTICE.txt  output  README.txt  sbin  share  wcinput  wcoutput
[root@hadoop101 hadoop]#
[root@hadoop101 hadoop]# hdfs namenode -format
[root@hadoop101 hadoop]# start-all.sh
- 1
- 2
- 3
- 4
- 5
- 6
- 7
- 8
- 9
安装结果:
[root@hadoop101 hadoop]# jps   ##主节点
[root@hadoop101 etc]# jps
5648 Jps
5329 NodeManager
5221 ResourceManager
5062 SecondaryNameNode
4760 NameNode
4891 DataNode

[root@hadoop101 hadoop]# netstat -tnlup | grep 500
tcp        0      0 0.0.0.0:50090           0.0.0.0:*               LISTEN      5096/java
tcp        0      0 0.0.0.0:50070           0.0.0.0:*               LISTEN      4899/java
[root@hadoop101 hadoop]# netstat -tnlup | grep 8088
tcp6       0      0 192.168.0.102:8088      :::*                    LISTEN      5253/java
[root@hadoop101 hadoop]#


[root@hadoop-slave1 etc]# jps
2775 Jps
2536 DataNode
2649 NodeManager

[root@hadoop-slave2 etc]# jps
2740 Jps
2619 NodeManager
2508 DataNode


DataNode   --hdfs进程
SecondaryNameNode  --hdfs进程
NodeManager  --mapreduce进程
NameNode   --hdfs进程
ResourceManager  --mapreduce进程
- 1
- 2
- 3
- 4
- 5
- 6
- 7
- 8
- 9
- 10
- 11
- 12
- 13
- 14
- 15
- 16
- 17
- 18
- 19
- 20
- 21
- 22
- 23
- 24
- 25
- 26
- 27
- 28
- 29
- 30
- 31
- 32
- 33
然后在master节点执行stop-all.sh再执行start-all.sh
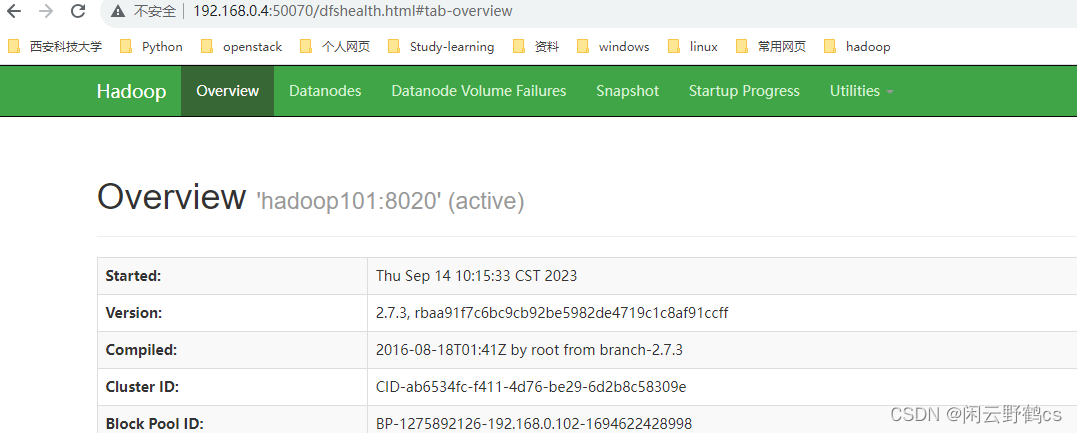
http://192.168.0.3:50070 //ip为当前机器ip namenode的web界面

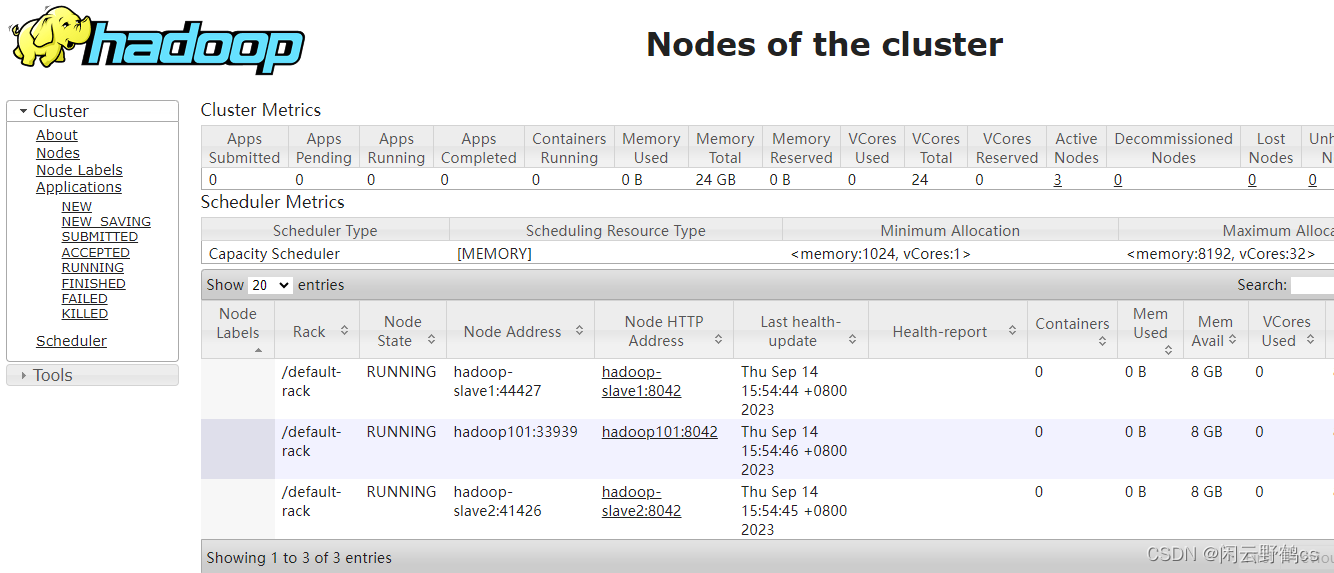
http://192.168.0.3:8088/cluster yarn的web ui
三个node

常用命令:
[root@hadoop101 hadoop]# stop-all.sh
注意点
格式化NameNode,会产生新的集群id,导致NameNode和DataNode的集群id不一致,集群找不到已往数据。所以,格式NameNode时,一定要先删除data数据和log日志,然后再格式化NameNode。
如果集群是第一次启动,需要格式化NameNode,执行一次format就行了(注意格式化之前或者重新格式化,一定要先停止上次启动的所有namenode和datanode进程,然后再删除data和log数据),start-dfs.sh开启namenode和datanode守护进程,停止进程并退出使用stop-dfs.sh。
[root@hadoop101 hadoop]# ls /opt/software/hadoop/logs/
[root@hadoop 101 hadoop]# rm -rf logs/*
单独启动进程的时候要先启动HDFS(start-dfs.sh),然后再启动YARN(start-yarn.sh)
常用命令
[root@hadoop102 hadoop]#  hdfs dfs -get /out/part-r-00000 .  ##下载结果到当前目录
hadoop fs-help 列出所有HadoopShell支持的命令
hadoop fs-help command-name  显示关于某个命令的详细信息
hadoop job -history output-dir 用户可使用以下命令在指定路径下查看历史日志汇总
  hdfs dfs -ls / ==hdfs -ls /
  hdfs dfs -ls /
  hdfs  -put a.txt   /input/  使用put命令可以将本地文件上传到HDFS系统中.例如: 将本地当前目录文件a.txt上传到HDFS文件系统根目录的input文件夹
  hdfs  -get  /input/a.txt  ./  hadoop fs  -get  /input/a.txt  ./
  hdfs  -rm   /input/a.txt
  hdfs  -rm   -r   /output
  hdfs  -mkdir  /input/
  hdfs  -mkdir  -p   /input/file
  hdfs  -cp  /input/a.txt    /input/b.txt  使用cp命令可以复制HDFS中的文件到另一个文件,相当于给文件重命名并保存
  hdfs  -mv  /input/a.txt  /input/b.txt
  hdfs  -cat  /input/a.txt
- 1
- 2
- 3
- 4
- 5
- 6
- 7
- 8
- 9
- 10
- 11
- 12
- 13
- 14
- 15
将/stu/students.txt文件拷贝到本地
hadoop dfs -copyToLocal /stu/students.txt
将目录拷贝到本地
hadoop dfs -copyToLocal /home localdir
将word.txt文件拷贝到/wordcount/input/目录
hadoop dfs -copyFromLocal word.txt /wordcount/input
将word.txt文件从本地移动到/wordcount/input/目录下
hadoop dfs -moveFromLocal word.txt /wordcount/input/
删除一个目录
hadoop dfs -rmr /home
删除以"xbs-"开头的目录及其子目录
hadoop dfs -rm -r /xbs-*
查看HDFS集群的磁盘空间使用情况
hadoop dfs -df -h
查看文件
hadoop dfs -cat /hello
查看/word.txt文件的内容
hadoop dfs -cat /word.txt
将name.txt文件中的内容添加到/wordcount/input/words.txt文件中
hadoop dfs -appendToFile name.txt /wordcount/input/words.txt
动态查看/wordcount/input/words.txt文件的内容
hadoop dfs -tail -f /wordcount/input/words.txt
统计/flume目录总大小
hadoop dfs -du -s -h /flume
分别统计/flume目录下各个子目录(或文件)大小
hadoop dfs -du -s -h /flume/*
运行jar包中的程序
//hadoop jar + 要执行的jar包 + 要运行的类 + 输入目录 + 输出目录
hadoop jar wordcount.jar com.xuebusi.hadoop.mr.WordCountDriver /wordcount/input /wordcount/out
查看hdfs集群状态
hdfs dfsadmin -report
查看dfs的情况
hadoop dfsadmin -report
查看正在跑的Java程序
jps
在hadoop指定目录下新建一个空文件
使用touchz命令:
hdfs dfs -touchz /user/new.txt


