
- 1大语言模型(LLMs)全面学习指南,初学者入门,一看就懂!
- 2使用Llama Index创建和查询知识图谱_llamaindex的知识图谱检索
- 3hive基础介绍_hive insert into select from
- 4Linux赋予文件权限 最高权限 可执行权限_linux赋予文件执行权限
- 5基于stm32的智能门禁系统_stm32智能门禁_基于stm32f13的智能门禁系统
- 62021年全国职业院校技能大赛 “大数据技术与应用”—模拟赛题(二)_设置jdk环境变量,并使环境变量只对当前root用户生效
- 7Docker配置国内镜像源_docker配置国内源
- 8git clone报错 RPC failed; curl 92 HTTP/2 stream 5 was not closed cleanly: CANCEL (err 8)_git clone curl 92
- 9万界星空科技电线电缆MES系统实现线缆全流程追溯
- 10Django REST Framework(DRF)框架之其他常用API的使用_drf api
【机器学习】QLoRA:基于PEFT亲手量化微调Qwen2大模型_qlora微调
赞
踩

目录
三、量化与微调—实战演练:以Qwen2为例,亲手微调你的第一个AI大模型
一、引言
之前陆续写了Qwen1.5、Qwen2.0、GLM-4等国产开源大模型的原理、训练及推理相关的文章,每一篇都拿到了热榜第一,但其中训练部分均基于Llama-factory框架,对于工程师而言,最喜欢的就是刨根问底,使用中间层的训练框架,还是少一些“安全感”。今天我们抛开中间框架,深入底层,一步一步带大家微调一个大模型。
二、量化与微调—原理剖析
2.1 为什么要量化微调?
量化微调要解决的问题:全参数、高比特(32bit或16bit)微调训练需要大量的GPU显存资源,于是通过缩减参数位数(Quantization)以及缩减可训练参数规模(LoRA)等策略降低训练成本,达到全参数微调同等的效果。
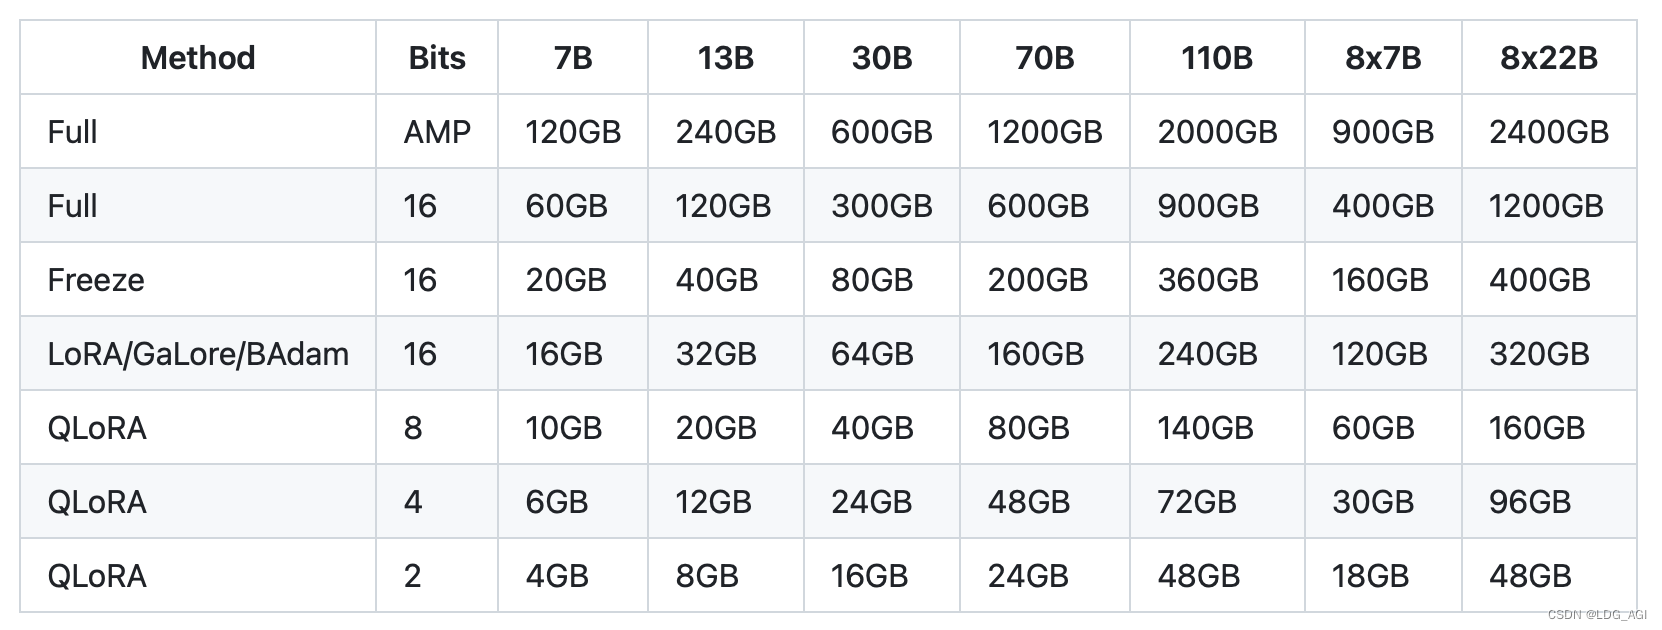
如上图,针对一个7B的模型,全参数16位微调,需要60G显存,QLoRA4位微调仅需6GB,仅需要1/10。面对昂贵的GPU资源,量化微调技术真的是“知识解放生产力”的典范。下面分别讲解量化和微调的原理。
2.2 量化(Quantization)
2.2.1 量化原理
向量量化:int8/int4
通俗将就是将float16位浮点型转换为int8位整型,可以分为“0点量化zero-point”和“最大绝对值absmax”量化,下图是“最大绝对值absmax”量化的示例。

我们计划量化至int8的范围为[-127,127]:
- 取fp16向量的最大值5.4,127除以5.4得到23.5,作为缩放因子
- fp16向量的所有数乘以23.5得到int8的向量
反量化为FP16:
- 将int8的向量除以缩放因子23.5
矩阵量化(0退化)
经过证明,量化的损失是由离群点(偏离整体分布的点)特征导致的,于是设定一个异常阈值,将大于阈值的列抽离出来维持fp16,对小于异常阈值的矩阵进行量化计算,可以保证精度不丢失。动图演示如下:

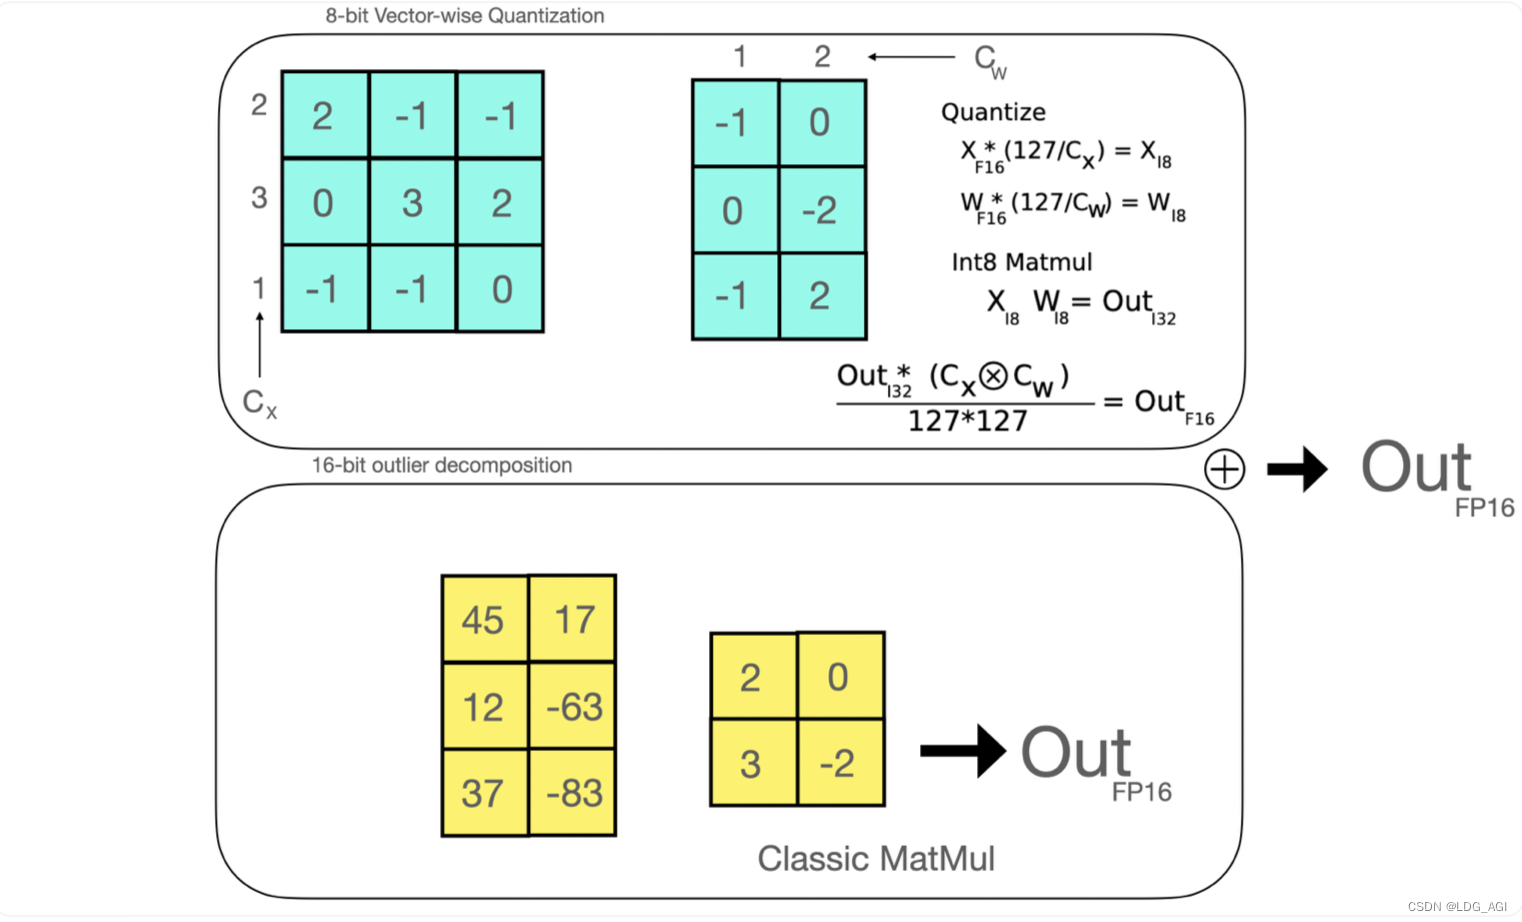
抽取线性矩阵W、X的非离群值量化为int8:
- 从输入的隐含状态中,按列提取异常值 (即大于某个阈值的值)。
- 对 FP16 离群值矩阵和 Int8 非离群值矩阵分别作矩阵乘法。
反量化为FP16:
- 反量化非离群值的矩阵乘结果并其与离群值矩阵乘结果相加,获得最终的 FP16 结果。
2.2.2 量化代码
bitsandbytes库:量化任何模型的最简单方法之一,与GGUF均属于零样本量化,不需要量化校准数据及校准过程(而AWQ和GPTQ等量化方啊均需要少量样本进行校准) 。任何模型只要含有 torch.nn.Linear 模块,就可以对其进行开箱即用的量化。
nf4/fp4量化代码,很简单,仅需要一个BitsAndBytesConfig配置即可使用。
- from transformers import AutoTokenizer, AutoModelForCausalLM,BitsAndBytesConfig
- ###int4量化配置
- quantization_config = BitsAndBytesConfig(
- load_in_4bit=True, # 或者 load_in_8bit=True,根据需要设置
- #llm_int8_threshold=6.0,
- #llm_int8_has_fp16_weight=False,
- bnb_4bit_compute_dtype=torch.float16,
- bnb_4bit_quant_type="nf4",#添加nf4配置,去掉为fp4
- bnb_4bit_use_double_quant=True,#添加nf4配置,去掉为fp4
- )
- model = AutoModelForCausalLM.from_pretrained(model_dir,device_map=device,trust_remote_code=True,torch_dtype=torch.float16,quantization_config=quantization_config)
- print(model)
输出模型结构,可以看到Attention和MLP层中的Linear线性层全部变成了linear4bit:
- Qwen2ForCausalLM(
- (model): Qwen2Model(
- (embed_tokens): Embedding(152064, 3584)
- (layers): ModuleList(
- (0-27): 28 x Qwen2DecoderLayer(
- (self_attn): Qwen2SdpaAttention(
- (q_proj): Linear4bit(in_features=3584, out_features=3584, bias=True)
- (k_proj): Linear4bit(in_features=3584, out_features=512, bias=True)
- (v_proj): Linear4bit(in_features=3584, out_features=512, bias=True)
- (o_proj): Linear4bit(in_features=3584, out_features=3584, bias=False)
- (rotary_emb): Qwen2RotaryEmbedding()
- )
- (mlp): Qwen2MLP(
- (gate_proj): Linear4bit(in_features=3584, out_features=18944, bias=False)
- (up_proj): Linear4bit(in_features=3584, out_features=18944, bias=False)
- (down_proj): Linear4bit(in_features=18944, out_features=3584, bias=False)
- (act_fn): SiLU()
- )
- (input_layernorm): Qwen2RMSNorm()
- (post_attention_layernorm): Qwen2RMSNorm()
- )
- )
- (norm): Qwen2RMSNorm()
- )
- (lm_head): Linear(in_features=3584, out_features=152064, bias=False)
- )
2.3 微调(Fine-Tuning)
2.3.1 LoRA
核心思想:通过低秩分解来模拟参数的改变量,以极小的参数来实现大模型的间接训练。
如下图,涉及到矩阵相乘的模块,比如transformers中的Q、K、V线性模块,在原始的权重旁边增加两个低维度的小矩阵A、B,通过前后两个矩阵A、B相乘,第一个矩阵A负责降维,第二个矩阵B负责升维,中间层维度为r,为了将维度还原。
假设原始维度为d,这样就将d*d降为d*r+r*d
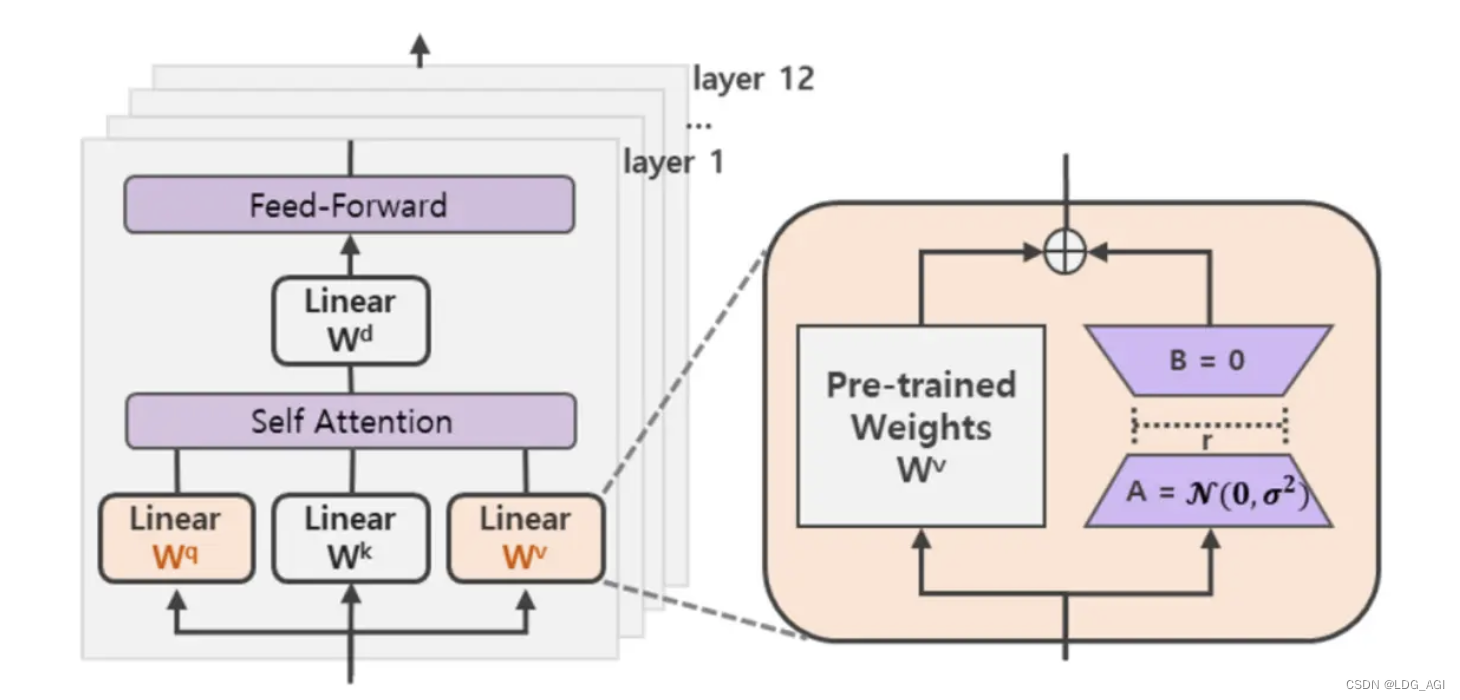
- 训练:只更新新增的A、B两个小矩阵参数
- 推理:将原矩阵W与A、B两个小矩阵乘积BA加起来作为结果h=Wx+BAx=(W+BA)x,对于推理来说,不增加额外资源
代码很简单,还是一个配置文件LoraConfig:
- from peft import LoraConfig,get_peft_model
- config = LoraConfig(
- r=32,
- lora_alpha=16,
- target_modules=["q_proj", "k_proj", "v_proj", "o_proj", "gate_proj", "up_proj","down_proj"],
- lora_dropout=0.05,
- bias="none",
- task_type="CAUSAL_LM",
- )
- model = get_peft_model(model, config)
- print(model)
- 引用peft(Parameter-Efficient Fine-Tuning)库
- 配置Lora配置文件LoraConfig
- 通过peft封装的get_peft_model方法将LoraConfig应用于model
查看模型结构会发现原有的Linear4bit结构,如q_proj:
(q_proj): Linear4bit(in_features=3584, out_features=3584, bias=True)
变成了:
- (q_proj): lora.Linear4bit(
- (base_layer): Linear4bit(in_features=3584, out_features=3584, bias=True)
- (lora_dropout): ModuleDict(
- (default): Dropout(p=0.05, inplace=False)
- )
- (lora_A): ModuleDict(
- (default): Linear(in_features=3584, out_features=32, bias=False)
- )
- (lora_B): ModuleDict(
- (default): Linear(in_features=32, out_features=3584, bias=False)
- )
- (lora_embedding_A): ParameterDict()
- (lora_embedding_B): ParameterDict()
- )
在Linear4bit基础上,新增了
- lora_dropout:用于防止过拟合
- Lora_A和Lora_B的ModuleDict:其中A的out_features与B的in_features相同,都为r=32
- Lora_A和Lora_B的embedding层
对["q_proj", "k_proj", "v_proj", "o_proj", "gate_proj", "up_proj","down_proj"]等7个Linear4bit量化后的完整模型结构如下
- PeftModelForCausalLM(
- (base_model): LoraModel(
- (model): Qwen2ForCausalLM(
- (model): Qwen2Model(
- (embed_tokens): Embedding(152064, 3584)
- (layers): ModuleList(
- (0-27): 28 x Qwen2DecoderLayer(
- (self_attn): Qwen2SdpaAttention(
- (q_proj): lora.Linear4bit(
- (base_layer): Linear4bit(in_features=3584, out_features=3584, bias=True)
- (lora_dropout): ModuleDict(
- (default): Dropout(p=0.05, inplace=False)
- )
- (lora_A): ModuleDict(
- (default): Linear(in_features=3584, out_features=32, bias=False)
- )
- (lora_B): ModuleDict(
- (default): Linear(in_features=32, out_features=3584, bias=False)
- )
- (lora_embedding_A): ParameterDict()
- (lora_embedding_B): ParameterDict()
- )
- (k_proj): lora.Linear4bit(
- (base_layer): Linear4bit(in_features=3584, out_features=512, bias=True)
- (lora_dropout): ModuleDict(
- (default): Dropout(p=0.05, inplace=False)
- )
- (lora_A): ModuleDict(
- (default): Linear(in_features=3584, out_features=32, bias=False)
- )
- (lora_B): ModuleDict(
- (default): Linear(in_features=32, out_features=512, bias=False)
- )
- (lora_embedding_A): ParameterDict()
- (lora_embedding_B): ParameterDict()
- )
- (v_proj): lora.Linear4bit(
- (base_layer): Linear4bit(in_features=3584, out_features=512, bias=True)
- (lora_dropout): ModuleDict(
- (default): Dropout(p=0.05, inplace=False)
- )
- (lora_A): ModuleDict(
- (default): Linear(in_features=3584, out_features=32, bias=False)
- )
- (lora_B): ModuleDict(
- (default): Linear(in_features=32, out_features=512, bias=False)
- )
- (lora_embedding_A): ParameterDict()
- (lora_embedding_B): ParameterDict()
- )
- (o_proj): lora.Linear4bit(
- (base_layer): Linear4bit(in_features=3584, out_features=3584, bias=False)
- (lora_dropout): ModuleDict(
- (default): Dropout(p=0.05, inplace=False)
- )
- (lora_A): ModuleDict(
- (default): Linear(in_features=3584, out_features=32, bias=False)
- )
- (lora_B): ModuleDict(
- (default): Linear(in_features=32, out_features=3584, bias=False)
- )
- (lora_embedding_A): ParameterDict()
- (lora_embedding_B): ParameterDict()
- )
- (rotary_emb): Qwen2RotaryEmbedding()
- )
- (mlp): Qwen2MLP(
- (gate_proj): lora.Linear4bit(
- (base_layer): Linear4bit(in_features=3584, out_features=18944, bias=False)
- (lora_dropout): ModuleDict(
- (default): Dropout(p=0.05, inplace=False)
- )
- (lora_A): ModuleDict(
- (default): Linear(in_features=3584, out_features=32, bias=False)
- )
- (lora_B): ModuleDict(
- (default): Linear(in_features=32, out_features=18944, bias=False)
- )
- (lora_embedding_A): ParameterDict()
- (lora_embedding_B): ParameterDict()
- )
- (up_proj): lora.Linear4bit(
- (base_layer): Linear4bit(in_features=3584, out_features=18944, bias=False)
- (lora_dropout): ModuleDict(
- (default): Dropout(p=0.05, inplace=False)
- )
- (lora_A): ModuleDict(
- (default): Linear(in_features=3584, out_features=32, bias=False)
- )
- (lora_B): ModuleDict(
- (default): Linear(in_features=32, out_features=18944, bias=False)
- )
- (lora_embedding_A): ParameterDict()
- (lora_embedding_B): ParameterDict()
- )
- (down_proj): lora.Linear4bit(
- (base_layer): Linear4bit(in_features=18944, out_features=3584, bias=False)
- (lora_dropout): ModuleDict(
- (default): Dropout(p=0.05, inplace=False)
- )
- (lora_A): ModuleDict(
- (default): Linear(in_features=18944, out_features=32, bias=False)
- )
- (lora_B): ModuleDict(
- (default): Linear(in_features=32, out_features=3584, bias=False)
- )
- (lora_embedding_A): ParameterDict()
- (lora_embedding_B): ParameterDict()
- )
- (act_fn): SiLU()
- )
- (input_layernorm): Qwen2RMSNorm()
- (post_attention_layernorm): Qwen2RMSNorm()
- )
- )
- (norm): Qwen2RMSNorm()
- )
- (lm_head): Linear(in_features=3584, out_features=152064, bias=False)
- )
- )
- )
2.3.2 QLoRA
聪明的人已经想到了,将上文讲到的Quantization与Lora结合,不就是QLoRA吗。
- 在训练模型的时候,将Linear层转换为Linear4bit
- 对Linear4bit量化层添加A、B两个低秩为r的小矩阵
- 这两个小矩阵的权重通过量化权重的反向传播梯度进行微调
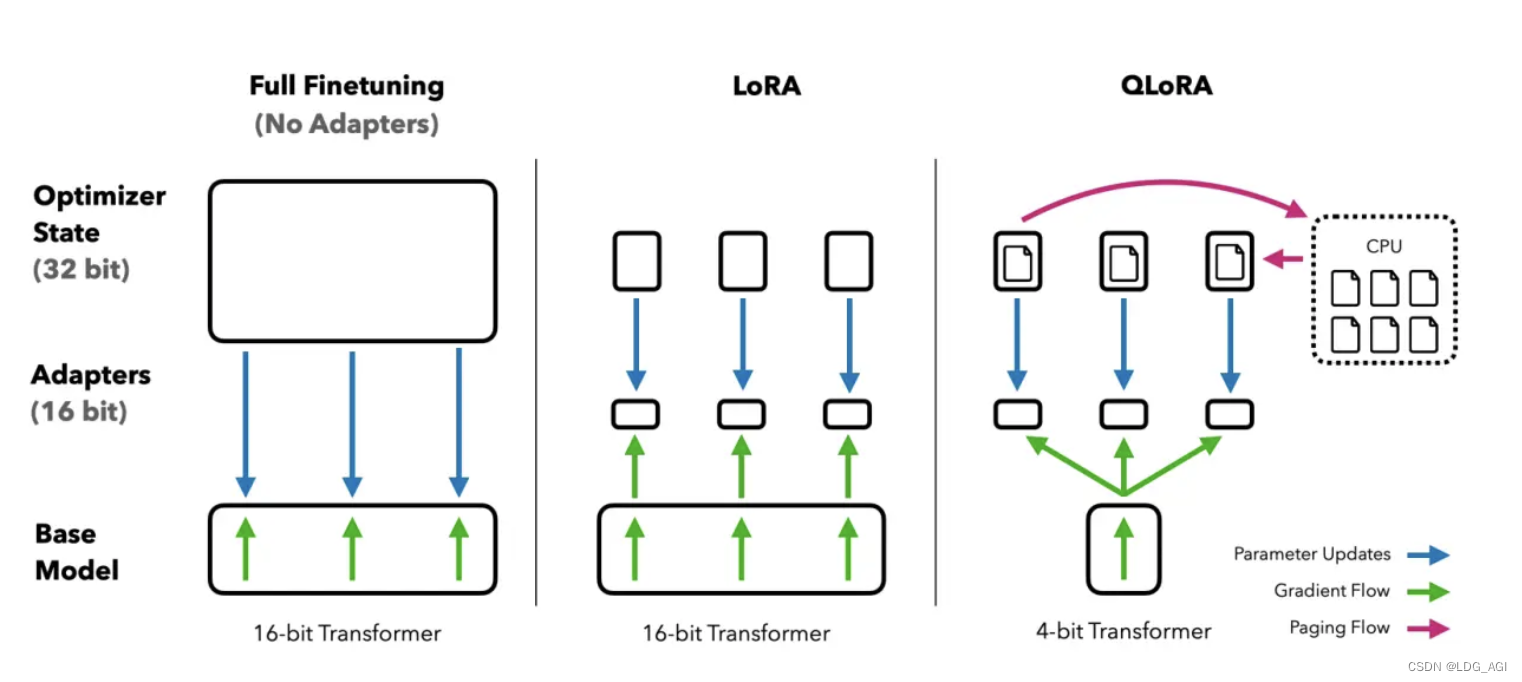
在LoRA的基础上,QLoRA关键做了3点创新:
- NF4(4bit NormalFloat):改进的4位量化法,确保每个量化箱中的值数量相等。
- 双量化:对第一次量化后的那些常量再进行一次量化,减少存储空间。
- 分页优化器:使用Nvidia内存分页,在GPU资源不足的情况下,使用CPU计算
回忆一下上面量化部分BitsAndBytesConfig的代码,是不是很熟悉:
- quantization_config = BitsAndBytesConfig(
- load_in_4bit=True, # 或者 load_in_8bit=True,根据需要设置
- #llm_int8_threshold=6.0,
- #llm_int8_has_fp16_weight=False,
- llm_int8_enable_fp32_cpu_offload=True,
- bnb_4bit_compute_dtype=torch.float16,
- bnb_4bit_quant_type="nf4",#添加nf4配置,去掉为fp4
- bnb_4bit_use_double_quant=True,#添加nf4配置,去掉为fp4
- )
三、量化与微调—实战演练:以Qwen2为例,亲手微调你的第一个AI大模型
3.1 模型预处理—依赖安装、库包导入、模型下载
- from modelscope import snapshot_download
- model_dir = snapshot_download('qwen/Qwen2-7B-Instruct')
-
- import torch
- import torch.nn as nn
- import transformers
- from datasets import load_dataset,load_from_disk
- from transformers import AutoTokenizer, AutoModelForCausalLM,BitsAndBytesConfig
-
- from peft import LoraConfig,get_peft_model,prepare_model_for_kbit_training
这里还是
- 使用modelscope下载模型,
- 使用transformers的自动分词器(AutoTokenizer)、自动模型库(AutoModelForCausalLM)、量化配置(BitsAndBytesConfig)等处理模型,
- 使用dataset处理数据,
- 使用peft加载lora配置并进行微调
- 以及离不开的torch。
回忆一下安装conda环境以及pip依赖包的方法
- conda create -n train_llm python
- conda activate train_llm
-
- pip install transformers,modelscope,peft,torch,datasets,accelerate,bitsandbytes -i https://mirrors.cloud.tencent.com/pypi/simple
3.2 模型预处理—加载量化模型
采用BitsAndBytesConfig配置量化参数,采用AutoModelForCausalLM加载量化参数
- device = "auto" # the value needs to be a device name (e.g. cpu, cuda:0) or 'auto', 'balanced', 'balanced_low_0', 'sequential'
-
- ###int4量化配置
- quantization_config = BitsAndBytesConfig(
- load_in_4bit=True, # 或者 load_in_8bit=True,根据需要设置
- #llm_int8_threshold=6.0,
- #llm_int8_has_fp16_weight=False,
- llm_int8_enable_fp32_cpu_offload=True,
- bnb_4bit_compute_dtype=torch.float16,#虽然我们以4位加载和存储模型,但我们在需要时会部分反量化他,并以16位精度进行计算
- bnb_4bit_quant_type="nf4",#nf量化类型
- bnb_4bit_use_double_quant=True,#双重量化,量化一次后再量化,进一步解决显存
- )
- model = AutoModelForCausalLM.from_pretrained(model_dir,device_map=device,trust_remote_code=True,torch_dtype=torch.float16,quantization_config=quantization_config)
- tokenizer = AutoTokenizer.from_pretrained(model_dir,trust_remote_code=True,padding_side="right",use_fast=False)
-
- print(model)
3.3 模型预处理—加载LoRA网络
- from peft import LoraConfig,get_peft_model,prepare_model_for_kbit_training
-
- model = prepare_model_for_kbit_training(model)
- config = LoraConfig(
- r=32,
- lora_alpha=16,
- target_modules=["q_proj", "k_proj", "v_proj", "o_proj", "gate_proj", "up_proj","down_proj"],
- lora_dropout=0.05,
- bias="none",
- task_type="CAUSAL_LM",
- )
- model = get_peft_model(model, config)
- print(model)
- 采用prepare_model_for_kbit_training对norm和LM head层进行处理,提升训练稳定性(非常必要,否则会报显存不足的错误):
- layer norm 层保留 FP32 精度
- embedding层以及 LM head 输出层保留 FP32 精度
- 采用get_peft_model为模型添加lora层
3.4 数据预处理—下载、处理数据
这里采用huggingface上的Abirate/english_quotes数据集,我这里由于网络环境原因,手动下载保存至./目录。
- data = load_dataset('json',data_files="./quotes.jsonl")
- data = data.map(lambda samples: tokenizer(samples["quote"]), batched=True)
- print(data)
数据集样例(这里为例调试,实际请替换自己的数据集。):

通过tokenizer和data.map将每一行quote中的数据分词处理为input_ids。输出为

3.5 模型训练
经过包导入、模型量化、模型lora、数据预处理,重要到了第5步:模型训练
- trainer = transformers.Trainer(
- model=model,
- train_dataset=data["train"],
- args=transformers.TrainingArguments(
- per_device_train_batch_size=4,
- gradient_accumulation_steps=4,
- warmup_steps=10,
- max_steps=50,
- learning_rate=3e-4,
- fp16=True,
- logging_steps=1,
- output_dir="outputs/checkpoint-1"+time_str,
- optim="paged_adamw_8bit",
- save_strategy = 'steps',
- save_steps = 10,
- ),
- data_collator=transformers.DataCollatorForLanguageModeling(tokenizer, mlm=False),
- )
-
- model.config.use_cache = False # silence the warnings. Please re-enable for inference!
- trainer.train()
-
- trainer.save_model(trainer.args.output_dir)
采用transformers的训练器Trainer,输入qlora模型、数据、训练参数、数据收集器等参数,启动训练。
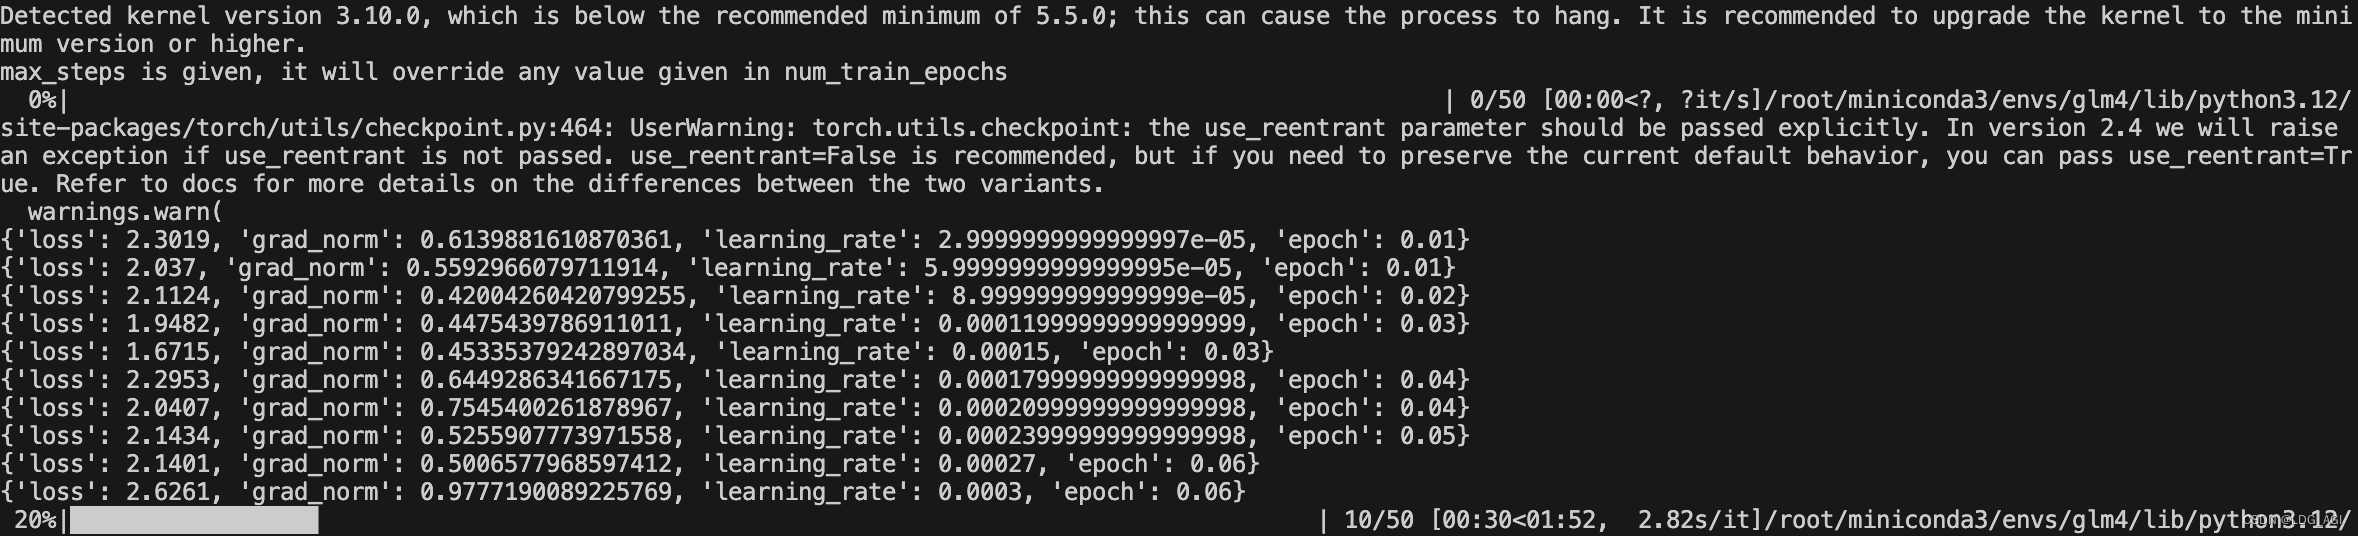
Qwen2-7B-Instruct模型按以上参数训练占用显存约20G。

3.6 模型合并及推理
以上是一段模型合并推理测试代码,主要包括
- 导入peft内的PeftModel模型类和PeftConfig配置类
- 通过trainer.args.output_dir获取微调模型目录peft_model_dir
- 获取微调后的模型配置config
- 加载基座模型
- 通过PeftModel.from_pretrained(model,peft_model_dir)将基座模型与微调模型合并
- 模型推理,同使用基座模型一样!
- import torch
- from peft import PeftModel, PeftConfig
- from transformers import AutoModelForCausalLM, AutoTokenizer
-
- peft_model_dir = trainer.args.output_dir
- config = PeftConfig.from_pretrained(peft_model_dir)
- print(config)
- model = AutoModelForCausalLM.from_pretrained(
- config.base_model_name_or_path, return_dict=True, device_map=device,
- torch_dtype=torch.float16, quantization_config=quantization_config
- )
- tokenizer = AutoTokenizer.from_pretrained(config.base_model_name_or_path)
-
- # Load the Lora model
- model = PeftModel.from_pretrained(model, peft_model_dir)
-
- print(model)
- # 模拟对话
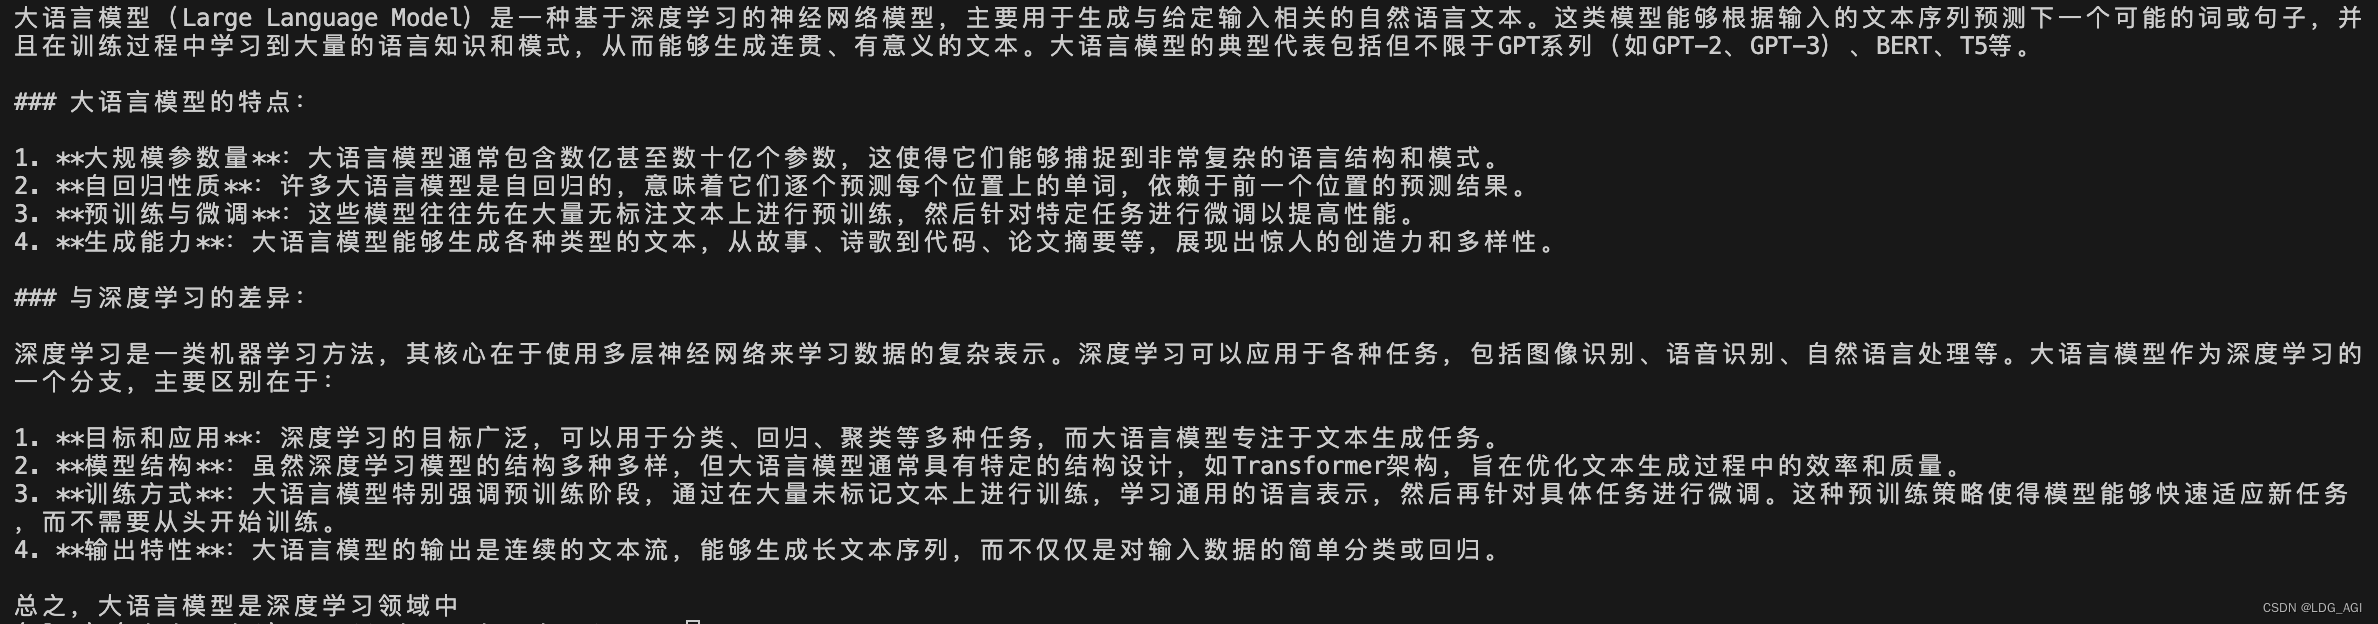
- prompt = "详细介绍一下大语言模型,评价下与深度学习的差异"
- messages = [
- {"role": "system", "content": "你是一个智能助理."},
- {"role": "user", "content": prompt}
- ]
- text = tokenizer.apply_chat_template(
- messages,
- tokenize=False,
- add_generation_prompt=True
- )
- model_inputs = tokenizer([text], return_tensors="pt").to(model.device)
-
- gen_kwargs = {"max_length": 512, "do_sample": True, "top_k": 1}
- with torch.no_grad():
- outputs = model.generate(**model_inputs, **gen_kwargs)
- outputs = outputs[:, model_inputs['input_ids'].shape[1]:] #切除system、user等对话前缀
- print(tokenizer.decode(outputs[0], skip_special_tokens=True))
推理所用显存:约15G

推理结果(本文仅为跑通流程,不提供涉及业务的任何相关数据,各位可以根据自己实际情况替换3.4的数据部分):
3.7 附:完整代码
- from datetime import datetime
- now = datetime.now()
- time_str = now.strftime('%Y-%m-%d %H:%M:%S')
- print(time_str)
-
- from modelscope import snapshot_download
- model_dir = snapshot_download('qwen/Qwen2-7B-Instruct')
-
- import torch
- import torch.nn as nn
- import transformers
- from datasets import load_dataset,load_from_disk
- from transformers import AutoTokenizer, AutoModelForCausalLM,BitsAndBytesConfig
-
-
- device = "auto" # the value needs to be a device name (e.g. cpu, cuda:0) or 'auto', 'balanced', 'balanced_low_0', 'sequential'
-
- ###int4量化配置
- quantization_config = BitsAndBytesConfig(
- load_in_4bit=True, # 或者 load_in_8bit=True,根据需要设置
- #llm_int8_threshold=6.0,
- #llm_int8_has_fp16_weight=False,
- llm_int8_enable_fp32_cpu_offload=True,
- bnb_4bit_compute_dtype=torch.float16,#虽然我们以4位加载和存储模型,但我们在需要时会部分反量化他,并以16位精度进行计算
- bnb_4bit_quant_type="nf4",#nf量化类型
- bnb_4bit_use_double_quant=True,#双重量化,量化一次后再量化,进一步解决显存
- )
- model = AutoModelForCausalLM.from_pretrained(model_dir,device_map=device,trust_remote_code=True,torch_dtype=torch.float16,quantization_config=quantization_config)
- tokenizer = AutoTokenizer.from_pretrained(model_dir,trust_remote_code=True,padding_side="right",use_fast=False)
- model.gradient_checkpointing_enable
-
- print(model)
-
- def print_trainable_parameters(model):
- """
- Prints the number of trainable parameters in the model.
- """
- trainable_params = 0
- all_param = 0
- for _, param in model.named_parameters():
- all_param += param.numel()
- if param.requires_grad:
- trainable_params += param.numel()
- print(
- f"trainable params: {trainable_params} || all params: {all_param} || trainable%: {100 * trainable_params / all_param}"
- )
-
- from peft import LoraConfig,get_peft_model,prepare_model_for_kbit_training
-
- model = prepare_model_for_kbit_training(model)
- config = LoraConfig(
- r=32,
- lora_alpha=16,
- target_modules=["q_proj", "k_proj", "v_proj", "o_proj", "gate_proj", "up_proj","down_proj"],
- lora_dropout=0.05,
- bias="none",
- task_type="CAUSAL_LM",
- )
- model = get_peft_model(model, config)
- print(model)
- print_trainable_parameters(model)
-
-
- # Verifying the datatypes.
- dtypes = {}
- for _, p in model.named_parameters():
- dtype = p.dtype
- if dtype not in dtypes:
- dtypes[dtype] = 0
- dtypes[dtype] += p.numel()
- total = 0
- for k, v in dtypes.items():
- total += v
- for k, v in dtypes.items():
- print(k, v, v / total)
-
- """### Training"""
-
- data = load_dataset('json',data_files="./quotes.jsonl")
- data = data.map(lambda samples: tokenizer(samples["quote"]), batched=True)
- print(data)
-
- trainer = transformers.Trainer(
- model=model,
- train_dataset=data["train"],
- args=transformers.TrainingArguments(
- per_device_train_batch_size=4,
- gradient_accumulation_steps=4,
- warmup_steps=10,
- max_steps=50,
- learning_rate=3e-4,
- fp16=True,
- logging_steps=1,
- output_dir="outputs/checkpoint-1"+time_str,
- optim="paged_adamw_8bit",
- save_strategy = 'steps',
- save_steps = 10,
- ),
- data_collator=transformers.DataCollatorForLanguageModeling(tokenizer, mlm=False),
- )
-
- model.config.use_cache = False # silence the warnings. Please re-enable for inference!
- trainer.train()
-
- trainer.save_model(trainer.args.output_dir)
-
-
- import torch
- from peft import PeftModel, PeftConfig
- from transformers import AutoModelForCausalLM, AutoTokenizer
-
- peft_model_dir = trainer.args.output_dir
- config = PeftConfig.from_pretrained(peft_model_dir)
- print(config)
- model = AutoModelForCausalLM.from_pretrained(
- config.base_model_name_or_path, return_dict=True, device_map=device,
- torch_dtype=torch.float16, quantization_config=quantization_config
- )
- tokenizer = AutoTokenizer.from_pretrained(config.base_model_name_or_path)
-
- # Load the Lora model
- model = PeftModel.from_pretrained(model, peft_model_dir)
-
- print(model)
- # 模拟对话
- prompt = "详细介绍一下大语言模型,评价下与深度学习的差异"
- messages = [
- {"role": "system", "content": "你是一个智能助理."},
- {"role": "user", "content": prompt}
- ]
- text = tokenizer.apply_chat_template(
- messages,
- tokenize=False,
- add_generation_prompt=True
- )
- model_inputs = tokenizer([text], return_tensors="pt").to(model.device)
-
- gen_kwargs = {"max_length": 512, "do_sample": True, "top_k": 1}
- with torch.no_grad():
- outputs = model.generate(**model_inputs, **gen_kwargs)
- outputs = outputs[:, model_inputs['input_ids'].shape[1]:] #切除system、user等对话前缀
- print(tokenizer.decode(outputs[0], skip_special_tokens=True))
四、总结
本文首先对量化和微调的原理进行剖析,接着以Qwen2-7B为例,基于QLoRA、PEFT一步一步带着大家微调自己的大模型,本文参考全网peft+qlora微调教程,一步一排坑,让大家在网络环境不允许的情况下,也能丝滑的开启大模型微调之旅。希望能帮助到大家,喜欢的话关注+三连噢。
如果您还有时间,可以看看我的其他文章:
《AI—工程篇》
AI智能体研发之路-工程篇(一):Docker助力AI智能体开发提效
AI智能体研发之路-工程篇(二):Dify智能体开发平台一键部署
AI智能体研发之路-工程篇(三):大模型推理服务框架Ollama一键部署
AI智能体研发之路-工程篇(四):大模型推理服务框架Xinference一键部署
AI智能体研发之路-工程篇(五):大模型推理服务框架LocalAI一键部署
《AI—模型篇》
AI智能体研发之路-模型篇(一):大模型训练框架LLaMA-Factory在国内网络环境下的安装、部署及使用
AI智能体研发之路-模型篇(二):DeepSeek-V2-Chat 训练与推理实战
AI智能体研发之路-模型篇(四):一文入门pytorch开发
AI智能体研发之路-模型篇(五):pytorch vs tensorflow框架DNN网络结构源码级对比
AI智能体研发之路-模型篇(六):【机器学习】基于tensorflow实现你的第一个DNN网络
AI智能体研发之路-模型篇(七):【机器学习】基于YOLOv10实现你的第一个视觉AI大模型
AI智能体研发之路-模型篇(八):【机器学习】Qwen1.5-14B-Chat大模型训练与推理实战
AI智能体研发之路-模型篇(九):【机器学习】GLM4-9B-Chat大模型/GLM-4V-9B多模态大模型概述、原理及推理实战
AI智能体研发之路-模型篇(十):【机器学习】Qwen2大模型原理、训练及推理部署实战
《AI—Transformers应用》
【AI大模型】Transformers大模型库(一):Tokenizer
【AI大模型】Transformers大模型库(二):AutoModelForCausalLM
【AI大模型】Transformers大模型库(三):特殊标记(special tokens)
【AI大模型】Transformers大模型库(四):AutoTokenizer
【AI大模型】Transformers大模型库(五):AutoModel、Model Head及查看模型结构
【AI大模型】Transformers大模型库(六):torch.cuda.OutOfMemoryError: CUDA out of memory解决

