- 1MySQL知识总结_mysql总结
- 2Yii框架模拟运行脚本步骤测试_yii的经营报表脚本文件
- 3【干货】机器人视觉存在的问题及研究方向_工业机器人视觉系统可能出现的问题
- 4弯度背景html,使用HTML和CSS的弯曲文本
- 5Wireshark抓包 [Tcp Previous Segment Not captured][Tcp Out-Of-Order][Tcp Spurious Retransmissiion]
- 6数业有道,智赢未来:BI 在企业数字化转型中的应用
- 7Android【CardView,DrawerLayout 滑动菜单,Fragment】_drawerlayout 加载fragment
- 8HTTPS(超文本传输安全协议)工作过程
- 9(关闭/开启)Mac系统中Google浏览器自动升级功能_macos 开启chrome自动更新
- 10【Mysql】mysql数据库查询缓存原理是什么_reset query cache
Android studio包含四个tab微信页面设计_android studio界面设计tabwidget
赞
踩
Android studio包含四个tab微信页面设计
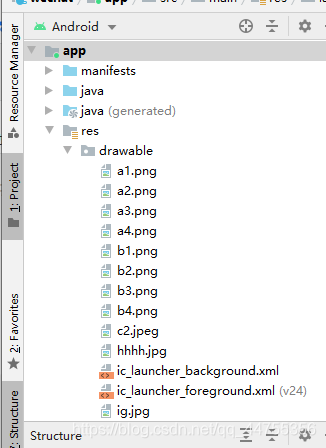
1.导入图标
新建一个project,然后将所需八个图标导入至app/res/drawable目录下任意的ic_launcher_xxxxx(复制粘贴即可)

2.编写所需xml文件

tap_01-tap_04分别是四个分页的显示内容,其中 android:gravity设置为center,
android:orientation设置为vertical
top.xml用于设置顶部格式, android:text设置为@string/app_name引用项目名
编写所需的多个xml文件,其中tap_01-tap_04分别存放四个分页的文本输出
botton.xml设置切换分页的四个botton
其中一个botton代码如下
<LinearLayout
        android:id="@+id/id_tab_01"
        android:layout_width="0dp"
        android:layout_height="match_parent"
        android:layout_weight="1"
        android:orientation="vertical">

        <ImageButton
            android:id="@+id/id_tab_01_img"
            android:layout_width="match_parent"
            android:layout_height="88dp"
            android:background="#3FB5B5"
            android:clickable="false"
            android:contentDescription="@string/app_name"
            app:srcCompat="@drawable/sktt1" />

        <TextView
            android:id="@+id/textView"
            android:layout_width="match_parent"
            android:layout_height="wrap_content"
            android:background="#9A111111"
            android:clickable="false"
            android:gravity="center"
            android:text="直播"
            android:textColor="@android:color/holo_green_light"
            android:textSize="12sp" />
    </LinearLayout>
- 1
- 2
- 3
- 4
- 5
- 6
- 7
- 8
- 9
- 10
- 11
- 12
- 13
- 14
- 15
- 16
- 17
- 18
- 19
- 20
- 21
- 22
- 23
- 24
- 25
- 26
- 27
thefragment.xml设置为页面中间文本显示区域
activity.xml为汇总的整体页面
代码如下
<?xml version="1.0" encoding="utf-8"?>
<LinearLayout xmlns:android="http://schemas.android.com/apk/res/android"
    android:layout_width="match_parent"
    android:layout_height="match_parent"
    android:orientation="vertical">
    <include layout="@layout/top" />
    <FrameLayout
        android:id="@+id/id_content"
        android:layout_width="match_parent"
        android:layout_height="0dp"
        android:layout_weight="1"></FrameLayout>

    <include
        layout="@layout/botton"
        android:layout_width="match_parent"
        android:layout_height="wrap_content" />
</LinearLayout>
- 1
- 2
- 3
- 4
- 5
- 6
- 7
- 8
- 9
- 10
- 11
- 12
- 13
- 14
- 15
- 16
- 17
layout="@layout/botton"引用botton.xml文件内容,layout="@layout/top"引用top.xml文件内容
在values中的string.xml中添加如下代码,用来声明app_name
<resources>
    <string name="app_name">wechat</string>
</resources>
- 1
- 2
- 3
3.在main文件同目录下编写.java文件

contact,friengds,setting,thefragment分别是四个分页的fragment文件,其中一个代码如下,其余相似
package com.example.wechat;

import android.os.Bundle;
import androidx.fragment.app.Fragment;
import android.view.LayoutInflater;
import android.view.View;
import android.view.ViewGroup;

public class thefragment extends Fragment {

    private static final String ARG_PARAM1 = "param1";
    private static final String ARG_PARAM2 = "param2";

    private String myParam1;
    private String myParam2;

    public thefragment() {
    }

    public static thefragment newInstance(String param1, String param2) {
       thefragment fragment = new thefragment();
        Bundle args = new Bundle();
        args.putString(ARG_PARAM1, param1);
        args.putString(ARG_PARAM2, param2);
        fragment.setArguments(args);
        return fragment;
    }

    @Override
    public void onCreate(Bundle savedInstanceState) {
        super.onCreate(savedInstanceState);
        if (getArguments() != null) {
            myParam1 = getArguments().getString(ARG_PARAM1);
            myParam2 = getArguments().getString(ARG_PARAM2);
        }
    }

    @Override
    public View onCreateView(LayoutInflater inflater, ViewGroup container,
                             Bundle savedInstanceState) {
        return inflater.inflate(R.layout.tap_01, container, false);
    }
}
- 1
- 2
- 3
- 4
- 5
- 6
- 7
- 8
- 9
- 10
- 11
- 12
- 13
- 14
- 15
- 16
- 17
- 18
- 19
- 20
- 21
- 22
- 23
- 24
- 25
- 26
- 27
- 28
- 29
- 30
- 31
- 32
- 33
- 34
- 35
- 36
- 37
- 38
- 39
- 40
- 41
- 42
- 43
在Mainactivity中先定义四个Fragment类对象,然后建立一个FragmentManager 类对象fm。定义一个initFragment()函数用来添加定义好的对象,传递中间界面的文字。定义一个initView(),包含四个参数分别存储四个button中的文字。hidefragment函数隐藏不需要显示的文字。定义其中的一个点击响应函数selectfragment,当传入的参数i的值不同的时候,就会相应在中间界面的显示不同的文字,而且会显示相应的图片。
4.执行结果如下

完整代码:https://gitee.com/wang-zz/wang-wz


