热门标签
热门文章
- 1微信小程序消息推送,实现未完成计划的在微信内的定时提醒功能_微信小程序定时提醒功能
- 2京津冀协同发展:北京·光子1号金融算力中心——智能科技新高地
- 3Linux_192.168.66.1
- 4andorid 检测内存泄露及解决办法_android oom 内存泄漏 内存溢出
- 5DSPE-PEG-MAL,474922-22-0,DSPE-PEG-Maleimide_dspe-peg-mal结构式
- 6python np linspace_Python numpy.linspace() 使用实例
- 72023 华为 Datacom-HCIE 真题题库 06/12--含解析_网络管理员真题
- 8红黑树原理简单解析_红黑树的原理
- 9HDC2021技术分论坛:ArkUI 3.0让多设备开发更简单_arkui 设置组件宽高比
- 10JAVA实现websocket_websocket java
当前位置: article > 正文
使用OpenCV检测图像中的矩形_opencv 找矩形
作者:我家自动化 | 2024-03-22 11:15:07
赞
踩
opencv 找矩形
前言
1.OpenCV没有内置的矩形检测的函数,如果想检测矩形,要自己去实现。
2.我这里使用的OpenCV版本是3.30.
矩形检测
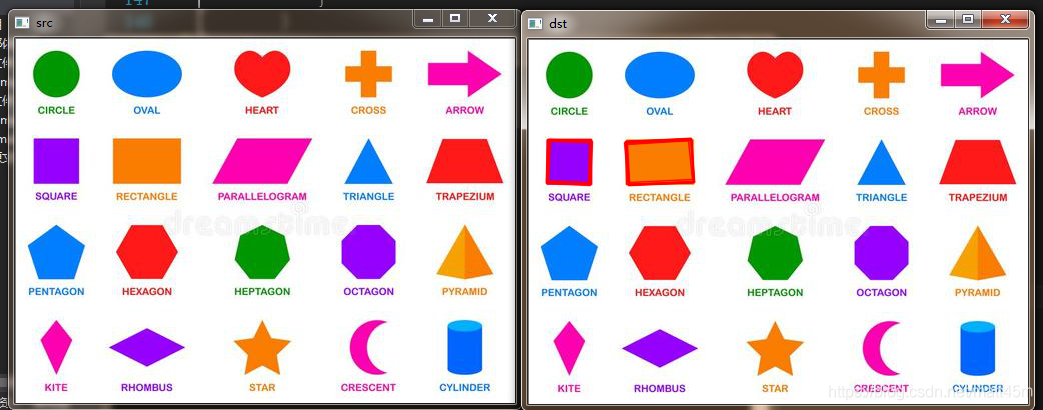
1.得到原始图像之后,代码处理的步骤是:
(1)滤波增强边缘。
(2)分离图像通道,并检测边缘。
(3) 提取轮廓。
(4)使用图像轮廓点进行多边形拟合。
(5)计算轮廓面积并得到矩形4个顶点。
(6)求轮廓边缘之间角度的最大余弦。
(7)画出矩形。
2.代码
//检测矩形
//第一个参数是传入的原始图像,第二是输出的图像。
void findSquares(const Mat& image,Mat &out)
{
	int thresh = 50, N = 5;
	vector<vector<Point> > squares;
	squares.clear();

	Mat src,dst, gray_one, gray;

	src = image.clone();
	out = image.clone();
	gray_one = Mat(src.size(), CV_8U);
	//滤波增强边缘检测
	medianBlur(src, dst, 9);
	//bilateralFilter(src, dst, 25, 25 * 2, 35);

	vector<vector<Point> > contours;
	vector<Vec4i> hierarchy;

	//在图像的每个颜色通道中查找矩形
	for (int c = 0; c < image.channels(); c++)
	{
		int ch[] = { c, 0 };

		//通道分离
		mixChannels(&dst, 1, &gray_one, 1, ch, 1);

		// 尝试几个阈值
		for (int l = 0; l < N; l++)
		{
			// 用canny()提取边缘
			if (l == 0)
			{
				//检测边缘
				Canny(gray_one, gray, 5, thresh, 5);
				//膨脹
				dilate(gray, gray, Mat(), Point(-1, -1));
				imshow("dilate", gray);
			}
			else
			{
				gray = gray_one >= (l + 1) * 255 / N;
			}

			// 轮廓查找
			//findContours(gray, contours, RETR_CCOMP, CHAIN_APPROX_SIMPLE);
			findContours(gray, contours, hierarchy, RETR_CCOMP, CHAIN_APPROX_SIMPLE);

			vector<Point> approx;

			// 检测所找到的轮廓
			for (size_t i = 0; i < contours.size(); i++)
			{
				//使用图像轮廓点进行多边形拟合
				approxPolyDP(Mat(contours[i]), approx, arcLength(Mat(contours[i]), true)*0.02, true);

				//计算轮廓面积后,得到矩形4个顶点
				if (approx.size() == 4 &&fabs(contourArea(Mat(approx))) > 1000 &&isContourConvex(Mat(approx)))
				{
					double maxCosine = 0;

					for (int j = 2; j < 5; j++)
					{
						// 求轮廓边缘之间角度的最大余弦
						double cosine = fabs(angle(approx[j % 4], approx[j - 2], approx[j - 1]));
						maxCosine = MAX(maxCosine, cosine);
					}

					if (maxCosine < 0.3)
					{
						squares.push_back(approx);
					}
				}
			}
		}
	}


	for (size_t i = 0; i < squares.size(); i++)
	{
		const Point* p = &squares[i][0];

		int n = (int)squares[i].size();
		if (p->x > 3 && p->y > 3)
		{
			polylines(out, &p, &n, 1, true, Scalar(0, 255, 0), 3, LINE_AA);
		}
	}
	imshow("dst",out);
}

static double angle(Point pt1, Point pt2, Point pt0)
{
	double dx1 = pt1.x - pt0.x;
	double dy1 = pt1.y - pt0.y;
	double dx2 = pt2.x - pt0.x;
	double dy2 = pt2.y - pt0.y;
	return (dx1*dx2 + dy1*dy2) / sqrt((dx1*dx1 + dy1*dy1)*(dx2*dx2 + dy2*dy2) + 1e-10);
}
- 1
- 2
- 3
- 4
- 5
- 6
- 7
- 8
- 9
- 10
- 11
- 12
- 13
- 14
- 15
- 16
- 17
- 18
- 19
- 20
- 21
- 22
- 23
- 24
- 25
- 26
- 27
- 28
- 29
- 30
- 31
- 32
- 33
- 34
- 35
- 36
- 37
- 38
- 39
- 40
- 41
- 42
- 43
- 44
- 45
- 46
- 47
- 48
- 49
- 50
- 51
- 52
- 53
- 54
- 55
- 56
- 57
- 58
- 59
- 60
- 61
- 62
- 63
- 64
- 65
- 66
- 67
- 68
- 69
- 70
- 71
- 72
- 73
- 74
- 75
- 76
- 77
- 78
- 79
- 80
- 81
- 82
- 83
- 84
- 85
- 86
- 87
- 88
- 89
- 90
- 91
- 92
- 93
- 94
- 95
- 96
- 97
- 98
- 99
- 100
3.运行结果


声明:本文内容由网友自发贡献,不代表【wpsshop博客】立场,版权归原作者所有,本站不承担相应法律责任。如您发现有侵权的内容,请联系我们。转载请注明出处:https://www.wpsshop.cn/w/我家自动化/article/detail/287701
推荐阅读
相关标签


