
- 1JAVA微信公众号完整版教程扫一扫登录/自动回复/客服消息_wx-java-mp实现微信扫码登录
- 2数值分析复习:Newton插值
- 3html2canvas.min.js(生成图片插件)
- 4crossover软件干嘛的 手把手教你怎么激活crossover_crossover软件是干嘛的
- 5使用YOLOv5实现人脸口罩佩戴检测(详细)_基于yolov5的人脸口罩检测
- 6android适配鸿蒙系统开发_androidstudio可以迁移harmonyos吗
- 7Android Studio 3.5安装教程_android studio3.5下载安装教程
- 8php清除页面别人挂的马_hjb564.top
- 9小型IT咨询公司发展迅猛_it咨询公司创建
- 10Pycharm服务器配置与内网穿透工具结合实现远程开发的解决方法_pycorrector 内网接口使用
windows insightface库 人脸识别入门教程_insightface教程
赞
踩
初学insightface,在网上找了几天的博客,但是大多都是在Linux上运行的教程。而且我下的源代码跟他们的结构完全不一样,一度怀疑自己下错了。后来发现是因为作者一直在迭代更新,到现在跟之前已经有很大不同了。为了便于自己入门,所以我去github上下载了作者19年的版本。
环境配置
环境配置按照https://zhuanlan.zhihu.com/p/33750684所说就行,cuda10.1也可以运行。
源码下载
https://github.com/deepinsight/insightface#test-on-megaface
可以找19年的版本,能看懂也可以直接用新的。
库目录
我下载下来的库文件如图,版本不同会有小差别,大致差不多就行。
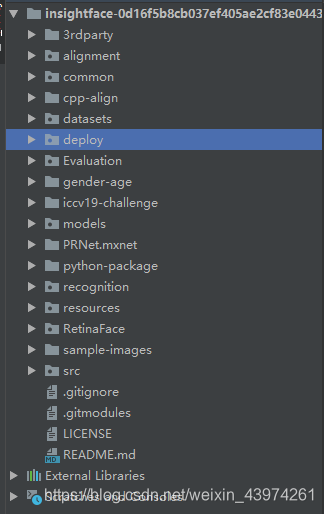
之后的操作都是再deploy目录中进行的。
模型下载
在网盘中下载好模型
https://pan.baidu.com/s/1jKahEXw
下载好后放在models文件夹中
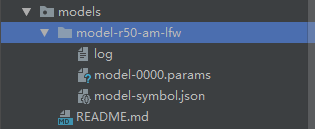
之后就可以在deploy目录下的test.py中进行人脸识别了。
路径配置
里面会有一些红线是不用管的。
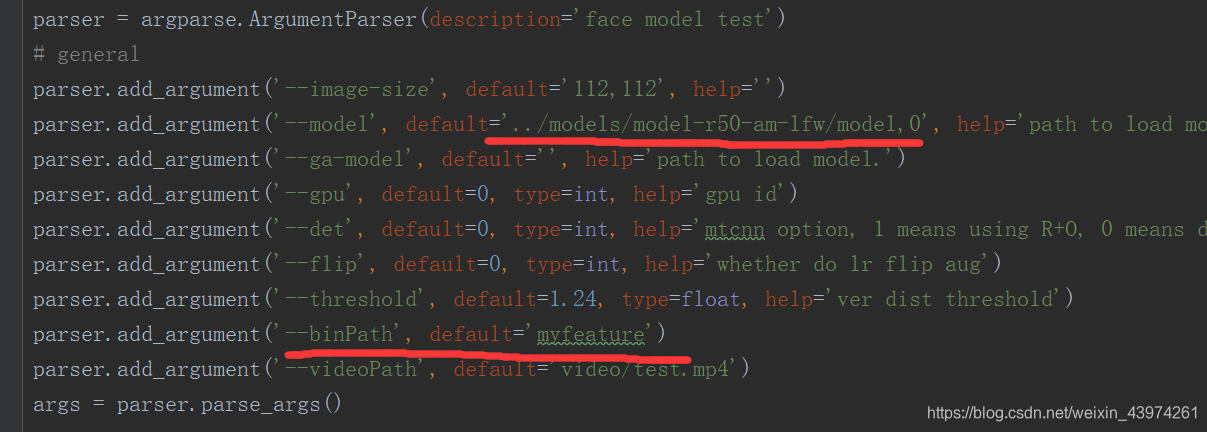
之后是路径的配置,将你模型的路径填进去,还有存放人脸特征的路径,由于我做的视频的人脸识别,所以最后是视频的路径。
之后可以通过这些方式进行调用。
人脸识别
人脸识别的工作原理是用检测到的人脸输入进模型,得到特征值后,与特征库中的人脸数据进行对比,计算它与特征库中每个数据的距离。之后取距离最短的一个数据的标签作为该人脸的识别结果。所以需要先进行人脸特征的持久化,之后进行人脸识别操作。
人脸特征持久化
import face_model
import argparse
import cv2
import sys
import numpy as np
import os


parser = argparse.ArgumentParser(description='face model test')
# general
parser.add_argument('--image-size', default='112,112', help='')
parser.add_argument('--model', default='../models/model-r50-am-lfw/model,0', help='path to load model.')
parser.add_argument('--ga-model', default='', help='path to load model.')
parser.add_argument('--gpu', default=0, type=int, help='gpu id')
parser.add_argument('--det', default=0, type=int, help='mtcnn option, 1 means using R+O, 0 means detect from begining')
parser.add_argument('--flip', default=0, type=int, help='whether do lr flip aug')
parser.add_argument('--threshold', default=1.24, type=float, help='ver dist threshold')
parser.add_argument('--binPath', default='myfeature')
parser.add_argument('--videoPath', default='video/test.mp4')
args = parser.parse_args()


videoPath = args.videoPath
binPath = args.binPath
threshold = float(args.threshold)

feature = []
label = []
# model = face_model_v2.FaceModel(args)
#查看是否存在路径,没有则创建
if not os.path.exists(binPath):
    os.makedirs(binPath)
#调用模型
model = face_model.FaceModel(args)
#遍历路径中的图片,将他们的名字保存到label
for s in os.listdir('imgs'):
    img = cv2.imread('imgs/'+s)
    img = model.get_input(img)
    f1 = model.get_feature(img)
    f1.tofile('myfeature/%s.bin'%s.split('.')[0])

- 1
- 2
- 3
- 4
- 5
- 6
- 7
- 8
- 9
- 10
- 11
- 12
- 13
- 14
- 15
- 16
- 17
- 18
- 19
- 20
- 21
- 22
- 23
- 24
- 25
- 26
- 27
- 28
- 29
- 30
- 31
- 32
- 33
- 34
- 35
- 36
- 37
- 38
- 39
- 40
- 41
- 42
运行后可以得到bin文件
图片人脸识别
计算两个人脸的距离代码:
# 查找当前特征最接近的特征
def findNear(feature, f, threshold, label):
    dist_list = []
    # 遍历特征库
    for feature_unit in feature:
        # 距离的定义是(特征1-特征2)开根号并求和
        dist = np.sum(np.square(feature_unit - f))
        # dist_list作用是将所有距离都保存下来,以便获得最小距离
        dist_list.append(dist)
        # 寻找到最小距离
    minDist = np.min(dist_list)
    print(minDist)
    # 如果最小距离小于等于阈值
    if minDist <= threshold:
        # 求出最小距离对应的索引
        minIdx = np.argmin(dist_list)
        # 找到姓名
        print(label[minIdx])
		#返回姓名和概率
        return label[minIdx],(threshold-minDist)/threshold
    else:
        # 如果没有满足条件的,就返回'none'
        return 'none',0
- 1
- 2
- 3
- 4
- 5
- 6
- 7
- 8
- 9
- 10
- 11
- 12
- 13
- 14
- 15
- 16
- 17
- 18
- 19
- 20
- 21
- 22
- 23
在进行识别之前修改一下face_model.py中的部分代码,因为源代码每次只能检测一张人脸,在建立人脸特征库时够用,但进行人脸检测时照片里不止一个人,因此需要做一些修改。
复制粘贴face_model.py,将名字改为Face_model_v2.py.
之后修改其中的get_input的方法。
  # 主要修改get_input方法
  def get_input(self, face_img):
    # print('into face_model_v2')
    ret = self.detector.detect_face(face_img, det_type=self.args.det)
    if ret is None:
      return None
    bbox, points = ret
    # 存放所有检测的人脸图像
    aligned_list = []
    # 存放所有人脸坐标
    bbox_list = []
    if bbox.shape[0] == 0:
      return None
    for i in range(bbox.shape[0]):
      # 获取每一个坐标
      bbox_ = bbox[i, 0:4]
      # 存放坐标
      bbox_list.append(bbox_)
      # 获取每一个特征点
      points_ = points[i, :].reshape((2, 5)).T
      nimg = face_preprocess.preprocess(face_img, bbox_, points_, image_size='112,112')
      nimg = cv2.cvtColor(nimg, cv2.COLOR_BGR2RGB)
      aligned = np.transpose(nimg, (2, 0, 1))
      # 存放坐标
      aligned_list.append(aligned)
    return aligned_list, bbox_list
- 1
- 2
- 3
- 4
- 5
- 6
- 7
- 8
- 9
- 10
- 11
- 12
- 13
- 14
- 15
- 16
- 17
- 18
- 19
- 20
- 21
- 22
- 23
- 24
- 25
- 26
修改完后记得将之前持久化导入的模型改为
model = face_model_v2.FaceModel(args)
- 1
照片人脸识别代码:
# 遍历目录获得目录中文件名字作为label,文件内容加入feature
for bin_ in os.listdir(binPath):
    # 注意要指定dtype
    feature.append(np.fromfile(binPath + '/' + bin_, dtype=np.float32))
    label.append(bin_.split('.')[0])

img=cv2.imread('hezhao.jpg')
# img=cv2.resize(img,(500,500))
imgs, bbox = model.get_input(img)
for img_unit, bbox_unit in zip(imgs, bbox):
    if img_unit.shape:
        # 获得特征
        f = model.get_feature(img_unit)
        # 找到匹配信息
        res,dist = findNear(feature, f, threshold, label)
        # 如果匹配到了姓名
        if res != 'none':
            # 用方框标注,bbox_unit中的值为(左,上,右,下)
            # 按照cv2.rectangle的参数写入
            cv2.rectangle(img, (int(bbox_unit[0]), int(bbox_unit[1])),
                          (int(bbox_unit[2]), int(bbox_unit[3])), (0, 0, 255))
            # 标记文字到图像中,参数:图像,文字,位置,字体,大小,颜色,宽度
            img = cv2.putText(img, res+"%.2f"%float(dist), (int(bbox_unit[0])-2, int(bbox_unit[1])),cv2.FONT_HERSHEY_SIMPLEX, 0.5, (0, 0, 255), 1)
cv2.imshow('name',img)
cv2.waitKey(0)
- 1
- 2
- 3
- 4
- 5
- 6
- 7
- 8
- 9
- 10
- 11
- 12
- 13
- 14
- 15
- 16
- 17
- 18
- 19
- 20
- 21
- 22
- 23
- 24
- 25
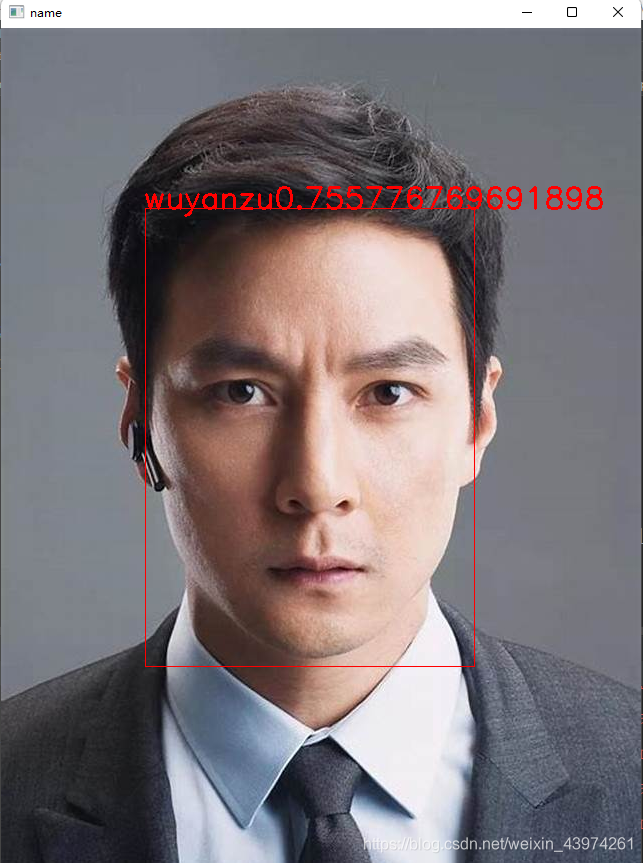
用博主的自拍测试了下
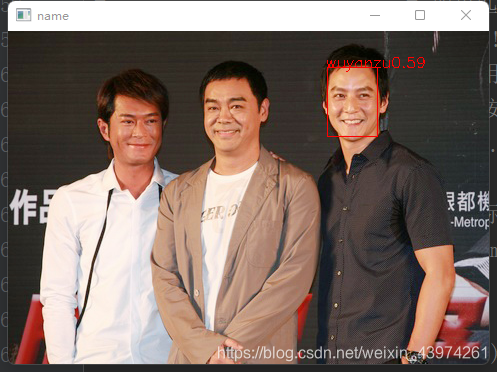
之后用合照测试:
总的代码:
import face_model_v2
import face_model
import argparse
import cv2
import sys
import numpy as np
import os


parser = argparse.ArgumentParser(description='face model test')
# general
parser.add_argument('--image-size', default='112,112', help='')
parser.add_argument('--model', default='../models/model-r50-am-lfw/model,0', help='path to load model.')
parser.add_argument('--ga-model', default='', help='path to load model.')
parser.add_argument('--gpu', default=0, type=int, help='gpu id')
parser.add_argument('--det', default=0, type=int, help='mtcnn option, 1 means using R+O, 0 means detect from begining')
parser.add_argument('--flip', default=0, type=int, help='whether do lr flip aug')
parser.add_argument('--threshold', default=1.24, type=float, help='ver dist threshold')
parser.add_argument('--binPath', default='myfeature')
parser.add_argument('--videoPath', default='video/test.mp4')
args = parser.parse_args()


videoPath = args.videoPath
binPath = args.binPath
threshold = float(args.threshold)

feature = []
label = []
model = face_model_v2.FaceModel(args)
#查看是否存在路径,没有则创建
# if not os.path.exists(binPath):
#     os.makedirs(binPath)
#调用模型
# model = face_model.FaceModel(args)
# 遍历路径中的图片,将他们的名字保存到label
# for s in os.listdir('imgs'):
#     img = cv2.imread('imgs/'+s)
#     img,_ = model.get_input(img)
#     f1 = model.get_feature(img)
#     f1.tofile('myfeature/%s.bin'%s.split('.')[0])

# 查找当前特征最接近的特征
def findNear(feature, f, threshold, label):
    dist_list = []
    # 遍历特征库
    for feature_unit in feature:
        # 距离的定义是(特征1-特征2)开根号并求和
        dist = np.sum(np.square(feature_unit - f))
        # dist_list作用是将所有距离都保存下来,以便获得最小距离
        dist_list.append(dist)
        # 寻找到最小距离
    minDist = np.min(dist_list)
        # 如果最小距离小于等于阈值
    if minDist <= threshold:
        # 求出最小距离对应的索引
        minIdx = np.argmin(dist_list)
        # 找到姓名
        return label[minIdx]
    else:
        # 如果没有满足条件的,就返回'none'
        return 'none'


# 遍历目录获得目录中文件名字作为label,文件内容加入feature
for bin_ in os.listdir(binPath):
    # 注意要指定dtype
    feature.append(np.fromfile(binPath + '/' + bin_, dtype=np.float32))
    label.append(bin_.split('.')[0])


# 查找当前特征最接近的特征
def findNear(feature, f, threshold, label):
    dist_list = []
    # 遍历特征库
    for feature_unit in feature:
        # 距离的定义是(特征1-特征2)开根号并求和
        dist = np.sum(np.square(feature_unit - f))
        # dist_list作用是将所有距离都保存下来,以便获得最小距离
        dist_list.append(dist)
        # 寻找到最小距离
    minDist = np.min(dist_list)
    print(minDist)
    # 如果最小距离小于等于阈值
    if minDist <= threshold:
        # 求出最小距离对应的索引
        minIdx = np.argmin(dist_list)
        # 找到姓名
        print(label[minIdx])

        return label[minIdx],(threshold-minDist)/threshold
    else:
        # 如果没有满足条件的,就返回'none'
        return 'none',0


img=cv2.imread('hezhao.jpg')
# img=cv2.resize(img,(500,500))
imgs, bbox = model.get_input(img)
for img_unit, bbox_unit in zip(imgs, bbox):
    if img_unit.shape:
        # 获得特征
        f = model.get_feature(img_unit)
        # 找到匹配信息
        res,dist = findNear(feature, f, threshold, label)
        # 如果匹配到了姓名
        if res != 'none':
            # 用方框标注,bbox_unit中的值为(左,上,右,下)
            # 按照cv2.rectangle的参数写入
            cv2.rectangle(img, (int(bbox_unit[0]), int(bbox_unit[1])),
                          (int(bbox_unit[2]), int(bbox_unit[3])), (0, 0, 255))
            # 标记文字到图像中,参数:图像,文字,位置,字体,大小,颜色,宽度
            img = cv2.putText(img, res+"%.2f"%float(dist), (int(bbox_unit[0])-2, int(bbox_unit[1])),cv2.FONT_HERSHEY_SIMPLEX, 0.5, (0, 0, 255), 1)
cv2.imshow('name',img)
cv2.waitKey(0)
- 1
- 2
- 3
- 4
- 5
- 6
- 7
- 8
- 9
- 10
- 11
- 12
- 13
- 14
- 15
- 16
- 17
- 18
- 19
- 20
- 21
- 22
- 23
- 24
- 25
- 26
- 27
- 28
- 29
- 30
- 31
- 32
- 33
- 34
- 35
- 36
- 37
- 38
- 39
- 40
- 41
- 42
- 43
- 44
- 45
- 46
- 47
- 48
- 49
- 50
- 51
- 52
- 53
- 54
- 55
- 56
- 57
- 58
- 59
- 60
- 61
- 62
- 63
- 64
- 65
- 66
- 67
- 68
- 69
- 70
- 71
- 72
- 73
- 74
- 75
- 76
- 77
- 78
- 79
- 80
- 81
- 82
- 83
- 84
- 85
- 86
- 87
- 88
- 89
- 90
- 91
- 92
- 93
- 94
- 95
- 96
- 97
- 98
- 99
- 100
- 101
- 102
- 103
- 104
- 105
- 106
- 107
- 108
- 109
- 110
- 111
- 112
- 113
- 114
- 115
- 116
视频人脸识别
关于视频的人脸识别可以看参考文章中的博客,里面已经很详细了。
参考文章:
https://blog.csdn.net/xiaotuzigaga/article/details/89224594

