
- 1斯坦福AI2021报告出炉!详解七大热点,论文引用中国首超美国
- 2OpenAI 开发系列(七):LLM提示工程(Prompt)与思维链(CoT)_llm 将高层次指令拆分成子任务
- 32. Transformer相关的原理(2.3. 图解BERT)_bertencoder图
- 4adb devices找不到设备的很多原因
- 5pytorch初学笔记(一):如何加载数据和Dataset实战_python dataset
- 6鸿蒙开发,对于前端开发来说,究竟是福是祸呢?_前端 鸿蒙
- 7宇视VM新BS界面配置告警联动上墙
- 8决策树python源码实现(含预剪枝和后剪枝)_def createdatalh(): data = np.array([['青年', '否', '
- 9hive集群搭建
- 10掌握Go语言:Go语言类型转换,解锁高级用法,轻松驾驭复杂数据结构(30)
YOLOv8 目标检测 | 自定义数据集
赞
踩
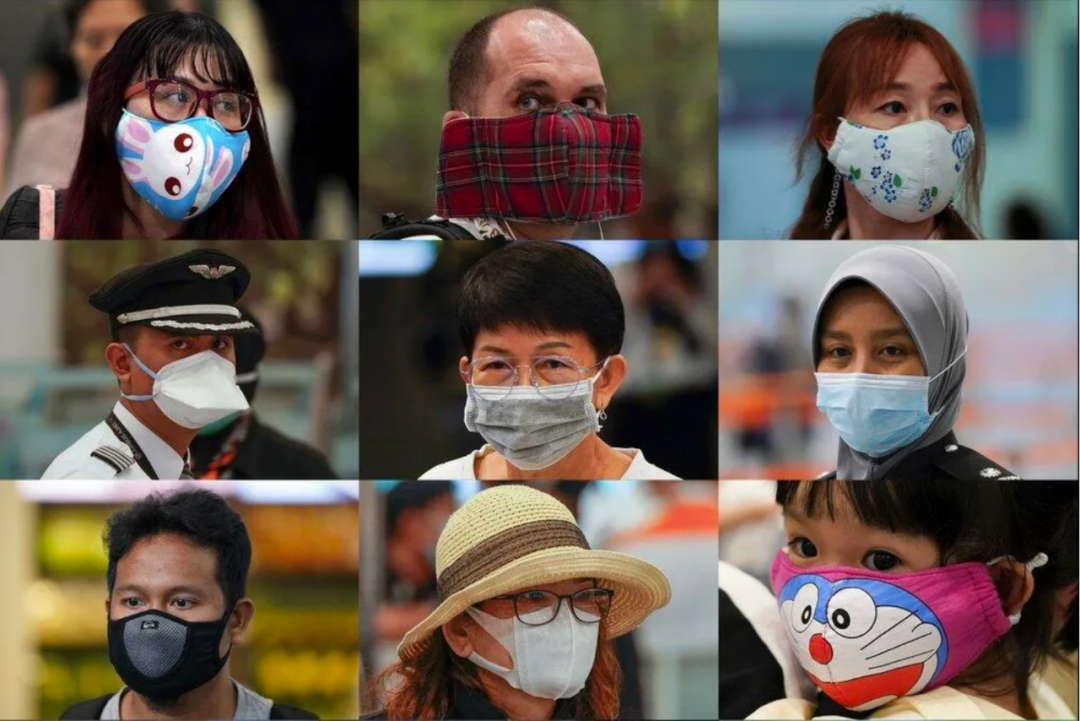
本文介绍了使用用于目标检测的自定义数据训练 YOLOv8 模型。我正在使用来自 kaggle 的 yolo 格式的“Face Mask Dataset”,数据集链接如下:https://www.kaggle.com/datasets/maalialharbi/face-mask-dataset?resource=download
YOLOv8 是目前最先进的 YOLO 模型,可用于目标检测、图像分类和实例分割任务。
我使用 Google Colab 进行训练,如果您有兴趣使用 YOLOv5 对自定义数据进行检查,可是使用下面链接中的代码:https://github.com/Balakishan77/yolov5_custom_traffic_sign_detector。
关于这个用于目标检测任务的数据集:
数据集“Face Mask Dataset”已转换好 YOLO 格式以用于检测任务。它既可以用于训练,也可以用于测试。
图像数据集可以切分如下:
测试:136 =10%
训练:990 = 70%
验证:294 = 20%
总计 = 1420 张图片
图像数据增强是为了增加数据集的大小并使其更强大。图像格式:JPEG、PNG,共有 3 个类:no_mask mask improper_mask。
训练自定义检测模型:
我正在使用 Yolov8m 对口罩数据进行自定义训练。我通过从 Google Drive 读取数据并在 Google colab 上进行训练。以下步骤将详细介绍使用 YOLOv8 在 Mask Data 上进行自定义训练:
配置 Google Colab
YOLOv8 安装
安装 Google Drive
创建 face_mask_detetcion.yaml(数据集配置文件)(YOLOV8格式)
训练我们的自定义口罩检测模型
指标
使用自定义 YOLOv8 目标检测模型训练权重进行推理
1. 配置 Google Colab
Google Colab 是一个类似于 Jupiter notebook 的在线深度学习训练环境,您可以在上面的 GPU/TPU 上训练深度学习模型。Google Colab 允许您在断开连接之前免费训练深度学习模型长达 12 小时。通过访问运行时部分,将运行类型更改为 GPU 并使用以下命令检查 GPU 详细信息。
- # to check and monitoring of NVIDIA GPU devices.
- !nvidia-smi
2. YOLOv8 安装
我们可以通过 clone git 上面的代码或使用 torch hub 使用 YOLOv5。最近的 YOLOv8 已经发布为 pip 包,所以我们不需要 clone 任何代码,便可以安装 v8 版本所有的依赖项。
- # installing package to work with yolov8
- !pip install ultralytics
3. 安装 Google Drive
我已经将 mask_dataset 文件夹上传到“MyDrive/datasets/mask_dataset/”路径中的 Google Drive,我将使用以下代码进行安装。(它会要求您输入授权码,您可以通过单击下面显示的链接来输入授权码)。标注数据已按照图像和标签(文本文件)分开的方式进行切分。
- from google.colab import drive
- drive.mount('/content/drive')
YOLOv8格式:
YOLOv8 的格式与 Yolov5 相同。YOLO 格式,每个图像有一个对应的 .txt 文件(如果图像中没有对象,则不需要 .txt 文件)。*.txt 文件规范为:
每个对象对应一行,每行依次保存了 class, x_center, y_center width height。框坐标必须采用 xywh 格式(归一化到 0–1)。如果您的框以像素为单位,请将 x_center 和 width 除以图像 width,将 y_center 和 height 除以图像 heigth。class 是从零进行索引的。下面我们将探索数据集中的一些示例图像。
- # Checking the size of images and displaying them
- import numpy as np
- import cv2
- # Image shape in Training
- image = cv2.imread('/content/drive/MyDrive/datasets/mask_dataset/train/images/5e353e347af50726986e84c0.jpeg')
- height = np.size(image, 0)
- width = np.size(image, 1)
- print ("shape of the training image {}, {}".format(height, width))
- # Image shape in validation
- image = cv2.imread('/content/drive/MyDrive/datasets/mask_dataset/valid/images/maksssksksss67.png')
- height = np.size(image, 0)
- width = np.size(image, 1)
- print ("shape of the validation image {}, {}".format(height, width))
- # dispying with different width
- from IPython.display import Image
- Image(filename='/content/drive/MyDrive/datasets/mask_dataset/train/images/5e353e347af50726986e84c0.jpeg', width=300)
4. 创建 face_mask_detetcion.yaml(数据集配置文件)
“face mask dataset”中的图像拆分如下:
训练:990 = 70%
验证:294 = 20%
测试:136 =10%
(我没有使用测试数据集,而是用一些来自互联网的视频进行测试)
总计 = 1420 张图片
下面创建的 mask_dataset/face_mask_detetcion.yaml 是定义以下内容的数据集配置文件:
数据集根目录路径和 train / test /val 图像目录的相对路径(或带有图像路径的 *.txt 文件)
nc:类别数目
names:类名列表
- # I will write the contents of the cell to a file
- %%writefile /content/drive/MyDrive/datasets/mask_dataset/face_mask_detection.yaml
-
-
- # Train/val/test sets as 1) dir: path/to/imgs, 2) file: path/to/imgs.txt, or 3) list: [path/to/imgs1, path/to/imgs2, ..]
- path: /content/drive/MyDrive/datasets/mask_dataset # dataset root dir
- train: train/images/ # train images (relative to 'path')
- val: valid/images/ # val images (relative to 'path')
- test: # test images (optional)
-
-
- # number of classes
- nc: 3
-
-
- # class names
- #names: ['0', '1', '2']
- names: [ 'no_mask', 'mask','improper_mask'] # class names

5. 训练我们自定义口罩检测模型
我正在使用 YOLOv8m 预训练模型对口罩数据集进行训练。我们可以调整多个参数以获得更好的结果,我正在使用 yolov8m 模型训练 25 个 epoch。
参数:
指定数据配置文件的路径
输入图像尺寸
epoch
- from ultralytics import YOLO
-
-
- # Load a model
- # model = YOLO("yolov8m.yaml") # build a new model from scratch
- model = YOLO("yolov8m.pt") # load a pretrained model (recommended for training)
-
-
- # Use the model
- results = model.train(data="/content/drive/MyDrive/datasets/mask_dataset/face_mask_detection.yaml", epochs=25, imgsz=640) # train the model
VAL:
在验证数据集上验证经过训练的 YOLOv8m 模型准确性。不需要传递参数,因为模型将其训练数据和参数保留为一个完整模型。
results = model.val() # evaluate model performance on the validation set6. 指标
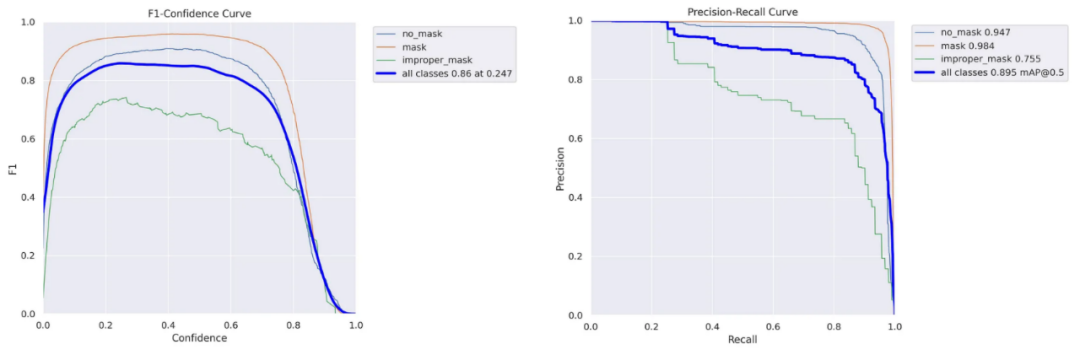
每个类别和整体的训练 mAP 效果都很好,视频测试结果也很好。如果我们针对 epoch 进行训练,添加更多数据并使用超参数可以提高模型的性能。下面我们可以看到 Precision-Recall 和 F1 置信度曲线。
- # dislaying metrics for train data
- from IPython.display import Image
- from IPython.display import display
- x = Image(filename='runs/detect/train2/F1_curve.png')
- y = Image(filename='runs/detect/train2/PR_curve.png')
- z = Image(filename='runs/detect/train2/confusion_matrix.png')
- display(x, y,z)
7. 推理
- # checking the latest trained files
- !ls 'runs/detect/train2/weights'
- best.pt last.pt
- # loading the trianed model
- model = YOLO("runs/detect/train2/weights/best.pt") # load a custom model
- # testing the model on a video
- !yolo task=detect mode=predict model="runs/detect/train2/weights/best.pt" source="/content/drive/MyDrive/datasets/mask_dataset/mask_testing.mp4"
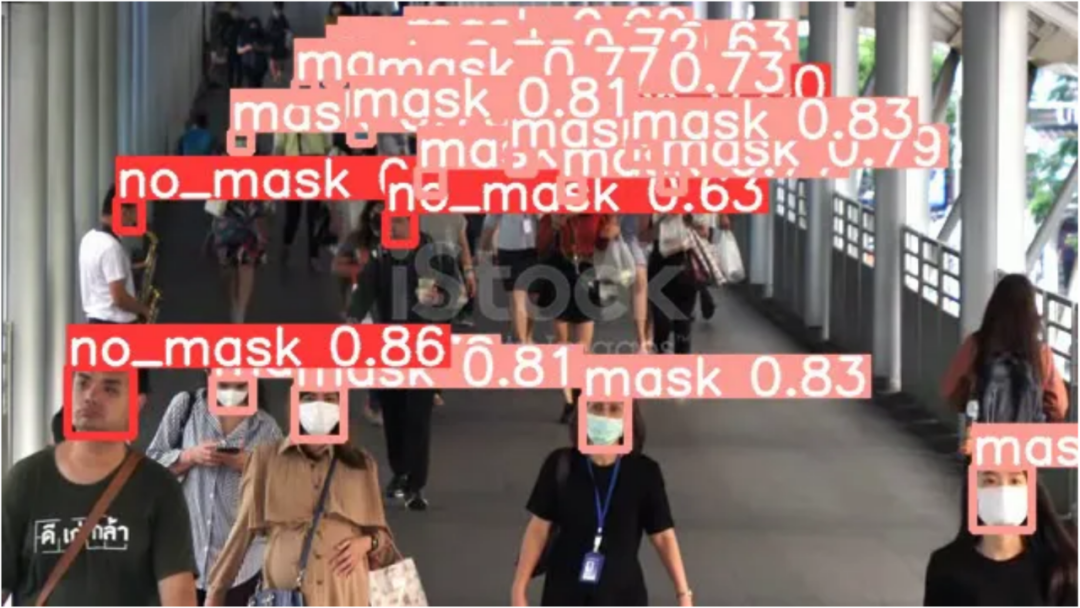
下面是使用该模型对图像进行推理的示例。
下面提供了使用经过训练模型推理并进行标注的视频链接:
https://github.com/Balakishan77/Yolov8-Custom-ObjectDetetction/blob/main/face_mask_detetcion_yolov8.mp4
结论
根据推理结果,经过训练的模型效果很好。我们可以尝试通过使用更大型的 YOLOv8 模型、扩增数据集和添加超参数的方式对模型进行改进,小伙伴们有兴趣可以自行尝试。
· END ·
HAPPY LIFE


