- 1AI伪原创神器,轻松拥有!_ai伪原创工具
- 2ROS仿真机器人(安装、配置、测试、建图、定位、路径规划)_ros仿真环境搭建
- 3NLP定义和机器翻译_nlp机器翻译
- 4(2023,Diffusion & 稳健性 & 攻击)稳定扩散模型是不稳定的_diffusion model生成不稳定
- 5多模态情感分析_adversarial and domain-aware bert for cross-domain
- 6如何使用 Gemma LLM?_gemma的输出如何过滤掉输入信息
- 7Javascript高级面试
- 8显示器校准软件:BetterDisplay Pro for Mac v2.0.11激活版下载_mac betterdisplay下载
- 92022李宏毅机器学习深度学习学习笔记第十九周_hidden states
- 10MySQL提示“too many connections“的解决方法_too many connections mysql
Tailscale配合Headscale组网_tailscale headscale
赞
踩
Tailscale 简介
Tailscale 是一项服务,可让您在世界任何地方安全、轻松地访问您拥有的设备和应用程序。它使用开源WireGuard协议启用加密的点对点连接,这意味着只有您的私有网络上的设备才能相互通信。

Tailscale 建立在安全的网络结构之上,与传统方法相比,提供速度、稳定性和简单性。Tailscale 快速可靠,与通过中央网关服务器传输所有网络流量的传统方案不同,Tailscale 创建了一个点对点网状网络(称为 tailnet)。

Tailscale 两种使用方式:
- 下载官方客户端,连接官方免费控制服务器,使用简单,但由于服务器在国外有一定网络延迟;
- 基于开源headscale自建控制服务器,连接速度较快。
Headscale 简介
Tailscale 的控制服务器是不开源的,而且对免费用户有诸多限制,目前有一款开源的实现叫 Headscale,Headscale 由欧洲航天局的 Juan Font 使用 Go 语言开发,在 BSD 许可下发布,实现了 Tailscale 控制服务器的所有主要功能,可以部署在企业内部,没有任何设备数量的限制,且所有的网络流量都由自己控制,Headscale是Tailscale 控制服务器的开源、自托管实现。

项目地址:https://github.com/juanfont/headscale
安装 headscale
参考:https://github.com/juanfont/headscale/blob/main/docs/running-headscale-container.md
前提条件:准备一台具有公网IP地址的Linux服务器,例如公有云的云主机。
创建相关目录,用于保存headscale配置和SQLite数据库:
mkdir -p /data/headscale/config
cd /data/headscale
- 1
- 2
在 headscale 目录中创建一个空的 SQlite 数据库:
touch ./config/db.sqlite
- 1
从headscale 存储库下载示例配置的副本(强烈推荐)。
wget -O ./config/config.yaml https://raw.githubusercontent.com/juanfont/headscale/main/config-example.yaml
- 1
修改配置文件,其中your-host-name 需要设置为服务器公网IP地址:
server_url: <http://your-host-name:8080>
metrics_listen_addr: 0.0.0.0:9090
private_key_path: /etc/headscale/private.key
db_path: /etc/headscale/db.sqlite
- 1
- 2
- 3
- 4
在主机 headscale 目录中工作时启动 headscale 服务器:
docker run -d --name headscale \
  --restart always \
  -v /data/headscale/config:/etc/headscale/ \
  -p 8080:8080 \
  -p 9090:9090 \
  headscale/headscale:0.15-alpine headscale serve
- 1
- 2
- 3
- 4
- 5
- 6
验证正在运行的容器:
root@ubuntu-vm:~# docker ps
CONTAINER ID   IMAGE                             COMMAND             CREATED        STATUS        PORTS                                                                                  NAMES
d1d9cd29c469   headscale/headscale:0.15-alpine   "headscale serve"   8 weeks ago    Up 5 hours    0.0.0.0:8080->8080/tcp, :::8080->8080/tcp, 0.0.0.0:9090->9090/tcp, :::9090->9090/tcp   headscale
- 1
- 2
- 3
验证headscale是否可用:
root@ubuntu-vm:~# curl http://127.0.0.1:9090/metrics
# HELP gin_request_duration_seconds The HTTP request latencies in seconds.
# TYPE gin_request_duration_seconds summary
gin_request_duration_seconds_sum 0
gin_request_duration_seconds_count 0
# HELP gin_request_size_bytes The HTTP request sizes in bytes.
# TYPE gin_request_size_bytes summary
gin_request_size_bytes_sum 0
gin_request_size_bytes_count 0
# HELP gin_response_size_bytes The HTTP response sizes in bytes.
# TYPE gin_response_size_bytes summary
.....
- 1
- 2
- 3
- 4
- 5
- 6
- 7
- 8
- 9
- 10
- 11
- 12
创建一个命名空间:
docker exec headscale \
  headscale namespaces create myfirstnamespace
- 1
- 2
生成认证key
docker exec headscale \
  headscale --namespace myfirstnamespace preauthkeys create --reusable --expiration 24h
- 1
- 2
查看生成的authkey
root@ubuntu-vm:~/.config/clash# docker exec headscale \
>   headscale --namespace myfirstnamespace preauthkeys create --reusable --expiration 24h
fc42723daaxxxxxxxxxxxxxx00d69ddbad3d5afd0bd5
- 1
- 2
- 3
Windows客户端注册
以这台windows客户端位于家里网络为例。
1、下载官方tailscale客户端并安装:https://tailscale.com/download/
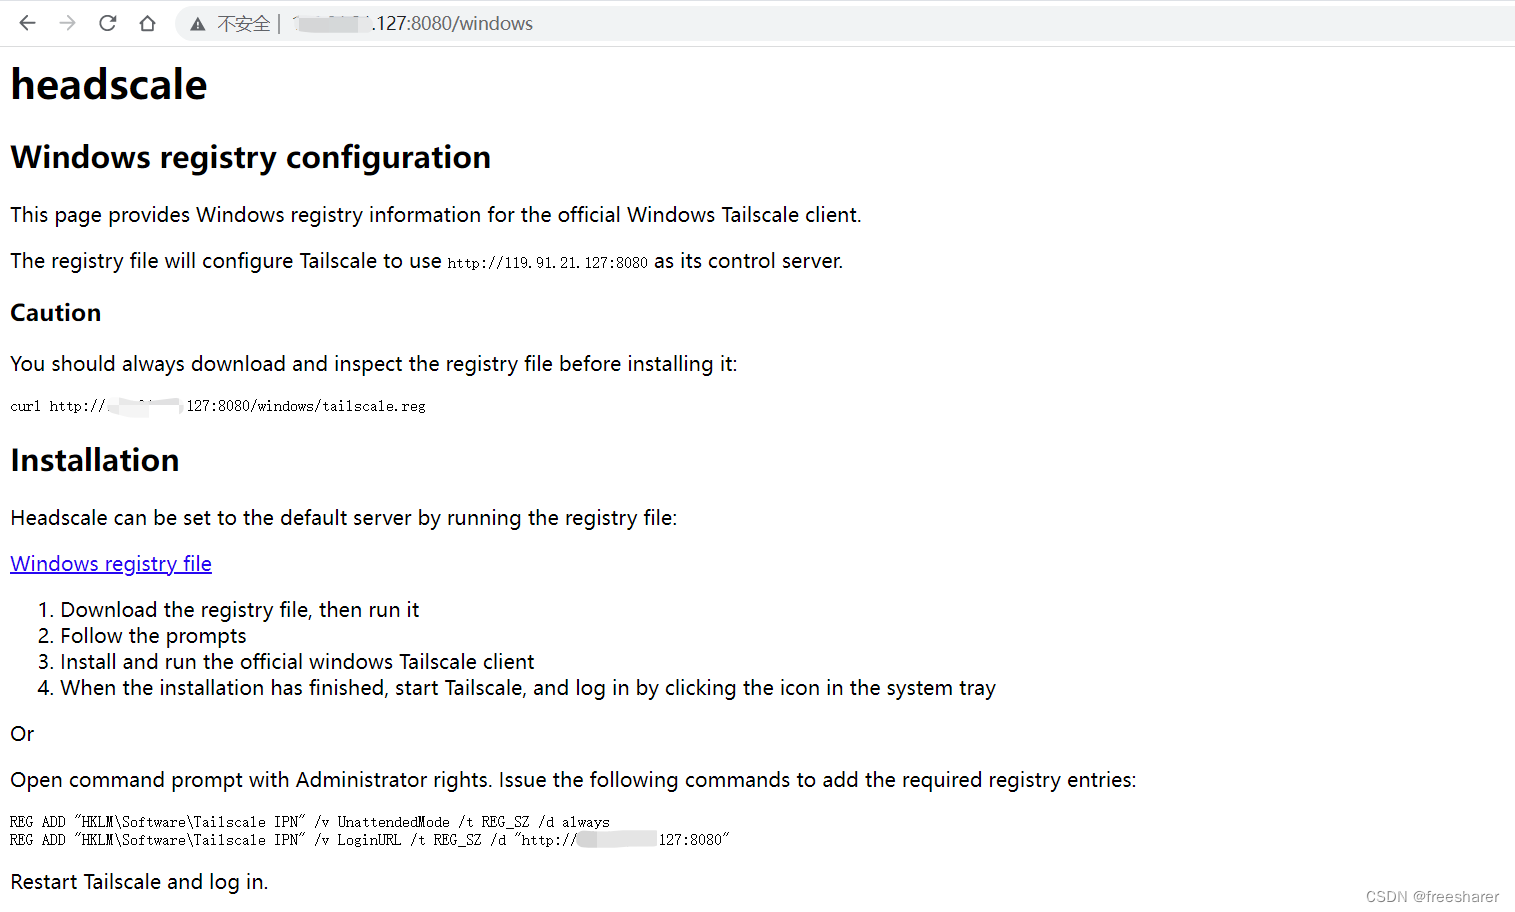
2、访问headscale控制端http://<headscale-ip>:8080,点击下载安装Windows registry file注册表文件。

3、客户端开启路由转发功能
搜索框输入regedit,打开注册表编辑器,在注册表编辑器中将参数IPEnableRouter的值从0修改为1,然后关闭注册表编辑器并重新启动系统。
HKEY_LOCAL_MACHINE\SYSTEM\CurrentControlSet\Services\Tcpip\Parameters
- 1
4、注册客户端到headscale控制服务器
打开 windows CMD命令行界面,执行以下命令
tailscale up --accept-dns=false --accept-routes --advertise-routes=192.168.10.0/24 --login-server=http://<headscale-ip>:8080 --authkey fc42723daad8a30xxxxxxx9ddbad3d5afd0bd5
- 1
参数说明:
- –advertise-routes 将本地子网也发布到headscale网络,这样无需所有设备都安装tailscale客户端就能接入tailscale点对点网络
- –login-server headscale控制服务器的公网IP地址
- –authkey 上一步生成的authkey
5、headscale控制端确认客户端节点已注册并处于在线状态,并且headscale为每个客户端额外分配了一个IP地址100.64.0.5 ,也可以使用该IP地址直接访问客户端所在机器
root@ubuntu-vm:~# docker exec -it headscale headscale nodes list
ID | Name        | NodeKey | Namespace        | IP addresses                  | Ephemeral | Last seen           | Online  | Expired
7  | windows11   | [dJBsL] | myfirstnamespace | fd7a:115c:a1e0::5, 100.64.0.5 | false     | 2022-08-27 03:04:03 | online  | no
- 1
- 2
- 3
如果需要删除客户端执行以下命令
root@ubuntu-vm:~# docker exec -it headscale sh
/ # headscale nodes delete -i 7
- 1
- 2
6、默认客户端发布的子网并未启用,需要在headscale控制端启用发布的子网,查看客户端发布的subnet
root@ubuntu-vm:~# docker exec -it headscale sh
/ # headscale nodes routes list -i 7
Route           | Enabled
192.168.10.0/24 | false
- 1
- 2
- 3
- 4
执行以下命令启用发布的子网
/ # headscale nodes routes enable -i 7 -r 192.168.10.0/24
Route           | Enabled
192.168.10.0/24 | true
- 1
- 2
- 3
Linux客户端注册
以这台Linux客户端位于阿里云VPC网络为例。
1、使用容器安装tailscale客户端
docker run -d --name tailscaled \
  --restart always \
  -v /var/lib:/var/lib \
  -v /dev/net/tun:/dev/net/tun \
  -v /lib/modules:/lib/modules \
  --network=host --privileged=true \
  tailscale/tailscale tailscaled
- 1
- 2
- 3
- 4
- 5
- 6
- 7
2、开启路由转发
echo 'net.ipv4.ip_forward = 1' | tee /etc/sysctl.d/ipforwarding.conf
echo 'net.ipv6.conf.all.forwarding = 1' | tee -a /etc/sysctl.d/ipforwarding.conf
sysctl -p /etc/sysctl.d/ipforwarding.conf
- 1
- 2
- 3
3、注册客户端到headscale
docker exec -it tailscaled \
tailscale up --accept-dns=false --accept-routes --advertise-routes=10.0.10.0/24 --login-server=http://<headscale-ip>:8080 --authkey fc42723daad8xxxxxxxxxxxxxx69ddbad3d5afd0bd5
- 1
- 2
4、同样在headscale控制端启用发布的子网
测试网络连接
基于以上方式,可以接入任意网络中的任意节点到headscale点对点网络,tailscale网络无视防火墙和NAT设备,安装了tailscale客户端并完成注册的节点之间私网IP直接能够互通。如果发布了本地网络的子网,子网中的任意设备无需全部安装headscale客户端也具有同样效果。
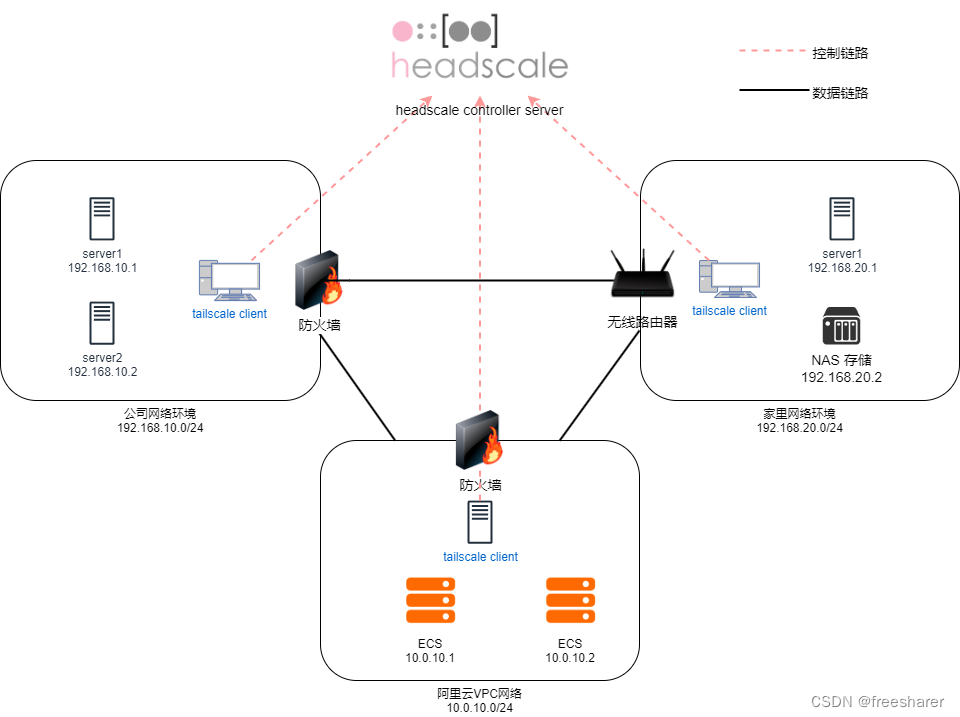
上面注册了一台windows客户端和一台linux客户端,假设windows客户端是一台位于公司网络的办公主机,或者是一台位于家里宽带网络的笔记本电脑,linux客户端是阿里云上VPC中的一台云服务器,下图是最终实现的组网效果。
图中的任意设备和节点之间可以直接通过私有IP地址互相访问和通信,例如你可以在家里访问公司服务器,在公司访问家里个人NAS存储,在公司访问阿里云上的ECS开发测试服务器。


