
- 1微信小程序获取用户定位(经纬度)信息_微信小程序获取位置信息
- 2[异常处理]class kafka.common.UnknownTopicOrPartitionException (kafka.server.ReplicaFetcherThread)_unknown topic or partition error in listoffset
- 3centos 杀死进程命令kill
- 4微信小程序页面开发-本地生活_为想见你小程序开发本地生活
- 5Git——多人协作/版本控制,在一个gitee仓库下开发(Gitee版教程)手把手教学,包好用的!_gitee多人协作
- 6FPGA 20个例程篇:20.USB2.0/RS232/LAN控制并行DAC输出任意频率正弦波、梯形波、三角波、方波(三)_fpga怎么输出任意频率的方波
- 7华为超聚变2288H V6服务器配置RAID及安装ESXI7.0-闭坑,亲测_华为超聚变服务器 怎么配置raid
- 8如何快速解决验证码图像问题 | 最佳图像(OCR)验证码解决工具
- 9ios开发错误积累_ios 17.4 simulator
- 10京东面经分享
ShardingSphere分库分表教程 Spring Boot 34,0基础网络安全开发_spring.shardingsphere.sharding.tables
赞
踩
先自我介绍一下,小编浙江大学毕业,去过华为、字节跳动等大厂,目前阿里P7
深知大多数程序员,想要提升技能,往往是自己摸索成长,但自己不成体系的自学效果低效又漫长,而且极易碰到天花板技术停滞不前!
因此收集整理了一份《2024年最新网络安全全套学习资料》,初衷也很简单,就是希望能够帮助到想自学提升又不知道该从何学起的朋友。


既有适合小白学习的零基础资料,也有适合3年以上经验的小伙伴深入学习提升的进阶课程,涵盖了95%以上网络安全知识点,真正体系化!
由于文件比较多,这里只是将部分目录截图出来,全套包含大厂面经、学习笔记、源码讲义、实战项目、大纲路线、讲解视频,并且后续会持续更新
如果你需要这些资料,可以添加V获取:vip204888 (备注网络安全)

正文
Apache ShardingSphere 产品定位为Database Plus,旨在构建多模数据库上层的标准和生态。它关注如何充分合理地利用数据库的计算和存储能力,而非实现一个全新的数据库。Apache ShardingSphere站在数据库的上层视角,关注它们之间的协作多于数据库本身。
六、Apache ShardingSphere的三个核心概念
1、连接
通过对数据库协议、SQL方言以及数据库存储的灵活适配,快速的连接应用与多模式的异构数据库。
2、增量
获取数据库的访问流量,并提供流量重定向(数据分片、读写分离、影子库)、流量变形(数据加密、数据脱敏)、流量鉴权(安全、审计、权限)、流量治理(熔断、限流)以及流量分析(服务质量分析、可观察性)等透明化增量功能。
3、可插拔
项目采用微内核 + 3层可插拔模式,使内核、功能组件以及生态对接完全能够灵活的方式进行可插拔式扩展,开发者能够像使用积木一样定制数据自己的独特系统。

七、Apache ShardingSphere的三款产品
1、ShardingSphere-JDBC
定位为轻量级Java框架,在java的JDBC层提供额外服务。它使用客户端直接连接数据库,以jar包形式提供服务,无需额外部署和依赖,可理解为增强型的JDBC驱动,完全兼容JDBC和各种ORM框架。
适用于任何基于JDBC的ORM框架,如mybatis、hibernate、JPA、Spring JDBC Template或直接使用JDBC。
支持任意实现JDBC规范的数据库,目前支持MySQL、Oracle、SQLServer、PostgreSQL。
支持任何第三方的数据库连接池,如Druid、DBCP、C3P0、BoneCP、HikariCP等。

2、Sharding-Proxy
定位为透明化的数据库代理端,提供封装了数据库二进制协议的服务端版本,用于完成对异构语言的支持。目前支持MySQL和PostgreSQL,它可以兼容Navicat、DBeaver等数据库第三方客户端。

3、ShardingSphere-Sidecar
定位为kubernetes的云原生数据库代理,以sidecar的形式代理所有对数据库的访问。通过无中心、零侵入的方案提供与数据库交互的啮合层,即Database Mesh,又可称数据库网格。
Database Mesh 的关注重点在于如何将分布式的数据访问应用与数据库有机串联起来,它更加关注的是交互,是将杂乱无章的应用与数据库之间的交互进行有效地梳理。 使用 Database Mesh,访问数据库的应用和数据库终将形成一个巨大的网格体系,应用和数据库只需在网格体系中对号入座即可,它们都是被啮合层所治理的对象。

八、ShardingSphere-JDBC代码实例
1、ShardingSphere-JDBC 实现水平分表
(1)pom.xml
<?xml version="1.0" encoding="UTF-8"?>
<project xmlns="http://maven.apache.org/POM/4.0.0" xmlns:xsi="http://www.w3.org/2001/XMLSchema-instance"
         xsi:schemaLocation="http://maven.apache.org/POM/4.0.0 https://maven.apache.org/xsd/maven-4.0.0.xsd">
    <modelVersion>4.0.0</modelVersion>
    <parent>
        <groupId>org.springframework.boot</groupId>
        <artifactId>spring-boot-starter-parent</artifactId>
        <version>2.2.1.RELEASE</version>
        <relativePath/> <!-- lookup parent from repository -->
    </parent>
    <groupId>com.guor</groupId>
    <artifactId>shardingjdbc</artifactId>
    <version>0.0.1-SNAPSHOT</version>
    <name>shardingjdbc</name>
    <description>Demo project for Spring Boot</description>

    <properties>
        <java.version>1.8</java.version>
    </properties>

    <dependencies>
        <dependency>
            <groupId>org.springframework.boot</groupId>
            <artifactId>spring-boot-starter</artifactId>
        </dependency>

        <dependency>
            <groupId>org.springframework.boot</groupId>
            <artifactId>spring-boot-starter-test</artifactId>
        </dependency>

        <dependency>
            <groupId>com.alibaba</groupId>
            <artifactId>druid-spring-boot-starter</artifactId>
            <version>1.1.20</version>
        </dependency>
        <dependency>
            <groupId>mysql</groupId>
            <artifactId>mysql-connector-java</artifactId>
        </dependency>
        <dependency>
            <groupId>org.apache.shardingsphere</groupId>
            <artifactId>sharding-jdbc-spring-boot-starter</artifactId>
            <version>4.0.0-RC1</version>
        </dependency>
        <dependency>
            <groupId>com.baomidou</groupId>
            <artifactId>mybatis-plus-boot-starter</artifactId>
            <version>3.0.5</version>
        </dependency>

        <dependency>
            <groupId>org.projectlombok</groupId>
            <artifactId>lombok</artifactId>
        </dependency>
    </dependencies>

    <build>
        <plugins>
            <plugin>
                <groupId>org.springframework.boot</groupId>
                <artifactId>spring-boot-maven-plugin</artifactId>
            </plugin>
        </plugins>
    </build>

</project>

- 1
- 2
- 3
- 4
- 5
- 6
- 7
- 8
- 9
- 10
- 11
- 12
- 13
- 14
- 15
- 16
- 17
- 18
- 19
- 20
- 21
- 22
- 23
- 24
- 25
- 26
- 27
- 28
- 29
- 30
- 31
- 32
- 33
- 34
- 35
- 36
- 37
- 38
- 39
- 40
- 41
- 42
- 43
- 44
- 45
- 46
- 47
- 48
- 49
- 50
- 51
- 52
- 53
- 54
- 55
- 56
- 57
- 58
- 59
- 60
- 61
- 62
- 63
- 64
- 65
- 66
- 67
- 68
(2)application.properties
ShardingSphere-JDBC 的简单配置,参照ShardingSphere官方文档即可。
# shardingjdbc分片策略
# 配置数据源,给数据源起名称,
# 水平分库,配置两个数据源
spring.shardingsphere.datasource.names=g1

# 一个实体类对应两张表,覆盖
spring.main.allow-bean-definition-overriding=true

#配置第一个数据源具体内容,包含连接池,驱动,地址,用户名和密码
spring.shardingsphere.datasource.g1.type=com.alibaba.druid.pool.DruidDataSource
spring.shardingsphere.datasource.g1.driver-class-name=com.mysql.cj.jdbc.Driver
spring.shardingsphere.datasource.g1.url=jdbc:mysql://localhost:3306/guor?serverTimezone=GMT%2B8
spring.shardingsphere.datasource.g1.username=root
spring.shardingsphere.datasource.g1.password=root

#指定数据库分布情况,数据库里面表分布情况
spring.shardingsphere.sharding.tables.course.actual-data-nodes=g1.student_$->{1..2}

# 指定student表里面主键id 生成策略  SNOWFLAKE
spring.shardingsphere.sharding.tables.student.key-generator.column=id
spring.shardingsphere.sharding.tables.student.key-generator.type=SNOWFLAKE

# 指定表分片策略  约定id值偶数添加到student_1表,如果cid是奇数添加到student_2表
spring.shardingsphere.sharding.tables.student.table-strategy.inline.sharding-column=id
spring.shardingsphere.sharding.tables.student.table-strategy.inline.algorithm-expression=student_$->{id % 2 + 1}

# 打开sql输出日志
spring.shardingsphere.props.sql.show=true
- 1
- 2
- 3
- 4
- 5
- 6
- 7
- 8
- 9
- 10
- 11
- 12
- 13
- 14
- 15
- 16
- 17
- 18
- 19
- 20
- 21
- 22
- 23
- 24
- 25
- 26
- 27
- 28
(3)student
package com.guor.shardingjdbc.bean;

import lombok.Data;

import java.util.Date;

@Data
public class Student {
    private Long id;
    private String name;
    private Integer age;
    private Integer sex;
    private String address;
    private String phone;
    private Date create_time;
    private Date update_time;
    private String deleted;
    private String teacher_id;
}
- 1
- 2
- 3
- 4
- 5
- 6
- 7
- 8
- 9
- 10
- 11
- 12
- 13
- 14
- 15
- 16
- 17
- 18
- 19
- 20
(4)mapper
由于使用的是mybatis_plus,所以单表的CRUD继承BaseMapper即可。
package com.guor.shardingjdbc.mapper;

import com.baomidou.mybatisplus.core.mapper.BaseMapper;
import com.guor.shardingjdbc.bean.Student;
import org.springframework.stereotype.Repository;

@Repository
public interface StudentMapper extends BaseMapper<Student> {
}
- 1
- 2
- 3
- 4
- 5
- 6
- 7
- 8
- 9
- 10
(5)启动类
package com.guor.shardingjdbc;

import org.mybatis.spring.annotation.MapperScan;
import org.springframework.boot.SpringApplication;
import org.springframework.boot.autoconfigure.SpringBootApplication;

@SpringBootApplication
@MapperScan("com.guor.shardingjdbc.mapper")
public class ShardingjdbcApplication {

    public static void main(String[] args) {
        SpringApplication.run(ShardingjdbcApplication.class, args);
    }

}
- 1
- 2
- 3
- 4
- 5
- 6
- 7
- 8
- 9
- 10
- 11
- 12
- 13
- 14
- 15
- 16
(6)test
package com.guor.shardingjdbc;

import com.guor.shardingjdbc.bean.Student;
import com.guor.shardingjdbc.mapper.StudentMapper;
import org.junit.jupiter.api.Test;
import org.springframework.beans.factory.annotation.Autowired;
import org.springframework.boot.test.context.SpringBootTest;

import java.util.Date;

@SpringBootTest
class ShardingjdbcApplicationTests {

    @Autowired
    private StudentMapper studentMapper;

    @Test
    void addStudent() {
        Student student = new Student();
        student.setName("哪吒");
        student.setAge(18);
        student.setCreate_time(new Date());
        student.setPhone("10086");
        studentMapper.insert(student);
    }

}
- 1
- 2
- 3
- 4
- 5
- 6
- 7
- 8
- 9
- 10
- 11
- 12
- 13
- 14
- 15
- 16
- 17
- 18
- 19
- 20
- 21
- 22
- 23
- 24
- 25
- 26
- 27
- 28
(7)sql建表语句
-- guor.student_1 definition

CREATE TABLE `student_1` (
  `id` bigint(20) DEFAULT NULL,
  `name` varchar(100) NOT NULL,
  `age` int(10) NOT NULL,
  `sex` int(11) DEFAULT NULL,
  `address` varchar(100) DEFAULT NULL,
  `phone` varchar(100) DEFAULT NULL,
  `create_time` timestamp NULL DEFAULT NULL,
  `update_time` timestamp NULL DEFAULT NULL,
  `deleted` int(11) DEFAULT NULL,
  `teacher_id` int(11) DEFAULT NULL
) ENGINE=InnoDB DEFAULT CHARSET=utf8;
- 1
- 2
- 3
- 4
- 5
- 6
- 7
- 8
- 9
- 10
- 11
- 12
- 13
- 14
(8)水平分表 -> 插入数据库

2、ShardingSphere-JDBC 实现水平分库
首先要建一个新库,guor1库,然后建两个与上述一样的student_1和student_2表。
(1)添加application.properties
# shardingjdbc分片策略
# 配置数据源,给数据源起名称,
# 水平分库,配置两个数据源
spring.shardingsphere.datasource.names=ds1,ds2

# 一个实体类对应两张表,覆盖
spring.main.allow-bean-definition-overriding=true

#配置第一个数据源具体内容,包含连接池,驱动,地址,用户名和密码
spring.shardingsphere.datasource.ds1.type=com.alibaba.druid.pool.DruidDataSource
spring.shardingsphere.datasource.ds1.driver-class-name=com.mysql.cj.jdbc.Driver
spring.shardingsphere.datasource.ds1.url=jdbc:mysql://localhost:3306/guor?serverTimezone=GMT%2B8
spring.shardingsphere.datasource.ds1.username=root
spring.shardingsphere.datasource.ds1.password=root

#配置第二个数据源具体内容,包含连接池,驱动,地址,用户名和密码
spring.shardingsphere.datasource.ds2.type=com.alibaba.druid.pool.DruidDataSource
spring.shardingsphere.datasource.ds2.driver-class-name=com.mysql.cj.jdbc.Driver
spring.shardingsphere.datasource.ds2.url=jdbc:mysql://localhost:3306/guor1?serverTimezone=GMT%2B8
spring.shardingsphere.datasource.ds2.username=root
spring.shardingsphere.datasource.ds2.password=root

#指定数据库分布情况,数据库里面表分布情况
spring.shardingsphere.sharding.tables.course.actual-data-nodes=ds$->{1..2}.course_$->{1..2}

# 指定student表里面主键id 生成策略  SNOWFLAKE
spring.shardingsphere.sharding.tables.student.key-generator.column=id
spring.shardingsphere.sharding.tables.student.key-generator.type=SNOWFLAKE

# 指定表分片策略  约定id值偶数添加到student_1表,如果cid是奇数添加到student_2表
spring.shardingsphere.sharding.tables.student.table-strategy.inline.sharding-column=id
spring.shardingsphere.sharding.tables.student.table-strategy.inline.algorithm-expression=student_$->{id % 2 + 1}

# 指定数据库分片策略 约定user_id是偶数添加ds1,是奇数添加ds2
#spring.shardingsphere.sharding.default-database-strategy.inline.sharding-column=teacher_id
#spring.shardingsphere.sharding.default-database-strategy.inline.algorithm-expression=m$->{teacher_id % 2 + 1}
spring.shardingsphere.sharding.tables.student.database-strategy.inline..sharding-column=teacher_id
spring.shardingsphere.sharding.tables.student.database-strategy.inline.algorithm-expression=ds$->{teacher_id % 2 + 1}

# 打开sql输出日志
spring.shardingsphere.props.sql.show=true
- 1
- 2
- 3
- 4
- 5
- 6
- 7
- 8
- 9
- 10
- 11
- 12
- 13
- 14
- 15
- 16
- 17
- 18
- 19
- 20
- 21
- 22
- 23
- 24
- 25
- 26
- 27
- 28
- 29
- 30
- 31
- 32
- 33
- 34
- 35
- 36
- 37
- 38
- 39
- 40
- 41
(2)测试
package com.guor.shardingjdbc;

import com.baomidou.mybatisplus.core.conditions.query.QueryWrapper;
import com.guor.shardingjdbc.bean.Student;
import com.guor.shardingjdbc.mapper.StudentMapper;
import org.junit.jupiter.api.Test;
import org.springframework.beans.factory.annotation.Autowired;
import org.springframework.boot.test.context.SpringBootTest;

import java.util.Date;

@SpringBootTest
class ShardingjdbcApplicationTests {

    @Autowired
    private StudentMapper studentMapper;


    //测试水平分库
    @Test
    void addStudentDb() {
        Student student = new Student();
        student.setName("哪吒");
        student.setAge(28);
        student.setCreate_time(new Date());
        student.setPhone("110");
        student.setTeacher_id(101);
        studentMapper.insert(student);
    }

    @Test
    void getStudentDb() {
        QueryWrapper<Student> wrapper = new QueryWrapper();
        wrapper.eq("teacher_id",100);
        wrapper.eq("id",1439791276024459266L);
        Student student = studentMapper.selectOne(wrapper);
        System.out.println(student);
    }
}
- 1
- 2
- 3
- 4
- 5
- 6
- 7
- 8
- 9
- 10
- 11
- 12
- 13
- 14
- 15
- 16
- 17
- 18
- 19
- 20
- 21
- 22
- 23
- 24
- 25
- 26
- 27
- 28
- 29
- 30
- 31
- 32
- 33
- 34
- 35
- 36
- 37
- 38
- 39
- 40
(3)执行结果
水平分库 -> 插入数据库

水平分库 -> 查询数据库

3、配置公共表
# 配置公共表
spring.shardingsphere.sharding.broadcast-tables=t_udict
spring.shardingsphere.sharding.tables.t_udict.key-generator.column=dictid
spring.shardingsphere.sharding.tables.t_udict.key-generator.type=SNOWFLAKE
- 1
- 2
- 3
- 4
九、 什么是读写分离
为了确保数据库产品的稳定性,很多数据库拥有双机热备功能。
第一台数据库服务器对外提供增删改业务的生产数据;
第二台数据库服务器,主要进行读的操作;
Sharding-JDBC通过sql语句语义分析,实现读写分离过程,不会做数据同步。
十、配置MySQL主从服务器
1、新增MySQL实例
复制原有 mysql 如: D:\mysql-5.7.25( 作为主库 ) -> D:\mysql-5.7.25-s1( 作为从库 ) ,并修改以 下从库的 my.ini:
[mysqld]
# 设置 3307 端口
port = 3307
# 设置 mysql 的安装目录
basedir = D : \mysql‐5.7.25‐s1
# 设置 mysql 数据库的数据的存放目录
datadir = D : \mysql‐5.7.25‐s1\data
然后将从库安装为 windows 服务,注意配置文件位置:
D:\mysql‐5.7.25‐s1\b in >mysqld install mysqls1
‐‐defaults‐file = “D:\mysql‐5.7.25‐s1\my.ini”
删除服务命令
sc delete 服务名称
由于从库是从主库复制过来的,因此里面的数据完全一致,可使用原来的账号、密码登录。
2、修改主、从库的配置文件
新增内容如下:
主库 my,ini
[mysqld]
# 开启日志
log‐bin = mysql‐bin
# 设置服务 id ,主从不能一致
server‐id = 1
# 设置需要同步的数据库
binlog‐do‐db = user_db
# 屏蔽系统库同步
binlog‐ignore‐db = mysql
binlog‐ignore‐db = information_schema
binlog‐ignore‐db = performance_schema
从库 my.ini
[mysqld]
# 开启日志
log‐bin = mysql‐bin
# 设置服务 id ,主从不能一致
server‐id = 2
# 设置需要同步的数据库
replicate_wild_do_table = user_db.%
# 屏蔽系统库同步
replicate_wild_ignore_table = mysql.%
replicate_wild_ignore_table = information_schema.%
replicate_wild_ignore_table = performance_schema.%
重启主库和从库
3、创建用于主从复制的账号
# 切换至主库 bin 目录,登录主库
mysql ‐h localhost ‐uroot ‐p
# 授权主备复制专用账号
GRANT REPLICATION SLAVE ON *.* TO ‘db_sync’ @ ‘%’ IDENTIFIED BY ‘db_sync’ ;
# 刷新权限
FLUSH PRIVILEGES;
# 确认位点 记录下文件名以及位点
show master status;
4、设置从库向主库同步数据
#切换至从库bin目录,登录从库
mysql ‐h localhost ‐P3307 ‐uroot ‐p
# 先停止同步
STOP SLAVE;
# 修改从库指向到主库,使用上一步记录的文件名以及位点
CHANGE MASTER TO
master_host = ‘localhost’ ,
master_user = ‘db_sync’ ,
master_password = ‘db_sync’ ,
master_log_file = ‘mysql‐bin.000002’ ,
master_log_pos = 154 ;
# 启动同步
START SLAVE;
# 查看从库状态 Slave_IO_Runing 和 Slave_SQL_Runing 都为 Yes 说明同步成功,如果不为 Yes ,请检查
error_log ,然后
排查相关异常。
show slave status
# 注意 如果之前此从库已有主库指向 需要先执行以下命令清空
STOP SLAVE IO_THREAD FOR CHANNEL ‘’ ;
reset slave all;
十一、Sharding-JDBC实现读写分离
Sharding-JDBC无法实现主从数据库同步,主从数据库同步是由MySQL数据库实现的,而Sharding-JDBC实现的是增删改时选择操作主库,查数据时操作从库。
# 增加数据源s0,使用上面主从同步配置的从库。 spring.shardingsphere.datasource.names = m0,m1,m2,s0 ... spring.shardingsphere.datasource.s0.type = com.alibaba.druid.pool.DruidDataSource spring.shardingsphere.datasource.s0.driver‐class‐name = com.mysql.jdbc.Driver spring.shardingsphere.datasource.s0.url =jdbc:mysql://localhost:3307/user_db?useUnicode=true spring.shardingsphere.datasource.s0.username = root spring.shardingsphere.datasource.s0.password = root ## 学习路线: 这个方向初期比较容易入门一些,掌握一些基本技术,拿起各种现成的工具就可以开黑了。不过,要想从脚本小子变成黑客大神,这个方向越往后,需要学习和掌握的东西就会越来越多以下是网络渗透需要学习的内容: 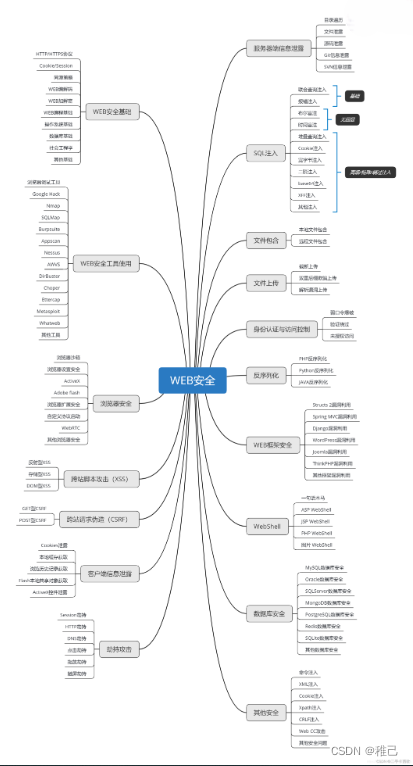 **网上学习资料一大堆,但如果学到的知识不成体系,遇到问题时只是浅尝辄止,不再深入研究,那么很难做到真正的技术提升。** **需要这份系统化的资料的朋友,可以添加V获取:vip204888 (备注网络安全)**  **一个人可以走的很快,但一群人才能走的更远!不论你是正从事IT行业的老鸟或是对IT行业感兴趣的新人,都欢迎加入我们的的圈子(技术交流、学习资源、职场吐槽、大厂内推、面试辅导),让我们一起学习成长!** ataSource spring.shardingsphere.datasource.s0.driver‐class‐name = com.mysql.jdbc.Driver spring.shardingsphere.datasource.s0.url =jdbc:mysql://localhost:3307/user_db?useUnicode=true spring.shardingsphere.datasource.s0.username = root spring.shardingsphere.datasource.s0.password = root ## 学习路线: 这个方向初期比较容易入门一些,掌握一些基本技术,拿起各种现成的工具就可以开黑了。不过,要想从脚本小子变成黑客大神,这个方向越往后,需要学习和掌握的东西就会越来越多以下是网络渗透需要学习的内容:  **网上学习资料一大堆,但如果学到的知识不成体系,遇到问题时只是浅尝辄止,不再深入研究,那么很难做到真正的技术提升。** **需要这份系统化的资料的朋友,可以添加V获取:vip204888 (备注网络安全)** [外链图片转存中...(img-gGECcgwW-1713402295073)] **一个人可以走的很快,但一群人才能走的更远!不论你是正从事IT行业的老鸟或是对IT行业感兴趣的新人,都欢迎加入我们的的圈子(技术交流、学习资源、职场吐槽、大厂内推、面试辅导),让我们一起学习成长!**
- 1
- 2
- 3
- 4
- 5
- 6
- 7
- 8
- 9
- 10
- 11
- 12
- 13
- 14
- 15
- 16
- 17
- 18
- 19
- 20
- 21
- 22
- 23
- 24
- 25
- 26
- 27
- 28
- 29
- 30
- 31
- 32
- 33
- 34
- 35
- 36
- 37
- 38
- 39
- 40
- 41
- 42
- 43
- 44
- 45
- 46
- 47
- 48
- 49

