
热门标签
热门文章
- 1接收第三方系统的附件文件转为MultipartFile对象进行存储_接收第三方文件信息和附件
- 22024年目标检测数据集大合集所有下载地址汇总_仓鼠数据集下载
- 3相机系列——透视投影:针孔相机模型_透视投影模型
- 4在使用pro-cli来搭建初始化脚手架时出现:“git‘ 不是内部或外部命令,也不是可运行的程序或批处理文件。”_git' 不是内部或外部命令,也不是可运行的程序 或批处理文件。
- 5牛客网Java测试题解析_public class hasstatic { private static int x = 10
- 6算法数据结构——图的遍历之深度优先搜索算法(Depth First Search)_图的深度优先搜索 试用自己的语言理解图的深度遍历的过程。 并写成下列图的深度遍
- 7Unity3D人物移动篇之刚体跳跃重力下落慢的问题_unity中如何修改刚体下落加速度
- 8nginx的配置:TLSv1 TLSv1.1 被暴露不安全_nginx 放行tls1
- 9select * into 和insert into 备份与插入_select insert into
- 10女生当程序员到底行不行?数学149的女学霸,直言男生也没有比我好!_程序员张功
当前位置: article > 正文
STM32F103RCT6学习笔记2:串口通信_stm32f103rct6语音播报全部代码
作者:我家自动化 | 2024-07-16 20:24:31
赞
踩
stm32f103rct6语音播报全部代码
今日开始快速掌握这款STM32F103RCT6芯片的环境与编程开发,有关基础知识的部分不会多唠,直接实践与运用!文章贴出代码测试工程与测试效果图:
目录
串口通信实验计划:
配置初始化串口1,使用串口1周期性发送数据给上位机。
串口通信配置代码:
- #include "stdarg.h" //自定义printf需要使用
- #include "stdio.h" //1.61328125kb
- #include "USART1.h"
- #include "USART1.h"
-
- #define USART_REC_LEN 30
-
- u8 USART_RX_BUF[USART_REC_LEN] __attribute__ ((at(0X20001000)));
- //接收缓冲,最大USART_REC_LEN个字节,起始地址为0X20001000.
- u16 USART_RX_STA=0; //接收状态标记
- u16 USART_RX_CNT=0; //接收的字节数
-
-
- #if 1
- #pragma import(__use_no_semihosting)
- //标准库需要的支持函数
- struct __FILE
- {
- int handle;
- /* Whatever you require here. If the only file you are using is */
- /* standard output using printf() for debugging, no file handling */
- /* is required. */
- };
- /* FILE is typedef’ d in stdio.h. */
- FILE __stdout;
- //定义_sys_exit()以避免使用半主机模式
- void _sys_exit(int x)
- {
- x = x;
- }
- //重定向fputc函数
- //printf的输出,指向fputc,由fputc输出到串口
- //这里使用串口1(USART1)输出printf信息
- int fputc(int ch, FILE *f)
- {
- while((USART1->SR&0X40)==0);//循环发送,直到发送完毕
- USART1->DR = (u8) ch;
- return ch;
- }
- #endif
-

- void uart1_init(u32 bound){
- //GPIO端口设置(初始化)
- GPIO_InitTypeDef GPIO_InitStructure;
- USART_InitTypeDef USART_InitStructure;
- NVIC_InitTypeDef NVIC_InitStructure;
-
- RCC_APB2PeriphClockCmd(RCC_APB2Periph_USART1|RCC_APB2Periph_GPIOA, ENABLE);
- //使能USART1,GPIOA时钟
-
- //USART1_TX GPIOA.9
- GPIO_InitStructure.GPIO_Pin = GPIO_Pin_9; //PA.9
- GPIO_InitStructure.GPIO_Speed = GPIO_Speed_50MHz;
- GPIO_InitStructure.GPIO_Mode = GPIO_Mode_AF_PP; //复用推挽输出
- GPIO_Init(GPIOA, &GPIO_InitStructure);//初始化GPIOA.9
-
- //USART1_RX GPIOA.10初始化
- GPIO_InitStructure.GPIO_Pin = GPIO_Pin_10;//PA10
- GPIO_InitStructure.GPIO_Mode = GPIO_Mode_IN_FLOATING;//浮空输入
- GPIO_Init(GPIOA, &GPIO_InitStructure);//初始化GPIOA.10
-
- //Usart1 NVIC 配置
- NVIC_InitStructure.NVIC_IRQChannel = USART1_IRQn;
- NVIC_InitStructure.NVIC_IRQChannelPreemptionPriority=3 ;//抢占优先级3
- NVIC_InitStructure.NVIC_IRQChannelSubPriority = 3; //子优先级3
- NVIC_InitStructure.NVIC_IRQChannelCmd = ENABLE; //IRQ通道使能
- NVIC_Init(&NVIC_InitStructure); //根据指定的参数初始化VIC寄存器
-
- //USART 初始化设置
-
- USART_InitStructure.USART_BaudRate = bound;//串口波特率
- USART_InitStructure.USART_WordLength = USART_WordLength_8b;//字长为8位数据格式
- USART_InitStructure.USART_StopBits = USART_StopBits_1;//一个停止位
- USART_InitStructure.USART_Parity = USART_Parity_No;//无奇偶校验位
- USART_InitStructure.USART_HardwareFlowControl = USART_HardwareFlowControl_None;//无硬件数据流控制
- USART_InitStructure.USART_Mode = USART_Mode_Rx | USART_Mode_Tx; //收发模式
-
- USART_Init(USART1, &USART_InitStructure); //初始化串口1
- USART_ITConfig(USART1, USART_IT_RXNE, ENABLE);//开启串口接受中断
- USART_Cmd(USART1, ENABLE); //使能串口1
-
- }
-
- #ifndef _USART1_H_
- #define _USART1_H_
-
- #include "headfire.h"
-
-
- void uart1_init(u32 bound);
-
- #endif
-
-
- int main(void)
- {
- uint16_t t;
-
- delay_init();
- NVIC_Configuration();
- uart1_init(115200);
- printf("welcome!\r\n");
-
-
- while(1)
- {
- printf("%d\r\n",t);
- t++;
- delay_ms(500);
-
- }
- }
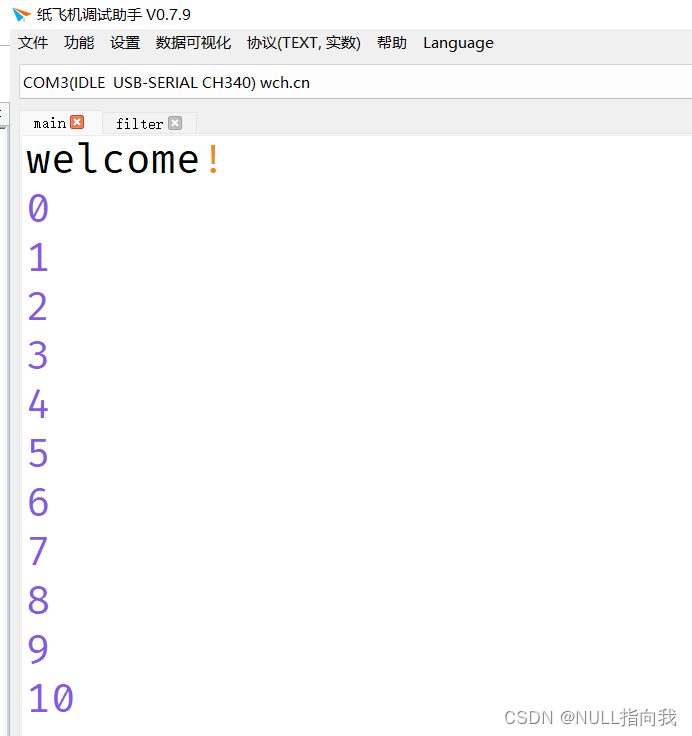
测试效果图:
声明:本文内容由网友自发贡献,不代表【wpsshop博客】立场,版权归原作者所有,本站不承担相应法律责任。如您发现有侵权的内容,请联系我们。转载请注明出处:https://www.wpsshop.cn/w/我家自动化/article/detail/836009?site
推荐阅读
相关标签

