- 1Python的Pillow库进行图像文件处理(配图详解)_python pillow
- 2Redisson延迟队列_redissonclient.getblockingqueue
- 3STM32 系统时钟初始化函数和延时函数
- 4【深度学习】Softmax 函数_softmax()
- 5mysql的双机热备自动切换_mysql 主从复制(mysql双机热备的实现)
- 6机器学习算法应用场景_机器学习算法与实际场景
- 7Qt例子学习笔记 - Examples/Qt-6.2.0/qt3d/compute-particles_layer.samplername
- 8只需用几个简单的命令,让你的Linux更安全_python对linux安全加固
- 9【YOLO小项目】跌倒检测摔倒检测_可以单独使用yolov8实现跌倒检测吗
- 10python123数值运算代码_Python中的变量、数据类型(数值、列表)操作实例
基于 Microsoft Phi3 视觉语言模型的文档数据提取
赞
踩
点击下方卡片,关注“小白玩转Python”公众号
本文使用最新版本的 Microsoft Phi3 视觉语言模型进行零样本 OCR 应用的示例,展示了如何通过将 Phi3 模型应用于相关文档图像,提取身份卡、驾驶证或健康保险卡等文档的数据。

Phi3 模型是 Microsoft 小型语言模型的最新版本。它有四个变种(更多信息请查看此链接:https://azure.microsoft.com/en-us/blog/new-models-added-to-the-phi-3-family-available-on-microsoft-azure/):
Phi-3-mini:一个包含 38 亿参数的语言模型,有两个上下文长度(128K 和 4K)
Phi-3-small:一个包含 70 亿参数的语言模型,有两个上下文长度(128K 和 8K)
Phi-3-medium:一个包含 140 亿参数的语言模型,有两个上下文长度(128K 和 4K)
Phi-3-vision:一个包含 42 亿参数的多模态模型,具有语言和视觉功能
在这篇文章中,我关注多模态视觉语言模型的应用。正如官方文档中所解释的,Phi-3-Vision-128K-Instruct 是一个轻量级、最先进的开放多模态模型,适用于需要视觉和文本输入能力的一般用途 AI 系统和应用程序,适用场景包括:
内存/计算受限的环境;
低延迟场景;
一般图像理解;
OCR;
图表和表格理解。
在这篇文章中,我感兴趣的是在个人文档(如身份证、驾驶证和健康保险卡)上使用该模型进行 OCR 数据提取的能力。测试中使用的文档是仿制品,不是原件,也不属于真实的人。完整的代码链接如下:https://github.com/enrico310786/phi3_vision_language
模型实例
为了在推理模式下使用该模型,我构建了如下环境:
- 1) conda create -n llm_images python=3.10
-
-
- 2) conda activate llm_images
-
-
- 3) pip install torch==2.3.0 torchvision==0.18.0
-
-
- 4) pip install packaging
-
-
- 5) pip install pillow==10.3.0 chardet==5.2.0 flash_attn==2.5.8 accelerate==0.30.1 bitsandbytes==0.43.1 Requests==2.31.0 transformers==4.40.2
-
-
- 6) pip uninstall jupyter
-
-
- 7) conda install -c anaconda jupyter
-
-
- 8) conda update jupyter
-
-
- 9) pip install --upgrade 'nbconvert>=7' 'mistune>=2'
-
-
- 10) pip install cchardet

环境可用后,我从 Huggingface 仓库下载了模型。
- # Import necessary libraries
- from PIL import Image
- import requests
- from transformers import AutoModelForCausalLM
- from transformers import AutoProcessor
- from transformers import BitsAndBytesConfig
- import torch
- from IPython.display import display
- import time
-
-
-
-
- # Define model ID
- model_id = "microsoft/Phi-3-vision-128k-instruct"
-
-
- # Load processor
- processor = AutoProcessor.from_pretrained(model_id, trust_remote_code=True)
-
-
- # Define BitsAndBytes configuration for 4-bit quantization
- nf4_config = BitsAndBytesConfig(
- load_in_4bit=True,
- bnb_4bit_quant_type="nf4",
- bnb_4bit_use_double_quant=True,
- bnb_4bit_compute_dtype=torch.bfloat16,
- )
-
-
- # Load model with 4-bit quantization and map to CUDA
- model = AutoModelForCausalLM.from_pretrained(
- model_id,
- device_map="cuda",
- trust_remote_code=True,
- torch_dtype="auto",
- quantization_config=nf4_config,
- )

接下来,我准备了一个 Python 函数,该函数将消息和图像路径作为输入传递给模型,并输出模型结果。
- def model_inference(messages, path_image):
-
- start_time = time.time()
-
- image = Image.open(path_image)
-
-
- # Prepare prompt with image token
- prompt = processor.tokenizer.apply_chat_template(
- messages, tokenize=False, add_generation_prompt=True
- )
-
-
- # Process prompt and image for model input
- inputs = processor(prompt, [image], return_tensors="pt").to("cuda:0")
-
-
- # Generate text response using model
- generate_ids = model.generate(
- **inputs,
- eos_token_id=processor.tokenizer.eos_token_id,
- max_new_tokens=500,
- do_sample=False,
- )
-
-
- # Remove input tokens from generated response
- generate_ids = generate_ids[:, inputs["input_ids"].shape[1] :]
-
-
- # Decode generated IDs to text
- response = processor.batch_decode(
- generate_ids, skip_special_tokens=True, clean_up_tokenization_spaces=False
- )[0]
-
-
-
-
- display(image)
- end_time = time.time()
- print("Inference time: {}".format(end_time - start_time))
-
-
- # Print the generated response
- print(response)
 '运行
'运行在接下来的部分中,我展示了如何从不同的文档中提取数据。根据文档的正面或背面,我准备了一个特定的提示来识别我要提取数据的字段。
身份证 OCR
正面
对于意大利身份证的正面,我使用以下提示提取主要个人数据,并将其放入 JSON 格式输出。
- prompt_cie_front = [{"role": "user", "content": "<|image_1|>\nOCR the text of the image. Extract the text of the following fields and put it in a JSON format: \
- 'Comune Di/ Municipality', 'COGNOME /Surname', 'NOME/NAME', 'LUOGO E DATA DI NASCITA/\
- PLACE AND DATE OF BIRTH', 'SESSO/SEX', 'STATURA/HEIGHT', 'CITADINANZA/NATIONALITY',\
- 'EMISSIONE/ ISSUING', 'SCADENZA /EXPIRY'. Read the code at the top right and put it in the JSON field 'CODE'"}]
-
-
- # Download image from URL
- path_image = "/home/randellini/llm_images/resources/cie_fronte.jpg"
-
-
- # inference
- model_inference(prompt_cie_front, path_image)

对于上述图像,我获得了以下输出。可以看到,唯一的卡片代码位于卡片的右上角,没有关联字段。为了提取其值,我在提示中指定模型要读取右上角的代码并将其放入名为 “CODE” 的 JSON 字段中。唯一的错误是唯一代码中的第一个零被交换成大写字母 O。
- Inference time: 9.793543815612793
- {
- "Comune Di/ Municipality": "SERENELLA MARITTIMA",
- "COGNOME /Surname": "ROSSI",
- "NOME/NAME": "BIANCA",
- "LUOGO E DATA DI NASCITA": "PINO SULLA SPONDA DEL LAGO MAGGIORE (VA) 30.12.1964",
- "SESSO/SEX": "F",
- "STATURA/HEIGHT": "180",
- "CITADINANZA/NATIONALITY": "ITA",
- "EMISSIONE/ ISSUING": "30.05.2022",
- "SCADENZA /EXPIRY": "30.12.2031",
- "CODE": "CAO000AA"
- }
背面
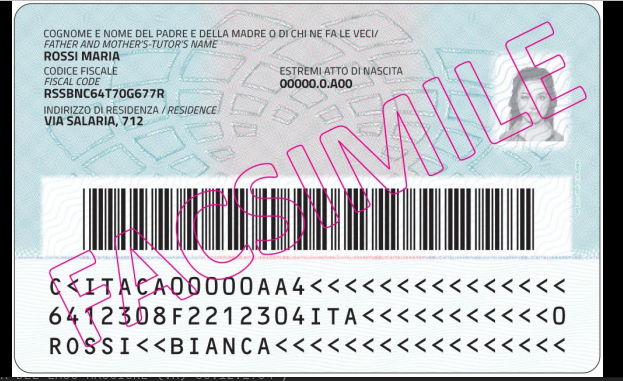
要提取背面数据,我使用了以下提示:
- prompt_cie_back = [{"role": "user", "content": "<|image_1|>\nOCR the text of the image. Extract the text of the following fields and put it in a JSON format: \
- 'CODICE FISCALE/FISCAL CODE', 'ESTREMI ATTO DI NASCITA', 'INDIRIZZO DI RESIDENZA/RESIDENCE'"}]
-
-
- # Download image from URL
- path_image = "/home/randellini/llm_images/resources/cie_retro.jpg"
-
-
- # inference
- model_inference(prompt_cie_back, path_image)

意大利身份证背面 我得到了以下结果。只有一个错误,即缺少税号的第三个字符,大写字母 S。
- Inference time: 4.082342147827148
- {
- "codice_fiscale": "RSBNC64T70G677R",
- "estremi_atto_di_nascita": "00000.0A00",
- "indirizzo_di_residenza": "Via Salaria, 712"
- }
驾驶证 OCR
对于意大利驾驶证的正面,我使用了以下提示:
- prompt_ld_front = [{"role": "user", "content": "<|image_1|>\nOCR the text of the image. Extract the text of the following fields and put it in a JSON format: \
- '1.', '2.', '3.', '4a.', '4b.', '4c.', '5.','9.'"}]
-
-
- # Download image from URL
- path_image = "/home/randellini/llm_images/resources/patente_fronte.png"
-
-
- # inference
- model_inference(prompt_ld_front, path_image)

获得的结果是:
- Inference time: 5.2030909061431885
- {
- "1": "ROSSI",
- "2": "MARIA",
- "3": "01/01/65",
- "4a": "01/03/2014",
- "4b": "01/01/2025",
- "4c": "MIT-UCO",
- "5": "A0A000000A",
- "9": "B"
- }
对于意大利驾驶证的背面,目前我还没有找到合适的提示来读取表格中列 '9.'、'10.'、'11.' 和 '12.' 的值。此外,‘12.’ 出现了两次。首先,作为表格列的名称,然后作为卡片左下角的一个字段。这个最后一个字段很重要,因为它警示了对司机施加的特殊义务。例如,代码 01 表示必须佩戴眼镜驾驶。

健康保险卡 OCR
正面
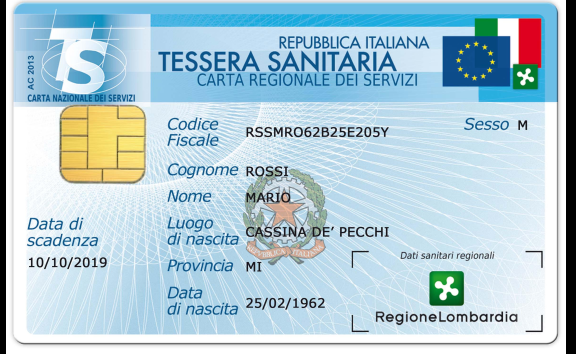
为了读取意大利健康保险卡正面的值,我使用了以下提示
- prompt_hic_front = [{"role": "user", "content": "<|image_1|>\nOCR the text of the image. Extract the text of the following fields and put it in a JSON format: \
- 'Codice Fiscale', 'Sesso', 'Cognome', 'Nome', 'Luogo di nascita', 'Provincia', 'Data di nascita', 'Data di scadenza'"}]
-
-
- # Download image from URL
- path_image = "/home/randellini/llm_images/resources/tessera_sanitaria_fronte.jpg"
-
-
- # inference
- model_inference(prompt_hic_front, path_image)

我获得了以下结果
- Inference time: 7.003508806228638
- ```json
- {
- "Codice Fiscale": "RSSMRO62B25E205Y",
- "Sesso": "M",
- "Cognome": "ROSSI",
- "Nome": "MARIO",
- "Luogo di nascita": "CASSINA DE' PECCHI",
- "Provincia": "MI",
- "Data di nascita": "25/02/1962",
- "Data di scadenza": "10/10/2019"
- }
- ```
背面
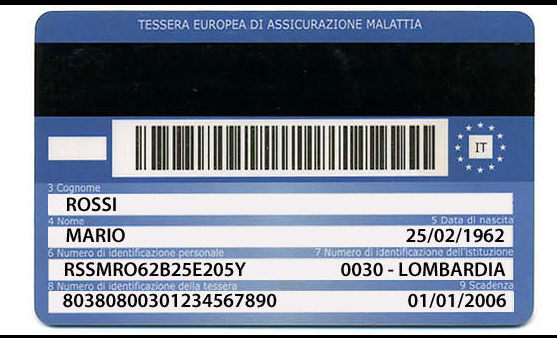
为了读取卡片的背面,我使用了以下提示
- prompt_hic_back = [{"role": "user", "content": "<|image_1|>\nOCR the text of the image. Extract the text of the following fields and put it in a JSON format: \
- '3 Cognome', '4 Nome', '5 Data di nascita', '6 Numero identificativo personale', '7 Numero identificazione dell'istituzione', 'Numero di identificazione della tessera', '9 Scadenza'"}]
-
-
- # Download image from URL
- path_image = "/home/randellini/llm_images/resources/tessera_sanitaria_retro.jpg"
-
-
- # inference
- model_inference(prompt_hic_back, path_image)

获得的结果是
- Inference time: 7.403932809829712
- {
- "3 Cognome": "ROSSI",
- "4 Nome": "MARIO",
- "5 Data di nascita": "25/02/1962",
- "6 Numero identificativo personale": "RSSMRO62B25E205Y",
- "7 Numero identificazione dell'istituzione": "0030 - LOMBARDIA",
- "Numero di identificazione della tessera": "80380800301234567890",
- "9 Scadenza": "01/01/2006"
- }
· END ·
HAPPY LIFE

本文仅供学习交流使用,如有侵权请联系作者删除


