
- 1CNN 与 Transformer 的强强联合!谷歌最新开源 BoTNet,ImageNet 达 84.7%准确率_cnn和transformer结合的网络
- 2Docker--compose概述与部署_docker-compose
- 3c语言扫雷(递归算法)_扫雷c语言用的什么算法
- 4SSM网上商城购物系统(前台+后台)_基于ssm的线上商城系统(前台+后台)
- 5PostgreSQL Daily Maintenance - reindex_reindex需要多久
- 6Xilinx 7系列FPGA PCB设计指导(一)_xilinx官网设计指导
- 72022消费人群_市场研报:Z世代/95后/新青年/单身(共108份)_饿了么&阿里研究院:2022年轻人过年新趋势洞察下载
- 8Verilog笔记:输出为X态红色信号的原因_verliog中led的输出为啥是xx
- 9工业异常检测AnomalyGPT-训练试跑及问题解决_valueerror: no slot '1' specified on host 'localho
- 10深度探索Apache NiFi:关键技术学习路径与实战指南_nifi中的租户具有独立的工作空间么
二、WEB安全 02——DIV、CSS基础_web中posistion:outside在div
赞
踩
二、WEB安全 02——DIV、CSS基础
1、DIV CSS基础 01——样式表类型、样式选择器
(1)DIV和CSS样式
层叠样式表(英文全称:Cascading Style Sheets)是一种用来表现HTML(标准通用标记语言的一个应用)或XML(标准通用标记语言的一个子集)等文件样式的计算机语言。CSS不仅可以静态地修饰网页,还可以配合各种脚本语言动态地对网页各元素进行格式化。
CSS 能够对网页中元素位置的排版进行像素级精确控制,支持几乎所有的字体字号样式,拥有对网页对象和模型样式编辑的能力。
DIV是html的一个标签(块级元素),CSS是一个样式表(层叠样式表)。
(2)样式表类型
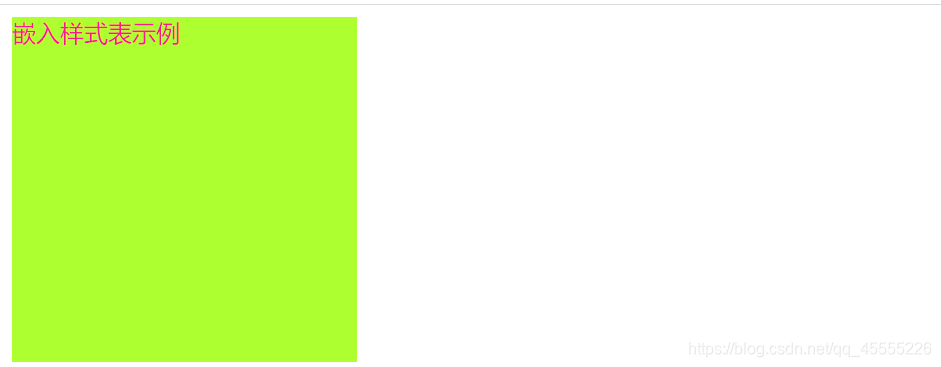
嵌入样式表示例:
demo1.html的内容:
<!DOCTYPE html>
<html>
	<head>
		<meta charset="UTF-8">
		<title></title>
		<style>
			.demo1{
				color: deeppink;
				width: 230px;
				height: 230px;
				background: greenyellow;
			}
		</style>
	</head>
	<body>
		<div class="demo1">
			嵌入样式表示例
		</div>
	</body>
</html>

- 1
- 2
- 3
- 4
- 5
- 6
- 7
- 8
- 9
- 10
- 11
- 12
- 13
- 14
- 15
- 16
- 17
- 18
- 19
- 20
- 21
- 22
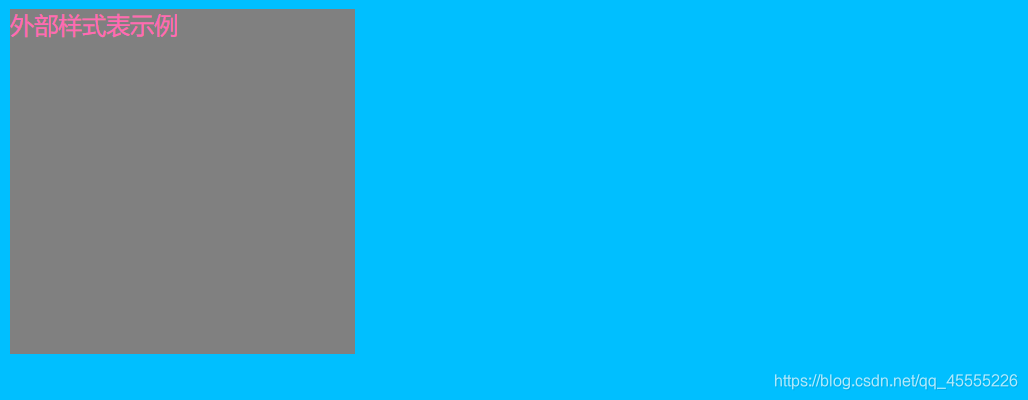
外部样式表示例:
demo2.html的内容:
<!DOCTYPE html>
<html>
	<head>
		<meta charset="UTF-8">
		<title></title>
		<link rel="stylesheet" href="css/demo2.css" />
	</head>
	<body>
		<div class="demo2">
			外部样式表示例
		</div>
	</body>
</html>


css/global.css的内容:
body{
	background-color: deepskyblue;
}


css/demo2.css的内容:
@import url("global.css");
.demo2{
	color: hotpink;
	width: 230px;
	height: 230px;
	background-color: gray;
}
- 1
- 2
- 3
- 4
- 5
- 6
- 7
- 8
- 9
- 10
- 11
- 12
- 13
- 14
- 15
- 16
- 17
- 18
- 19
- 20
- 21
- 22
- 23
- 24
- 25
- 26
- 27
- 28
- 29
- 30
- 31
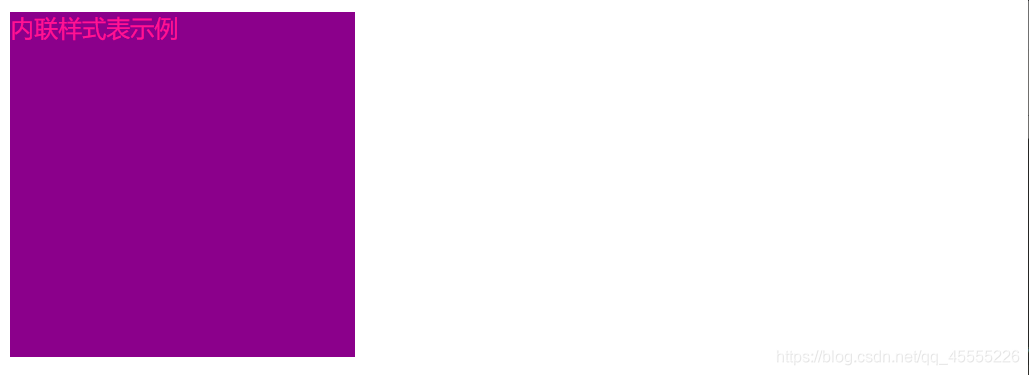
内联样式表示例:
demo3.html的内容:
<!DOCTYPE html>
<html>
	<head>
		<meta charset="UTF-8">
		<title></title>
	</head>
	<body>
		<div style="color:deeppink;width:230px;height:230px;background:darkmagenta;">
			内联样式表示例
		</div>
	</body>
</html>
- 1
- 2
- 3
- 4
- 5
- 6
- 7
- 8
- 9
- 10
- 11
- 12
- 13
CSS的注释,其快捷键是:键盘键入Ctrl+/
/*这是一个CSS的注释,且可以多行注释*/
- 1
(3)样式选择器
元素选择器的格式:元素名{属性:值;}
demo4.html的内容:
<style>
	div{
		border: 10px solid black;
	}
</style>

<div>
	元素选择器示例
</div>
- 1
- 2
- 3
- 4
- 5
- 6
- 7
- 8
- 9
- 10

id选择器的格式: #id名{属性:值;}
demo5.html的内容:
<style>
	#id1{
			color: deeppink;
			background-color: deepskyblue;
	}
</style>

<div id="demo5">
	id选择器的示例
</div>
- 1
- 2
- 3
- 4
- 5
- 6
- 7
- 8
- 9
- 10
- 11

class类选择器的格式: .类名{属性:值;}
demo6.html的内容:
<style>
	.demo6{
		color: deepskyblue;
		background-color: deeppink;
	}
</style>


<div class="demo6">
	class类选择器的示例
</div>
- 1
- 2
- 3
- 4
- 5
- 6
- 7
- 8
- 9
- 10
- 11
- 12

子选择器的格式: 父元素名/父元素选择器 空格 子元素名/子元素选择器{属性:值;}
demo7.html的内容:
<style>
	.demo7 p{
		color: hotpink;
	}
</style>

<div class="demo7">
	<h1>子选择器的示例</h1>
	<p>子选择器的示例</p>
</div>
- 1
- 2
- 3
- 4
- 5
- 6
- 7
- 8
- 9
- 10
- 11

后代选择器的格式: 父元素名/父元素选择器 > 子元素名/子元素选择器{属性:值;}
demo8.html的内容:
<style>
    .class2 > p{
    	color: hotpink;
    }
</style>

<div class="demo8">
	<p>qwsn</p>
	<p>后代选择器的示例</p>
</div>
- 1
- 2
- 3
- 4
- 5
- 6
- 7
- 8
- 9
- 10
- 11

属性选择器的格式: 元素[属性]{属性:属性值;}
略
- 1
通配符选择器的格式: *{属性:值;}
demo9.html的内容:
<style>
	*{
		margin:0px;
		padding:0px;
	}
</style>

<div>
	统配符选择器示例
	<p>通配符选择器示例</p>
</div>
- 1
- 2
- 3
- 4
- 5
- 6
- 7
- 8
- 9
- 10
- 11
- 12

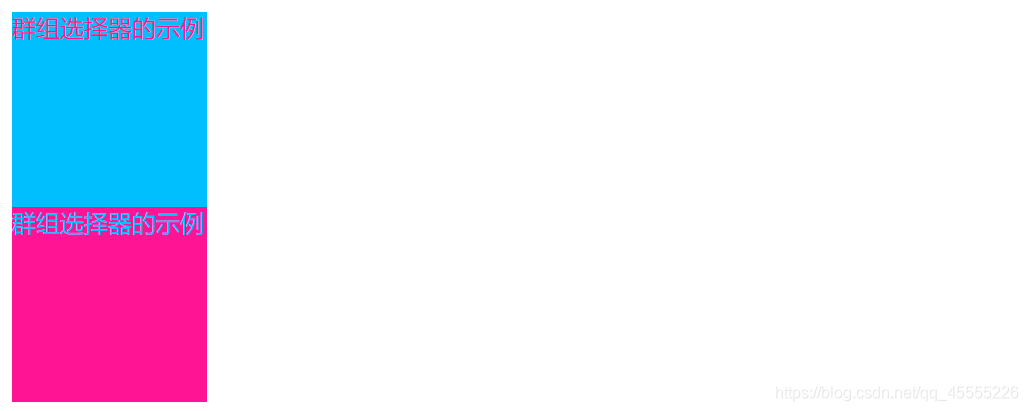
群组选择器的格式:某种选择器,某种选择器{属性:值;}
demo10.html的内容:
<style>
	.demo10,#demo10{
		width: 130px;
		height: 130px;
	}
	.demo10{
		color: deeppink;
		background-color: deepskyblue;
	}
	#demo10{
		color: deepskyblue;
		background-color: deeppink;
	}
</style>

<div class="demo10">
	群组选择器的示例
</div>
<div id="demo10">
	群组选择器的示例
</div>
- 1
- 2
- 3
- 4
- 5
- 6
- 7
- 8
- 9
- 10
- 11
- 12
- 13
- 14
- 15
- 16
- 17
- 18
- 19
- 20
- 21
- 22
2、DIV CSS基础 02——背景、边框
(1)背景
背景的属性:
background-color 		规定要使用的背景颜色。
background-image		规定要使用的背景图像。
background-repeat 		规定如何重复背景图像。
background-attachment	规定背景图像是否固定或者随着页面的其余部分滚动。
background-position 	规定背景图像的位置。
background-size 		规定背景图像的尺寸。
background-origin 		规定背景图像的定位区域。
background-clip 		规定背景的绘制区域。
- 1
- 2
- 3
- 4
- 5
- 6
- 7
- 8
background-repeat的属性值:
background-repeat:repeat;		默认。背景图像将在垂直方向和水平方向重复。
background-repeat:repeat-x;		背景图像将在水平方向重复。
background-repeat:repeat-y;		背景图像将在垂直方向重复。
background-repeat:no-repeat;	背景图像将仅显示一次。
background-repeat:inherit;		规定应该从父元素继承 background-repeat 属性的设置。
- 1
- 2
- 3
- 4
- 5
background-attachment属性的值:
background-attachment:fixed; 	固定,不随内容的滚动而滚动
background-attachment:scroll; 	滚动,随内容的滚动而滚动
- 1
- 2
background-position属性的值:
background-position:left top;
background-position:left center;
background-position:left bottom;
background-position:right top;
background-position:right center;
background-position:right bottom;
background-position:center top;
background-position:center center;
background-position:center bottom;
- 1
- 2
- 3
- 4
- 5
- 6
- 7
- 8
- 9
背景简写:
background: url(images/bg.gif) no-repeat fixed right top
- 1
背景示例:
demo11.html的内容:
<style>
	body{
			/*background-color:#FFC0CB;*/
			/*background-image: url(../web01/img/logo.jpg);*/
			/*background-repeat:no-repeat;*/
			/*background-repeat:repeat-y ;*/
			/*background-repeat:repeat-x ;*/
			/*background-attachment: fixed;*/
			/*background-attachment: scroll;*/
			background: url(../web01/img/logo.jpg) no-repeat fixed right top;
	}
</style>
- 1
- 2
- 3
- 4
- 5
- 6
- 7
- 8
- 9
- 10
- 11
- 12
- 13
(2)边框
边框的属性:
border-top 		设置上边框,一般单独设置上边框样式使用。
border-right 	设置右边框,一般单独设置右边框样式使用。
border-bottom 	设置下边框,一般单独设置下边框样式使用,有时可将下边框样式作为css下划线效果应用。
border-left	 	设置左边框,一般单独设置左边框样式使用。
border-color	边框颜色
border-width	边框宽度
border-style	边框样式
- 1
- 2
- 3
- 4
- 5
- 6
- 7
边框样式属性值:
border-style:none;		无边框。与任何指定的border-width值无关
border-style:hidden;	隐藏边框。IE不支持
border-style:dotted;	在MAC平台上IE4+与WINDOWS和UNIX平台上IE5.5+为点线。否则为实线(常用)
border-style:dashed;	在MAC平台上IE4+与WINDOWS和UNIX平台上IE5.5+为虚线。否则为实线(常用)
border-style:solid; 	实线边框(常用)
border-style:double; 	双线边框。两条单线与其间隔的和等于指定的border-width值
- 1
- 2
- 3
- 4
- 5
- 6
边框简写:
border:5px solid red; (上右下左)
- 1
边框示例:
demo12.html的n内容:
<style>
	.class1{
		width: 120px;
		height: 120px ;
		/*border-width: 2px;
		border-style: solid;
		border-color: red;
		*/
		border: 1px solid red;
	}
	.class2{
		margin-top: 20px;
		width: 150px;
		height: 150px ;
		border-width: 5px;
		border-top: solid;
		border-right: dashed;
		border-bottom: double;
		border-left: dotted;
		border-color: pink;
	}
</style>

<div class="class1">
	边框的示例1
</div>
<div class="class2">
	边框的示例2
</div>
- 1
- 2
- 3
- 4
- 5
- 6
- 7
- 8
- 9
- 10
- 11
- 12
- 13
- 14
- 15
- 16
- 17
- 18
- 19
- 20
- 21
- 22
- 23
- 24
- 25
- 26
- 27
- 28
- 29
- 30

3、DIV CSS基础 03——文字、文本的属性
(1)文字属性
文字的属性:
color:red; 			 	 文字颜色(#ffeeees)
font-size:12px; 	 	 文字大小
font-weight:bolds 	 	 文字粗细(bold/normal)
font-family:”宋体”		文字字体
font-variant:small-caps	 小写字母以大写字母显示
- 1
- 2
- 3
- 4
- 5
文字的属性示例:
demo13.html的内容:
<style>
body{
color: #FF1493;
font-family: "微软雅黑";
font-size: 23px;
/*font-weight: bold;*/
font-variant: small-caps;
}
</style>
<div class="div1">
<p class="p1"> 某公司的<span style="font-weight: bold;">技术部门</span>需要添加Samba服务器作为文件服务器,工作组名为Workgroup,发布共享目录/share/tech,共享名为tech,这个共享目录允许技术部所有员工访问,允许浏览,允许读写,不允许匿名服务。</p>
</div>
- 1
- 2
- 3
- 4
- 5
- 6
- 7
- 8
- 9
- 10
- 11
- 12
- 13
- 14
- 15

(2)文本属性
文本的属性:
text-align:center; 		文本对齐(right/left/center)
line-height:10px; 		行间距(可通过它实现文本的垂直居中)
text-indent:20px; 		首行缩进
text-decoration:none;	文本线(none/underline/overline/line-through)
letter-spacing: 		字间距

underline/overline/line-through; 定义文本上的下划线/上划线/中划线
- 1
- 2
- 3
- 4
- 5
- 6
- 7
文本的属性示例:
demo14.html的内容:
<style>
	body{
		color: #FF69B4;
		font-family: "微软雅黑";
		font-size: 23px;
		/*font-weight: bold;*/
		font-variant: small-caps;
		line-height: 40px;
	}
	.p1{
		text-indent: 20px;
	}
	a{
		text-decoration: none;
	}
	.demo14{
		text-align: center;
	}
</style>

<div class="demo14">
	demo14
</div>
<div class="div1">
	<p class="p1">某公司的<span style="font-weight: bold;">技术部门</span>需要添加Samba服务器作为文件服务器,工作组名为Workgroup,发布共享目录/share/tech,共享名为tech,这个共享目录允许技术部所有员工访问,允许浏览,允许读写,不允许匿名服务。<a href="https://blog.csdn.net/qq_45555226">点击了解</a></p>
</div>
- 1
- 2
- 3
- 4
- 5
- 6
- 7
- 8
- 9
- 10
- 11
- 12
- 13
- 14
- 15
- 16
- 17
- 18
- 19
- 20
- 21
- 22
- 23
- 24
- 25
- 26
- 27

4、DIV CSS基础 04——列表样式、伪类超链接
(1)列表样式
列表标签的常用样式属性:
list-style-type 		设置列表项目符号的类型。
list-style-position 	设置在何处放置列表项目符号。
list-style-image 		使用图像来替换列表项目符号。

inherit 				规定应该从父元素继承 list-style 属性的值。
- 1
- 2
- 3
- 4
- 5
list-style-type列表样式类型属性的值:
list-style-type的取值:
disc | circle | square | decimal | decimal-leading-zero | lower-roman | upper-roman | lower-greek | lower-latin | upper-latin | armenian | georgian | lower-alpha | upper-alpha | none | inherit
释意:
        disc: 点
        circle: 圆圈
        square: 正方形
        decimal: 数字
        decimal-leading-zero: 十进制数,不足两位的补齐前导0,例如: 01, 02, 03, ..., 98, 99
        lower-roman: 小写罗马文字,例如: i, ii, iii, iv, v, ...
        upper-roman: 大写罗马文字,例如: I, II, III, IV, V, ...
        lower-greek: 小写希腊字母,例如: α(alpha), β(beta), γ(gamma), ...
        lower-latin: 小写拉丁文,例如: a, b, c, ... z
        upper-latin: 大写拉丁文,例如: A, B, C, ... Z
        armenian: 亚美尼亚数字
        georgian: 乔治亚数字,例如: an, ban, gan, ..., he, tan, in, in-an, ...
        lower-alpha: 小写拉丁文,例如: a, b, c, ... z
        upper-alpha: 大写拉丁文,例如: A, B, C, ... Z
        none: 无(取消所有的list样式)
        inherit:继承
- 1
- 2
- 3
- 4
- 5
- 6
- 7
- 8
- 9
- 10
- 11
- 12
- 13
- 14
- 15
- 16
- 17
- 18
- 19
list-style-position列表样式位置属性的值:
list-style-position可能值:
inside | outside
释意:
		inside:列表项目标记放置在文本以内,且环绕文本根据标记对齐。
		outside:默认值。保持标记位于文本的左侧。列表项目标记放置在文本以外,且环绕文本不根据标记对齐。
- 1
- 2
- 3
- 4
- 5
- 6
列表样式属性的简写:
list-style: square inside ;
list-style: url('/i/arrow.gif') inside ;
- 1
- 2
列表样式示例:
demo15.html的内容:
<style>
	.demo15{
		/*list-style-type: decimal;*/
		/*list-style-image: url('../web01/img/logo.jpg');
		list-style-position: inside;*/
		list-style: url('../web01/img/logo.jpg') inside;
	}
	a{
		color: #000000;
		text-decoration: none;
	}
</style>

<ul class="demo15">
	<li><a href="https://blog.csdn.net/qq_45555226">qwsn的博客</a></li>
	<li><a href="https://blog.csdn.net/qq_45555226">qwsn的博客</a></li>
	<li><a href="https://blog.csdn.net/qq_45555226">qwsn的博客</a></li>
	<li><a href="https://blog.csdn.net/qq_45555226">qwsn的博客</a></li>
	<li><a href="https://blog.csdn.net/qq_45555226">qwsn的博客</a></li>
	<li><a href="https://blog.csdn.net/qq_45555226">qwsn的博客</a></li>
	<li><a href="https://blog.csdn.net/qq_45555226">qwsn的博客</a></li>
	<li><a href="https://blog.csdn.net/qq_45555226">qwsn的博客</a></li>
	<li><a href="https://blog.csdn.net/qq_45555226">qwsn的博客</a></li>
</ul>
- 1
- 2
- 3
- 4
- 5
- 6
- 7
- 8
- 9
- 10
- 11
- 12
- 13
- 14
- 15
- 16
- 17
- 18
- 19
- 20
- 21
- 22
- 23
- 24
- 25
(2)伪超链接
伪超链接:
a{text-decoration: none;}	/*去除默认的下划线*/
a:link {color:#FF0000;} 	/* 未访问的链接 */
a:visited {color:#00FF00;}	/* 已访问的链接 */
a:hover {color:#FF00FF;} 	/* 鼠标划过链接 */
a:active {color:#0000FF;} 	/* 已选中的链接 */
- 1
- 2
- 3
- 4
- 5
伪超链接示例:
demo16.html的内容:
<style>
	a{
		/*color: #000000;*/
		text-decoration: none;
	}
	a:link{
		color: black;
	}
	a:visited{
		color: red;
	}
	a:hover{
		color: pink;
	}
	a:active{
		color: greenyellow;
	}
</style>

<a href="https://blog.csdn.net/qq_45555226">qwsn的博客</a>
- 1
- 2
- 3
- 4
- 5
- 6
- 7
- 8
- 9
- 10
- 11
- 12
- 13
- 14
- 15
- 16
- 17
- 18
- 19
- 20
- 21


5、DIV CSS基础 05——盒子模型、边框、外边距、内边距
(1)盒子模型
盒子模型的组成部分:四个属性
外边距(margin)
边框(border)
内边距(padding)
内容(content)
- 1
- 2
- 3
- 4
盒子模型的内容content的宽高属性:width、height
width:230px;	/*content内容宽为230px*/
height:230px;	/*content内容高为230px*/
- 1
- 2
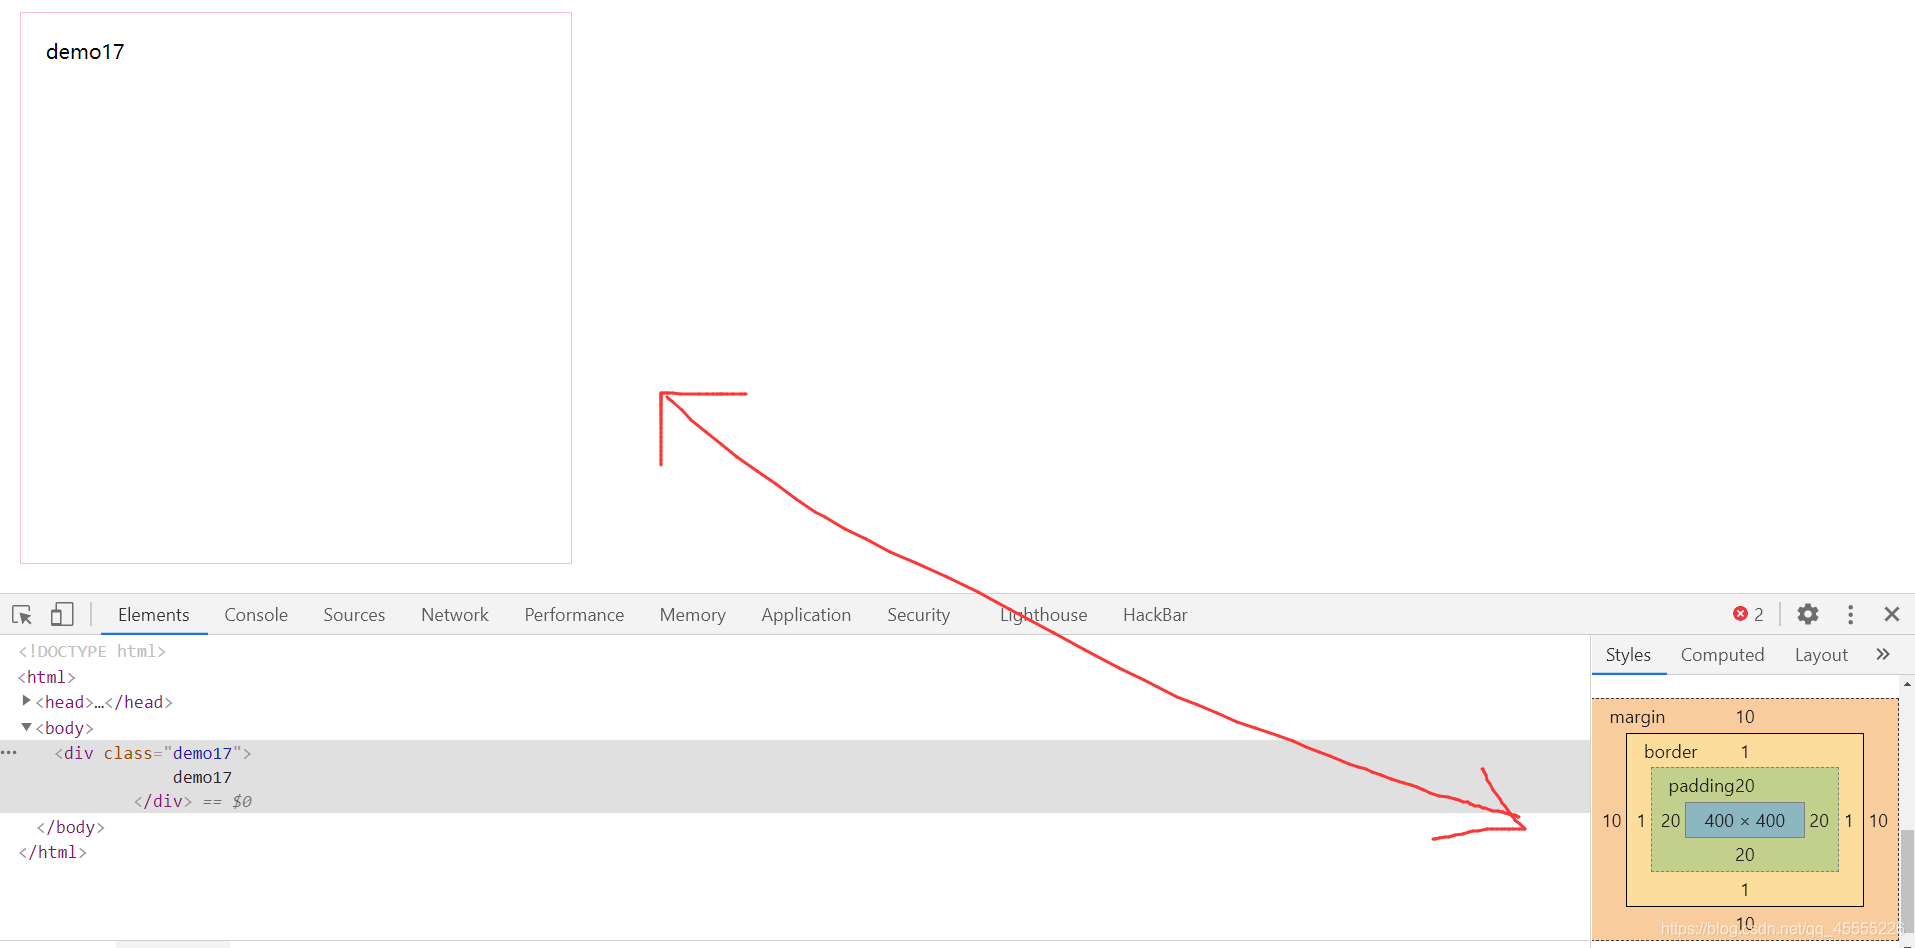
盒子模型图:
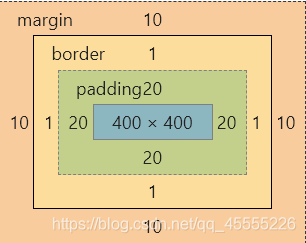
以上盒子模型图对应的代码:
demo17.html的内容:
<style>
	.demo17{
		margin: 10px;
		border: 1px solid pink;
		padding: 20px;
		width: 400px;
		height: 400px;
	}
</style>

<div class="demo17">
	demo17
</div>
- 1
- 2
- 3
- 4
- 5
- 6
- 7
- 8
- 9
- 10
- 11
- 12
- 13
- 14
- 15
(2)边框
边框的属性:
border-width:2px		/*边框的宽度*/
border-style: solid		/*边框的样式*/
border-color: red		/*边框的颜色*/
- 1
- 2
- 3
边框的样式属性的值:
border-style:dotted;	/*点状虚线*/
border-style:dashed;	/*虚线*/
border-style:solid;		/*实线*/
border-style:double;	/*双实线*/
- 1
- 2
- 3
- 4
边框的属性简写:
border:1px solid #000000;
- 1
边框的属性示例:
demo18.html的内容:
<style>
	.demo18{
		width: 400px;	/*content内容的宽*/
		height: 400px;	/*content内容的高*/
		/*border: 1px solid red;*/
		border-width: 10px;
		/*border-style: dotted;*/
		border-color: pink;
		border-top-style: dotted;
		border-right-style: dashed;
		border-bottom-style: double;
		border-left-style: solid;
	}			}
</style>

<div class="demo18">
	边框的属性示例
</div>
- 1
- 2
- 3
- 4
- 5
- 6
- 7
- 8
- 9
- 10
- 11
- 12
- 13
- 14
- 15
- 16
- 17
- 18
- 19

(3)外边距
margin是外边距,它的值是像素/厘米等长度单位、百分比。若两个盒子同时设置了外边距,会进行一个外边距合并。
margin的属性:
margin-top:10px;
margin-right:10px;
margin-bottom:10px;
margin-left:10px;
- 1
- 2
- 3
- 4
margin属性的值:
margin:10px; 上下左右
margin:10px 10px; 上下 左右
margin:10px 10px 10px; 上 左右 下
margin:10px 10px 10px 10px; 上 右 下 左(设置4个点-->顺时针方向)
- 1
- 2
- 3
- 4
margin属性的特殊值:
margin: 0px auto; 		/*盒子居中*/
text-align: center;		/*内容居中*/
- 1
- 2
(4)内边距
padding是内边距,它的值是像素/厘米等长度单位、百分比。当设置内边距的时候会把盒子撑大,为了保持盒子原来的大小,应该高度和宽度进行减小,根据width和height减小。
padding的属性:
padding-top:10px;
padding-right:10px;
padding-bottom:10px;
padding-left:10px;
- 1
- 2
- 3
- 4
padding的属性值:
padding:10px; 上下左右
padding:10px 10px; 上下 左右
padding:10px 10px 10px; 上 左右 下
padding:10px 10px 10px 10px; 上 右 下 左(设置4个点-->顺时针方向)
- 1
- 2
- 3
- 4
6、DIV CSS基础 06——float属性、块级元素、行内元素、溢出处理
(1)float文档流浮动属性
float文档流浮动属性的值:
float:left;  	/*元素向左浮动*/	/*从左边开始排*/
float:right; 	/*元素向右浮动*/	/*从右边开始排*/
- 1
- 2
清除浮动的方法:使用clear属性
clear: both/left/right;
- 1
float文档流浮动、clear清除浮动的示例:
demo19.html的内容:
<style>
    div{
        width: 200px;
        height: 200px;
        border: 2px solid deeppink;
    }
    .div1,.div2{
        float: left;			/*div1和div2左浮动,且div2紧跟div1*/
    }
    .div3{
        float: right;
    }
    .div4{
        width: 400px;
        height: 400px;
        border: 2px solid blue;
        clear: both;			/*若没有该浮动,则自动浮到最左上角*/
    }
</style>

<div class="div1">
	div1
</div>
<div class="div2">
	div2
</div>
<div class="div3">
	div3
</div>
<div class="div4">
	div4
</div>
- 1
- 2
- 3
- 4
- 5
- 6
- 7
- 8
- 9
- 10
- 11
- 12
- 13
- 14
- 15
- 16
- 17
- 18
- 19
- 20
- 21
- 22
- 23
- 24
- 25
- 26
- 27
- 28
- 29
- 30
- 31
- 32
- 33
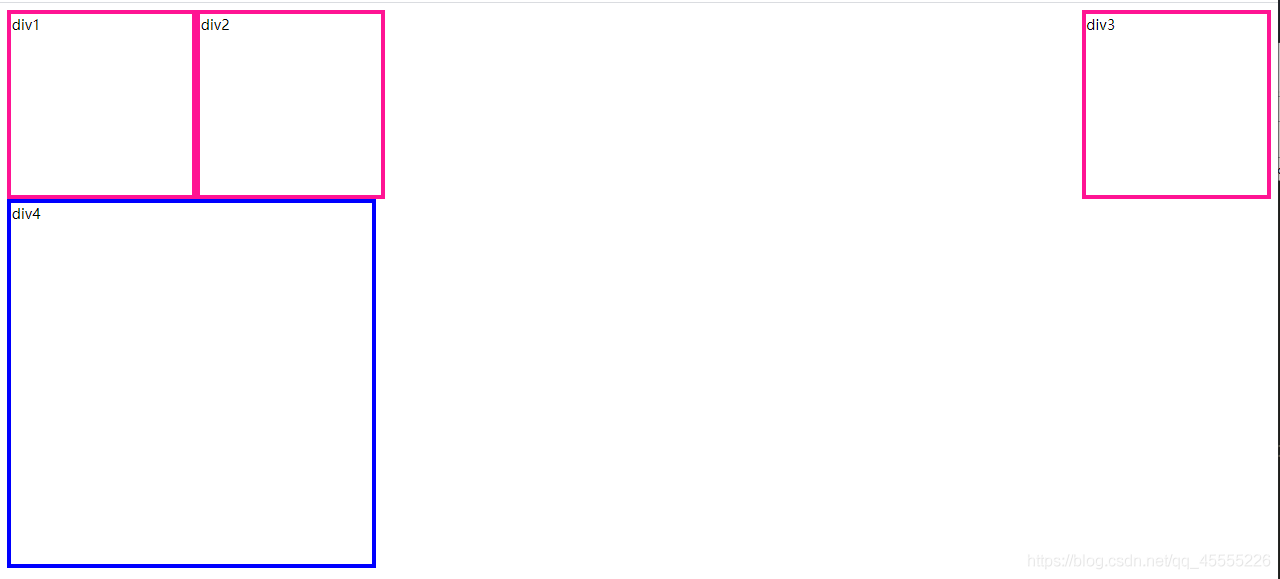
(2)块级元素(block element)
他会独占一行,在默认情况下,其宽度自动填满其父元素的宽度;块级元素可以设置width、height属性;块级元素即使设置了宽度也是独占一行,块级元素可以设置margin、padding属性。
块级元素有哪些:
                address 	地址
                center 		举中对齐块
                div			常用块级容易
                dl			定义列表
                form 		交互表单 (只能用来容纳其它块元素)
                hn			标题标签
                hr 			水平分隔线
                ol 			无序列表
                ul			有序列表
                p 			段落
                pre 		格式化文本
- 1
- 2
- 3
- 4
- 5
- 6
- 7
- 8
- 9
- 10
- 11
(3)行内元素
行内元素不会独占一行,相邻的行内元素会排列在同一行里,直到行排不下,就自动换行,其宽度随内容而变化;行内元素的width、height属性则无效;行内元素的margin、padding属性很奇怪,水平方向的padding-left、padding-rigtht、margin-left、padding-right都会产生边距效果,但是竖直方向的padding-top、padding-bottom、margin-top、margin-bottom却不产生边距效果。
行内元素有哪些:
                a - 锚点
                b - 粗体(不推荐)
                br- 换行
                code - 计算机代码(在引用源码的时候需要)
                em - 强调
                i - 斜体
                img - 图片(特殊的内联元素,同时是内联替换元素,替换元素可以设置宽高)
                当图片和DIV在一起时,图片周围会出现margin现象,即元素不重合贴在一起,为了解决这个问题,				设置img的css为{margin:0;display:block;border:0px}
                input - 输入框
                label - 表格标签
                select - 项目选择
                strong - 粗体强调
                textarea - 多行文本输入框
                u - 下划线
                var - 定义变量
- 1
- 2
- 3
- 4
- 5
- 6
- 7
- 8
- 9
- 10
- 11
- 12
- 13
- 14
- 15
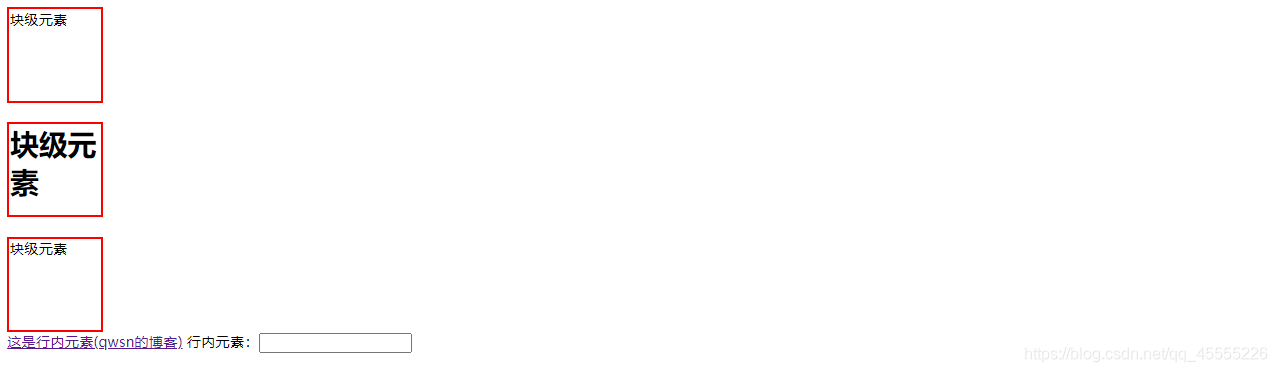
块级元素与行内元素的示例:
demo20.html的内容:
<style>
	.demo20,h1,form{			/*块级元素可以设置宽度和高度、可以设置上下的内外边距*/
		border: 3px solid red;
		width: 100px;
		height: 100px;
	}
</style>

<div class="demo20">块级元素</div>
<h1>块级元素</h1>
<form>块级元素</form>
<a href="https://blog.csdn.net/qq_45555226">这是行内元素(qwsn的博客)</a>
<lable>行内元素:</lable><input type="text"/>
- 1
- 2
- 3
- 4
- 5
- 6
- 7
- 8
- 9
- 10
- 11
- 12
- 13
- 14
块级元素与行内元素转换:使用display属性
                    display:none; 			不显示
                    display:block;			变成块级元素
                    display:inline; 		变成行内元素
                    display:inline-block;	以块级元素样式展示,以行级元素样式排列
- 1
- 2
- 3
- 4
示例:以块级元素样式显示,以行级元素样式排列
demo21.html的内容:
<style>
	.div11,.div22,.div33{
		border: 3px solid deeppink;
		width: 400px;
		height: 100px;
		display: inline-block;
	}
</style>

<div class="div11">以块级元素样式显示,以行级元素样式排列</div>
<div class="div22">以块级元素样式显示,以行级元素样式排列</div>
<div class="div33">以块级元素样式显示,以行级元素样式排列</div>
- 1
- 2
- 3
- 4
- 5
- 6
- 7
- 8
- 9
- 10
- 11
- 12
- 13

注意: 我们知道块级元素可以设置宽(height)高(weight),行内元素却不能设置宽和高,但这其中有一些行内元素,如img,是可以设置宽高的,这就跟之前说的相违背了,由此引出了替换元素和非替换元素。、
替换元素:
	替换元素,就是浏览器根据其标签的元素属性来判断显示具体的内容的元素,且元素一般拥有固定的尺寸(宽高或宽高比)。
	举例说明:img标签我们在审查元素的时候是看不到实体图片的,看到的只是它的src,浏览器根据src来显示内容;再如input标签,浏览器根据input的type值来选择显示输入框还是选择框或者其他类型。
	在html中像这样的元素有img, input, textarea, select, object,这些都是替换元素,这些元素都没有实际的内容。
- 1
- 2
- 3
非替换元素:
	非替换元素:html中大多数都是非替换元素,他们直接将内容告诉浏览器,直接显示出来。
	举例说明:p标签,浏览器会直接显示p标签里的内容。
	替换元素和非替换元素不仅是在行内元素中有,块级元素也有替换和非替换之分,比如嵌入的文档iframe,audio,canvas在某些情况下也为替换元素。
- 1
- 2
- 3
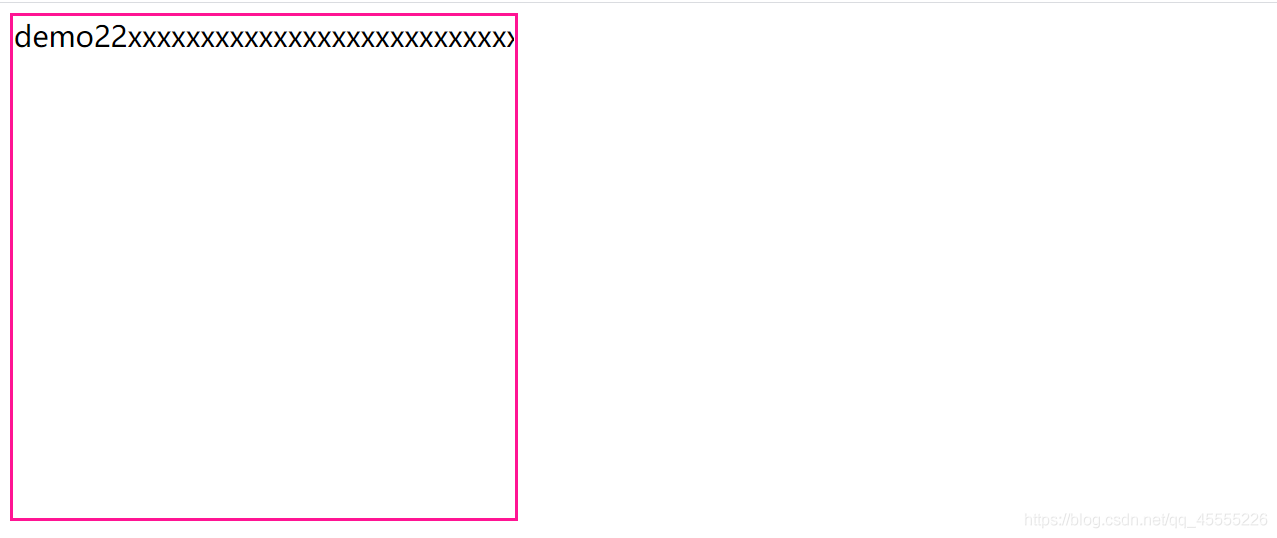
(4)溢出处理
overflow属性:规定当内容溢出元素框时发生的事情。
overflow: visible;	默认值。内容不会被修剪,会呈现在元素框之外。
overflow: hidden;	内容会被修剪,并且其余内容是不可见的。
overflow: scroll;	内容会被修剪,但是浏览器会显示滚动条以便查看其余的内容。
overflow: auto;		如果内容被修剪,则浏览器会显示滚动条以便查看其余的内容。
overflow: inherit;	规定应该从父元素继承 overflow 属性的值。
- 1
- 2
- 3
- 4
- 5
demo22.html的内容:
<style>
	.demo22{
		fond-size: 5px;
		width: 400px;
		height: 400px;
		border: 3px solid deeppink;
		/*overflow: hidden;*/
	}
</style>

<div class="demo22">demo15xxxxxxxxxxxxxxxxxxxxxxxxxxxxxxxxxx</div>
- 1
- 2
- 3
- 4
- 5
- 6
- 7
- 8
- 9
- 10
- 11
- 12
溢出现象:
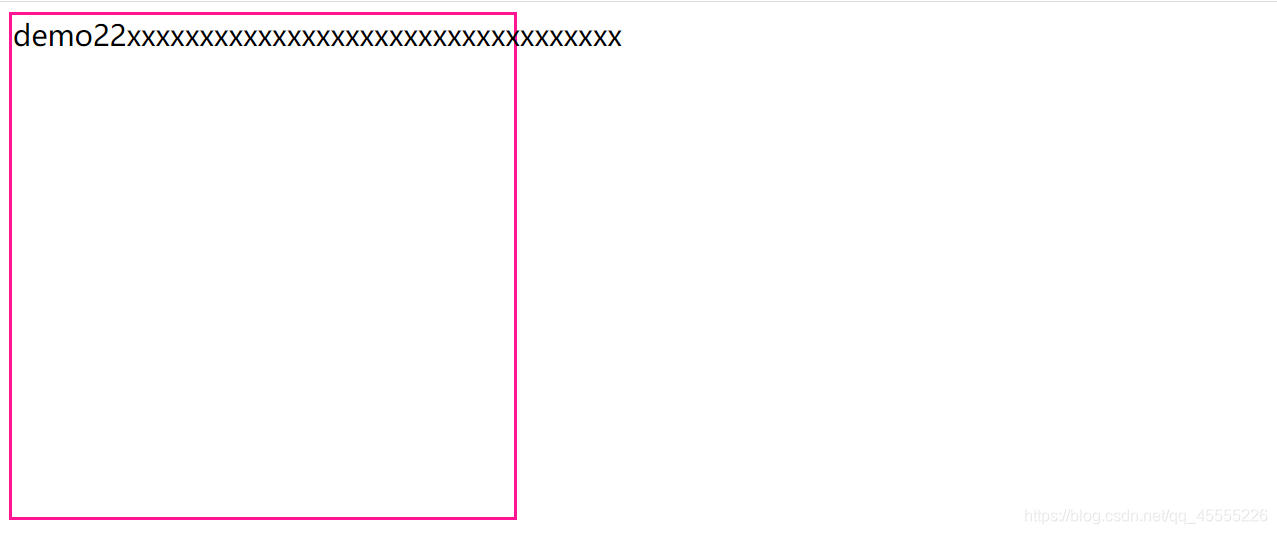
溢出隐藏:
7、DIV CSS基础 07——position四种定位、z-index堆叠顺序
(1)position属性的四种定位
position:static;	静态定位(不对它的位置进行改变,在哪里就在那里)默认值。没有定位,元素出现在					  		正常的流中(忽略 top,bottom, left, right 或者z-index 声明)。

position:fixed;		固定定位(参照物--浏览器窗口)---做弹窗广告用到。生成固定定位的元素,相对于						浏览器窗口进行定位。 元素的位置通过 "left", "top", "right"以及"bottom"属性进行					   规定。

position:relative;	相对定位(参照物以他本身)生成相对定位的元素,相对于其正常位置进行定位。

position:absolute;	绝对定位(除了static都可以,找到参照物-->与它最近的已经有定位的父元素进行定位)生成					  绝对定位的元素,相对于 static 定位以外的第一个父元素进行定位。元素的位置通过 						"left", "top", "right" 以及 "bottom" 属性进行规定
- 1
- 2
- 3
- 4
- 5
- 6
- 7
position属性的四种定位示例:
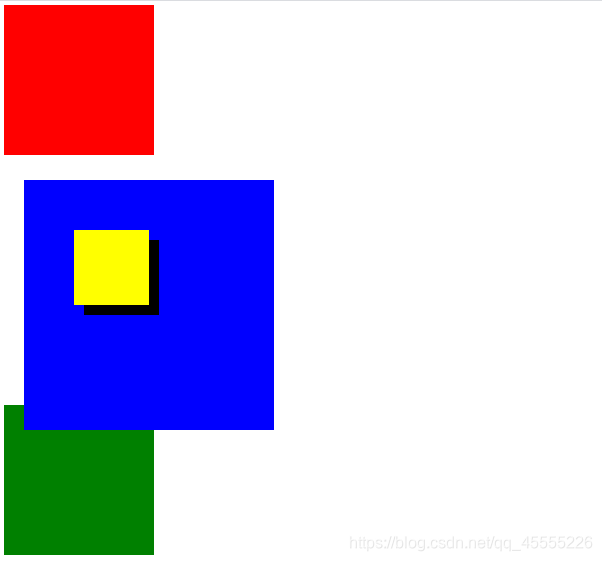
demo23.html的内容:
<style>
	div{
		width: 300px;
		height: 300px;
	}
	.div111{
		background: red;
	}
	.div222{
		width: 500px;
		height: 500px;
		background: blue;
		/*position: static;*/
		/*position: fixed;*/
		position: relative;
		left: 40px;
		top: 50px;
	}
	.div333{
		background: green;
	}
	.div444{
		width: 150px;
		height: 150px;
		background: yellow;
		position: absolute;
		top:100px;
		left: 100px;
	}
	.div555{
		width: 150px;
		height: 150px;
		background: black;
		position: absolute;
		top:120px;
		left: 120px;
	}
</style>

<div class="div111"></div>
<div class="div222">
	<div class="div444"></div>
	<div class="div555"></div>
</div>
<div class="div333"></div>
- 1
- 2
- 3
- 4
- 5
- 6
- 7
- 8
- 9
- 10
- 11
- 12
- 13
- 14
- 15
- 16
- 17
- 18
- 19
- 20
- 21
- 22
- 23
- 24
- 25
- 26
- 27
- 28
- 29
- 30
- 31
- 32
- 33
- 34
- 35
- 36
- 37
- 38
- 39
- 40
- 41
- 42
- 43
- 44
- 45
- 46

(2)堆叠顺序
z-index 属性设置元素的堆叠顺序。拥有更高堆叠顺序的元素总是会处于堆叠顺序较低的元素的前面。
定位的基本思想: 它允许你定义元素框相对于其正常位置应该出现的位置,或者相对于父元素、另一个元素甚至浏览器窗口本身的位置。
z-index属性的堆叠示例1:谁大谁就在上面
在demo23.html中添加:
.div444{
	z-index: 2;		/*2>1,所以黄色在前面*/
	/*background: yellow;*/
}
.div555{
	z-index: 1;		/*1<2,所以黑色在后面*/
	/*background: black;*/
}
- 1
- 2
- 3
- 4
- 5
- 6
- 7
- 8
- 9
z-index属性的堆叠示例2:-1表示在最下面
在demo23.html中修改:
.div444{
	z-index: -1;		/*最小值为-1,作用是把该div藏在最下面*/
	/*background: yellow;*/
}
- 1
- 2
- 3
- 4
- 5

2021年7月1日
2021年7月6日

