
热门标签
热门文章
- 1程序员入门培训班多少钱?可以学到哪些东西?_程序员培训班要多少钱
- 2jwt 介绍_怎么查看一个浏览器网页的jwt
- 32021年危险化学品生产单位安全生产管理人员考试题库及危险化学品生产单位安全生产管理人员考试内容_人体是导体,在静电场中可能接触起电
- 4Vivado工程经验与时序收敛技巧_vivado fix cell
- 5算法——动态规划_完全加括号是什么意思
- 6git代码库迁移保留commit历史_Git 如何迁移仓库并保留 commit 记录
- 7RK3328 Debian安装OpenMediaVault
- 8git 拉取代码时显示Filename too long的解决办法_git file name too long
- 9系统盘50G,数据盘100G(需求:将数据磁盘扩容至1T)_系统盘和数据盘配比
- 10WooCommerce入门指南:简介
当前位置: article > 正文
香橙派aipro上手
作者:木道寻08 | 2024-07-09 20:59:42
赞
踩
香橙派aipro
开箱上手
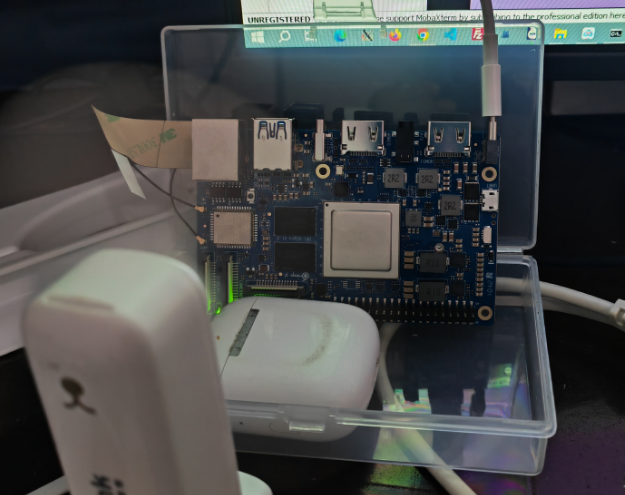
用显示器、键鼠连接开发板,连接了一下WiFi,并做了简单配置,后面就只需要一根电源线就够了。
系统烧录
使用256G的TF卡、windows10的balenaEtcher-Setup-1.18.4.exe烧录软件烧录“opiaipro_ubuntu22.04_desktop_aarch64_20240227.img.xz”文件。烧录有“烧录”、“验证”两个过程,我这里验证后提示烧录失败,但不影响在开发板上使用。
关于电源和散热
没有购买官方的电源所以找了两个已有电源试了试,都可以使用。
首先尝试使用的电源

第二次尝试使用的电源

板子到的第一天散热还没有到,我就用一把手持的小风扇对着板子吹,npu-smi info显示温度在30~34之间波动。这期间我连了一个1080的屏幕进行了一些配置,并没有跑AI的demo。
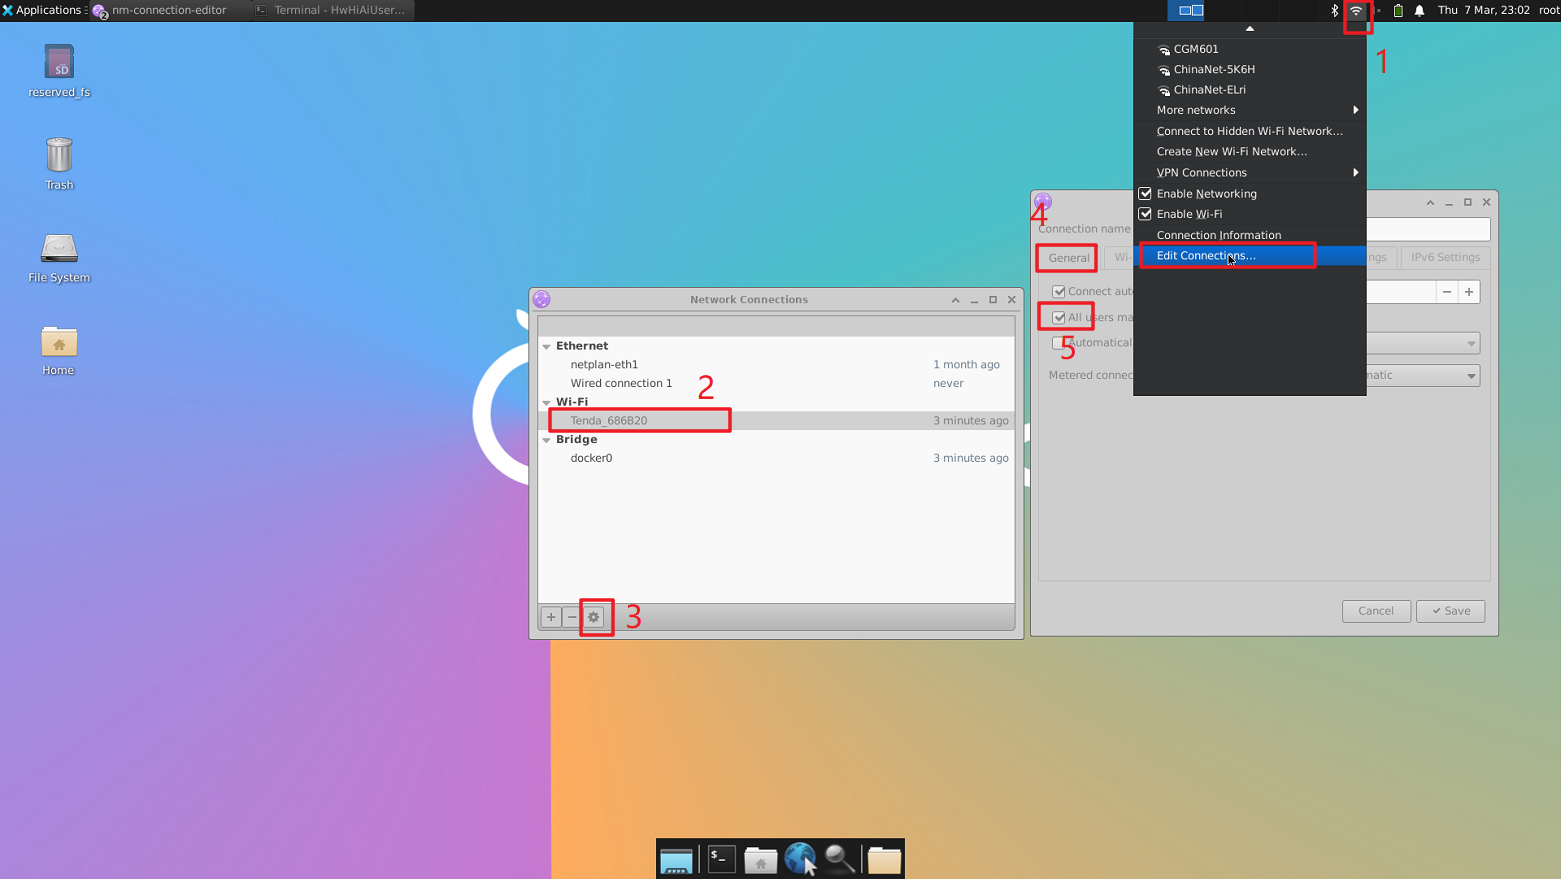
wifi相关
这里要设置一下任何用户都可以连接,不然上电开机后不会自动连接。需要手动输入密码,进入图形化界面才能连接。
防火墙相关
sudo apt-get update
sudo apt-get install ufw
sudo ufw allow 22		# ssh的端口
sudo ufw allow 5901		# vnc的端口
sudo ufw allow 6001		# vnc的端口
- 1
- 2
- 3
- 4
- 5
效率必备
休眠相关
systemctl mask sleep.target suspend.target hibernate.target hybrid-sleep.target
- 1
pip源
往pip.conf文件中写入配置
#创建一个文件夹
mkdir ~/.pip
#打开文件
vim ~/.pip/pip.conf
- 1
- 2
- 3
- 4
写入配置内容
[global]
index-url = https://pypi.tuna.tsinghua.edu.cn/simple
- 1
- 2
conda源
在~/.condarc文件中写入镜像路径
# 打开文件
vim ~/.condarc
- 1
- 2
写入如下内容
default_channels:
  - https://mirrors.tuna.tsinghua.edu.cn/anaconda/pkgs/main
  - https://mirrors.tuna.tsinghua.edu.cn/anaconda/pkgs/free
  - https://mirrors.tuna.tsinghua.edu.cn/anaconda/pkgs/r
- 1
- 2
- 3
- 4
tmux
无法apt直接安装,需要源码安装。
参考:TMUX安装教程
# tmux_download_installer.sh
# download
read -p "Enter the Download path: " target_path
read -p "Enter the install path: " install_path

mkdir ${install_path}

wget -P ${target_path} https://github.com/libevent/libevent/releases/download/release-2.1.11-stable/libevent-2.1.11-stable.tar.gz
wget -P ${target_path} https://github.com/tmux/tmux/releases/download/3.0a/tmux-3.0a.tar.gz
wget -P ${target_path} https://ftp.gnu.org/gnu/ncurses/ncurses-6.2.tar.gz --no-check-certificate

# unzip
tar -xzvf ${target_path}/libevent-2.1.11-stable.tar.gz -C ${install_path}
tar -xzvf ${target_path}/ncurses-6.2.tar.gz -C ${install_path}
tar -xzvf ${target_path}/tmux-3.0a.tar.gz -C ${install_path}

#bevent
cd ${install_path}/libevent*
./configure --prefix=/opt/tmux/tmux_depend --disable-shared
make && make install

#ncurses
cd ${install_path}/ncur*
./configure --prefix=/opt/tmux/tmux_depend
make && make install

#tmux
cd ${install_path}/tmux*
./configure CFLAGS="-I/opt/tmux/tmux_depend/include -I/opt/tmux/tmux_depend/include/ncurses" LDFLAGS="-L/opt/tmux/tmux_depend/lib -L/opt/tmux/tmux_depend/include/ncurses -L/opt/tmux/tmux_depend/include"

#CPPFLAGS="-I/opt/tmux/tmux_depend//include -I/opt/tmux/tmux_depend//include/ncurses" LDFLAGS="-static -L/opt/tmux/tmux_depend//include -L/opt/tmux/tmux_depend//include/ncurses -L/opt/tmux/tmux_depend//lib"

# add config file
echo "  " >  ~/.tmux.conf
cat>~/.tmux.conf<<EOF
# Send prefix
set-option -g prefix C-a
unbind-key C-a
bind-key C-a send-prefix

# Use Alt-arrow keys to switch panes
bind -n M-Left select-pane -L
bind -n M-Right select-pane -R
bind -n M-Up select-pane -U
bind -n M-Down select-pane -D

# Shift arrow to switch windows
bind -n S-Left previous-window
bind -n S-Right next-window

# Mouse mode
set -g mouse on


# Set easier window split keys
bind-key v split-window -h
bind-key h split-window -v

# Easy config reload
bind-key r source-file ~/.tmux.conf \; display-message "tmux.conf reloaded"
EOF

tmux source ~/.tmux.conf

- 1
- 2
- 3
- 4
- 5
- 6
- 7
- 8
- 9
- 10
- 11
- 12
- 13
- 14
- 15
- 16
- 17
- 18
- 19
- 20
- 21
- 22
- 23
- 24
- 25
- 26
- 27
- 28
- 29
- 30
- 31
- 32
- 33
- 34
- 35
- 36
- 37
- 38
- 39
- 40
- 41
- 42
- 43
- 44
- 45
- 46
- 47
- 48
- 49
- 50
- 51
- 52
- 53
- 54
- 55
- 56
- 57
- 58
- 59
- 60
- 61
- 62
- 63
声明:本文内容由网友自发贡献,不代表【wpsshop博客】立场,版权归原作者所有,本站不承担相应法律责任。如您发现有侵权的内容,请联系我们。转载请注明出处:https://www.wpsshop.cn/w/木道寻08/article/detail/803639
推荐阅读
相关标签

