- 1反过来,正过去_北科佟超
- 2python OpenCV 图像像素访问 (三)_img.ndim
- 3crossover是什么软件?CrossOver 24.0中文破解版本激活教程_crossover 24.0.1 解锁
- 4Transformer得到的图像attention map可视化,同时叠加到原图
- 5动态人物抠图换背景 MediaPipe
- 6DCRNN:递归神经网络在交通预测中的创新应用
- 7动态规划算法,js实现,图解执行原理_动态规划原理 动图
- 8MySQL复制详解
- 9“Java已死、前端已凉”:是真相还是贩卖焦虑?
- 10zynq学习笔记3,fpga开发流程(基于vivado) testbench_vivado testbench
【git1】指令,commit,免密_git vscode打标签
赞
踩
1.常用指令:git branch查看本地分支, -r查看远程分支, -a查看本地和远程,-v查看各分支最后一次提交, -D删除分支
git pull -p    # 拉取分支和tag,git remote update -p
git fetch origin arch(远程):arch(本地)
git lfs clone  #Large File Storage,在Git仓库中用一个1KB不到的文本指针来代替文件的存在,通过把大文件存储在Git仓库外,可减小Git仓库本身的体积,使克隆Git仓库的速度加快且不会损失性能

git add -A   # 全部,这样新增的文件也能stash save
git commit -m '提交信息' --no-verify    # 可以跳过代码检查
git commit --amend -m '提交信息' --no-verify    #对上一次的提交进行修改
git log --oneline --graph   # 查看commit第一行
git status   # 查看工作区变更是红色(缓存区是绿色),新版本
git push origin dev(本地) :dev(远程) -f    # 覆盖commit

git stash save a  # 先git add -A再执行这一步后再git pull origin ,因为有冲突也能pull成功
git stash list  # 可到新分支pop此分支改动
git stash pop stash@{0}  #有冲突也pop出来了,解决冲突(updated是远程)后保存并git add这文件即标记已解决,可用git reset HEAD 文件将绿变红,最后git stash drop stash@{0}
- 1
- 2
- 3
- 4
- 5
- 6
- 7
- 8
- 9
- 10
- 11
- 12
- 13
- 14
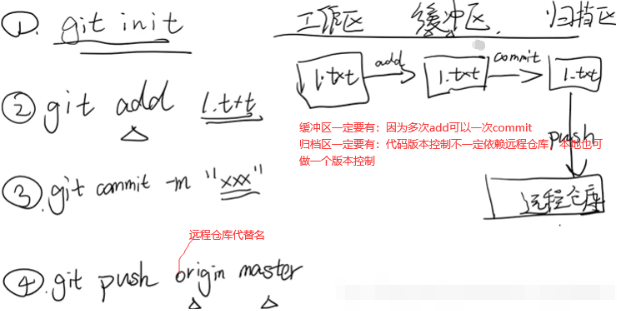
桌面新建名为gitdemo文件夹通过vscode软件打开,vscode安装两个插件:Git History,GitLens。如下执行后即创建了本地版本库,vscode左下角出现master分支。

新建1.txt文件。git add 文件前先ctrl+s,git diff,git status,git log查看需提交的文件路径。

git remote add/remove添加/删除一个远端仓库,origin名字可代替后面github仓库(这是github仓库是https版本,换成ssh版本并配置key免密登录),git remote -v显示所有远程仓库。git push将本地归档区内容提交到远程github仓库。因为采用https会提示登录github。关联后就可以直接git pull/push 空(git clone不需要自己创建本地版本库,会自动和远程版本库进行关联)。
git reset --mixed commithash(这个commithash之前都没了,默认mixed)或HEAD^^(回退2个版本)(缓存区和归档区都回滚)。git reset --hard硬还原前面回滚掉的版本,commithash因为被回滚掉了,用git log 空(每次提交commit信息)查不到,用git reflog 空(所有操作信息)查,三个区都回滚了保持一致。git reset --soft只回滚归档区。git revert commithash,将中间一次commithash扣掉,这个commithash的三个区都被扣掉。

# 在Windows下,标准的行结尾格式是CRLF(回车符和换行符),它由一个回车符(CR)和一个换行符(LF)组成,即\r\n。
# 在Unix和类Unix系统(如Linux和macOS)中,标准的行结尾格式只使用换行符(LF),即\n。
# git 提交出现dos格式的解决方法,关闭 git 的自动换行符转换。
git config --global core.autocrlf false
- 1
- 2
- 3
- 4
git checkout -- a.html  # 还原a.html文件改动, 红色变没 ,*还原所有文件
git checkout -b dev   # 创建并切换到dev分支,不加-b只是切换

git pull = git fetch + git merge  # 一般不单独用merge
git push <远程主机名> <本地分支名>:<远程分支名>  # git push origin dev:dev 和 git push origin dev 等效,因为本地分支和远程分支同名可以省略冒号部分

git diff > a.patch , git apply a.patch
git add,  git commit -m "" ,  git format-patch -1
git cherry-pick 另一分支commitid, 出现冲突,git status查看解决后git add冲突文件后git cherry-pick --continue

git tag  # 查看本地分支标签
git tag -a s3ip-v0.02.00 -m "s3ip v0.02.00 release"  # 创建分支
git checkout -b s3ip-v0.02.00   # 切分支,如果分支不存在则创建
编译代码,image刷到目标机器测试功能
创建压缩包(image,md5,releaseNote,自测报告),把压缩包发给pm并上传W:\3.OpenBMC\Project\S3IP\release
上传tag(git push origin s3ip-v0.02.00)和branch
- 1
- 2
- 3
- 4
- 5
- 6
- 7
- 8
- 9
- 10
- 11
- 12
- 13
- 14
- 15
- 16
2.commit规范:git commit进入vi界面(进入前要git config core.editor vim设一下vi模式)
# .commit_template.txt隐藏文件:
[Project/Common][Feature/Bug/Enhancement/Porting/Debug/Style/Build/Docs/Refactor/Revert]: Brief oneline Summary(Less than 50 characters)

[Description]:
------
Detail description of this change, can be multiple line and each line less than 60 characters

[Root Cause]:
------
Why the issue happened

[Solution]:
------
Your design proposal(for requirement)

[JIRA]:
------
https://jira.huaqin.com:8443/browse/xxxx

[Test]:
------
Add log or Add log file, picture in Merge Request


# .commit-msg-hooks.sh隐藏文件:
#!/bin/sh
str=$(cat $1)    # $1就是git commit进入里的信息即ommit_template.txt内容和下面注释的信息
python .git/hooks/commit-msg-check.py "$str"


# .commit-msg-check.py隐藏文件:
#!/usr/bin/python
import sys
support_plat = ["Common", "SR", "Lin"]
support_type = ["Feature", "Bug", "Enhancement", "Porting",
                "Debug", "Style", "Build", "Docs", "Refactor", "Revert"]
format_dict = {"Description": False, "Root Cause": False,
               "Solution": False, "JIRA": False, "Test": False}

line = sys.argv[1]
if line.startswith("Merge branch"):
    exit(0)

commit = line.splitlines()
if len(commit[0]) == 0:
    print("Reject!!!! \nFirst line of commit message must not empty! !")
    exit(1)

platform = commit[0].lstrip()[1:-1].split("]")[0]
types = commit[0].lstrip()[1:-1].split("]")[1].lstrip()[1:]
if types not in support_type:
    print("Reject!!!! \nPlease select type in {} !".format(support_type))
    exit(1)

if platform not in support_plat:
    print("Reject!!!! \nPlease select platform in {} !".format(support_plat))
    exit(1)

for index in range(1, len(commit)):
    commit_line = commit[index]
    if commit_line.startswith("[Description"):
        format_dict["Description"] = True
    if commit_line.startswith("[Root"):
        format_dict["Root Cause"] = True
    if commit_line.startswith("[Solution"):
        format_dict["Solution"] = True
    if commit_line.startswith("[JIRA"):
        format_dict["JIRA"] = True
    if commit_line.startswith("[Test"):
        format_dict["Test"] = True

for key, value in format_dict.items():
    if not value:
        print("Reject!!!! \nLost \"{}\" field in commit!".format(key))
        exit(1)
exit(0)
- 1
- 2
- 3
- 4
- 5
- 6
- 7
- 8
- 9
- 10
- 11
- 12
- 13
- 14
- 15
- 16
- 17
- 18
- 19
- 20
- 21
- 22
- 23
- 24
- 25
- 26
- 27
- 28
- 29
- 30
- 31
- 32
- 33
- 34
- 35
- 36
- 37
- 38
- 39
- 40
- 41
- 42
- 43
- 44
- 45
- 46
- 47
- 48
- 49
- 50
- 51
- 52
- 53
- 54
- 55
- 56
- 57
- 58
- 59
- 60
- 61
- 62
- 63
- 64
- 65
- 66
- 67
- 68
- 69
- 70
- 71
- 72
- 73
- 74
- 75
- 76
# openbmc-init-build-env文件或setup文件:
title_num=$(sed -n '/\[commit\]/p' .git/config | wc | awk -F' ' '{print $1}')
file_num=$(sed -n '/template = \.git\/commit_template.txt/p' .git/config | wc | awk -F' ' '{print $1}')
if ! ([ "$title_num" -gt 0 ] && [ "$file_num" -gt 0 ]) ; then
    echo "[commit]" >> .git/config
    echo "        template = .git/commit_template.txt" >> .git/config
fi

if [ -f ".commit_template.txt" ];then
    cp .commit_template.txt .git/commit_template.txt
fi

if [ -f ".commit-msg-hooks.sh" ];then
    chmod 777 .commit-msg-hooks.sh
    cp .commit-msg-hooks.sh .git/hooks/commit-msg ###### git commit触发
fi

if [ -f ".commit-msg-check.py" ];then
    chmod 777 .commit-msg-check.py
    cp .commit-msg-check.py .git/hooks/commit-msg-check.py
fi

#如下在项目目录:
#source openbmc-init-build-env meta-hua/meta-whitebox
#cat .git/config
#[commit]
#        template = .git/commit_template.txt
- 1
- 2
- 3
- 4
- 5
- 6
- 7
- 8
- 9
- 10
- 11
- 12
- 13
- 14
- 15
- 16
- 17
- 18
- 19
- 20
- 21
- 22
- 23
- 24
- 25
- 26
- 27

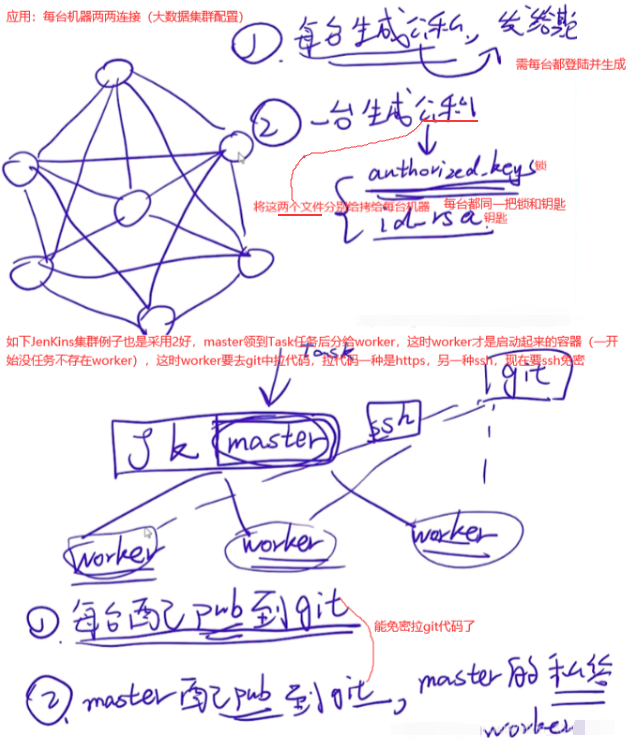
3.ssh免密登录(不是https):whoami,adduser,su,-i
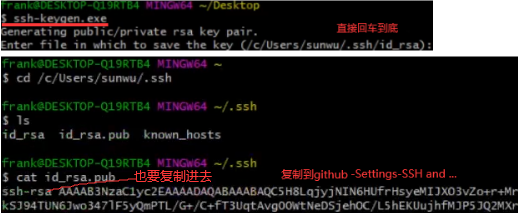
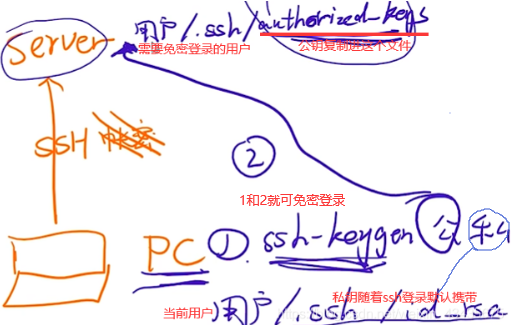
ssh可以免密码,但要配置公钥到github上。

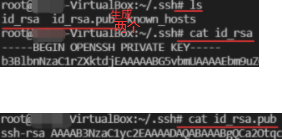
如下一行(linux中没有.exe)是在.ssh文件夹中(原来只有known_hosts文件)生成两个id文件。
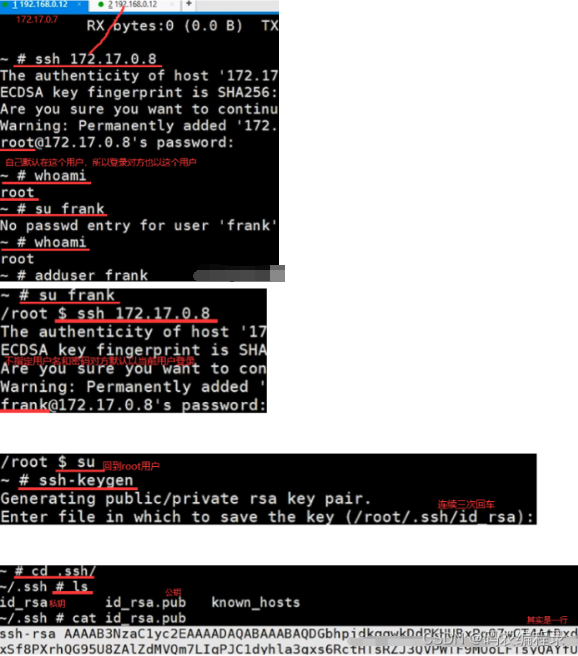
如下两个ip是一台机器两个docker,为什么询问root密码而不是别的密码?

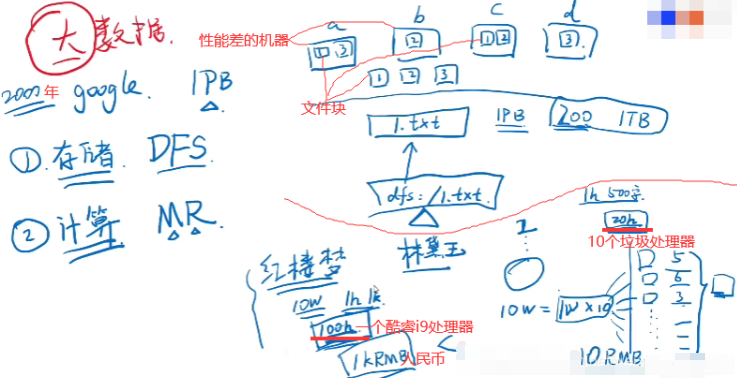
1.访问dfs这个文件系统只需读1.txt这个文件就行了,读的方式是dfs:/1.txt,就能读到1.txt全部内容,他是如何获取这个全部内容的呢?如读前1/3内容,就去看是一号文件块,然后在原数据信息里会记录一号文件块在a和c这两台机器上,它就会到a或c上去获取文件内容,对于使用这个文件的人,只需去输入这样的一个文件路径就能进行文件读取了,不用关心底层文件是怎么分片和怎么存储到每台机器上,这就是DFS即分布式文件系统也是文件系统,像windows右击磁盘属性,可看到是NTFS文件系统格式。
2.计算红楼梦书中林黛玉出现的数量,怎么做?一种方法是一个字一个字去读,遇到林黛玉记一个1。大数据框架提出新计算方式叫MapReduce即MR:把红楼梦10万个字分成10份(10个小学生),每个小学生就是一个mapper,他分的任务把这个过程叫做map。reduce就是将每个小学生数出来林黛玉的数量进行汇总,有一个reducer(这10个小学生中的任意1个)进行数量相加,10个数相加瞬间算完。
A通过ssh首次连接到B,B会将公钥1(host key)传递给A,A将公钥1存入known_hosts文件(~/.ssh文件夹下原本有known_hosts)中。以后A再连接B,B依然会传递给A一个公钥2,OpenSSH会对比公钥1与公钥2 是否相同来进行验证,如果公钥不同,OpenSSH会发出警告, 避免你受到DNS Hijack之类的攻击。

A通过ssh登陆B时提示 Host key verification failed,原因:A的known_hosts文件中记录的B的公钥1 与 连接时B传过来的公钥2不匹配。解决方法:
方法一:删除A的known_hosts文件中记录的B的公钥(手动进行,不适用于自动化部署)。rm -rf ~/.ssh/known_hosts
方法二:修改配置文件,在ssh登陆时不通过known_hosts文件进行验证(安全性有所降低),修改完需重启机器。vi ~/.ssh/config ,添加以下两行代码:
StrictHostKeyChecking no
UserKnownHostsFile /dev/null
命令行:ssh localhost (root/普通用户登陆自己输入root/普通密码,不能免密登录自己),如下配置后再输入ssh localhost就不需要登录密码,-t参数指定要生成的密钥类型,-P密码"表示没有,-f是密钥的生成后的保存文件位置。
ssh-keygen -t rsa -P '' -f ~/.ssh/id_rsa #生成如下两个文件
- 1
cat ~/.ssh/id_rsa.pub >> ~/.ssh/authorized_keys
chmod 0600 ~/.ssh/authorized_keys
- 1
- 2


