- 1docker 安装 人大金仓数据库
- 2还能报名!风靡硅谷开发者的Unstructured Data Meetup 杭州站与您6月15日见面!
- 3科研神器:Vscode + latex+grammarly+github copilot_vscode grammarly
- 4python编程等级证书,python证书含金量_python证书一共有几级
- 5Spring中毒太深,离开Spring我连最基本的CRUD都不会写了...
- 6Win10 32位及64位安装SQL 2000的方法_64位win安装sql2000
- 7四川古力未来科技抖音小店打造品质生活,可靠之选引领潮流
- 8人工智能期末复习(简答)_什么是人工智能人工智能的研究意义目标和策略是什么
- 9RabbitMQ 的使用场景有哪些?_rabbitmq的应用场景
- 1074390设计模24计数器(3*8)_74390设计模24计数器电路图
Logistic Regression 吴恩达机器学习实验二(逻辑回归)_实验二 logistic回归
赞
踩
Linear Regression
实验要求
"""
In this part, you need to use the Logstic Regression which is able to predict wheter students get admission in university.
Suppose that you are the administrator of a university department and you want to determine each applicant’s chance of admission based on their
results on two exams.
You have historical data from previous applicants that you can use as a training set for logistic regression.
For each training example, you have the applicant’s scores on two exams and the admissions decision.
Your task is to build a classification model that estimates an applicant’s probability of admission based the scores from those two exams.
"""
- 1
- 2
- 3
- 4
- 5
- 6
- 7
- 8
读取数据集
"""
Before starting to implement any learning algorithm, it is always good to visualize the data if possible.
"""
import numpy as np
import pandas as pd
import matplotlib.pyplot as plt

# extracting data
data = pd.read_csv('ex2data1.txt',header = None,names = ['score1','score2','y'])
data
- 1
- 2
- 3
- 4
- 5
- 6
- 7
- 8
- 9
- 10
看看数据集啥样:
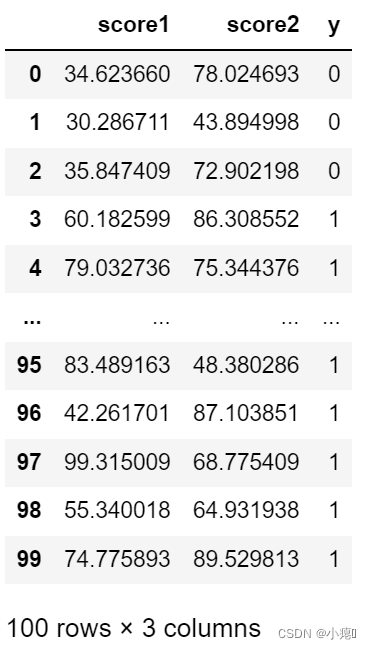
100行3列数据集,两个feature一个label。
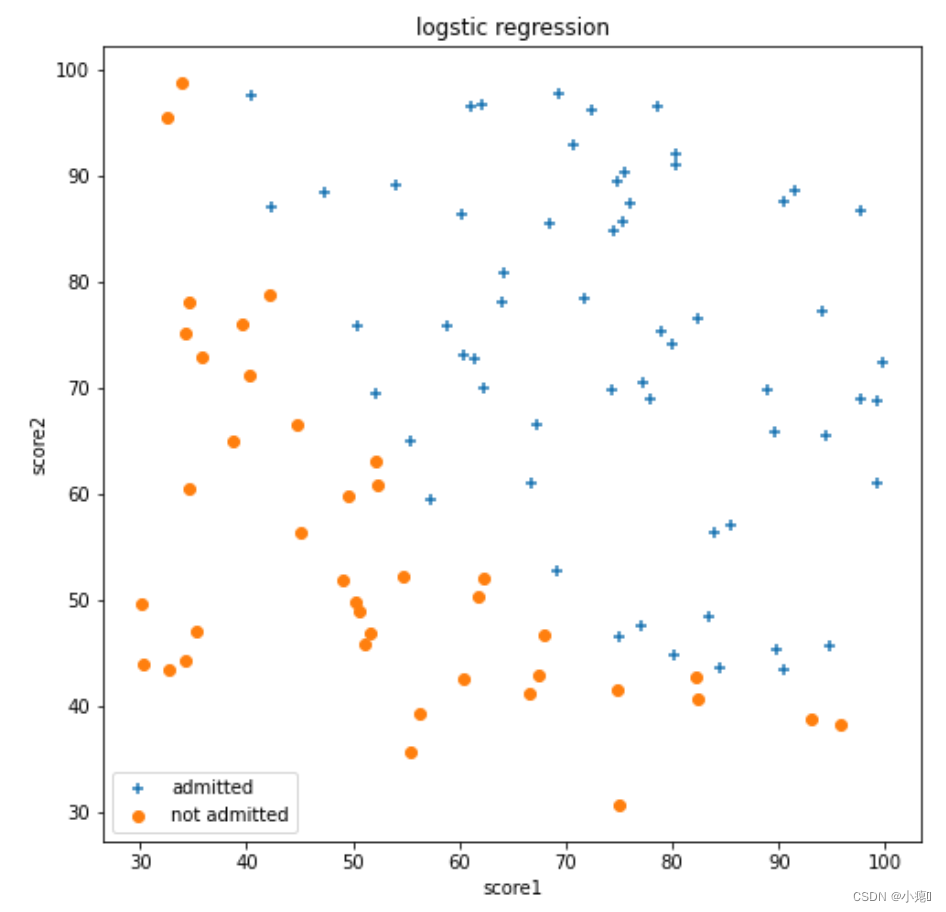
可视化数据
可视化数据可以让我们容易明白数据分布,直观理解数据。
# visualizing the data

pos_data = data[data.iloc[:,2]== 1]
neg_data = data[data.iloc[:,2]== 0]

figure = plt.figure(figsize=(8,8))
plt.scatter(pos_data.score1,pos_data.score2,marker = '+',label = 'admitted')
plt.scatter(neg_data.score1,neg_data.score2,marker = 'o',label = 'not admitted')
plt.xlabel('score1')
plt.ylabel('score2')
plt.title("logstic regression")
plt.legend(loc=3)
plt.show()
- 1
- 2
- 3
- 4
- 5
- 6
- 7
- 8
- 9
- 10
- 11
- 12
- 13
sigmoid函数
用numy包里的exp()函数,可以进行向量化的计算。
原函数:
g
(
z
)
=
1
1
+
e
−
z
g\left( z \right)=\frac{1}{1+{{e}^{-z}}}
g(z)=1+e−z1
与假设函数联立:
h
θ
(
x
)
=
1
1
+
e
−
θ
T
X
{h}_{\theta }\left( x \right)=\frac{1}{1+{{e}^{-{{\theta }^{T}}X}}}
hθ(x)=1+e−θTX1
# sigmoid function
def sigmoid(x):
    s = 1 / ( 1 + np.exp(-x))
    return s
- 1
- 2
- 3
- 4
代价函数
J ( θ ) = 1 m ∑ i = 1 m [ − y ( i ) log ( h θ ( x ( i ) ) ) − ( 1 − y ( i ) ) log ( 1 − h θ ( x ( i ) ) ) ] J\left( \theta \right)=\frac{1}{m}\sum\limits_{i=1}^{m}{[-{{y}^{(i)}}\log \left( {{h}_{\theta }}\left( {{x}^{(i)}} \right) \right)-\left( 1-{{y}^{(i)}} \right)\log \left( 1-{{h}_{\theta }}\left( {{x}^{(i)}} \right) \right)]} J(θ)=m1i=1∑m[−y(i)log(hθ(x(i)))−(1−y(i))log(1−hθ(x(i)))]
# compute cost
def ComputeCost(X,y,theta):
    X = np.matrix(X)
    y = np.matrix(y)
    theta = np.matrix(theta)
    first = np.multiply(-y,np.log(sigmoid(X * theta.T )))
    second = np.multiply(1-y,np.log(1-sigmoid(X * theta.T )))
    return np.sum(first - second) / len(X)
- 1
- 2
- 3
- 4
- 5
- 6
- 7
- 8
- 9
计算梯度
这里我直接在梯度函数里进行的训练。
向量化计算的批量梯度下降:
1
m
X
T
(
S
i
g
m
o
i
d
(
X
θ
)
−
y
)
\frac{1}{m} X^T( Sigmoid(X\theta) - y )
m1XT(Sigmoid(Xθ)−y)
∂
J
(
θ
)
∂
θ
j
=
1
m
∑
i
=
1
m
(
h
θ
(
x
(
i
)
)
−
y
(
i
)
)
x
j
(
i
)
\frac{\partial J\left( \theta \right)}{\partial {{\theta }_{j}}}=\frac{1}{m}\sum\limits_{i=1}^{m}{({{h}_{\theta }}\left( {{x}^{(i)}} \right)-{{y}^{(i)}})x_{_{j}}^{(i)}}
∂θj∂J(θ)=m1i=1∑m(hθ(x(i))−y(i))xj(i)
# gradient

def Gradient(X,y,theta,lr,iters):
    temp = np.zeros(theta.shape)
    temp = np.matrix(temp)
    para = int(theta.ravel().shape[1])
    cost = np.zeros(iters)
    for i in range(iters):
        error = sigmoid(X * theta.T ) - y
        for j in range(para):
            term = np.multiply(error , X[:,j] )
            temp[0,j] = theta[0,j] - (( lr / len(X))* np.sum(term))

        theta = temp
        cost[i] = ComputeCost(X,y,theta)

    return theta, cost
- 1
- 2
- 3
- 4
- 5
- 6
- 7
- 8
- 9
- 10
- 11
- 12
- 13
- 14
- 15
- 16
- 17
- 18
初始化参数
# 初始化参数
alpha = 0.001
iters = 100000 # 批量梯度下降需要迭代多次才能取得好的效果

data.insert(0,'Ones',1)
X = data.iloc[:,0:3]
y = data.iloc[:,3:4]
theta = np.matrix([0,0,0])
X = np.matrix(X)
y = np.matrix(y)

# theta.shape,X.shape,y.shape
- 1
- 2
- 3
- 4
- 5
- 6
- 7
- 8
- 9
- 10
- 11
- 12
训练
theta,cost =  Gradient(X,y,theta,alpha,iters)
cost[-1]
- 1
- 2
计算出最后的代价是:0.3873895227111881
代价是否收敛
可视化看看代价收敛没有:
fig, ax = plt.subplots(figsize=(12,8))
ax.plot(np.arange(iters), cost, 'r')
ax.set_xlabel('Iterations')
ax.set_ylabel('Cost')
ax.set_title('Error vs. Training Epoch')
plt.show()
- 1
- 2
- 3
- 4
- 5
- 6
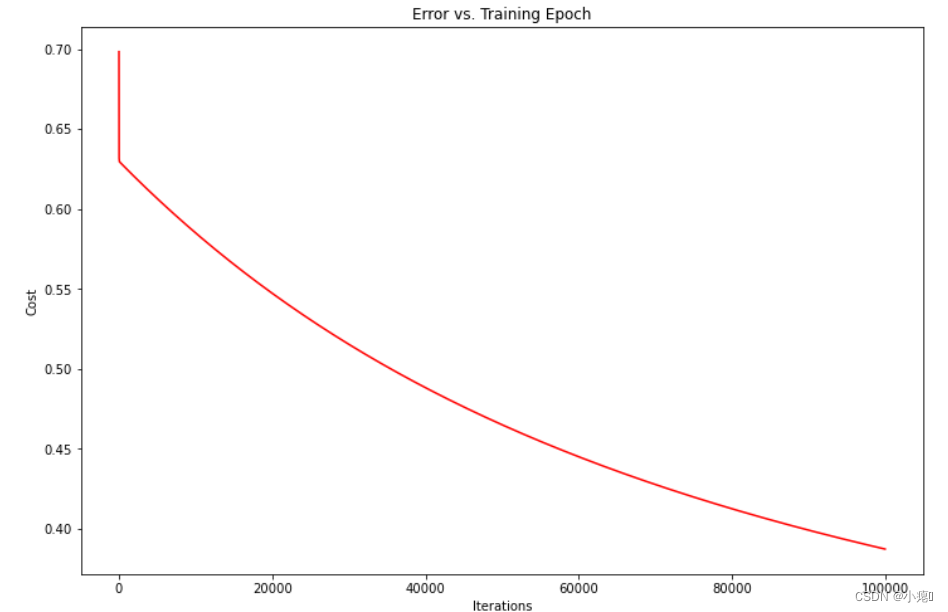
可以看出正在代价正在下降,但是要达到收敛还需要大量迭代和时间,这里可以看出批量梯度下降的缺点,耗时,需要大量迭代次数。估计会花费许多时间。可以使用SciPy的“optimize”命名空间来做同样的事情。
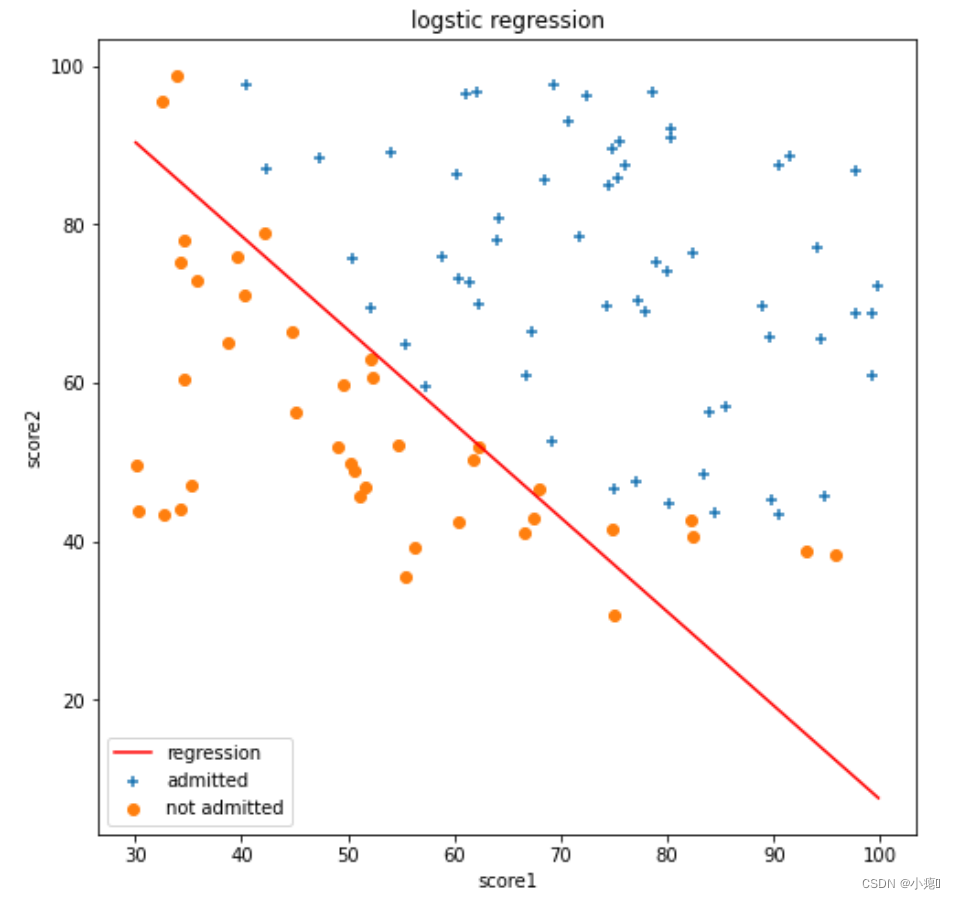
可视化决策边界
# plotting image

figure = plt.figure(figsize=(8,8))
x1 = np.linspace(data.score1.min(), data.score1.max(), 80)

x2 = -(theta[0,0] + theta[0,1] * x1) / theta[0,2]


plt.plot(x1 , x2 ,'r',label = 'regression')
plt.scatter(pos_data.score1,pos_data.score2,marker = '+',label = 'admitted')
plt.scatter(neg_data.score1,neg_data.score2,marker = 'o',label = 'not admitted')
plt.xlabel('score1')
plt.ylabel('score2')
plt.title("logstic regression")
plt.legend(loc=3)
plt.show()
- 1
- 2
- 3
- 4
- 5
- 6
- 7
- 8
- 9
- 10
- 11
- 12
- 13
- 14
- 15
- 16
评估准确性
def predict(theta, X):
    probability = sigmoid(X * theta.T)
    return [1 if x >= 0.5 else 0 for x in probability]


predictions = predict(theta, X)
correct = [1 if ((a == 1 and b == 1) or (a == 0 and b == 0)) else 0 for (a, b) in zip(predictions, y)]
accuracy = (sum(map(int, correct)) % len(correct))
print ('accuracy = {0}%'.format(accuracy))
- 1
- 2
- 3
- 4
- 5
- 6
- 7
- 8
- 9

正则化的逻辑回归
实验要求
"""
Regularized logistic regression


In this part of the exercise, you will implement regularized logistic regression to predict
whether microchips from a fabrication plant passes quality assurance (QA).
During QA, each microchip goes through various tests to ensure it is functioning correctly.


Suppose you are the product manager of the factory and you have the test results for some microchips on two different tests.
From these two tests,you would like to determine whether the microchips should be accepted or rejected.
To help you make the decision, you have a dataset of test results on past microchips, from which you can build a logistic regression model.

"""
- 1
- 2
- 3
- 4
- 5
- 6
- 7
- 8
- 9
- 10
- 11
- 12
- 13
- 14
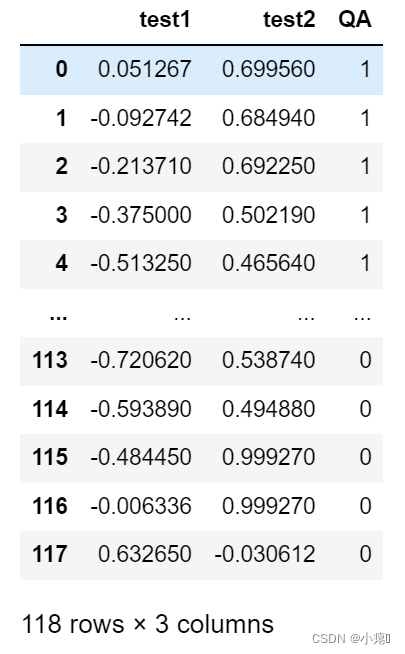
读取数据
# extracting the data
import numpy as np
import matplotlib.pyplot as plt
import pandas as pd

data2 = pd.read_csv('ex2data2.txt',header = None,names = ['test1','test2','QA'])
data2
- 1
- 2
- 3
- 4
- 5
- 6
- 7
- 8
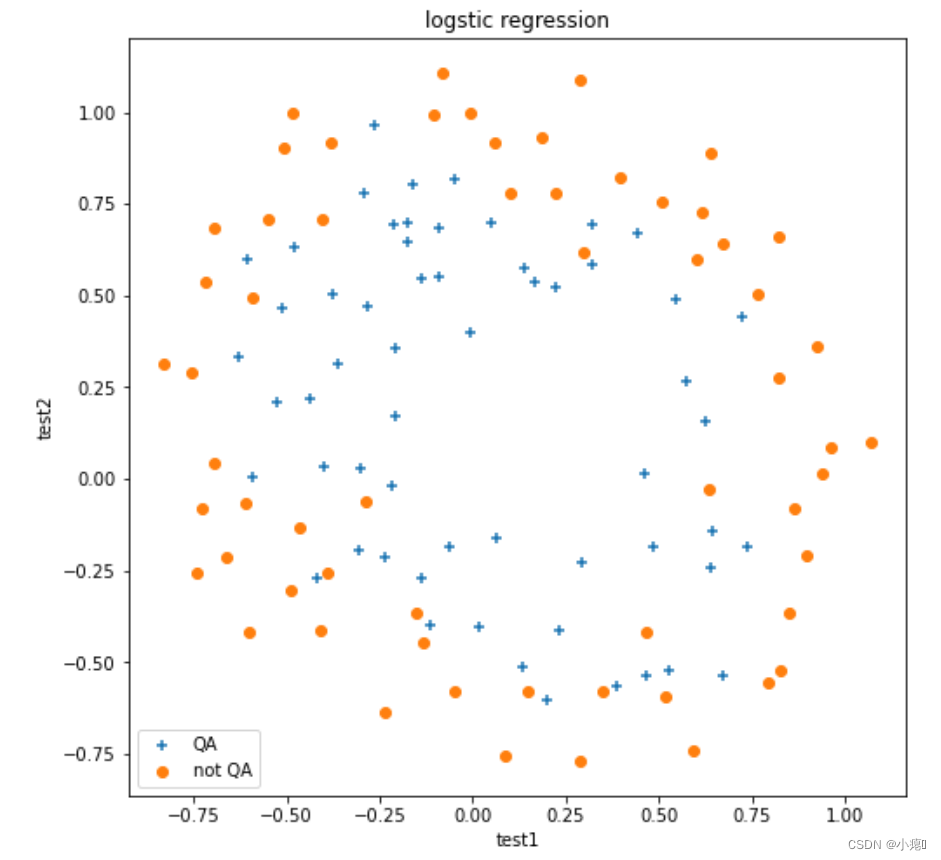
同样可视化数据
# visualizing data

pos_data2 = data2[data2.iloc[:,2] == 1]
neg_data2 = data2[data2.iloc[:,2] == 0]

figure = plt.figure(figsize=(8,8))
plt.scatter(pos_data2.test1,pos_data2.test2,marker = '+',label = 'QA')
plt.scatter(neg_data2.test1,neg_data2.test2,marker = 'o',label = 'not QA')
plt.xlabel('test1')
plt.ylabel('test2')
plt.title("logstic regression")
plt.legend(loc=3)
plt.show()
- 1
- 2
- 3
- 4
- 5
- 6
- 7
- 8
- 9
- 10
- 11
- 12
- 13
特征映射
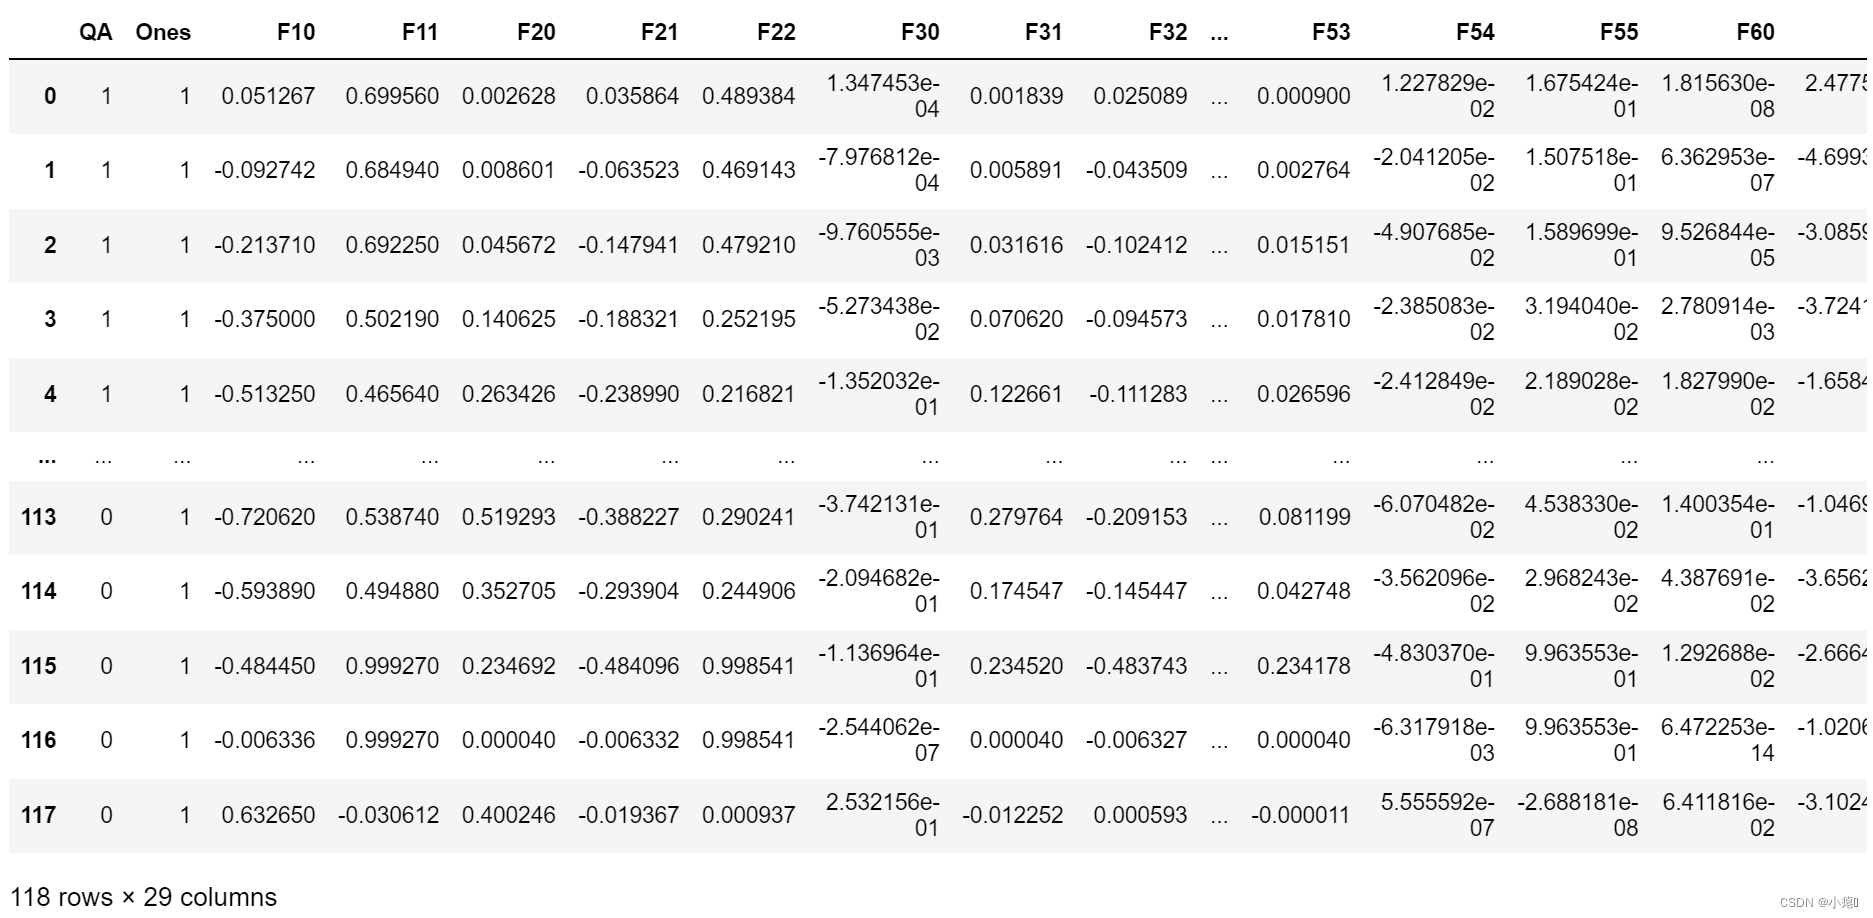
由上图可以知道,如果要做到分类正负样本,线性分类肯定是行不通的。所以要采用一个高维的决策边界,来区分数据。所以可以使用特征映射,将特征映射到高维。利用特征多项式可以更好地区分数据。由吴恩达实验要求,创建一个28维数据。
degree = 7
x1 = data2['test1']
x2 = data2['test2']


new_x1 = x1
new_x2 = x2
data2.insert(3, 'Ones', 1)

for i in range(1, degree):
    for j in range(0, i+1):
        data2['F' + str(i) + str(j)] = np.power(x1, i-j) * np.power(x2, j)

data2.drop('test1', axis=1, inplace=True)
data2.drop('test2', axis=1, inplace=True)
data2
- 1
- 2
- 3
- 4
- 5
- 6
- 7
- 8
- 9
- 10
- 11
- 12
- 13
- 14
- 15
- 16
- 17
代价与梯度
J
(
θ
)
=
1
m
∑
i
=
1
m
[
−
y
(
i
)
log
(
h
θ
(
x
(
i
)
)
)
−
(
1
−
y
(
i
)
)
log
(
1
−
h
θ
(
x
(
i
)
)
)
]
+
λ
2
m
∑
j
=
1
n
θ
j
2
J\left( \theta \right)=\frac{1}{m}\sum\limits_{i=1}^{m}{[-{{y}^{(i)}}\log \left( {{h}_{\theta }}\left( {{x}^{(i)}} \right) \right)-\left( 1-{{y}^{(i)}} \right)\log \left( 1-{{h}_{\theta }}\left( {{x}^{(i)}} \right) \right)]}+\frac{\lambda }{2m}\sum\limits_{j=1}^{n}{\theta _{j}^{2}}
J(θ)=m1i=1∑m[−y(i)log(hθ(x(i)))−(1−y(i))log(1−hθ(x(i)))]+2mλj=1∑nθj2
梯度更新区分
θ
0
\theta_0
θ0 与
θ
j
\theta_j
θj
j
=
1
,
2
,
.
.
.
,
n
j = 1,2,...,n
j=1,2,...,n。因为我们不对
θ
0
\theta_0
θ0正则化。
R
e
p
e
a
t
u
n
t
i
l
c
o
n
v
e
r
g
e
n
c
e
{
θ
0
:
=
θ
0
−
a
1
m
∑
i
=
1
m
[
h
θ
(
x
(
i
)
)
−
y
(
i
)
]
x
0
(
i
)
θ
j
:
=
θ
j
−
a
1
m
∑
i
=
1
m
[
h
θ
(
x
(
i
)
)
−
y
(
i
)
]
x
j
(
i
)
+
λ
m
θ
j
}
R
e
p
e
a
t
对上面的算法中 j=1,2,…,n 时的更新式子进行调整可得:
θ
j
:
=
θ
j
(
1
−
a
λ
m
)
−
a
1
m
∑
i
=
1
m
(
h
θ
(
x
(
i
)
)
−
y
(
i
)
)
x
j
(
i
)
{{\theta }_{j}}:={{\theta }_{j}}(1-a\frac{\lambda }{m})-a\frac{1}{m}\sum\limits_{i=1}^{m}{({{h}_{\theta }}\left( {{x}^{(i)}} \right)-{{y}^{(i)}})x_{j}^{(i)}}
θj:=θj(1−amλ)−am1i=1∑m(hθ(x(i))−y(i))xj(i)
# Cost function and gradient

# compute cost
def ReCost(X,y,theta,lr):
    X = np.matrix(X)
    y = np.matrix(y)
    theta = np.matrix(theta)
    first = np.multiply(-y,np.log(sigmoid(X * theta.T )))
    second = np.multiply(1-y,np.log(1-sigmoid(X * theta.T )))
    third =  lr * np.sum(np.multiply(theta,theta)) / ( 2 * (len(X)))
    return np.sum(first - second) / len(X) + third


# gradient

def ReGradient(X,y,theta,aph,iters,lr):
    temp = np.zeros(theta.shape)
    temp = np.matrix(temp)
    para = int(theta.ravel().shape[1])
    cost2 = np.zeros(iters)
    i=0
    for i in range(iters):
        error = sigmoid(X * theta.T ) - y
        term_0 = np.multiply(error , X[:,0] )
        temp[0,0] = temp[0,0] - (aph / len(X)) * np.sum(term_0)
        j = 1
        for j in range(para):
            term = np.multiply(error , X[:,j] )
            temp[0,j] = theta[0,j] - aph * ((( 1 / len(X))* np.sum(term)) + (lr * theta[0,j] / len(X)))

        theta = temp
        cost2[i] = ReCost(X,y,theta,lr)

    return theta, cost2
- 1
- 2
- 3
- 4
- 5
- 6
- 7
- 8
- 9
- 10
- 11
- 12
- 13
- 14
- 15
- 16
- 17
- 18
- 19
- 20
- 21
- 22
- 23
- 24
- 25
- 26
- 27
- 28
- 29
- 30
- 31
- 32
- 33
- 34
- 35
初始化参数
# 初始化数据

X2 = data2.iloc[:,1:12]
y2 = data2.iloc[:,0:1]
theta2 = np.matrix([0,0,0,0,0,0,0,0,0,0,0,0,0,0,0,0,0,0,0,0,0,0,0,0,0,0,0,0])# 28 维
X2 = np.matrix(X2)
y2 = np.matrix(y2)
theta2.shape,X2.shape,y2.shape

# 初始化参数
alpha = 0.001
iters = 50000 # 50000
learningRate = 0 # 1 ,0 , 100
- 1
- 2
- 3
- 4
- 5
- 6
- 7
- 8
- 9
- 10
- 11
- 12
- 13
训练
theta_min2,cost2 = ReGradient(X2,y2,theta2,alpha,iters,learningRate)
- 1
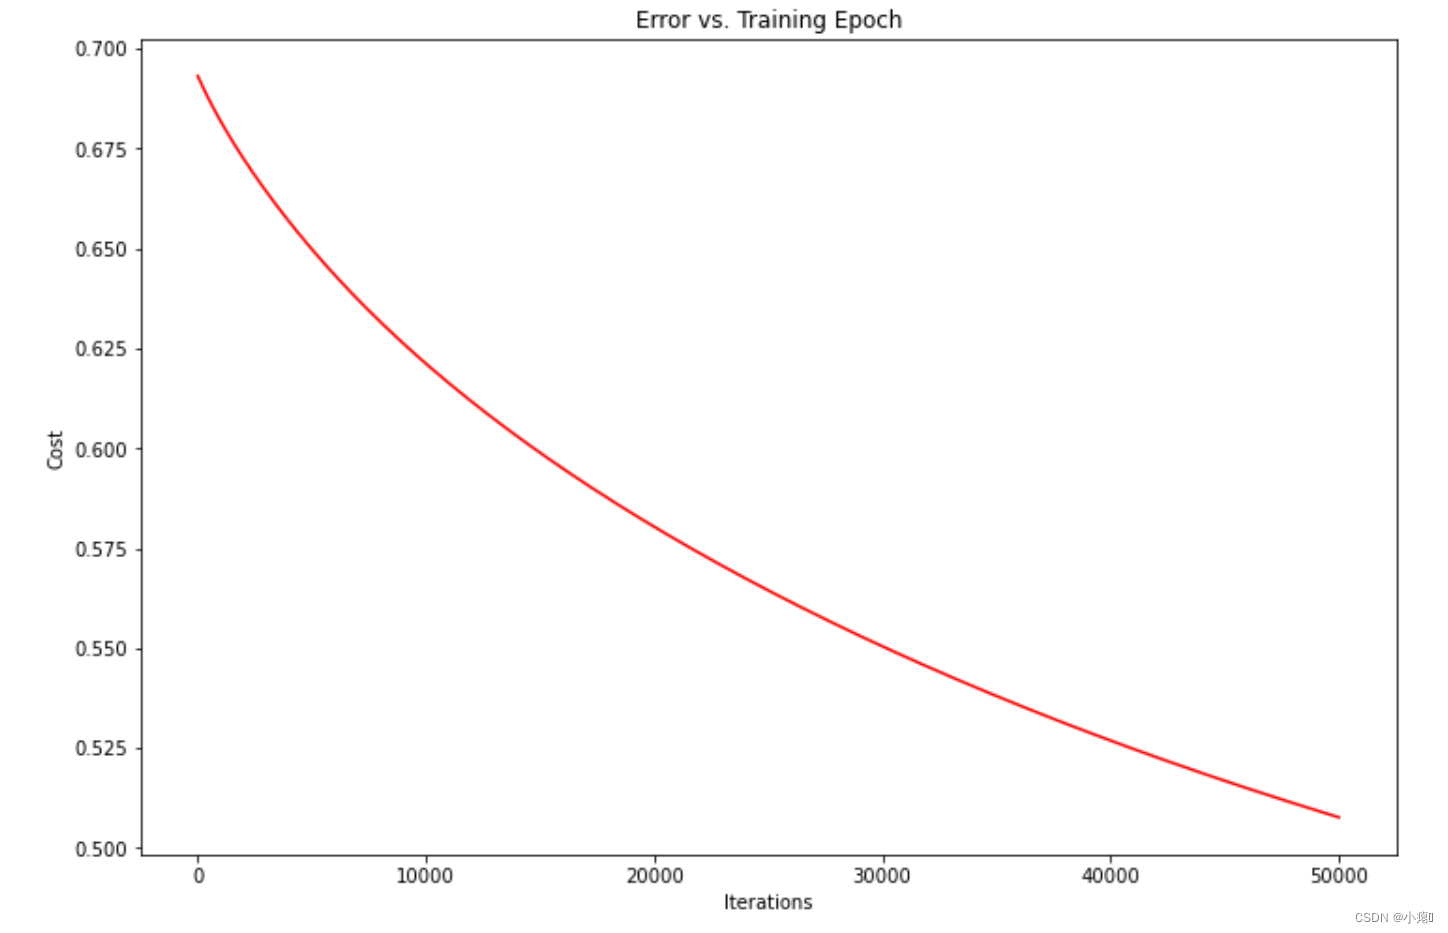
可视化是否收敛
还是没有收敛
# 观察正则化逻辑回归代价是否收敛

fig, ax = plt.subplots(figsize=(12,8))
ax.plot(np.arange(iters), cost2, 'r')
ax.set_xlabel('Iterations')
ax.set_ylabel('Cost')
ax.set_title('Error vs. Training Epoch')
plt.show()
- 1
- 2
- 3
- 4
- 5
- 6
- 7
- 8
评估模型
# Evaluating logistic regression

def predict2(theta, X):
    probability = sigmoid(X * theta.T)
    return [1 if x >= 0.5 else 0 for x in probability]


predictions = predict2(theta_min2, X2)
correct = [1 if ((a == 1 and b == 1) or (a == 0 and b == 0)) else 0 for (a, b) in zip(predictions, y2)]
accuracy = (sum(map(int, correct)) % len(correct))
print ('accuracy = {0}%'.format(accuracy))
- 1
- 2
- 3
- 4
- 5
- 6
- 7
- 8
- 9
- 10
- 11

这个精确度感觉很高了啊。
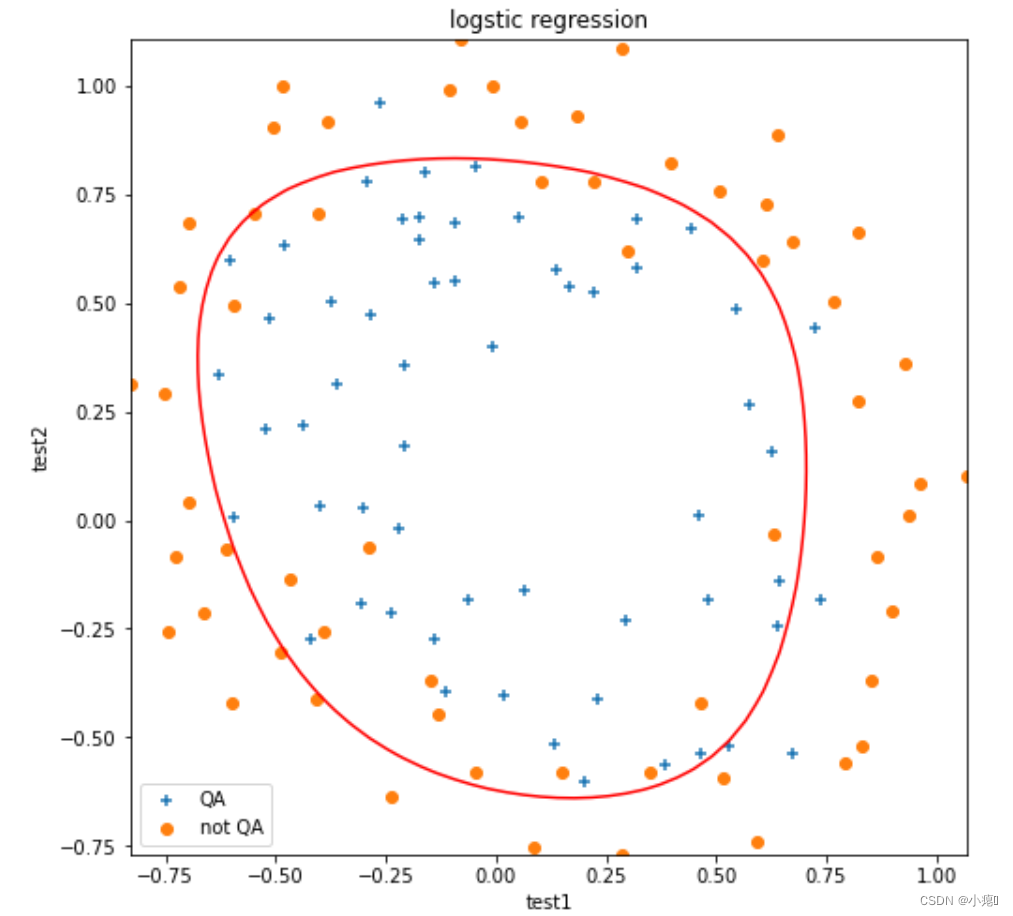
可视化决策边界
因为我们进行了特征映射,所以在这里还需要对坐标进行对应的特征映射才行。
figure = plt.figure(figsize=(8,8))
# plt_x1 = np.linspace(new_x1.min(),new_x1.max(),118)
# plt_x2 = np.linspace(new_x2.min(),new_x2.max(),118)
plt_x1, plt_x2 = np.meshgrid(np.linspace(new_x1.min(),new_x1.max()), np.linspace(new_x2.min(),new_x2.max()))

degree = 7
x_1 = plt_x1.ravel()
x_2 = plt_x2.ravel()
n = len(x_1)
x_1 = x_1.reshape(n,1)
x_2 = x_2.reshape(n,1)
plt_array_0 = np.ones([1,n])

for powerNum in range(1, degree):
    for power_index in range(0,powerNum+1):
        plt_new_feat = np.power(x_1,powerNum-power_index) * np.power(x_2,power_index)
        plt_array_0 = np.concatenate((plt_array_0,plt_new_feat.T), axis = 0)

plt_x_mat = np.matrix(plt_array_0)

plt_x_mat.shape,theta_min2.shape


f =  sigmoid(theta_min2 * plt_x_mat)
f =  f.reshape(plt_x1.shape)


plt.contour(plt_x1, plt_x2, f,[0.5],colors='r', linewidth=0.5)
plt.scatter(pos_data2.test1,pos_data2.test2,marker = '+',label = 'QA')
plt.scatter(neg_data2.test1,neg_data2.test2,marker = 'o',label = 'not QA')
plt.xlabel('test1')
plt.ylabel('test2')
plt.title("logstic regression")
plt.legend(loc=3)
plt.show()
- 1
- 2
- 3
- 4
- 5
- 6
- 7
- 8
- 9
- 10
- 11
- 12
- 13
- 14
- 15
- 16
- 17
- 18
- 19
- 20
- 21
- 22
- 23
- 24
- 25
- 26
- 27
- 28
- 29
- 30
- 31
- 32
- 33
- 34
- 35
- 36
- 37
效果不错,但是拟合太好会发生过拟合,而正则化可以有效应对。这只是正则化参数为1时的图像,其余参数大家可以试一试再可视化。
总结
本次实验可以感觉到批量梯度下降需要太多次的迭代了,第一次实验时代价一直没有收敛,呈现的是抖动的心电图,后来发现学习率太大了,慢慢下调到0.001才算稳定,但是收敛速度太慢。其实python中有很多包可以使用,下次我尝试利用一下。再次就是可视化决策边界,我看了很多其他博主的代码,还是一知半解。其次,决定决策边界的不是数据集的分布,而是参数 θ \theta θ的值。


