
- 1使用Verilog实现CRC-8的串行计算_crc8 verilog
- 2大数据、人工智能、云计算、物联网、区块链序言【大数据导论】_大数据、云计算、物联网相关概念普及
- 3spring.HttpMessageNotReadableException: JSON parse error_spring json parse error
- 4springboot整合redisson实战(一)整合 redisson-spring-boot-starter
- 5设置了uni.chooseLocation,小程序中打不开_uni.chooselocation点击之后没反应
- 6头歌实验代码_表格样式头歌代码
- 7mysql的clob转字符串_Oracle中clob与varchar字段互转
- 8日常学习记录——使用Visio2019绘制思维导图_visio画大括号思维导图
- 9【数据结构】:冒泡排序(c++实现)_c++冒泡排序统计轮数
- 10chatgpt赋能python:Python选择界面的SEO介绍
原来 TinyVue 组件库跨框架(vue2、vue3、react、solid)是这样实现的?
赞
踩
点击蓝字

关注我们
本文由 TinyVue 组件库核心成员郑志超分享,首先分享了实现跨框架组件库的必要性,同时通过演示demo和实际操作向我们介绍了如何实现一个跨框架的组件库。
前言
前端组件库跨框架是什么?
前端组件库跨框架是指在不同的前端框架(如 React、Vue、Solid 等)之间共享和复用组件的能力。这种能力可以让开发者在不同的项目中使用同一套组件库,从而提高开发效率和代码复用性。
为什么需要做前端组件库跨框架?
首先,不同的前端框架有不同的语法和 API,如果每个框架都要写一套组件库,那么开发成本和维护成本都会很高。其次,跨框架的组件库可以让开发者更加灵活地选择框架,而不必担心组件库的兼容性问题。而 TinyVue 组件库在实现跨框架之前也经历了三个阶段。
第一个阶段:
2019年初,当时 Vue 3.0 还未发布,TinyVue创始团队 率先使用了 @vue/composition-api 和 renderless 无渲染函数隔离模板、样式和逻辑代码;经过两年的发展,支持的项目达到了800+,同时因为组件功能的丰富,代码量也达到了20w+。
第二个阶段:
2021年初,当时 Vue 3.0 已经发展了半年有余,各个方面已经逐步完善,TinyVue 支持的项目由 Vue2.0 切换 Vue3.0 的意愿日渐强烈;但是又苦于没有支持 Vue 3.0 的组件库; 于是 TinyVue 基于@vue/composition-api 和 renderless的架构的巨大优势体现了出来,在短短两个月通过适配层 vue-common 将 20w+ 行代码全部适配了 Vue3.0, 极大的减少了开发成本。2021年10月 TinyVue 组件库实现了一套代码同时支持 Vue2.0 和 Vue3.0 。
第三个阶段:
2023年6月,TinyVue 团队需要和开源的 openInula(完全兼容 React )框架合作共同开发 Inula 组件库,并且通过中科院软件所的开源之夏活动与开发者共建 OpenTiny React 组件库。在此过程中,充分利用 TinyVue 的模板与逻辑分离的架构,完成了开发可以适配 React 的 common 适配层,并已完成 4 个 React 组件的开发,并且完全复用了 renderless 无渲染层的逻辑。
为了更好的理解,可以参考以下 TinyVue 组件库的架构图:
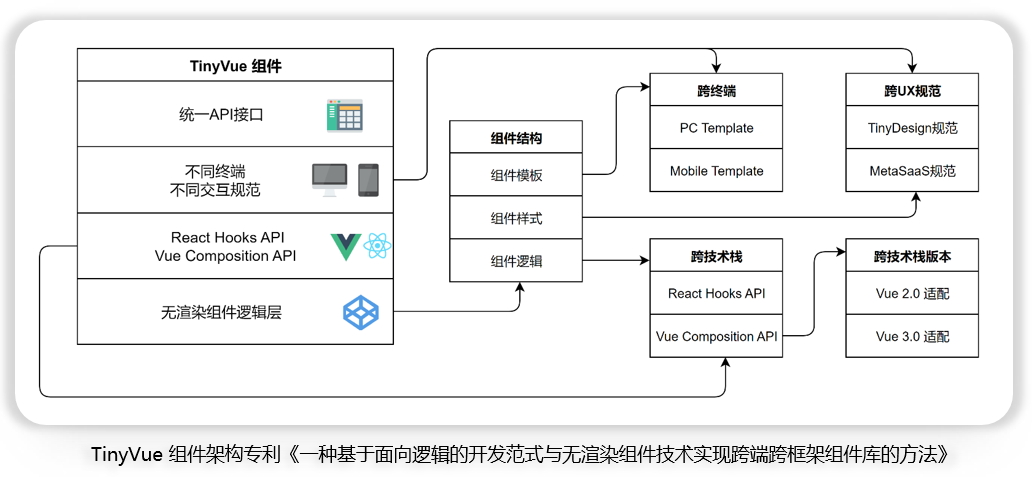
通过前端组件库跨框架,可以达到以下效果:
1. 提高开发效率和代码复用性,减少重复开发的工作量。
2. 统一 UI 风格和交互体验,提高产品的一致性和可用性。
3. 支持多种前端框架,让开发者更加灵活地选择框架。
4. 降低维护成本,减少代码冗余和重复的工作。
总之,前端组件库跨框架可以帮助开发者更加高效地开发和维护前端应用,提高产品的质量和用户体验。
如何开发
要实现前端组件库跨框架,需要使用一些技术手段。本文将要演示如何通过 common 适配层和 renderless 无渲染逻辑层实现跨框架组件库。
温馨提示:本文涉及到的代码较多,所以无法将所有代码都罗列出来,因此演示流程主要以分析思路为主,如果想要运行完整流程建议下载演示 Demo 查看源码和展示效果(文章最后会介绍如何下载和运行)
因为 TinyVue 组件库已具备同时兼容 Vue2 和 Vue3 的能力,所以本文以 React 和 Solid 为例,介绍如何开发一套复用现有 TinyVue 代码逻辑的跨框架组件库
首先开发 React 和 Solid 跨框架组件库主要分为几个步骤:
1、使用 pnpm 管理 monorepo 工程的组件库,可以更好的管理本地和线上依赖包。
2、创建 React 框架和 Solid 框架的 common 适配层,目的是抹平不同框架之间的差异,并对接 renderless 无渲染逻辑层。
3、实现无渲染逻辑层 renderless,目的是抽离与框架和渲染无关的业务逻辑,然后复用这部分逻辑。
4、创建模板层去对接 common 适配层和 renderless 无渲染层,从而实现了框架、模板和业务逻辑的分离。
下面演示下如何开发一个跨框架的组件库
一、使用 pnpm 管理 monorepo 工程的组件库
1、创建 monorepo 工程文件夹,使用 gitbash 输入以下命令(以下所有命令均在 gitbase 环境下运行)
- mkdir cross-framework-component
-
- cd cross-framework-component
-
- # 创建多包目录
- mkdir packages
2、在根目录下创建 package.json,并修改其内容
npm init -ypackage.json 内容主要分为两块:
(1)定义包管理工具和一些启动工程的脚本:
"preinstall": "npx only-allow pnpm" -- 本项目只允许使用 pnpm 管理依赖
"dev": "node setup.js" -- 启动无界微前端的主工程和所有子工程
"dev:home": "pnpm -C packages/home dev" -- 启动无界微前端的主工程(Vue3 框架)
"dev:react": "pnpm -C packages/react dev" -- 启动无界微前端的 React 子工程
"dev:solid": "pnpm -C packages/solid dev" -- 启动无界微前端的 Solid 子工程
"dev:vue2": "pnpm -C packages/vue2 dev" -- 启动无界微前端的 Vue2 子工程
"dev:vue3": "pnpm -C packages/vue3 dev" -- 启动无界微前端的 Vue3 子工程
(2)解决一些 pnpm 针对 Vue 不同版本(Vue2、Vue3)的依赖冲突,packageExtensions 项可以让 Vue2 相关依赖可以找到正确的 Vue 版本,从而可以正常加载 Vue2 和 Vue3 的组件。
package.json 内容如下:
- {
- "name": "@opentiny/cross-framework",
- "version": "1.0.0",
- "description": "",
- "main": "index.js",
- "scripts": {
- "preinstall": "npx only-allow pnpm",
- "dev": "node setup.js",
- "dev:home": "pnpm -C packages/home dev",
- "dev:react": "pnpm -C packages/react dev",
- "dev:solid": "pnpm -C packages/solid dev",
- "dev:vue2": "pnpm -C packages/vue2 dev",
- "dev:vue3": "pnpm -C packages/vue3 dev"
- },
- "repository": {
- "type": "git"
- },
- "keywords": [],
- "author": "",
- "license": "ISC",
- "dependencies": {
- "eslint": "8.48.0"
- },
- "pnpm": {
- "packageExtensions": {
- "vue-template-compiler@2.6.14": {
- "peerDependencies": {
- "vue": "2.6.14"
- }
- },
- "@opentiny/vue-locale@2.9.0": {
- "peerDependencies": {
- "vue": "2.6.14"
- }
- },
- "@opentiny/vue-common@2.9.0": {
- "peerDependencies": {
- "vue": "2.6.14"
- }
- }
- }
- }
- }

3、在根目录创建 pnpm-workspace.yaml 文件并配置如下:
- packages:
- - packages/** # packages文件夹下所有包含package.json的文件夹都是子包
4、创建组件源代码目录
- cd packages
- mkdir components
二、创建 React 框架和 Solid 框架的 common 适配层
将整个工程创建好之后,我们需要抹平不同框架之间的差异,这样才能实现一套代码能够去支持不同的框架,那如何来抹平不同框架之间的差异呢?这里出现一个重要概念--common 适配层 。它用来对接纯函数 renderless 无渲染逻辑层。
下面以 React 框架及 Solid 框架为例详细介绍如何构造两个框架的 common 适配层(Vue 的原理可以类比)
1、在上文创建的 components 文件夹中创建 React 和 Solid 文件夹,并初始化 package.json
- mkdir react
- mkdir solid
- cd react
- npm init -y
- cd ../solid
- npm init -y
package.json 的内容主要是把 dependencies 项中@opentiny/react-button 、@opentiny/react-countdown、@opentiny/solid-button、@opentiny/solid-countdown 4个依赖指向本地组件包,这是 pnpm 提供的本地包加载方式。
具体的配置如下所示:
@opentiny/react
- {
- "name": "@opentiny/react",
- "version": "1.0.0",
- "description": "",
- "main": "index.js",
- "scripts": {
- "test": "echo \"Error: no test specified\" && exit 1"
- },
- "keywords": [],
- "author": "",
- "license": "ISC",
- "dependencies": {
- "@opentiny/react-button": "workspace:~",
- "@opentiny/react-countdown": "workspace:~"
- }
- }
@opentiny/solid
- {
- "name": "@opentiny/solid",
- "version": "1.0.0",
- "description": "",
- "main": "index.js",
- "scripts": {
- "test": "echo \"Error: no test specified\" && exit 1"
- },
- "keywords": [],
- "author": "",
- "license": "ISC",
- "dependencies": {
- "@opentiny/solid-button": "workspace:~",
- "@opentiny/solid-countdown": "workspace:~"
- }
- }
2、在上文创建的 React 和 Solid 文件夹中创建适配层文件夹 common 并初始化package.json(路径:packages/components/react/common、packages/components/solid/common)
- mkdir common
- npm init -y
package.json 内容中的一些重要依赖项及其说明:
"@opentiny/renderless": "workspace:~" -- 使用本地的 renderless 包
"@opentiny/theme": "workspace:~" -- 使用本地的 theme 主题包
"classnames": "^2.3.2" -- 处理 html 标签的 class 类名
"ahooks": "3.7.8" -- 提供 React 响应式数据能力,对齐 Vue 的响应式数据
package.json 具体内容如下所示:
@opentiny/react-comon
- {
- "name": "@opentiny/react-common",
- "version": "1.0.0",
- "description": "",
- "main": "src/index.js",
- "keywords": [],
- "author": "",
- "license": "ISC",
- "dependencies": {
- "@opentiny/renderless": "workspace:~",
- "@opentiny/theme": "workspace:~",
- "// ---- 处理html标签的class类名 ----": "",
- "classnames": "^2.3.2",
- "// ---- 提供react响应式数据能力,对齐vue的响应式数据 ----": "",
- "ahooks": "3.7.8",
- "react": "18.2.0"
- }
- }
@opentiny/solid-common
- {
- "name": "@opentiny/solid-common",
- "version": "1.0.0",
- "description": "",
- "main": "src/index.js",
- "keywords": [],
- "author": "",
- "license": "ISC",
- "dependencies": {
- "@opentiny/renderless": "workspace:~",
- "@opentiny/theme": "workspace:~",
- "// ---- 处理html标签的class类名 ----": "",
- "classnames": "^2.3.2",
- "solid-js": "^1.7.8"
- }
- }
3、在上文创建的 common 文件夹中继续创建适配层逻辑页面(路径:packages/components/react/common、packages/components/solid/common)
- mkdir src
- cd src
- touch index.js
React 具体的目录结构如下:
- ├─ react
- │ ├─ common # react适配层
- │ │ ├─ package.json
- │ │ └─ src
- │ │ ├─ index.js
- │ ├─ index.js
- │ ├─ package.json
- │ ├─ README.md
- │ ├─ README.zh-CN.md
- │ └─ src
- │ ├─ button # react框架button组件的模板层
- │ │ ├─ package.json
- │ │ └─ src
- │ │ └─ pc.jsx
- │ └─ countdown # react框架倒计时组件的模板层
- │ ├─ package.json
- │ └─ src
- │ └─ pc.jsx
Solid 具体的目录结构如下:
- ├─ solid
- │ ├─ common # solid适配层
- │ │ ├─ package.json
- │ │ └─ src
- │ │ ├─ index.js
- │ ├─ index.js
- │ ├─ package.json
- │ ├─ README.md
- │ ├─ README.zh-CN.md
- │ └─ src
- │ ├─ button # solid框架button组件的模板层
- │ │ ├─ package.json
- │ │ └─ src
- │ │ └─ pc.jsx
- │ └─ countdown # solid框架倒计时组件的模板层
- │ ├─ package.json
- │ └─ src
- │ └─ pc.jsx
4、最后把 props 和无渲染逻辑层 renderless 导出的 api 进行适配 React 的处理,以下这两段代码主要是分别从三个方面来处理这个问题。
抹平响应式数据:为 React(Solid 本身具有响应式能力)提供响应式数据能力,从而可以复用 OpentinyVue 已经写好组件的 state 数据响应能力,React 使用了 ahooks 去模拟了 Vue 的响应式数据,并且可以在响应式数据变化的时候调用 React 的setState方法,从而触发了视图的渲染;而 Solid 只需要使用 createSignal 方法去创建响应式对象,并且在模板中使用 state().xxx去使用 Solid 自带的响应式能力,从而触发视图渲染。
抹平 Vue 的 nextTick:使用微任务 queueMicrotask 模拟 Vue 框架的 nextTick。
抹平事件触发机制:使用自定义方法模拟 Vue 框架的事件触发机制 emit。
其中 React 具体代码如下所示(路径:packages/components/react/common/src/index.js):
- import * as hooks from 'react'
- import '@opentiny/theme/base/index.less'
- import { useReactive } from 'ahooks' // 使用ahooks提供的useReactive抹平vue框架的响应式数据
-
- // 抹平vue框架的事件触发机制
- export const emit =
- (props) =>
- (evName, ...args) => {
- if (props[evName] && typeof props[evName] === 'function') {
- props[evName](...args)
- }
- }
-
- // 抹平vue框架的nextTick,等待 dom 更新后触发回调
- export const useNextTick = (callback) => {
- queueMicrotask(callback)
- }
-
- export const useSetup = ({
- props, // 模板层传递过来的props属性
- renderless, // renderless无渲染函数
- extendOptions = { framework: 'React' } // 模板层传递过来的额外参数
- }) => {
- const render =
- typeof props.tiny_renderless === 'function'
- ? props.tiny_renderless
- : renderless
- const utils = {
- parent: {},
- emit: emit(props)
- }
- const sdk = render(
- props,
- { ...hooks, useReactive, useNextTick },
- utils,
- extendOptions
- )
- return {
- ...sdk,
- type: props.type ?? 'default'
- }
- }
其中 Solid 具体代码如下所示(路径:packages/components/solid/common/src/index.js):
- import * as hooks from 'solid-js'
- import { createSignal } from 'solid-js'
- import '@opentiny/theme/base/index.less'
-
- const EVENTS_PREFIX = 'on'
-
- // 处理solid事件触发机制
- export const emit =
- (props) =>
- (evName, ...args) => {
- const eventsName = `${EVENTS_PREFIX}${evName[0].toLocaleUpperCase()}${evName.slice(
- 1
- )}`
- if (props[eventsName] && typeof props[eventsName] === 'function') {
- props[eventsName](...args)
- }
- }
-
- export const useSetState = (initialState) => {
- // equals: false 配置非常重要,保证state对象属性发生变化后视图可以更新
- const [state, setState] = createSignal(initialState, { equals: false })
-
- return [state, setState]
- }
-
- // props 应该不用做处理, props 都是 . 访问。
- export const useReactive = (staticObject) => {
- const [state, setState] = useSetState(staticObject)
-
- return {
- state,
- // 这里提供代理对象提供给renderless无渲染层使用
- proxy: new Proxy(state(), {
- get(target, property) {
- if (typeof target[property] === 'function') {
- return target[property](target)
- } else {
- return target[property]
- }
- },
- set(target, property, value) {
- Reflect.set(target, property, value)
- setState((val) => val)
- return true
- }
- })
- }
- }
-
- // nextTick, 等待 dom 更新后触发回调
- export const useNextTick = (callback) => {
- queueMicrotask(callback)
- }
-
- // emitEvent, dispath, broadcast
- export const emitEvent = () => {
- const broadcast = () => {
- return ''
- }
-
- return {
- dispatch: () => {
- return ''
- },
- broadcast
- }
- }
-
- export const useSetup = ({
- props,
- renderless,
- extendOptions = { framework: 'Solid' }
- }) => {
- const render =
- typeof props.tiny_renderless === 'function'
- ? props.tiny_renderless
- : renderless
- const utils = {
- parent: {},
- emit: emit(props)
- }
- const sdk = render(
- props,
- { ...hooks, useReactive, useNextTick },
- utils,
- extendOptions
- )
- return {
- ...sdk,
- type: props.type ?? 'default'
- }
- }
三、无渲染逻辑层 renderless 实现
接下来介绍下实现跨端组件库的第二个重要概念:renderless 无渲染层 -- 这块分为两部分:一个是与框架相关的入口函数文件(react.js、vue.js、solid.js)另外一个是与框架无关的纯函数文件(index.js)。
1、在 components 文件夹中创建 renderless 文件夹,并初始化 package.json
- mkdir renderless
- npm init -y
package.json 文件内容如下所示(其中 exports 项表示所有加载的资源都会从 randerless 目录下的 src 文件夹中按文件路径寻找):
- {
- "name": "@opentiny/renderless",
- "version": "3.9.0",
- "sideEffects": false,
- "type": "module",
- "exports": {
- "./package.json": "./package.json",
- "./*": "./src/*"
- }
- }
2、以 React 和 Solid 为例,采用无渲染逻辑的复用方式
首先看下 renderless 需要创建的文件夹和文件(注意:这里只是罗列了 renderless 文件夹中的文件结构,外部文件结构省略了):
- ├─ renderless
- │ ├─ package.json
- │ ├─ README.md
- │ ├─ README.zh-CN.md
- │ └─ src
- │ ├─ button
- │ │ ├─ index.js # 公共逻辑层
- │ │ ├─ react.js # react相关api层
- │ │ ├─ solid.js # solid相关api层
- │ │ └─ vue.js # vue相关api层
react.js 和solid.js 是@opentiny/react-button 组件和@opentiny/solid-button组件的 renderless 入口文件,它负责去对接 React 和 Solid 的适配层@opentiny/react-common,主要功能是去调用一些 React 和 Solid 相关的 api,比如生命周期函数等,在 renderless 函数最后返回了 state 响应式对象和一些方法,提供给 React 和 Solid 的函数式组件使用。
文件主要有两个需要注意的点:
(1)使用 common 适配层传递过来的 useReactive 函数返回基于 React 和 Solid 的响应式数据,对齐 Vue 的响应式数据
(2)使用双层函数(闭包)保存了一些组件状态,方便用户和模板层调用方法。
react.js 具体代码内容如下所示:
- import { handleClick, clearTimer } from './index'
-
- export const api = ['state', 'handleClick']
-
- export default function renderless(
- props,
- { useReactive },
- { emit },
- { framework }
- ) {
- // 利用ahooks提供的useReactive模拟vue的响应式数据,并且使用react的useRef防止响应式数据被重复执行定义
- const state = useReactive({
- timer: null,
- disabled: !!props.disabled,
- plain: props.plain,
- formDisabled: false
- })
-
- const api = {
- state,
- clearTimer: clearTimer(state),
- handleClick: handleClick({ emit, props, state, framework })
- }
-
- return api
- }
solid.js具体代码内容如下所示:
- import { handleClick, clearTimer } from './index'
-
- export const api = ['state', 'handleClick']
-
- export default function renderless(
- props,
- { useReactive },
- { emit },
- { framework }
- ) {
- // prox是state执行时候的原始对象的代理
- const { state, proxy } = useReactive({
- timer: null,
- disabled: !!props.disabled,
- plain: props.plain
- })
-
- const api = {
- state,
- clearTimer: clearTimer(proxy),
- handleClick: handleClick({ emit, props, state: proxy, framework })
- }
-
- return api
- }
index.js 是和 React、Solid、Vue 三大框架无关只和业务逻辑有关的公共逻辑层,因此这部分代码是和框架无关的纯业务逻辑代码。
index.js 逻辑层一般都是双层函数(闭包:函数返回函数),第一层函数保存了一些组件状态,第二层函数可以很方便的让用户和模板层调用。
这里介绍下 button 组件的纯逻辑层的两个函数:
(1)handleClick:当点击按钮时会触发 handleClick 内层函数,如果用户传递的重置时间大于零,则在点击之后会设置按钮的 disabled 属性为 true 禁用按钮,并在重置时间后解除按钮禁用,然后打印出当前逻辑触发是来自哪个框架,并向外抛出 click 点击事件;
(2)clearTimer:调用 clearTimer 方法可以快速清除组件的 timer 定时器。
具体内容如下所示:
- export const handleClick =
- ({ emit, props, state, framework }) =>
- (event) => {
- if (props.nativeType === 'button' && props.resetTime > 0) {
- state.disabled = true
- state.timer = setTimeout(() => {
- state.disabled = false
- }, props.resetTime)
- }
-
- console.log(`${framework}框架代码已触发!!!!!!!!!`)
-
- emit('click', event)
- }
-
- export const clearTimer = (state) => () => clearTimeout(state.timer)
四、创建模板层去对接 common 适配层和 renderless 无渲染层
由于需要创建的文件太多,为了方便操作,可以直接参考我们提供的示例源码工程查看(https://github.com/opentiny/cross-framework-component/tree/master/packages/components/react/src)
React 具体的目录结构如下:
- ├─ react
- │ ├─ common # react适配层
- │ │ ├─ package.json
- │ │ └─ src
- │ │ ├─ index.js
- │ ├─ index.js
- │ ├─ package.json
- │ ├─ README.md
- │ ├─ README.zh-CN.md
- │ └─ src
- │ ├─ button # react框架button组件的模板层
- │ │ ├─ package.json
- │ │ └─ src
- │ │ └─ pc.jsx
- │ └─ countdown # react框架倒计时组件的模板层
- │ ├─ package.json
- │ └─ src
- │ └─ pc.jsx
(https://github.com/opentiny/cross-framework-component/tree/master/packages/components/solid/src)
Solid 具体的目录结构如下:
- ├─ solid
- │ ├─ common # solid适配层
- │ │ ├─ package.json
- │ │ └─ src
- │ │ ├─ index.js
- │ ├─ index.js
- │ ├─ package.json
- │ ├─ README.md
- │ ├─ README.zh-CN.md
- │ └─ src
- │ ├─ button # solid框架button组件的模板层
- │ │ ├─ package.json
- │ │ └─ src
- │ │ └─ pc.jsx
- │ └─ countdown # solid框架倒计时组件的模板层
- │ ├─ package.json
- │ └─ src
- │ └─ pc.jsx
这里创建的模板层和一般的 React 和 Solid 函数式组件类似,都是接受使用组件的用户传递过来的属性,并返回需要渲染的 jsx 模板。不一样的地方是:jsx 绑定的数据是通过适配层和 renderless 无渲染层处理后的数据,并且数据发生变化的时候会触发视图渲染,比如下面代码中 useSetup 方法。
pc.jsx 的具体实现如下所示(React 路径:packages/components/react/src/button/src/pc.jsx):
- import renderless from '@opentiny/renderless/button/react' // renderless无渲染层import { useSetup } from '@opentiny/react-common' // 抹平不同框架的适配层
- import '@opentiny/theme/button/index.less' // 复用OpenTinyVue的样式文件
-
- export default function Button(props) {
- const {
- children,
- text,
- autofocus,
- round,
- circle,
- icon: Icon,
- size,
- nativeType = 'button'
- } = props
- // 通过common适配层的useSetup处理props和renderless无渲染层
- const { handleClick, state, tabindex, type, $attrs } = useSetup({
- props: { nativeType: 'button', resetTime: 1000, ...props },
- renderless
- })
-
- const className = [
- 'tiny-button',
- type ? 'tiny-button--' + type : '',
- size ? 'tiny-button--' + size : '',
- state.disabled ? 'is-disabled' : '',
- state.plain ? 'is-plain' : '',
- round ? 'is-round' : '',
- circle ? 'is-circle' : ''
- ]
- .join(' ')
- .trim()
- return (
- <button
- className={className}
- onClick={handleClick}
- disabled={state.disabled}
- autoFocus={autofocus}
- type={nativeType}
- tabIndex={tabindex}
- {...$attrs}>
- {Icon ? <Icon className={text || children ? 'is-text' : ''} /> : ''}
- <span>{children || text}</span>
- </button>
- )
- }
(Solid 路径:packages/components/solid/src/button/src/pc.jsx):
- import renderless from '@opentiny/renderless/button/solid' // renderless无渲染层
- import { useSetup } from '@opentiny/solid-common' // 抹平不同框架的适配层
- import '@opentiny/theme/button/index.less' // 复用OpenTinyVue的样式文件
-
- export default function Button(props) {
- const {
- children,
- text,
- autofocus,
- round,
- circle,
- icon: Icon,
- size,
- nativeType = 'button'
- } = props
- // 通过common适配层的useSetup处理props和renderless无渲染层
- const { handleClick, state, tabindex, type, $attrs } = useSetup({
- props: { nativeType: 'button', resetTime: 1000, ...props },
- renderless
- })
-
- // 这里需要注意在模板中需要调用state函数才能正常使用solid的响应式能力
- return (
- <button
- className={[
- 'tiny-button',
- type ? 'tiny-button--' + type : '',
- size ? 'tiny-button--' + size : '',
- state().disabled ? 'is-disabled' : '',
- state().plain ? 'is-plain' : '',
- round ? 'is-round' : '',
- circle ? 'is-circle' : ''
- ]
- .join(' ')
- .trim()}
- onClick={handleClick}
- disabled={state().disabled}
- autoFocus={autofocus}
- type={nativeType}
- tabIndex={tabindex}
- {...$attrs}>
- {Icon ? <Icon className={text || children ? 'is-text' : ''} /> : ''}
- <span>{children || text}</span>
- </button>
- )
- }
到此大体上描述了跨框架组件库的实现原理。
Demo演示
如果想快速查看效果和源码,可以克隆我们提供的跨框架示例 Demo,具体操作步骤如下:
1、使用如下命令把演示 Demo 克隆到本地:
git clone https://github.com/opentiny/cross-framework-component.git2、使用 pnpm 下载依赖:
- pnpm i
-
- # 如果没有pnpm需要执行以下命令
- npm i pnpm -g
3、工程目录结构分析
整个工程是基于 pnpm 搭建的多包 monorepo 工程,演示环境为无界微前端环境,整体工程的目录架构如下所示(本文主要介绍 packages/components 文件夹):
- ├─ package.json
- ├─ packages
- │ ├─ components # 组件库文件夹
- │ │ ├─ react # react组件库及其适配层
- │ │ ├─ renderless # 跨框架复用的跨框架无渲染逻辑层
- │ │ ├─ solid # solid组件库及其适配层
- │ │ ├─ theme # 跨框架复用的pc端样式层
- │ │ ├─ theme-mobile # 移动端模板样式层
- │ │ ├─ theme-watch # 手表带模板样式层
- │ │ └─ vue # vue组件库及其适配层
- │ ├─ element-to-opentiny # element-ui切换OpenTiny演示工程
- │ ├─ home # 基于vue3搭建无界微前端主工程
- │ ├─ react # 基于react搭建无界微前端子工程
- │ ├─ solid # 基于solid搭建无界微前端子工程
- │ ├─ vue2 # 基于vue2搭建无界微前端子工程
- │ └─ vue3 # 基于vue3搭建无界微前端子工程
- ├─ pnpm-workspace.yaml
- ├─ README.md
- ├─ README.zh-CN.md
- └─ setup.js
4、启动本地的无界微前端本地服务
pnpm dev启动后会总共启动5个工程,1个主工程和4个子工程,其中4个子工程分别引入了不同框架的组件库,但是不同框架的组件库复用了同一份交互逻辑代码和样式文件。
效果如下图所示:

如何证明 Vue2、Vue3、React、Solid 都共用了一套逻辑了呢?
我们可以点击按钮然后会在控制台打印,当前复用逻辑层是来自哪些不同的框架的:
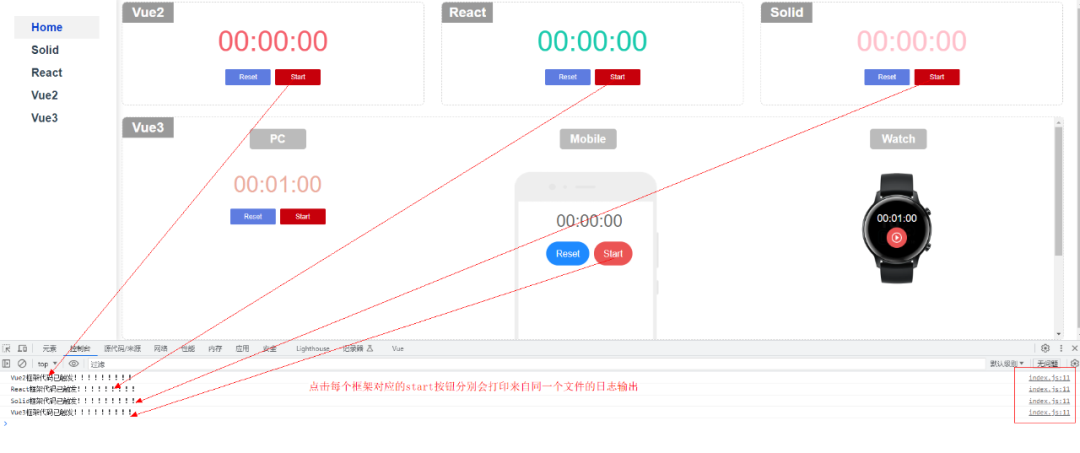
可以看到不同框架代码都已触发。
感兴趣的朋友可以持续关注我们TinyVue组件库。也欢迎给 TinyVue 开源项目点个 Star
Copyright © 2003-2013 www.wpsshop.cn 版权所有,并保留所有权利。

