Ubuntu 20.04 LTS 安装zabbix监控部署_ubuntu20.04安装zabbix
赞
踩
一、准备环境直接开搞
(1)准备一台虚拟机或者云服务器,本文环境云服务器
操作系统:Ubuntu 20.04 LTS
zabbix官网:下载Zabbix![]() https://www.zabbix.com/cn/download
https://www.zabbix.com/cn/download
(2)找到官网zabbix安装手册,选择对应的zabbix版本,我这里选择zabbix 6.0
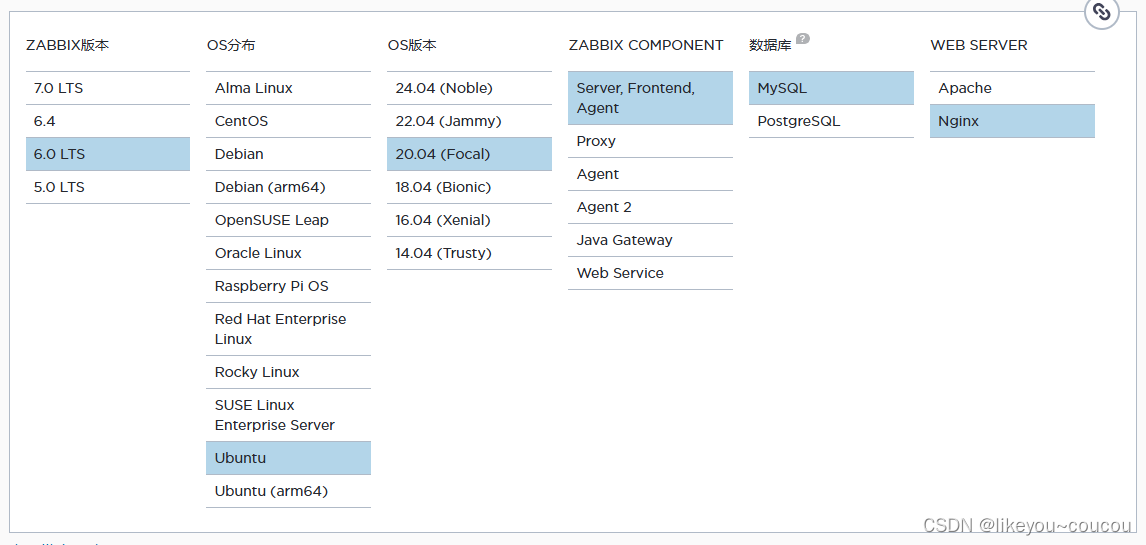
二、话不多说直接进行zabbix server安装操作
(1)下载zabbix安装包
wget https://repo.zabbix.com/zabbix/6.0/ubuntu/pool/main/z/zabbix-release/zabbix-release_6.0-4+ubuntu20.04_all.deb
- root@10-7-81-96:~# wget https://repo.zabbix.com/zabbix/6.0/ubuntu/pool/main/z/zabbix-release/zabbix-release_6.0-4+ubuntu18.04_all.deb
- --2024-07-02 11:27:34-- https://repo.zabbix.com/zabbix/6.0/ubuntu/pool/main/z/zabbix-release/zabbix-release_6.0-4+ubuntu18.04_all.deb
- Resolving repo.zabbix.com (repo.zabbix.com)... 178.128.6.101, 2604:a880:2:d0::2062:d001
- Connecting to repo.zabbix.com (repo.zabbix.com)|178.128.6.101|:443... connected.
- HTTP request sent, awaiting response... 200 OK
- Length: 3672 (3.6K) [application/octet-stream]
- Saving to: ‘zabbix-release_6.0-4+ubuntu20.04_all.deb’
-
- zabbix-release_6.0-4+ubuntu18.04_all.de 100%[==============================================================================>] 3.59K --.-KB/s in 0s
-
- 2024-07-02 11:27:35 (702 MB/s) - ‘zabbix-release_6.0-4+ubuntu20.04_all.deb’ saved [3672/3672]
-
- root@10-7-81-96:~#
(2) 进行zabbix安装,如果使用root用户则不会报错,使用Ubuntu用户直接安装会报错(如下图一),权限不足,使用sudo命令提权
sudo dpkg -i zabbix-release_6.0-4+ubuntu20.04_all.deb
- ubuntu@10-7-81-96:~$ dpkg -i zabbix-release_6.0-4+ubuntu18.04_all.deb
- dpkg: error: requested operation requires superuser privilege
- ubuntu@10-7-81-96:~$
- ubuntu@10-7-81-96:~$ sudo dpkg -i zabbix-release_6.0-4+ubuntu18.04_all.deb
- Selecting previously unselected package zabbix-release.
- (Reading database ... 95416 files and directories currently installed.)
- Preparing to unpack zabbix-release_6.0-4+ubuntu18.04_all.deb ...
- Unpacking zabbix-release (1:6.0-4+ubuntu18.04) ...
- Setting up zabbix-release (1:6.0-4+ubuntu18.04) ...
- ubuntu@10-7-81-96:~$ ls
- root@10-7-81-96:~# dpkg -i zabbix-release_6.0-4+ubuntu18.04_all.deb
- Selecting previously unselected package zabbix-release.
- (Reading database ... 95416 files and directories currently installed.)
- Preparing to unpack zabbix-release_6.0-4+ubuntu18.04_all.deb ...
- Unpacking zabbix-release (1:6.0-4+ubuntu18.04) ...
- Setting up zabbix-release (1:6.0-4+ubuntu18.04) ...
- root@10-7-81-96:~#
(3)更新Ubuntu源,更新之后最好reboot重新一下系统,使系统安装包已经内核生效
apt update
- root@10-7-81-96:~$ apt update
- Hit:1 http://mirrors.ucloud.cn/ubuntu bionic InRelease
- Get:2 http://mirrors.ucloud.cn/ubuntu bionic-security InRelease [102 kB]
- Get:3 http://mirrors.ucloud.cn/ubuntu bionic-updates InRelease [102 kB]
- Get:4 http://mirrors.ucloud.cn/ubuntu bionic-backports InRelease [102 kB]
- Get:5 http://mirrors.ucloud.cn/ubuntu bionic-proposed InRelease [251 kB]
- Get:6 http://mirrors.ucloud.cn/ubuntu bionic-security/main Sources [301 kB]
- Get:7 http://mirrors.ucloud.cn/ubuntu bionic-security/multiverse Sources [12.2 kB]
- Get:8 http://mirrors.ucloud.cn/ubuntu bionic-security/restricted Sources [32.4 kB]
- Get:9 http://mirrors.ucloud.cn/ubuntu bionic-security/universe Sources [337 kB]
- Get:10 http://mirrors.ucloud.cn/ubuntu bionic-security/main i386 Packages [1,379 kB]
- Get:11 http://mirrors.ucloud.cn/ubuntu bionic-security/main amd64 Packages [2,717 kB]
- Get:12 http://mirrors.ucloud.cn/ubuntu bionic-security/main Translation-en [467 kB]
- Get:13 http://mirrors.ucloud.cn/ubuntu bionic-security/restricted i386 Packages [33.0 kB]
- Get:14 http://mirrors.ucloud.cn/ubuntu bionic-security/restricted amd64 Packages [1,317 kB]
- ......中间省略......
- Get:63 https://repo.zabbix.com/zabbix/6.0/ubuntu bionic/main all Packages [18.2 kB]
- Get:64 https://repo.zabbix.com/zabbix/6.0/ubuntu bionic/main amd64 Packages [85.5 kB]
- Fetched 22.9 MB in 5s (4,805 kB/s)
- Reading package lists... Done
- Building dependency tree
- Reading state information... Done
- 277 packages can be upgraded. Run 'apt list --upgradable' to see them.
- root@10-7-81-96:~$

(4)安装Zabbix server,Web前端,agent
apt install zabbix-server-mysql zabbix-frontend-php zabbix-nginx-conf zabbix-sql-scripts zabbix-agent
- root@10-7-81-96:~$ apt install zabbix-server-mysql zabbix-frontend-php zabbix-nginx-conf zabbix-sql-scripts zabbix-agent
- Reading package lists... Done
- Building dependency tree
- Reading state information... Done
- The following additional packages will be installed:
- fontconfig-config fonts-dejavu fonts-dejavu-core fonts-dejavu-extra fping libaio1 libfontconfig1 libgd3 libjbig0 libjpeg-turbo8 libjpeg8 libmysqlclient20
- libnginx-mod-http-geoip libnginx-mod-http-image-filter libnginx-mod-http-xslt-filter libnginx-mod-mail libnginx-mod-stream libodbc1 libopenipmi0
- libpcre2-8-0 libsensors4 libsnmp-base libsnmp30 libsodium23 libssh-4 libtiff5 libwebp6 libx11-6 libx11-data libxau6 libxcb1 libxdmcp6 libxpm4 libxslt1.1
- mysql-client mysql-client-5.7 mysql-client-core-5.7 mysql-common nginx nginx-common nginx-core php-bcmath php-common php-fpm php-gd php-ldap php-mbstring
- php-mysql php-xml php7.2-bcmath php7.2-cli php7.2-common php7.2-fpm php7.2-gd php7.2-json php7.2-ldap php7.2-mbstring php7.2-mysql php7.2-opcache
- php7.2-readline php7.2-xml snmpd
- Suggested packages:
- libgd-tools libmyodbc odbc-postgresql tdsodbc unixodbc-bin lm-sensors snmp-mibs-downloader fcgiwrap nginx-doc ssl-cert php-pear snmptrapd
- zabbix-apache-conf virtual-mysql-server
- The following NEW packages will be installed:
- fontconfig-config fonts-dejavu fonts-dejavu-core fonts-dejavu-extra fping libaio1 libfontconfig1 libgd3 libjbig0 libjpeg-turbo8 libjpeg8 libmysqlclient20
- libnginx-mod-http-geoip libnginx-mod-http-image-filter libnginx-mod-http-xslt-filter libnginx-mod-mail libnginx-mod-stream libodbc1 libopenipmi0
- libpcre2-8-0 libsensors4 libsnmp-base libsnmp30 libsodium23 libssh-4 libtiff5 libwebp6 libx11-6 libx11-data libxau6 libxcb1 libxdmcp6 libxpm4 libxslt1.1
- mysql-client mysql-client-5.7 mysql-client-core-5.7 mysql-common nginx nginx-common nginx-core php-bcmath php-common php-fpm php-gd php-ldap php-mbstring
- php-mysql php-xml php7.2-bcmath php7.2-cli php7.2-common php7.2-fpm php7.2-gd php7.2-json php7.2-ldap php7.2-mbstring php7.2-mysql php7.2-opcache
- php7.2-readline php7.2-xml snmpd zabbix-agent zabbix-frontend-php zabbix-nginx-conf zabbix-server-mysql zabbix-sql-scripts
- 0 upgraded, 67 newly installed, 0 to remove and 277 not upgraded.
- Need to get 38.7 MB of archives.
- After this operation, 166 MB of additional disk space will be used.
- Do you want to continue? [Y/n] y #这里选择yes 进行下载安装
-

(5)创建初始数据库,如果进入数据库失败报错如下,重新安装mysql
apt install mysql-server
- root@10-7-81-96:~# mysql -uroot -p
- Enter password:
- ERROR 2002 (HY000): Can't connect to local MySQL server through socket '/var/run/mysqld/mysqld.sock' (2)
- root@10-7-81-96:~#
- 检查MySQL是否启动,看到MySQL并没有启动,连命令都没有找到
- root@10-7-81-96:~# systemctl status mysql
- Unit mysql.service could not be found.
- root@10-7-81-96:~# systemctl status mysql.service
- Unit mysqld.service could not be found.
- 重装一下mysql-server
- root@10-7-81-96# apt install mysql-server
- Reading package lists... Done
- Building dependency tree
- Reading state information... Done
- The following additional packages will be installed:
- libcgi-fast-perl libcgi-pm-perl libencode-locale-perl libevent-core-2.1-7 libevent-pthreads-2.1-7 libfcgi-perl
- libhtml-parser-perl libhtml-tagset-perl libhtml-template-perl libhttp-date-perl libhttp-message-perl libio-html-perl
- liblwp-mediatypes-perl libmecab2 libtimedate-perl liburi-perl mecab-ipadic mecab-ipadic-utf8 mecab-utils
- mysql-server-8.0 mysql-server-core-8.0
- Suggested packages:
- libdata-dump-perl libipc-sharedcache-perl libwww-perl mailx tinyca
- The following NEW packages will be installed:
- libcgi-fast-perl libcgi-pm-perl libencode-locale-perl libevent-core-2.1-7 libevent-pthreads-2.1-7 libfcgi-perl
- libhtml-parser-perl libhtml-tagset-perl libhtml-template-perl libhttp-date-perl libhttp-message-perl libio-html-perl
- liblwp-mediatypes-perl libmecab2 libtimedate-perl liburi-perl mecab-ipadic mecab-ipadic-utf8 mecab-utils mysql-server
- mysql-server-8.0 mysql-server-core-8.0
- 0 upgraded, 22 newly installed, 0 to remove and 322 not upgraded.
- Need to get 31.8 MB of archives.
- After this operation, 244 MB of additional disk space will be used.
- Do you want to continue? [Y/n] y
- ......
- 安装完成后,检查MySQL是否启动
- root@10-7-81-96:~# systemctl status mysql
- ● mysql.service - MySQL Community Server
- Loaded: loaded (/lib/systemd/system/mysql.service; enabled; vendor preset: enabled)
- Active: active (running) since Wed 2024-07-03 14:32:41 HKT; 22s ago
- Main PID: 12386 (mysqld)
- Status: "Server is operational"
- Tasks: 38 (limit: 4389)
- Memory: 365.5M
- CGroup: /system.slice/mysql.service
- └─12386 /usr/sbin/mysqld
- Jul 03 14:32:40 10-7-81-96 systemd[1]: Starting MySQL Community Server...
- Jul 03 14:32:41 10-7-81-96 systemd[1]: Started MySQL Community Server.

(6)正常启动MySQL,再次创建数据库
mysql -uroot -p
password
mysql> create database zabbix character set utf8mb4 collate utf8mb4_bin;
mysql> create user zabbix@localhost identified by 'password';
mysql> grant all privileges on zabbix.* to zabbix@localhost;
mysql> set global log_bin_trust_function_creators = 1;
mysql> quit;
- root@10-7-81-96:~# mysql -uroot -p
- Enter password:password #默认是password
- Welcome to the MySQL monitor. Commands end with ; or \g.
- Your MySQL connection id is 8
- Server version: 8.0.37-0ubuntu0.20.04.3 (Ubuntu)
-
- Copyright (c) 2000, 2024, Oracle and/or its affiliates.
-
- Oracle is a registered trademark of Oracle Corporation and/or its
- affiliates. Other names may be trademarks of their respective
- owners.
-
- Type 'help;' or '\h' for help. Type '\c' to clear the current input statement.
-
- mysql> create database zabbix character set utf8mb4 collate utf8mb4_bin;
- Query OK, 1 row affected (0.01 sec)
-
- mysql> create user zabbix@localhost identified by 'password';
- Query OK, 0 rows affected (0.01 sec)
-
- mysql> grant all privileges on zabbix.* to zabbix@localhost;
- Query OK, 0 rows affected (0.01 sec)
-
- mysql> set global log_bin_trust_function_creators = 1;
- Query OK, 0 rows affected, 1 warning (0.00 sec)
-
- mysql> quit;
- Bye

(7)导入初始架构和数据,输入新创建的密码。
zcat /usr/share/zabbix-sql-scripts/mysql/server.sql.gz | mysql --default-character-set=utf8mb4 -uzabbix -p zabbix
- root@10-7-81-96:~# zcat /usr/share/zabbix-sql-scripts/mysql/server.sql.gz | mysql --default-character-set=utf8mb4 -uzabbix -p zabbix
- Enter password:
- root@10-7-81-96:~#
(8)导入数据库架构后禁用log_bin_trust_function_creators选项。
- root@10-7-81-96:~# mysql -uroot -p
- Enter password:
- Welcome to the MySQL monitor. Commands end with ; or \g.
- Your MySQL connection id is 10
- Server version: 8.0.37-0ubuntu0.20.04.3 (Ubuntu)
-
- Copyright (c) 2000, 2024, Oracle and/or its affiliates.
-
- Oracle is a registered trademark of Oracle Corporation and/or its
- affiliates. Other names may be trademarks of their respective
- owners.
-
- Type 'help;' or '\h' for help. Type '\c' to clear the current input statement.
-
- mysql> set global log_bin_trust_function_creators = 0;
- Query OK, 0 rows affected, 1 warning (0.00 sec)
-
- mysql> quit;
- Bye

(9)配置Zabbix server数据库密码,找到DBpassword这行,取消注释填写密码
vim /etc/zabbix/zabbix_server.conf
- ### Option: DBPassword
- # Database password.
- # Comment this line if no password is used.
- #
- # Mandatory: no
- # Default:
- # DBPassword=
- DBPassword=password
-
(10)配置Zabbix前端PHP,编辑配置文件,将这两行注释取消即可
vim /etc/zabbix/nginx.conf
- server {
- listen 8080;
- server_name example.com;
-
(11)重启启动zabbix server和agent进程,并设置开机自启动
systemctl restart zabbix-server zabbix-agent nginx php7.4-fpm
systemctl enable zabbix-server zabbix-agent nginx php7.4-fpm
- root@10-7-81-96:~# systemctl restart zabbix-server zabbix-agent nginx php7.4-fpm
- root@10-7-81-96:~# systemctl enable zabbix-server zabbix-agent nginx php7.4-fpm
- Synchronizing state of zabbix-server.service with SysV service script with /lib/systemd/systemd-sysv-install.
- Executing: /lib/systemd/systemd-sysv-install enable zabbix-server
- Synchronizing state of zabbix-agent.service with SysV service script with /lib/systemd/systemd-sysv-install.
- Executing: /lib/systemd/systemd-sysv-install enable zabbix-agent
- Synchronizing state of nginx.service with SysV service script with /lib/systemd/systemd-sysv-install.
- Executing: /lib/systemd/systemd-sysv-install enable nginx
- Synchronizing state of php7.4-fpm.service with SysV service script with /lib/systemd/systemd-sysv-install.
- Executing: /lib/systemd/systemd-sysv-install enable php7.4-fpm
- Created symlink /etc/systemd/system/multi-user.target.wants/zabbix-server.service → /lib/systemd/system/zabbix-server.service.
- root@10-7-81-96:~#
注意:云服务器需要在防火墙开启对应的端口,例如3306,8080端口!!不然直接外网IP访问会失败!!
三、zabbix前端网页访问
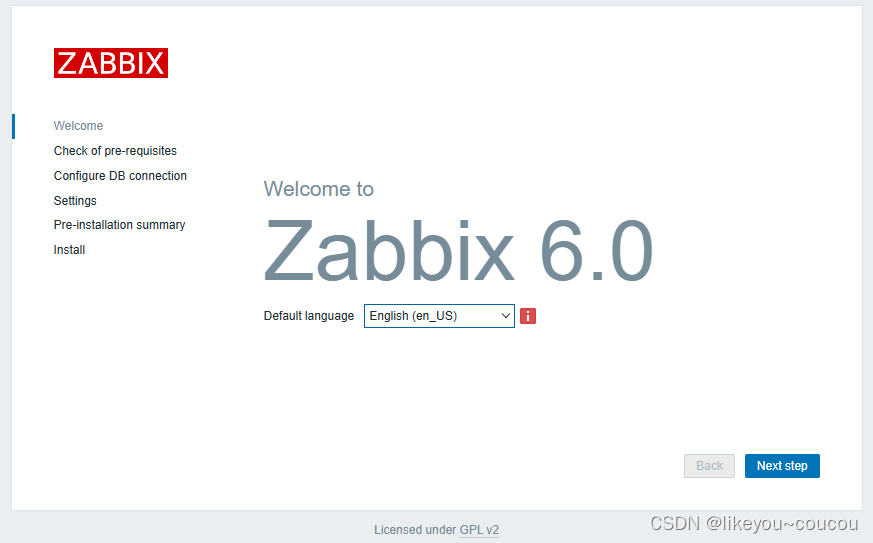
(1)网页访问进行zabbix:http://ip:8080/即可,如下图,一直点击下一步即可
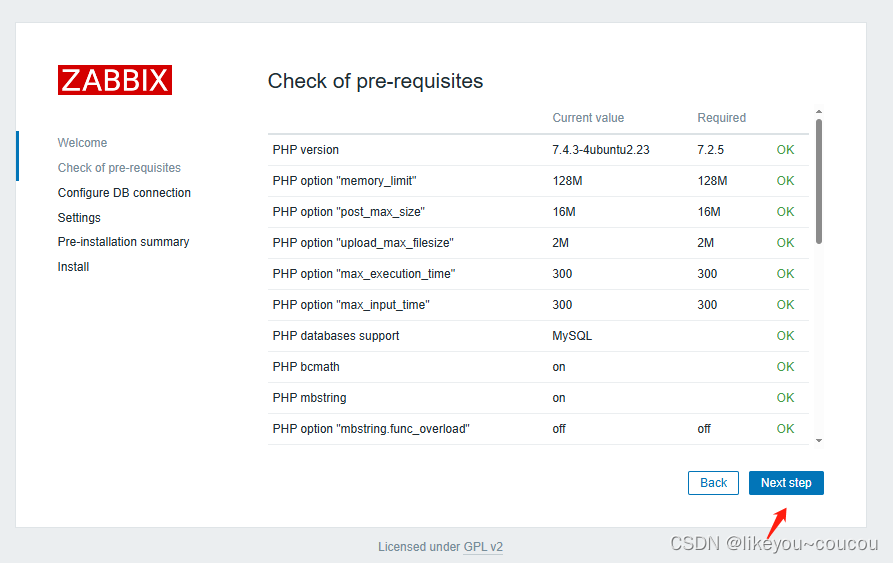
(2)都是正常的即可下一步
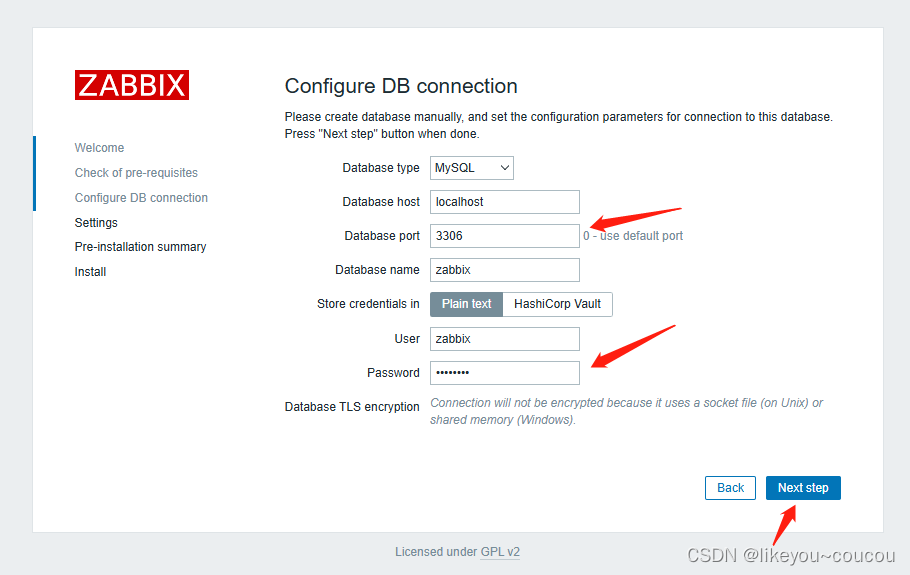
(3)需要输入zabbix数据库密码(步骤11配置的),数据库端口根据需求定义即可
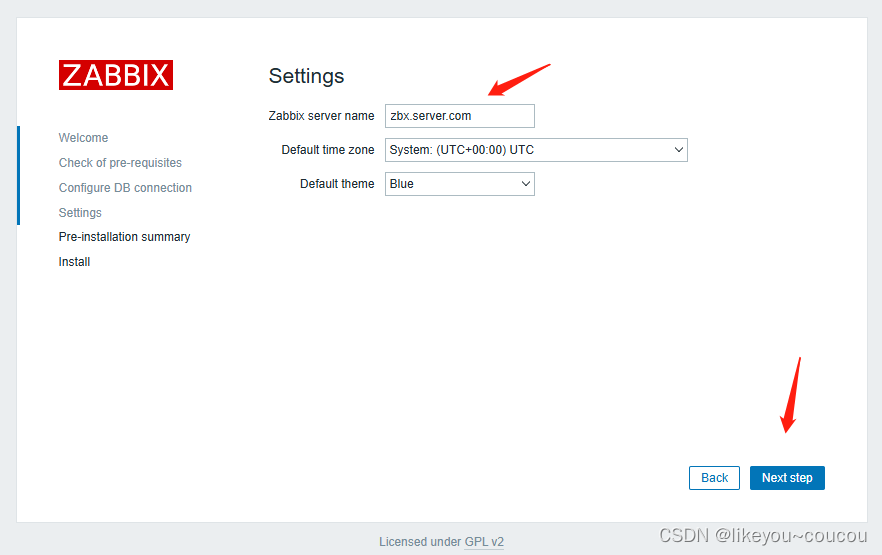
(4)设置主机名,根据自己情况定义即可
(5)检查一下用户,密码都没有问题之后即可
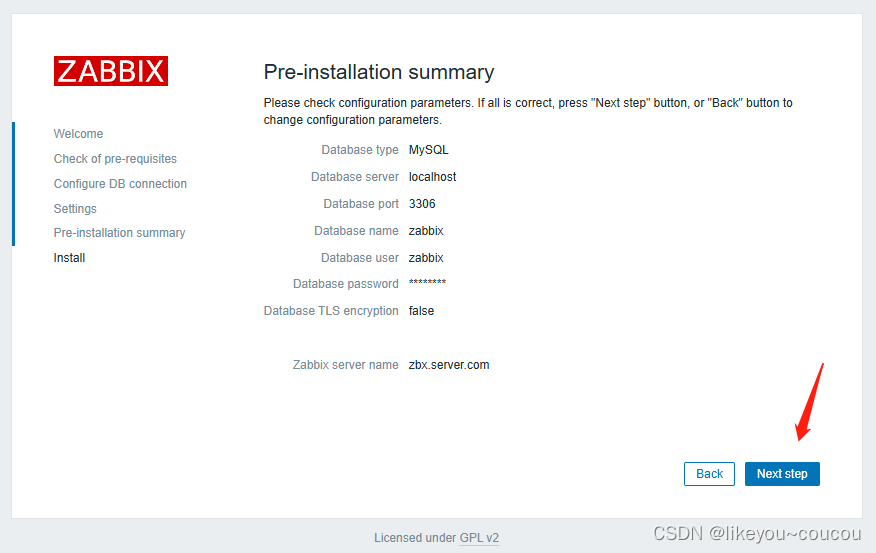
(6)出现下面界面,说明zabbix前端已经配置声明:本文内容由网友自发贡献,不代表【wpsshop博客】立场,版权归原作者所有,本站不承担相应法律责任。如您发现有侵权的内容,请联系我们。转载请注明出处:https://www.wpsshop.cn/w/煮酒与君饮/article/detail/881787
Copyright © 2003-2013 www.wpsshop.cn 版权所有,并保留所有权利。


