
热门标签
热门文章
- 1基于neo4j知识图谱+flask的大数据医疗领域知识问答系统(完整源码+源码解析+开发文档+视频讲解等资料_基于neo4j知识图谱的医疗问答系统
- 2chatgpt赋能python:Python怎么抢票?_抢票机器人
- 3互联网这么卷,还有必要入行吗?_互联网很卷吗
- 4自定义ViePage实现禁用滑动和释放的效果_52gao.arg
- 53 redis线程IO模型_redis底层磁盘及io模型
- 6Springboot计算机毕业设计基于微信小程序云开发的购物商城【附源码】开题+论文+mysql+程序+部署_基于微信小程序的智慧商场系统的设计与实现
- 7Python中的math库_python math
- 8MobaXterm 中文乱码_mobaxterm如何设置中文
- 9C++读文件很难么?std::copy的骚操作(实用的用法)!_std::copy vector
- 10Linux源码安装pgadmin4,Linux 服务器部署 PgAdmin 4 Server
当前位置: article > 正文
微信小程序上传图片到阿里云oss(纯前端)_微信小程序上传图片到oss
作者:爱喝兽奶帝天荒 | 2024-06-21 04:15:51
赞
踩
微信小程序上传图片到oss
之前一篇主要写关于vue上传到阿里云服务oss上面,文章地址:vue上传图片到阿里云oss
根据业务需要还需要做小程序端上传,故而也记录一下
1. 准备工作
1.2 小程序后台配置阿里云地址
1.2.1 添加合法域名
小程序后台地址:后台管理地址
步骤:登录小程序后台 → 开发 → 开发管理 → 开发设置 → 服务器域名 → 修改
提示:若使用过程中没有报域名问题第一步,或者调试阶段可忽略,只需要在开发者工具中→ 本地设置→ 勾选不校验合法域名即可
2. 主要方法
上传方法封装:主要也是使用这位大佬:wxapp-ali-oss-use 封装的方法,方法源码感兴趣可以研究下,我主要记录如何使用
官方方法地址:微信小程序上传
3. 使用步骤
3.1 文件改造
可以使用npm方式,由于项目不大,直接复制文件到本地目录来进行调取使用
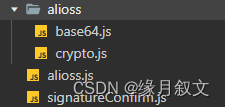
对alioss.js文件进行个性化改造
代码示例:
方法的重点主要是在于policy以及Signature值的获取,其他值都可以固定或者自己控制,只有这两个值是需要算法计算出来的
const Base64 = require('./alioss/base64.js');
const Crypto = require('./alioss/crypto.js');

const aliOSS = {
  accessKeyID: 'aaaaaaaaaaa',
  accessKeySecret: 'bbbbbbbbbbbb',
  host: 'https://ccccccccccc.oss-cn-hangzhou.aliyuncs.com',
  timeout: 87600,
};

export function uploadFile(filePath) {
  return new Promise(function (resolve, reject) {

    if (!filePath) {
      reject({
        status: false,
        err:'文件错误',
      });
      return;
    }
    const aliyunFileKey = 'cecbImages/' + Date.now() + '-' + Math.floor(Math.random() * 1000) + '.png';
    const policyBase64 = Base64.encode(JSON.stringify({
      "expiration": new Date(new Date().getTime() + aliOSS.timeout).toISOString(),
      "conditions": [
        ["content-length-range", 0, 1024 * 1024 * 10]//10m
      ]
    }));
    let bytes = Crypto.util.HMAC(Crypto.util.SHA1, policyBase64, aliOSS.accessKeySecret, { asBytes: true });
    const signature = Crypto.util.bytesToBase64(bytes);
    wx.uploadFile({
      url: aliOSS.host,
      filePath: filePath,
      name: 'file',
      formData: {
        'key': aliyunFileKey,
        'OSSAccessKeyId': aliOSS.accessKeyID,
        'policy': policyBase64,
        'Signature': signature,
        'success_action_status': '200',
      },
      success: function (res) {
        resolve({
          url:aliOSS.host+'/' + aliyunFileKey
        });
      },
      fail: function (err) {
        console.log(err);
      },
    })
  });
}
- 1
- 2
- 3
- 4
- 5
- 6
- 7
- 8
- 9
- 10
- 11
- 12
- 13
- 14
- 15
- 16
- 17
- 18
- 19
- 20
- 21
- 22
- 23
- 24
- 25
- 26
- 27
- 28
- 29
- 30
- 31
- 32
- 33
- 34
- 35
- 36
- 37
- 38
- 39
- 40
- 41
- 42
- 43
- 44
- 45
- 46
- 47
- 48
- 49
- 50
- 51
- accessKeyID与accessKeySecret若纯前端实现的话 就是固定写死的,这个在申请阿里云的时候就会给
- host 是一个拼接路径 bucket名称+ region地区节点(比如 oss-cn-hangzhou)
- timeout 超时时间
- aliyunFileKey 这里是上传的key的参数值,也是存放在oss上面的路径+名称(这里使用了随机数,也可以使用时间戳,只要确保唯一性就可以)
【注意】 上传后的文件地址:aliOSS.host+‘/’ + aliyunFileKey,该地址也是图片的实际获取地址,需要传给后端保存,以便于后期回显使用
使用Promise将上传成功之后的地址进行返回
3.2 文件调用
项目需要,我使用的图片是通过canvas绘制的,但是调用上是一样的,只需要腾讯对图片的暂存路径传进去即可
import {uploadFile} from './alioss.js'
...
uploadImage(){
	const that = this
    wx.canvasToTempFilePath({
      canvas: this.data.canvas, // canvas 实例
      success(res) {
        // canvas 生成图片成功
        uploadFile(res.tempFilePath).then(res=>{
          console.log(res.url)//图片路径
        })
      }
    })
}
- 1
- 2
- 3
- 4
- 5
- 6
- 7
- 8
- 9
- 10
- 11
- 12
- 13
- 14
3.3 拓展–canvas签名实现
.wxml文件:
    <!-- 签字部分 -->
    <view class="signature-canvas">
      <canvas class="canvas"
        disable-scroll="{{true}}"
        id="myCanvas"
        bindtouchstart="scaleStart"
        bindtouchmove="scaleMove"
        bindtouchend="scaleEnd"
        bindtap="mouseDown"
        type="2d"
      >
      </canvas>
    </view>
- 1
- 2
- 3
- 4
- 5
- 6
- 7
- 8
- 9
- 10
- 11
- 12
- 13
.scss文件
    // 签字部分
    .signature-canvas {
      .canvas{
        width: 670rpx;
        height: 260rpx;
        background-color: #33374A;
      }
    }
- 1
- 2
- 3
- 4
- 5
- 6
- 7
- 8
.js文件
  data: {
    canvas: {},
  },
    onShow() {
    const query = wx.createSelectorQuery()
    query.select('#myCanvas')
      .fields({
        node: true,
        size: true
      })
      .exec((res) => {
        const canvas = res[0].node
        const ctx = canvas.getContext('2d')
        const dpr = wx.getSystemInfoSync().pixelRatio
        canvas.width = res[0].width * dpr
        canvas.height = res[0].height * dpr
        this.width = canvas.width;
        this.height = canvas.height;
        ctx.scale(dpr, dpr)
        this.ctx = ctx;
        this.setData({
          canvas: canvas
        })
      })
  },
  scaleStart(e) {
    let {
      x,
      y
    } = e.touches[0]
    this.ctx.beginPath()
    this.ctx.moveTo(x, y)
    this.ctx.strokeStyle = "#24A6A4";
    this.ctx.lineWidth = '5'
  },
  scaleMove(e) {
    let {
      x,
      y
    } = e.touches[0]
    this.ctx.lineTo(x, y)
    this.ctx.stroke();
    this.ctx.lineCap = "round";
    this.ctx.moveTo(x, y)
  },
  scaleEnd(e) {
    this.ctx.lineCap = "round";
  },
  clearCanvas() {
    this.ctx.clearRect(0, 0, this.width, this.height)
    this.setData({
      scoreList:[
        {
          index:0,
          title:'专业水平:',
          value:1
        },
        {
          index:1,
          title:'服务态度:',
          value:1
        },
        {
          index:2,
          title:'解决速度:',
          value:1
        },
      ]
    });
  },
- 1
- 2
- 3
- 4
- 5
- 6
- 7
- 8
- 9
- 10
- 11
- 12
- 13
- 14
- 15
- 16
- 17
- 18
- 19
- 20
- 21
- 22
- 23
- 24
- 25
- 26
- 27
- 28
- 29
- 30
- 31
- 32
- 33
- 34
- 35
- 36
- 37
- 38
- 39
- 40
- 41
- 42
- 43
- 44
- 45
- 46
- 47
- 48
- 49
- 50
- 51
- 52
- 53
- 54
- 55
- 56
- 57
- 58
- 59
- 60
- 61
- 62
- 63
- 64
- 65
- 66
- 67
- 68
- 69
- 70
修改线色通过:this.ctx.strokeStyle = “#24A6A4”;
修改背景色直接在scss里面修改 .canvas{ background-color: #33374A;}
声明:本文内容由网友自发贡献,不代表【wpsshop博客】立场,版权归原作者所有,本站不承担相应法律责任。如您发现有侵权的内容,请联系我们。转载请注明出处:https://www.wpsshop.cn/w/爱喝兽奶帝天荒/article/detail/742027
推荐阅读
相关标签

