- 1Redis的持久化
- 2【2023·CANN训练营第一季】昇腾Al计算平台CANN的逻辑架构_海光信息昇腾cann架构
- 3使用 Azure OpenAI 打造自己的 ChatGPT_azurechatopenai
- 4【langchain中自定义LLM 超详细一步到位 以together为例子】_langchain 自定义llm
- 5基于Transformer的中英文翻译_基于transformer的中英机器翻译
- 6图像超分辨率:任意尺度超分方法Meta-SR: A Magnification-Arbitrary Network for Super-Resolution
- 7一分钟拥有ChatGPT!_wetab-ai新标签页怎么没有chatgpt
- 8基于Java+SSM的宠物管理系统设计与实现_基于java的宠物服务管理系统的设计与实现
- 9无需GPU,一键搭建本地大语言模型(LLM)服务,提供 OpenAI 接口 | 附 C#/Python 代码_local-llm-server
- 10YOLOv8与ELAN结合:利用最新的高效层聚合网络提升计算机视觉性能_elan高效网络架构
Android开发之lint代码检测编写和使用方法_android lint 检查
赞
踩
前言
lint是Android自带的静态代码检测框架,用来在不运行代码的情况下,对项目代码进行检测,检测范围包括方法调用、硬编码等。本文从项目结构、依赖、检查器编写、打包、运行测试的环节,描述一个lint检查器的编写和使用全过程。
项目结构
lint检查器首先是一个插件,需要打成aar或jar来被待检测项目使用。其次,lint检查器本身,需要包含两层:外层是壳工程,生成检查器aar供待检测项目使用;aar内容来自内层实现层;内层是实现层,负责检查器逻辑实现、注册等。
为了方便,本文将待检测项目、壳工程和实现层都放在一个项目中,作为不同的模块存在。不过壳工程还是会生成独立的aar,来供待检测模块使用。
待检测项目
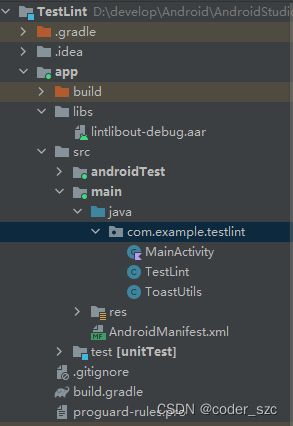
libs中的lintlibout-debug.aar就是壳工程生成的aar,src中有业务代码。
lint检查器
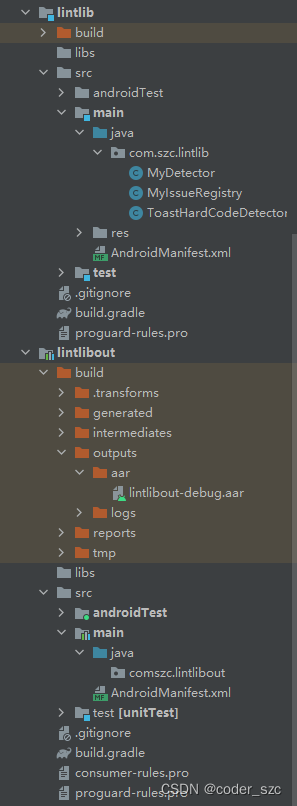
lintlibout是生成aar的壳工程,里面除了在build.gradle中指定aar的生成方式,没有其他代码;lintlib是实现层,里面存在着检查器相关代码
依赖方式
待检测项目
只需要在build.gradle中依赖到lint检查器aar即可:
plugins {
    id 'com.android.application'
    id 'org.jetbrains.kotlin.android'
}

android {
    namespace 'com.example.testlint'
    compileSdk 32

    defaultConfig {
        applicationId "com.example.testlint"
        minSdk 26
        targetSdk 32
        versionCode 1
        versionName "1.0"

        testInstrumentationRunner "androidx.test.runner.AndroidJUnitRunner"
    }

    buildTypes {
        release {
            minifyEnabled false
            proguardFiles getDefaultProguardFile('proguard-android-optimize.txt'), 'proguard-rules.pro'
        }
    }
    compileOptions {
        sourceCompatibility JavaVersion.VERSION_11
        targetCompatibility JavaVersion.VERSION_11
    }
    kotlinOptions {
        jvmTarget = '1.8'
    }
}

dependencies {
    implementation 'androidx.core:core-ktx:1.7.0'
    implementation 'androidx.appcompat:appcompat:1.4.1'
    implementation 'com.google.android.material:material:1.5.0'
    testImplementation 'junit:junit:4.13.2'
    androidTestImplementation 'androidx.test.ext:junit:1.1.3'
    androidTestImplementation 'androidx.test.espresso:espresso-core:3.4.0'

    implementation files("libs/lintlibout-debug.aar")
}
- 1
- 2
- 3
- 4
- 5
- 6
- 7
- 8
- 9
- 10
- 11
- 12
- 13
- 14
- 15
- 16
- 17
- 18
- 19
- 20
- 21
- 22
- 23
- 24
- 25
- 26
- 27
- 28
- 29
- 30
- 31
- 32
- 33
- 34
- 35
- 36
- 37
- 38
- 39
- 40
- 41
- 42
- 43
- 44
添加的唯一一行,是dependencies块中最后的implementation files("libs/lintlibout-debug.aar")
lint检查器
壳工程的依赖方式如下,在dependencies模块中指定lint aar的源工程:
plugins {
    id 'com.android.library'
    id 'org.jetbrains.kotlin.android'
}

android {
    namespace 'comszc.lintlibout'
    compileSdk 32

    defaultConfig {
        minSdk 26
        targetSdk 32

        consumerProguardFiles "consumer-rules.pro"
    }

    buildTypes {
        release {
            minifyEnabled false
            proguardFiles getDefaultProguardFile('proguard-android-optimize.txt'), 'proguard-rules.pro'
        }
    }
    compileOptions {
        sourceCompatibility JavaVersion.VERSION_1_8
        targetCompatibility JavaVersion.VERSION_1_8
    }
    kotlinOptions {
        jvmTarget = '1.8'
    }
}

dependencies {
    lintPublish project(':lintlib')
}
- 1
- 2
- 3
- 4
- 5
- 6
- 7
- 8
- 9
- 10
- 11
- 12
- 13
- 14
- 15
- 16
- 17
- 18
- 19
- 20
- 21
- 22
- 23
- 24
- 25
- 26
- 27
- 28
- 29
- 30
- 31
- 32
- 33
- 34
实现层需要:
- 依赖lint组件,注意lint版本,版本不同可能检测代码写法不一样;
- 指定将源文件生成jar;
- 指定lint注册器,用来向lint内核注册自定义的
issue
plugins {
    id 'org.jetbrains.kotlin.jvm'
    id 'java-library'
}

dependencies {
    // 1. 依赖Android的lint组件
    compileOnly "com.android.tools.lint:lint-api:30.2.1"
    compileOnly "com.android.tools.lint:lint-checks:30.2.1"
    compileOnly "com.android.tools.lint:lint:30.2.1"
    compileOnly "org.jetbrains.kotlin:kotlin-stdlib-jdk7:1.7.20"
}

java {
    sourceCompatibility = JavaVersion.VERSION_1_8
    targetCompatibility = JavaVersion.VERSION_1_8
}

jar {
    manifest {
        // 2. 指定lint注册器
        attributes('Lint-Registry-V2': 'com.szc.lintlib.MyIssueRegistry')
    }
}

// 3. 将源文件生成jar,同时调用第2步注册我们的注册器
configurations {
    lintJarOutput
}
dependencies {
    lintJarOutput files(jar)
}
- 1
- 2
- 3
- 4
- 5
- 6
- 7
- 8
- 9
- 10
- 11
- 12
- 13
- 14
- 15
- 16
- 17
- 18
- 19
- 20
- 21
- 22
- 23
- 24
- 25
- 26
- 27
- 28
- 29
- 30
- 31
- 32
代码编写
检测器代码编写可分为两大步:Detector注册和Detector编写,均在liblint实现层中。本文通过方法调用检测和Toast硬编码检测两个案例,来进行说明。
方法调用检测
Detector注册
编写IssueRegistry的子类,覆写getIssues()方法,返回要检测的检测issue:
public class MyIssueRegistry extends IssueRegistry {
    @NotNull
    @Override
    public List<Issue> getIssues() {
        return Arrays.asList(
                MyDetector.ISSUE
        );
    }
}
- 1
- 2
- 3
- 4
- 5
- 6
- 7
- 8
- 9
MyDetector是检测器,ISSUE在其中定义,所以直接看下一小节的Detector编写即可。
Detector编写
public class MyDetector extends Detector implements Detector.UastScanner {
    private static final String ISSUE_ID = "LogUseError";
    private static final String ISSUE_DESCRIPTION = "Please use LogUtil instead of Log.";
    private static final String ISSUE_EXPLANATION = "Please use LogUtil instead of Log, because I don`t like it!";
    private static final Category ISSUE_CATEGORY = Category.CORRECTNESS;
    private static final int ISSUE_PRIORITY = 5;
    private static final Severity ISSUE_SEVERITY = Severity.WARNING;

    // 1、定义 ISSUE
    public static final Issue ISSUE = Issue.create(
            ISSUE_ID,               // 唯一ID 这个id必须是独一无二的
            ISSUE_DESCRIPTION,      // 简单描述
            ISSUE_EXPLANATION,      // 详细描述
            ISSUE_CATEGORY,         // 验证正确性
            ISSUE_PRIORITY,         // 权重,优先级,必须在1到10之间。
            ISSUE_SEVERITY,         // 这是一个警告
            new Implementation(     // 这是连接Detector与Scope的桥梁,其中Detector的功能是寻找issue,而scope定义了在什么范围内查找issue
                    MyDetector.class,
                    Scope.JAVA_FILE_SCOPE));
    private static final List<String> CANDIDATE_METHOD_NAMES = Arrays.asList(
            "i", "d", "e", "v", "w", "wtf"
    );
    private static final String LOG_CLASS = "android.util.Log";

    // 2. 定义要检查的方法
    @Override
    public List<String> getApplicableMethodNames() {
        return CANDIDATE_METHOD_NAMES;
    }

    @Override
    public void visitMethodCall(@NotNull JavaContext context, @NotNull UCallExpression node, @NotNull PsiMethod method) {
        if (!context.getEvaluator().isMemberInClass(method, LOG_CLASS)) {
            // 3. 判断是不是指定的目标类
            return;
        }

        // 4. 上报issue信息
        context.report(ISSUE, node, context.getLocation(node), ISSUE_DESCRIPTION);
    }
}
- 1
- 2
- 3
- 4
- 5
- 6
- 7
- 8
- 9
- 10
- 11
- 12
- 13
- 14
- 15
- 16
- 17
- 18
- 19
- 20
- 21
- 22
- 23
- 24
- 25
- 26
- 27
- 28
- 29
- 30
- 31
- 32
- 33
- 34
- 35
- 36
- 37
- 38
- 39
- 40
- 41
Toast硬编码检测
Detector注册
在IssueRegistry的子类的getIssues()方法添加新的检测issue:
public class MyIssueRegistry extends IssueRegistry {
    @NotNull
    @Override
    public List<Issue> getIssues() {
        return Arrays.asList(
                MyDetector.ISSUE,
                ToastHardCodeDetector.ISSUE_HARD_CODE
        );
    }
}
- 1
- 2
- 3
- 4
- 5
- 6
- 7
- 8
- 9
- 10
Detector编写
public class ToastHardCodeDetector extends Detector implements Detector.UastScanner {
    private static final String ISSUE_ID_HARD_CODE = "HardCodeToast";
    private static final String ISSUE_DESCRIPTION_HARD_CODE = "Toast should not be hard-coded";
    private static final String ISSUE_EXPLANATION_HARD_CODE = "Using hard-coded Toast message is not recommended, " +
            "as it makes it harder to maintain, translate and update the app.";
    private static final Category ISSUE_CATEGORY_HARD_CODE = Category.CORRECTNESS;
    private static final int ISSUE_PRIORITY_HARD_CODE = 5;
    private static final Severity ISSUE_SEVERITY_HARD_CODE = Severity.WARNING;

    private static final String TOAST_CLASS = "android.widget.Toast";
    private static final String MAKE_TEXT_METHOD = "makeText";

    // 1. 定义Issue
    public static final Issue ISSUE_HARD_CODE = Issue.create(
            ISSUE_ID_HARD_CODE, // Issue的Id
            ISSUE_DESCRIPTION_HARD_CODE, // 简单描述
            ISSUE_EXPLANATION_HARD_CODE, // 详细描述
            ISSUE_CATEGORY_HARD_CODE, // 检查类型:检查正确性
            ISSUE_PRIORITY_HARD_CODE, // 检查优先级
            ISSUE_SEVERITY_HARD_CODE, // 检查不通过时的严重性
            new Implementation(ToastHardCodeDetector.class, Scope.JAVA_FILE_SCOPE)); // 连接Detector与Scope的桥梁,其中Detector的功能是寻找issue,而scope定义了在什么范围内查找issue,这里是在java或kotlin源文件中寻找并检测issue。

    // 2. 定义要检测的方法
    @Override
    public List<String> getApplicableMethodNames() {
        return Arrays.asList(MAKE_TEXT_METHOD);
    }

    // 3. 方法检测的具体逻辑
    @Override
    public void visitMethodCall(@NotNull JavaContext context, @Nullable UCallExpression call, @NotNull PsiMethod method) {
        if (!context.getEvaluator().isMemberInClass(method, TOAST_CLASS)) {
            // 该方法是否在目标类中实现
            return;
        }

        if (call == null) {
            return;
        }


        // 获取目标方法的入参列表
        List<UExpression> arguments = call.getValueArguments();

        if (arguments == null || arguments.size() < 3) {
            return;
        }

        // 获取某个入参,Toast.makeText()方法中第2个参数容易被硬编码,是检测目标
        UExpression messageArgument = arguments.get(1);

        if (messageArgument == null) {
            return;
        }

        // 获取该入参的原始字符串,是字符串的话会加上""
        String sourceMessage = messageArgument.asSourceString();

        if (sourceMessage == null) {
            return;
        }

        if (sourceMessage.matches("\".*\"")) {
            // 检测到message参数硬编码,则上报issue
            context.report(ISSUE_HARD_CODE, messageArgument, context.getLocation(messageArgument),
                    ISSUE_DESCRIPTION_HARD_CODE);
        }
    }
}
- 1
- 2
- 3
- 4
- 5
- 6
- 7
- 8
- 9
- 10
- 11
- 12
- 13
- 14
- 15
- 16
- 17
- 18
- 19
- 20
- 21
- 22
- 23
- 24
- 25
- 26
- 27
- 28
- 29
- 30
- 31
- 32
- 33
- 34
- 35
- 36
- 37
- 38
- 39
- 40
- 41
- 42
- 43
- 44
- 45
- 46
- 47
- 48
- 49
- 50
- 51
- 52
- 53
- 54
- 55
- 56
- 57
- 58
- 59
- 60
- 61
- 62
- 63
- 64
- 65
- 66
- 67
- 68
- 69
使用
壳工程打包
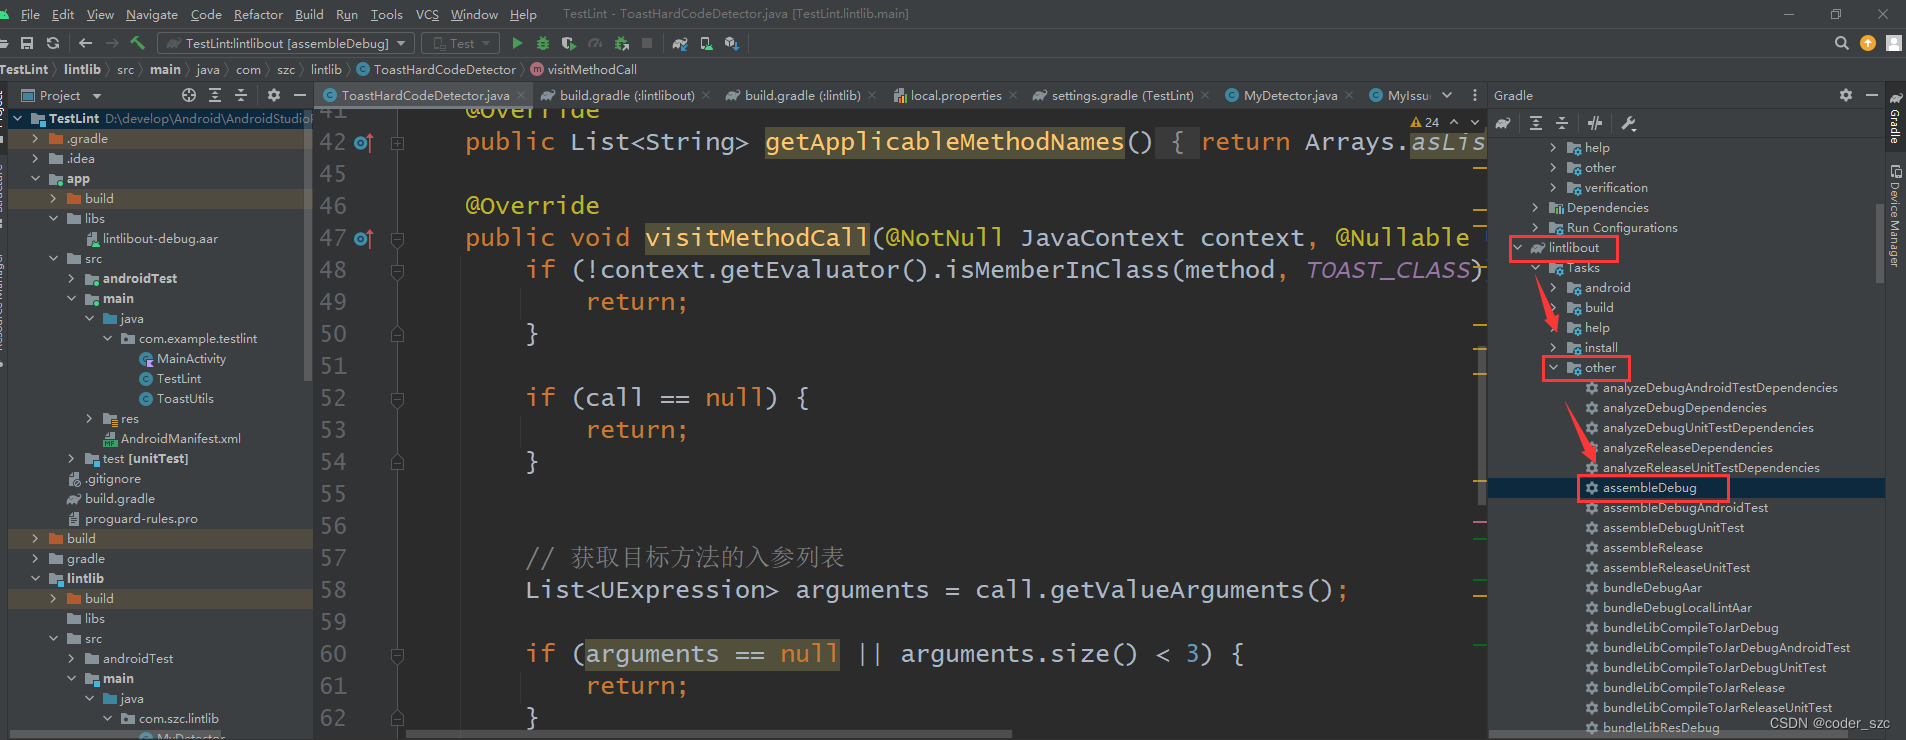
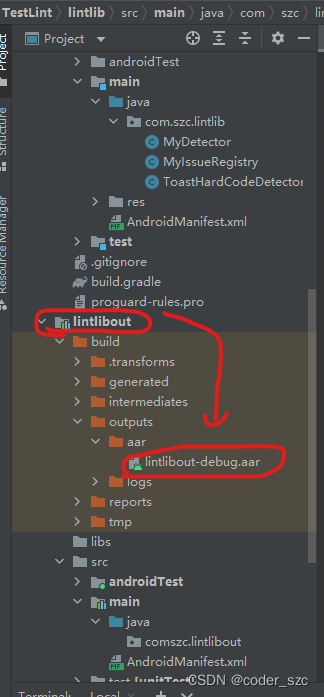
点击后,会在壳工程lintlibout/build/outputs/aar目录下生成检测的aar包:
待检测项目使用
根据2.1节指定的依赖方式,将生成的aar复制到libs目录下:
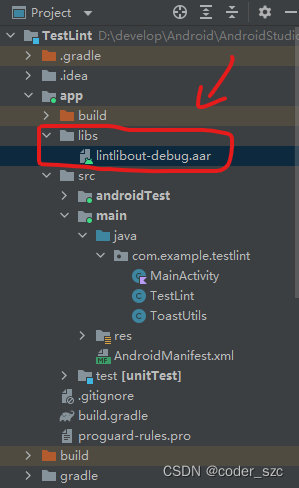
编写待检测的代码:
kotlin代码
class MainActivity: Activity() {
    fun test() {
        // 检测Log.*方法
        Log.i("", "")
        Log.d("", "")

        // 检测Toast硬编码
        Toast.makeText(this, "", Toast.LENGTH_LONG).show()

        val text = "text"
        Toast.makeText(this, text, Toast.LENGTH_LONG).show()
        // 检测套娃是否能逃过Toast硬编码检测
        ToastUtils.show(this, "")
    }
}
- 1
- 2
- 3
- 4
- 5
- 6
- 7
- 8
- 9
- 10
- 11
- 12
- 13
- 14
- 15
java代码
public class TestLint {
    void func() {
        // 检测Log.*方法
        Log.i("", "");
    }
}

//
public class ToastUtils {
    public static void show(Context context, String text) {
        // 检测Toast硬编码
        Toast.makeText(context, text, Toast.LENGTH_LONG).show();
    }
}
- 1
- 2
- 3
- 4
- 5
- 6
- 7
- 8
- 9
- 10
- 11
- 12
- 13
- 14
AS识别结果
可能需要重启下AS才能生效:
kotlin代码
Log.*方法检测:
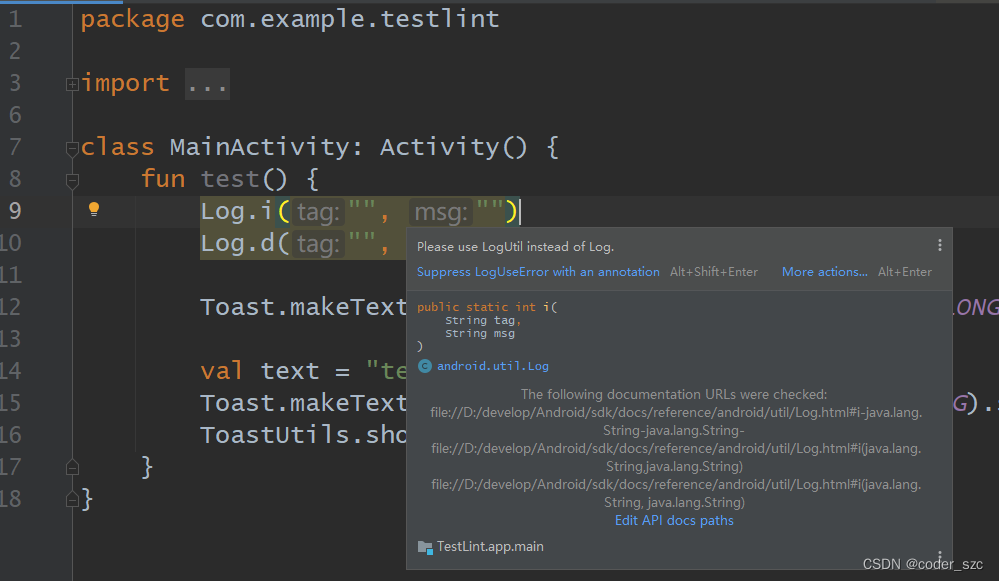
Toast硬编码:
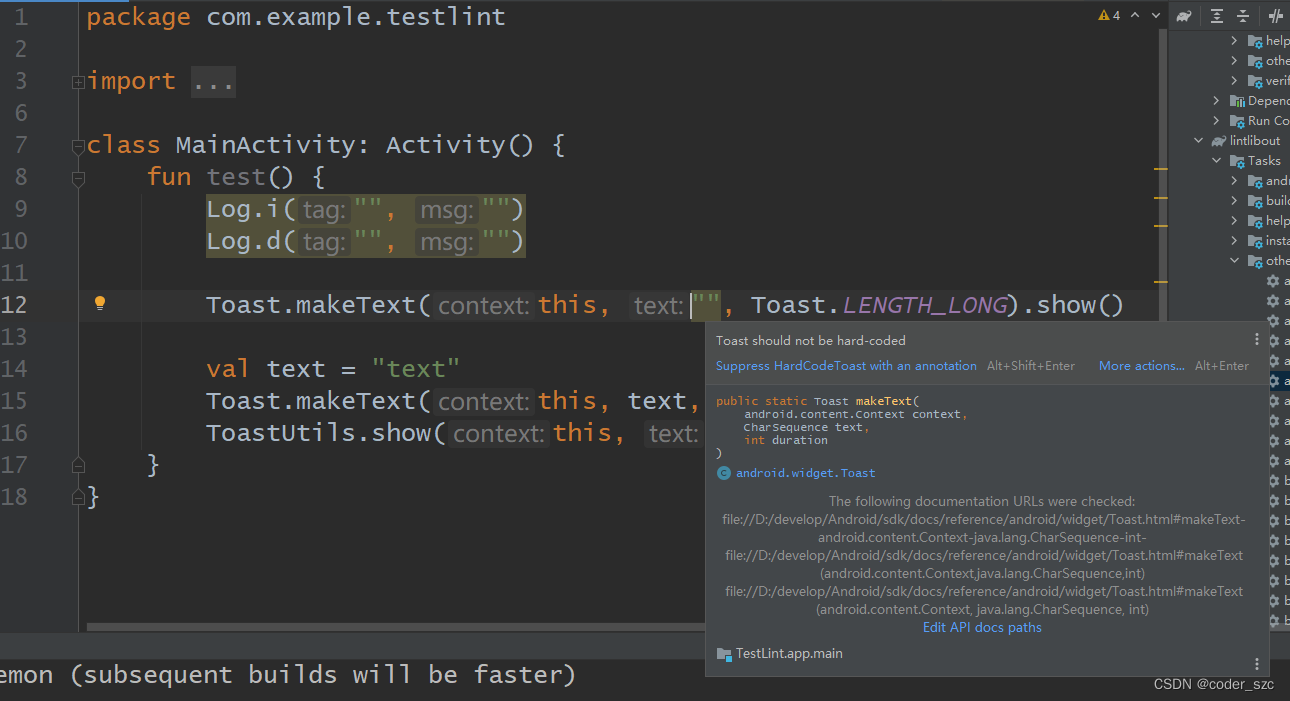
java代码
Log.*方法检测:

Toast硬编码检测(测试是否会误报):

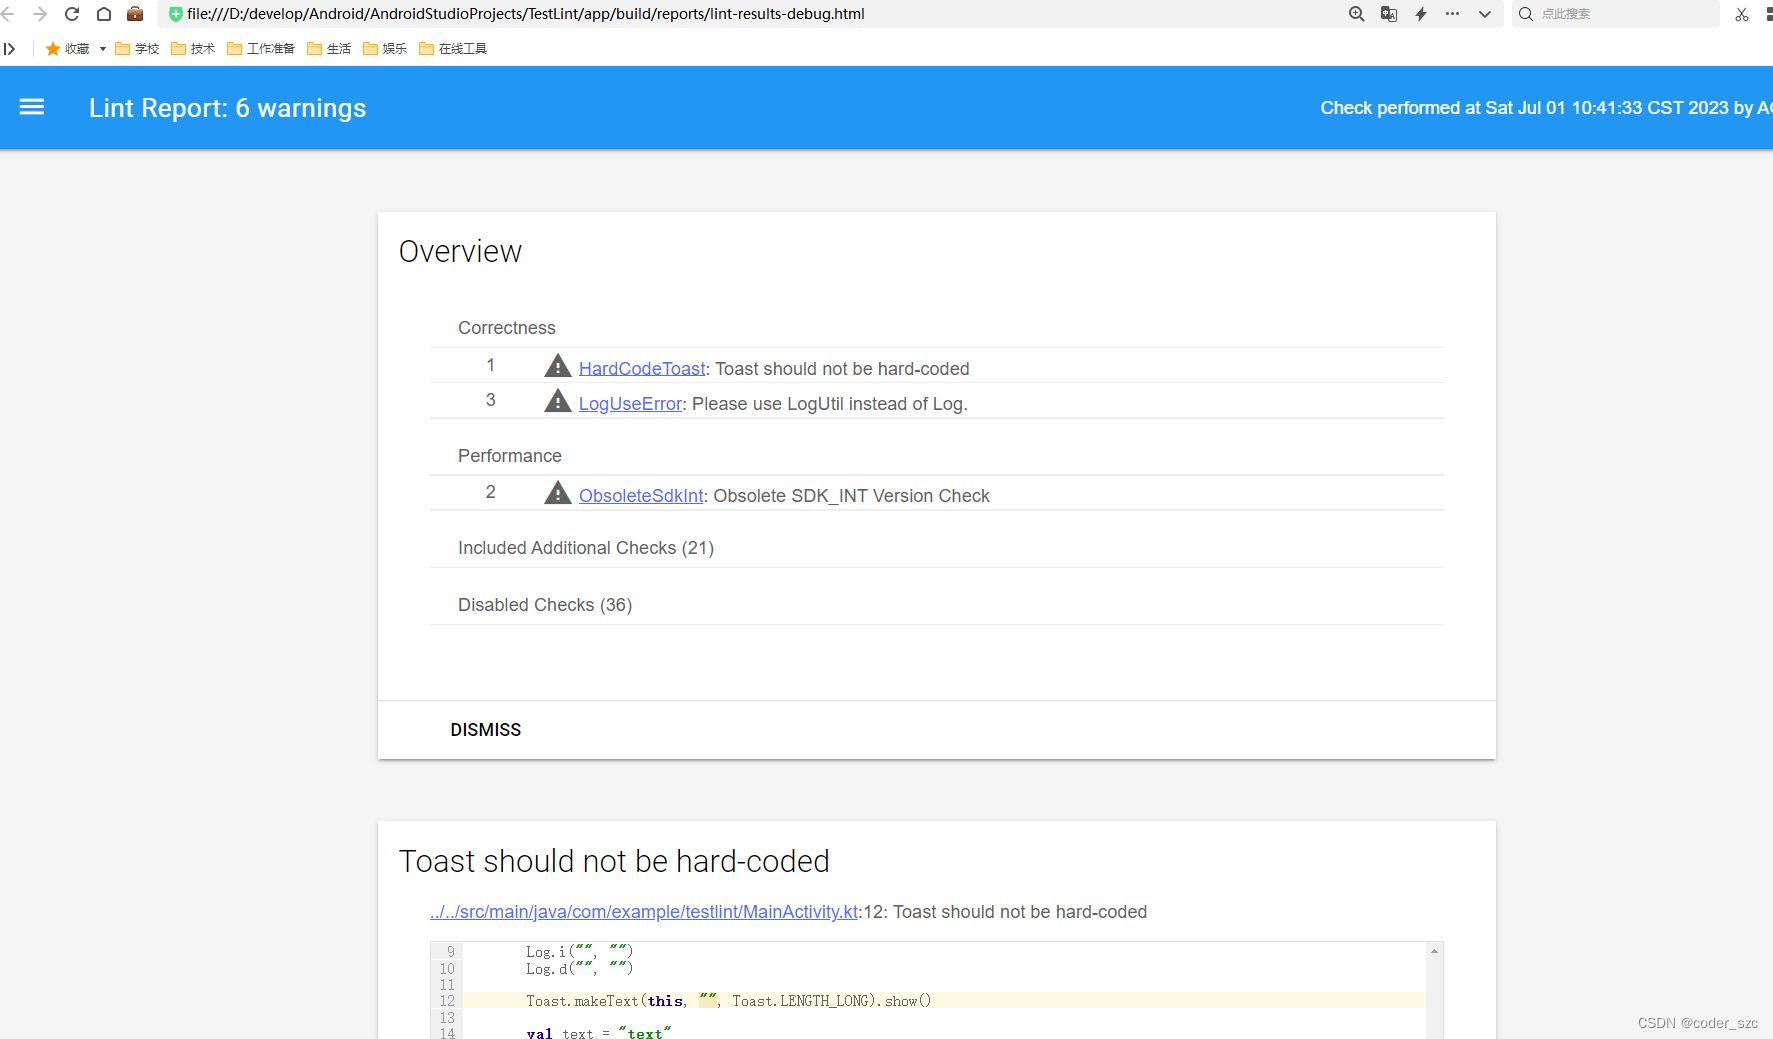
命令行检测
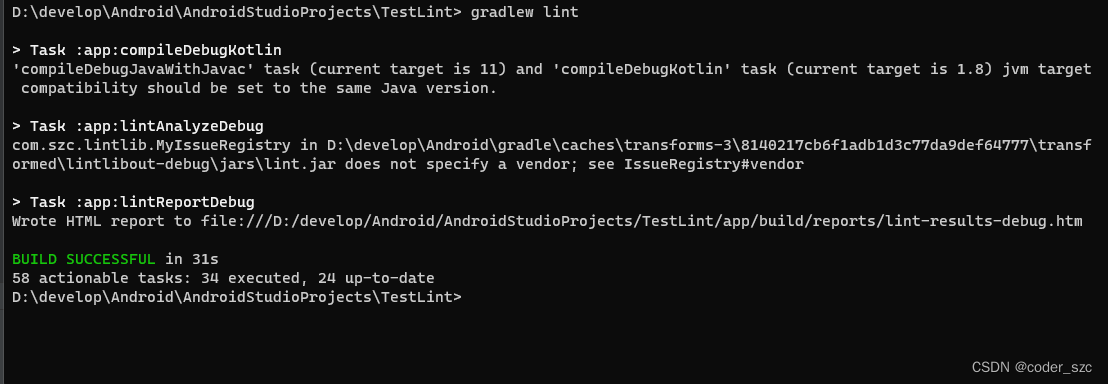
在项目根目录下,运行gradlew :app:lint,其中app是待检测的模块:
D:\develop\Android\AndroidStudioProjects\TestLint> gradlew lint

> Task :app:compileDebugKotlin
'compileDebugJavaWithJavac' task (current target is 11) and 'compileDebugKotlin' task (current target is 1.8) jvm target compatibility should be set to the same Java version.

> Task :app:lintAnalyzeDebug
com.szc.lintlib.MyIssueRegistry in D:\develop\Android\gradle\caches\transforms-3\8140217cb6f1adb1d3c77da9def64777\transformed\lintlibout-debug\jars\lint.jar does not specify a vendor; see IssueRegistry#vendor

> Task :app:lintReportDebug
Wrote HTML report to file:///D:/develop/Android/AndroidStudioProjects/TestLint/app/build/reports/lint-results-debug.htm

BUILD SUCCESSFUL in 31s
58 actionable tasks: 34 executed, 24 up-to-date
D:\develop\Android\AndroidStudioProjects\TestLint>
- 1
- 2
- 3
- 4
- 5
- 6
- 7
- 8
- 9
- 10
- 11
- 12
- 13
- 14
检测输出在待检测模块的build/reports目录下:

最清楚的应该是html格式的报告了,我们可以用浏览器打开查看:
参考文献
官网介绍:https://developer.android.google.cn/studio/write/lint?hl=zh-cn#commandline
其他论坛:https://zhuanlan.zhihu.com/p/307382854


