- 1给BERT补充其他特征的编码器实践_bert 自编码器
- 2Cobaltstrike简介及实战_cobalstrike
- 3【数据结构与算法】哈希—— 位图 | 布隆过滤器 | 哈希切割_布隆过滤器 哈希算法
- 4【MySQL】insert和select单表查询详解(包含大量示例,看了必会)_insert select
- 5python控制windows窗口,python 控制桌面程序_pyautoit
- 6QML动画(基本动画)_qml鼠标点击动画
- 7小白如何编写微信小程序的页面结构_小程序页面js的结构设计
- 8深入理解LinkedList_linkedlist 左右哪边是头
- 9使用 FastAPI 实现聊天完成 API 详解_fastapi stream api
- 10sql优化-单表优化_单表慢sql优化
利用知识图谱提升RAG应用的准确性_graphrag
赞
踩
本文转载自:lucas大叔 : 利用知识图谱提升RAG应用的准确性
https://zhuanlan.zhihu.com/p/692595027
英文原文:Enhancing the Accuracy of RAG Applications With Knowledge Graphs
https://neo4j.com/developer-blog/enhance-rag-knowledge-graph/
一、关于 GraphRAG
图检索增强生成(GraphRAG)利用图数据库的结构化特性,以节点和关系的方式进行组织数据,增加了检索到信息的深度和关联上下文,是传统向量检索方法的有效补充。
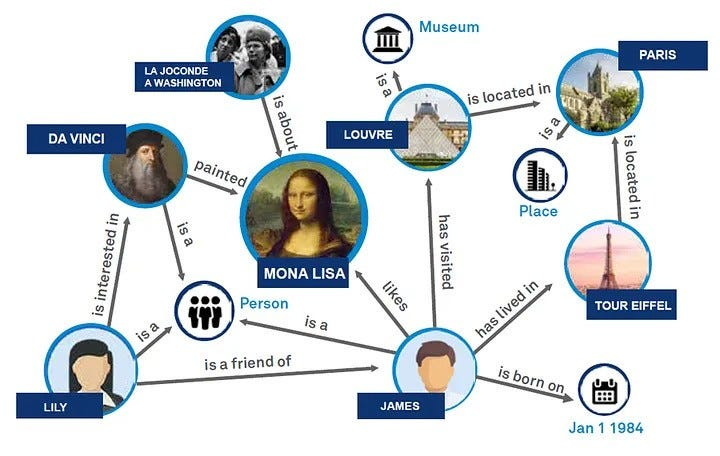
图擅长以结构化的方式表示和存储异构和互连的信息,可以轻松地捕捉不同数据类型之间的复杂关系和属性。
相比之下,向量数据库往往难以处理此类结构化信息,因为它们的优势在于通过高维向量处理非结构化数据。
在RAG应用中,可以将结构化图数据与非结构化文本的向量搜索相结合,以实现优势互补。
虽然知识图谱的概念已经比较普及,但构建知识图还是一项有挑战性的工作。
它涉及到数据的收集和结构化,需要对领域和图建模有深入的了解。
为了简化图谱构建过程,我们尝试利用LLM来构建。
LLM对语言和上下文有着深刻的理解,可以实现知识图创建过程重要部分的自动化。
通过分析文本数据,LLM可以识别实体,理解实体之间的关系,并建议如何在图结构中最好地表示它们。
作为实验的结果,我们在LangChain中添加了图构建模块的第一个版本,并将在这篇博客中进行演示。
相关代码:https://github.com/tomasonjo/blogs/blob/master/llm/enhancing_rag_with_graph.ipynb
二、Neo4j环境配置
首先创建一个Neo4j实例。
最简单的方法是在Neo4j Aura上启动一个免费实例,该实例提供Neo4j数据库的云实例。
或者,你也可以下载 Neo4j Desktop 应用并创建Neo4j数据库的本地实例。
os.environ["OPENAI_API_KEY"] = "sk-"
os.environ["NEO4J_URI"] = "bolt://localhost:7687"
os.environ["NEO4J_USERNAME"] = "neo4j"
os.environ["NEO4J_PASSWORD"] = "password"

graph = Neo4jGraph()
- 1
- 2
- 3
- 4
- 5
- 6
三、数据提取
本演示使用 Elizabeth I 的维基百科页面,我们用LangChain loader无缝地从维基百科抓取和分割文档。
# Read the wikipedia article
raw_documents = WikipediaLoader(query="Elizabeth I").load()

# Define chunking strategy
text_splitter = TokenTextSplitter(chunk_size=512, chunk_overlap=24)
documents = text_splitter.split_documents(raw_documents[:3])
- 1
- 2
- 3
- 4
- 5
- 6
现在用分割后的文档构建图谱。
为此,我们实现了LLMGraphTransformer模块,它大大简化了在图数据库中构建和存储知识图谱。
LLMGraphTransformer类利用LLM将文档转化为图谱文档,允许指定输出图谱中节点和关系类型的约束,不支持抽取节点或者关系的属性。
它的参数如下:
llm (BaseLanguageModel):支持结构化输出的语言模型实例allowed_nodes (List[str], optional): 指定图谱中包含哪些节点类型,默认是空list,允许所有节点类型allowed_relationships (List[str], optional): 指定图谱中包含哪些关系类型,默认是空list,允许所有关系类型prompt (Optional[ChatPromptTemplate], optional): 传给LLM的带有其他指令的promptstrict_mode (bool, optional): 确定转化是否应该使用筛选以严格遵守allowed_nodes和allowed_relationships,默认为True
本例allowed_nodes和allowed_relationships都采取默认设置,即图谱中允许所有的节点和关系类型。
llm=ChatOpenAI(temperature=0, model_name="gpt-4-0125-preview")
llm_transformer = LLMGraphTransformer(llm=llm)

# Extract graph data
graph_documents = llm_transformer.convert_to_graph_documents(documents)
# Store to neo4j
graph.add_graph_documents(
  graph_documents,
  baseEntityLabel=True,
  include_source=True
)
- 1
- 2
- 3
- 4
- 5
- 6
- 7
- 8
- 9
- 10
- 11
你可以定义知识图谱生成链要使用的LLM。目前,只支持OpenAI和Mistral的function-calling模型。在本例中,我们使用最新的GPT-4。
值得注意的是,生成图谱的质量在很大程度上取决于所使用的模型。
LLM graph transformer 返回图谱文档,通过add_graph_documents方法导入到Neo4j。
baseEntityLabel参数为每个节点分配一个额外的__Entity__标签,从而提高索引和查询性能。
include_source参数将节点链接到其原始文档,便于数据跟踪和上下文理解。
在Neo4j浏览器中可以检查生成的图谱。
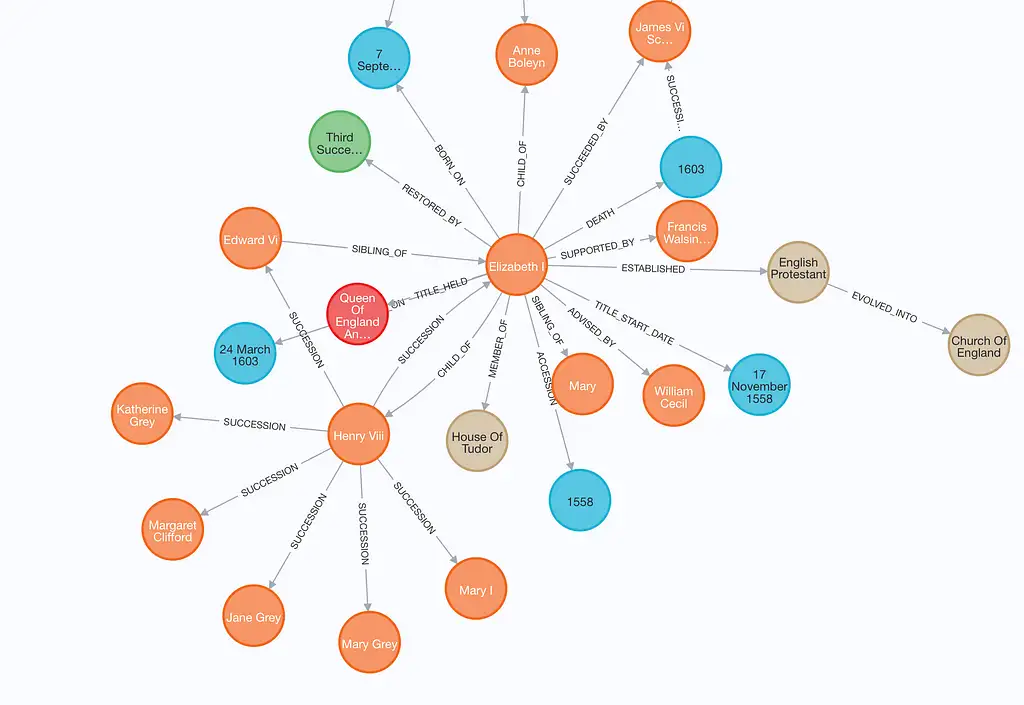
可以看到,每种类型的节点除了自身的节点类型之外,多了一个__Entity__ 标签。
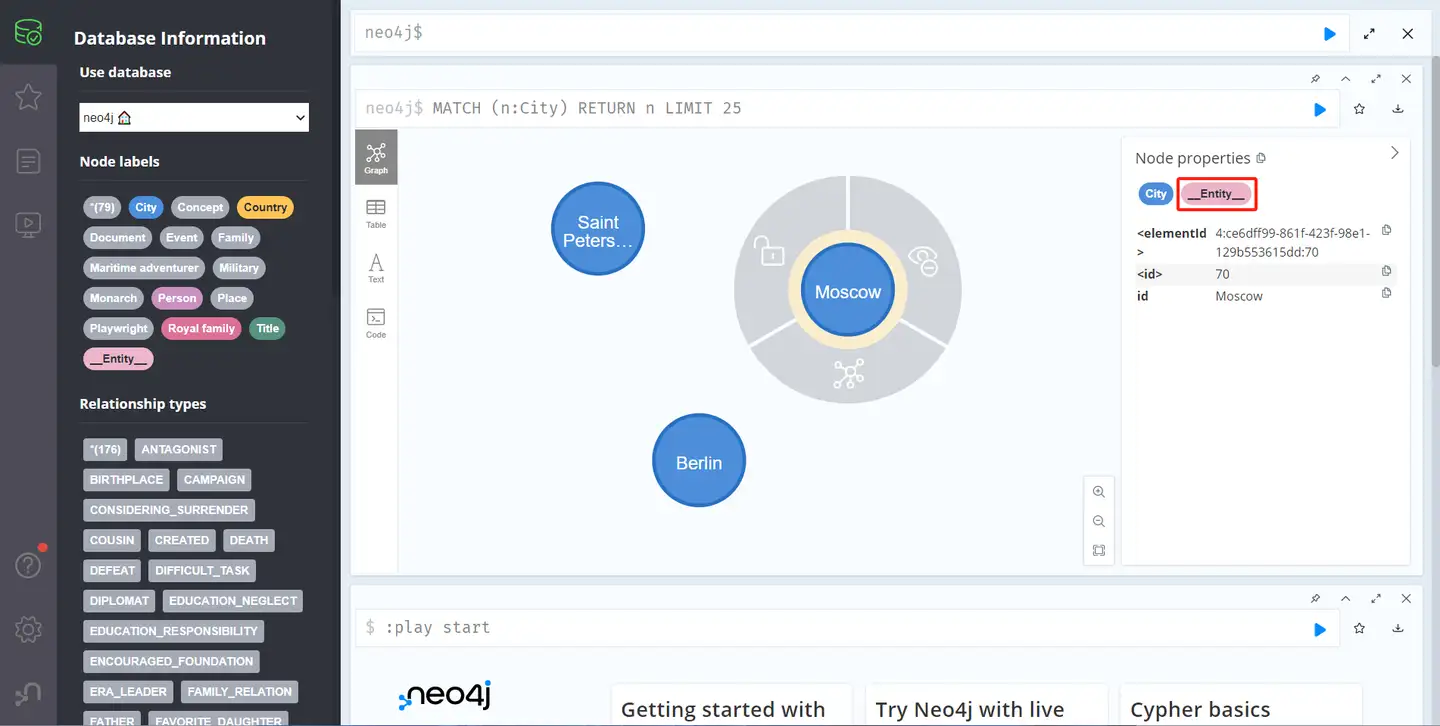
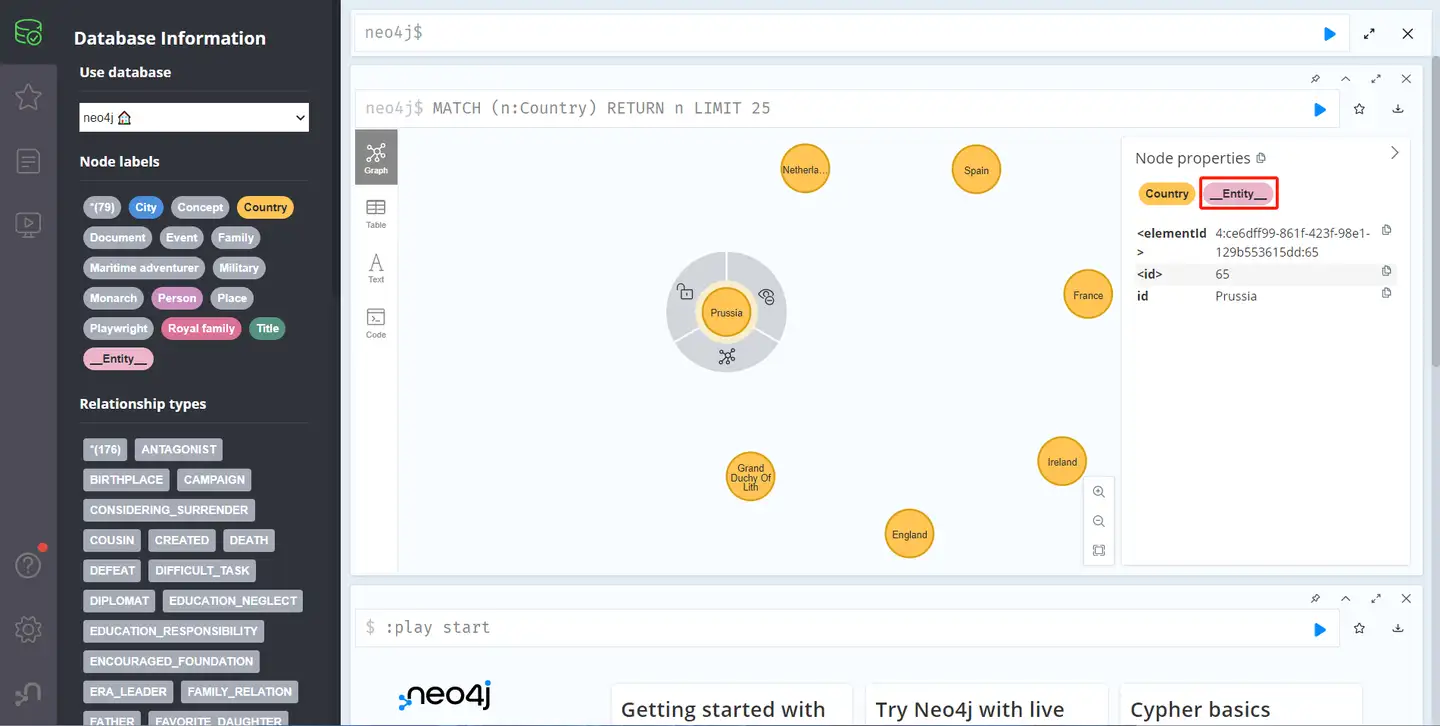
同时,节点通过MENTIONS关系与源文档连接。
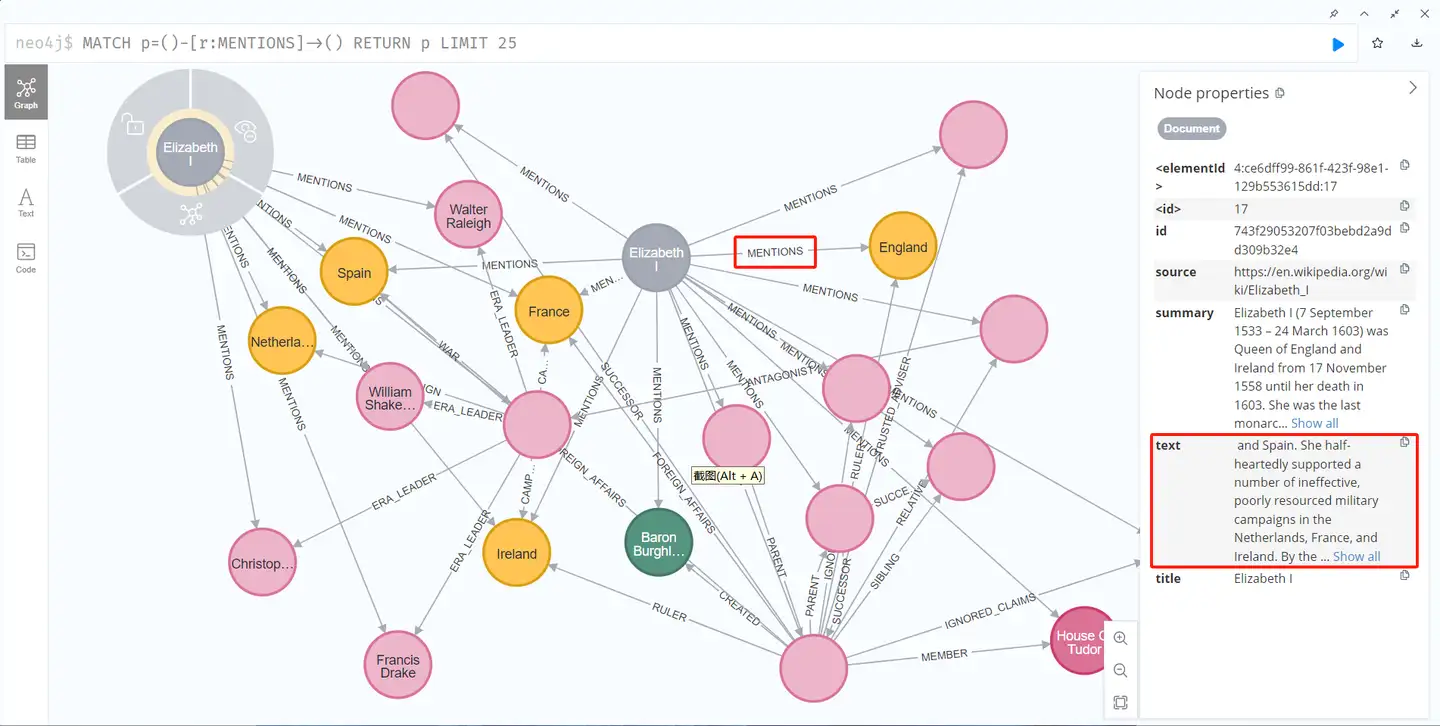
四、RAG混合检索
在生成图谱之后,我们将向量索引和关键字索引的混合检索与图谱检索结合起来用于RAG。
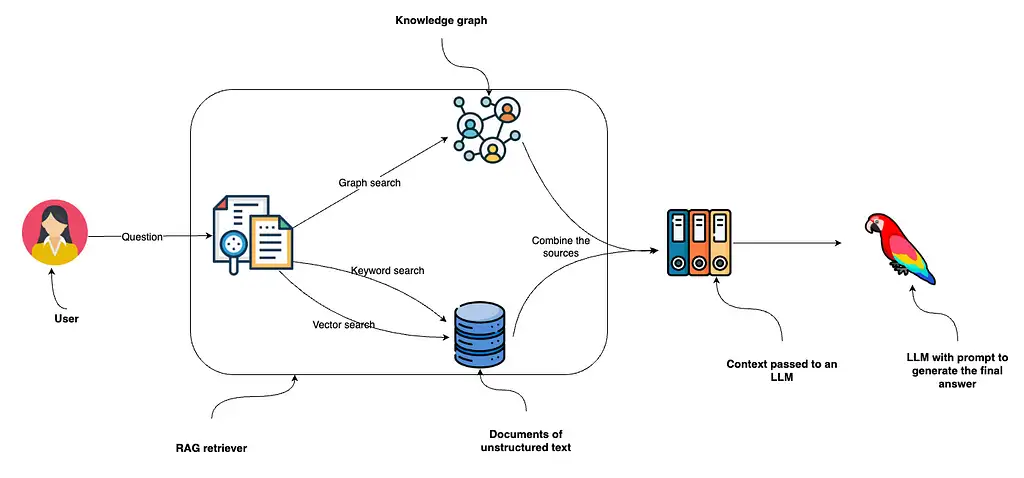
上图展示了从用户提出问题开始的检索过程,问题首先输入到RAG检索器,该检索器采用关键词和向量搜索非结构化文本数据,并与从知识图谱中收集的信息结合。
由于neo4j同时具有关键词和向量索引,因此可以使用单个数据库实现全部三种检索方式。
从这些数据源收集的数据输入给LLM生成最终答案。
1、非结构化数据检索器
可以用 Neo4jVector.from_existing_graph 方法为文档添加关键字和向量检索。
此方法为混合搜索方法配置关键字和向量搜索索引,目标节点类型为Document。
另外,如果文本embedding值缺失,它还会计算创建向量索引。
vector_index = Neo4jVector.from_existing_graph(
    OpenAIEmbeddings(),
    search_type="hybrid",
    node_label="Document",
    text_node_properties=["text"],
    embedding_node_property="embedding"
)
- 1
- 2
- 3
- 4
- 5
- 6
- 7
可以看到,Document节点原来没有embedding属性,创建非结构化数据检索器后,基于Document节点的text属性新创建了embedding。
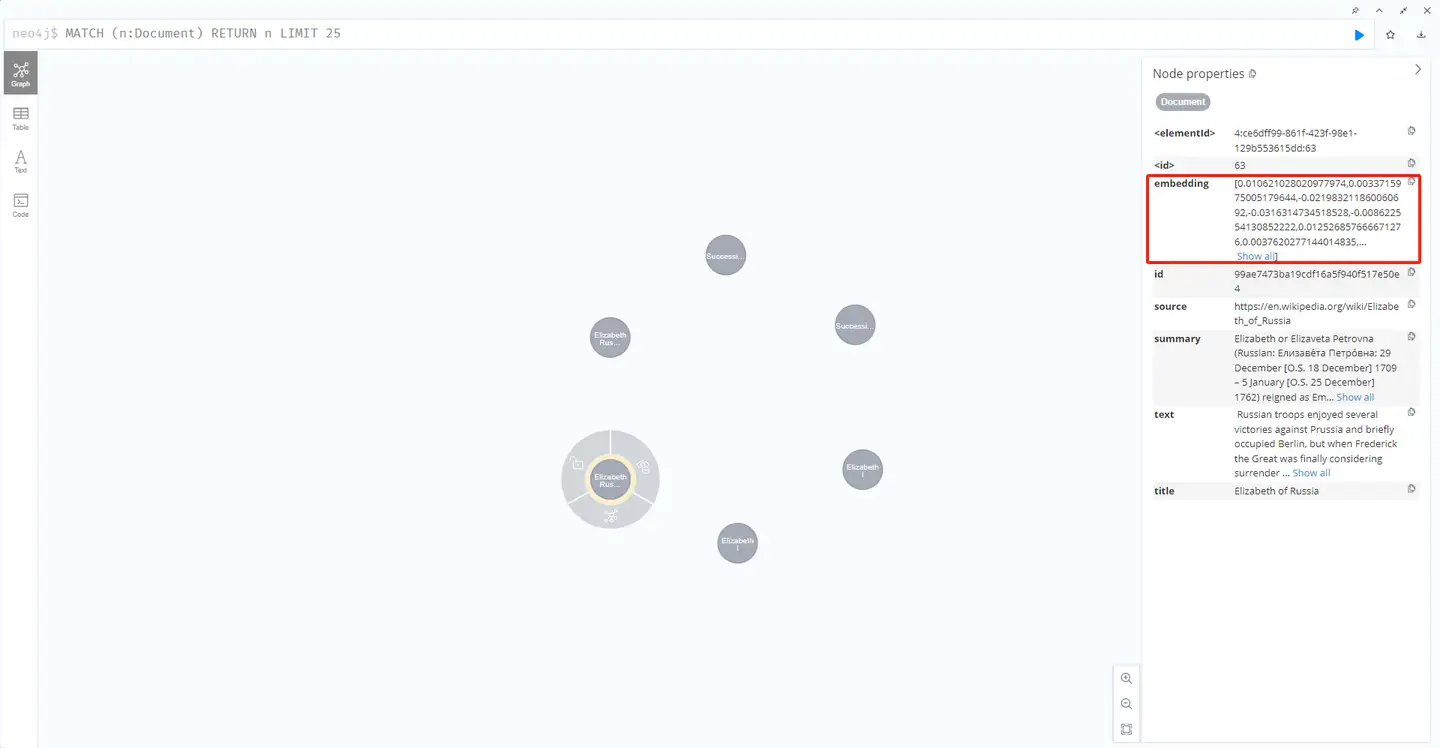
然后使用similarity_search方法就可以调用向量索引。
2、图谱检索器
另一方面,配置图谱检索更为复杂,但提供了更多的自由度。
本示例将使用全文索引 识别相关节点并返回其一阶邻居。

图谱检索器首先识别输入中的相关实体。
为简单起见,我们让LLM识别人、组织和地点等通用实体,用LCEL和新添加的with_structured_output 方法来提取。
# Extract entities from text
class Entities(BaseModel):
    """Identifying information about entities."""

    names: List[str] = Field(
        ...,
        description="All the person, organization, or business entities that "
        "appear in the text",
    )

prompt = ChatPromptTemplate.from_messages(
    [
        (
            "system",
            "You are extracting organization and person entities from the text.",
        ),
        (
            "human",
            "Use the given format to extract information from the following "
            "input: {question}",
        ),
    ]
)

entity_chain = prompt | llm.with_structured_output(Entities)
- 1
- 2
- 3
- 4
- 5
- 6
- 7
- 8
- 9
- 10
- 11
- 12
- 13
- 14
- 15
- 16
- 17
- 18
- 19
- 20
- 21
- 22
- 23
- 24
- 25
让我们测试一下:
entity_chain.invoke({"question": "Where was Amelia Earhart born?"}).names
# ['Amelia Earhart']
- 1
- 2
现在实现了从问题中检测出实体,接下来用全文索引将它们映射到知识图谱。
首先,我们需要定义全文索引和一个函数,该函数将生成允许有些拼写错误的全文查询。
graph.query(
    "CREATE FULLTEXT INDEX entity IF NOT EXISTS FOR (e:__Entity__) ON EACH [e.id]")

def generate_full_text_query(input: str) -> str:
    """
    Generate a full-text search query for a given input string.

    This function constructs a query string suitable for a full-text search.
    It processes the input string by splitting it into words and appending a
    similarity threshold (~2 changed characters) to each word, then combines
    them using the AND operator. Useful for mapping entities from user questions
    to database values, and allows for some misspelings.
    """
    full_text_query = ""
    words = [el for el in remove_lucene_chars(input).split() if el]
    for word in words[:-1]:
        full_text_query += f" {word}~2 AND"
    full_text_query += f" {words[-1]}~2"
    return full_text_query.strip()
- 1
- 2
- 3
- 4
- 5
- 6
- 7
- 8
- 9
- 10
- 11
- 12
- 13
- 14
- 15
- 16
- 17
- 18
- 19
把上面的功能组装在一起实现图谱检索的结构化检索器。
# Fulltext index query
def structured_retriever(question: str) -> str:
    """
    Collects the neighborhood of entities mentioned
    in the question
    """
    result = ""
    entities = entity_chain.invoke({"question": question})
    for entity in entities.names:
        response = graph.query(
            """CALL db.index.fulltext.queryNodes('entity', $query, {limit:2})
            YIELD node,score
            CALL {
              MATCH (node)-[r:!MENTIONS]->(neighbor)
              RETURN node.id + ' - ' + type(r) + ' -> ' + neighbor.id AS output
              UNION
              MATCH (node)<-[r:!MENTIONS]-(neighbor)
              RETURN neighbor.id + ' - ' + type(r) + ' -> ' +  node.id AS output
            }
            RETURN output LIMIT 50
            """,
            {"query": generate_full_text_query(entity)},
        )
        result += "\n".join([el['output'] for el in response])
    return result
- 1
- 2
- 3
- 4
- 5
- 6
- 7
- 8
- 9
- 10
- 11
- 12
- 13
- 14
- 15
- 16
- 17
- 18
- 19
- 20
- 21
- 22
- 23
- 24
- 25
structured_retriever 函数从检测用户问题中的实体开始,迭代检测到的实体,使用Cypher模板来检索相关节点的一阶邻居。
print(structured_retriever("Who is Elizabeth I?"))
# Elizabeth I - BORN_ON -> 7 September 1533
# Elizabeth I - DIED_ON -> 24 March 1603
# Elizabeth I - TITLE_HELD_FROM -> Queen Of England And Ireland
# Elizabeth I - TITLE_HELD_UNTIL -> 17 November 1558
# Elizabeth I - MEMBER_OF -> House Of Tudor
# Elizabeth I - CHILD_OF -> Henry Viii
# and more...
- 1
- 2
- 3
- 4
- 5
- 6
- 7
- 8
3、最终的检索器
如开头所述,我们将结合非结构化和图谱检索器来创建传递给LLM的最终上下文。
def retriever(question: str):
    print(f"Search query: {question}")
    structured_data = structured_retriever(question)
    unstructured_data = [el.page_content for el in vector_index.similarity_search(question)]
    final_data = f"""Structured data:
{structured_data}
Unstructured data:
{"#Document ". join(unstructured_data)}
    """
    return final_data
- 1
- 2
- 3
- 4
- 5
- 6
- 7
- 8
- 9
- 10
正如处理Python一样,可以简单地使用f-string拼接输出。
五、定义RAG Chain
我们已经成功地实现了RAG的检索组件。
首先引入查询重写功能,允许根据对话历史对当前问题进行改写。
# Condense a chat history and follow-up question into a standalone question
_template = """Given the following conversation and a follow up question, rephrase the follow up question to be a standalone question,
in its original language.
Chat History:
{chat_history}
Follow Up Input: {question}
Standalone question:"""  # noqa: E501
CONDENSE_QUESTION_PROMPT = PromptTemplate.from_template(_template)

def _format_chat_history(chat_history: List[Tuple[str, str]]) -> List:
    buffer = []
    for human, ai in chat_history:
        buffer.append(HumanMessage(content=human))
        buffer.append(AIMessage(content=ai))
    return buffer

_search_query = RunnableBranch(
    # If input includes chat_history, we condense it with the follow-up question
    (
        RunnableLambda(lambda x: bool(x.get("chat_history"))).with_config(
            run_name="HasChatHistoryCheck"
        ),  # Condense follow-up question and chat into a standalone_question
        RunnablePassthrough.assign(
            chat_history=lambda x: _format_chat_history(x["chat_history"])
        )
        | CONDENSE_QUESTION_PROMPT
        | ChatOpenAI(temperature=0)
        | StrOutputParser(),
    ),
    # Else, we have no chat history, so just pass through the question
    RunnableLambda(lambda x : x["question"]),
)
- 1
- 2
- 3
- 4
- 5
- 6
- 7
- 8
- 9
- 10
- 11
- 12
- 13
- 14
- 15
- 16
- 17
- 18
- 19
- 20
- 21
- 22
- 23
- 24
- 25
- 26
- 27
- 28
- 29
- 30
- 31
- 32
接下来,引入prompt利用集成混合检索器提供的上下文生成响应,完成RAG链的实现。
template = """Answer the question based only on the following context:
{context}

Question: {question}
"""
prompt = ChatPromptTemplate.from_template(template)

chain = (
    RunnableParallel(
        {
            "context": _search_query | retriever,
            "question": RunnablePassthrough(),
        }
    )
    | prompt
    | llm
    | StrOutputParser()
)
- 1
- 2
- 3
- 4
- 5
- 6
- 7
- 8
- 9
- 10
- 11
- 12
- 13
- 14
- 15
- 16
- 17
- 18
最后,继续测试混合RAG实现。
chain.invoke({"question": "Which house did Elizabeth I belong to?"})
# Search query: Which house did Elizabeth I belong to?
# 'Elizabeth I belonged to the House of Tudor.'
- 1
- 2
- 3
前面实现了查询重写功能,使RAG链能够适配允许后续问题的对话设置。
考虑到我们使用向量和关键字搜索,必须重写后续问题以优化搜索过程。
chain.invoke(
    {
        "question": "When was she born?",
        "chat_history": [("Which house did Elizabeth I belong to?", "House Of Tudor")],
    }
)
# Search query: When was Elizabeth I born?
# 'Elizabeth I was born on 7 September 1533.'
- 1
- 2
- 3
- 4
- 5
- 6
- 7
- 8
可以看到 When was she born? 首先被改写为“When was Elizabeth I born?”,然后使用重写后的查询来检索相关上下文并回答问题。
2024-05-12(日)


