热门标签
热门文章
- 1chatGPT看图写小作文
- 2Android--sharepreference总结_android sharepreference优缺点 site:blog.csdn.net
- 3TCP和UDP_协议any和tcp udp
- 4arcgis批量操作 动态生成表格并导出地图_arcgis批量出图动态表格
- 5「玩转Palworld/幻兽帕鲁」:一文搞懂Palworld/幻兽帕鲁服务器搭建
- 6HarmonyOS元服务端云一体化开发快速入门(下)_端云一体化已经集成以下哪些服务sdk
- 7阿里云服务器部署vscode-server,实现在iPad上打代码_vscode ipad 阿里云
- 83D点云语义分割篇——PointNet++_基于pointnet++的点云分割
- 9android 读取pdf,如何在我的Android应用程序中读取pdf?
- 10selenium高级应用
当前位置: article > 正文
python影像裁剪并保存成tiff格式_bmp转换成tiff python
作者:知新_RL | 2024-03-28 12:00:14
赞
踩
bmp转换成tiff python
- from read_landsat8 import read_landsat8_bands
- import numpy as np
- from osgeo import gdal_array
-
- def get_img(base_path):
- """
- 叠加波段的简单demo
- 与mask矩阵一起构建成3维数组结构"""
- bands = read_landsat8_bands(base_path)
-
- # 读取数据
- B1_gdal = gdal_array.LoadFile(bands[0][0])
- B2_gdal = gdal_array.LoadFile(bands[0][1])
- B3_gdal = gdal_array.LoadFile(bands[0][2])
-
- # 转化成ndarray形式
- B1_np = np.array(B1_gdal)
- B2_np = np.array(B2_gdal)
- B3_np = np.array(B3_gdal)
- print(B1_np.shape)
-
- B123 = np.stack([B1_np, B2_np, B3_np], axis=0)
- print(B123.shape) # 3,7301,7341
-
- # 构建0-1 mask矩阵
- height = B123.shape[1]
- width = B123.shape[2]
- mask = np.random.randint(0, 2, (1, height, width))
-
- # 按照通道堆叠
- img = np.concatenate([B123, mask], axis=0)
-
- return img

这里得到的img其实是一个3维数组,在本例中,它的维度是
4×7301×7341
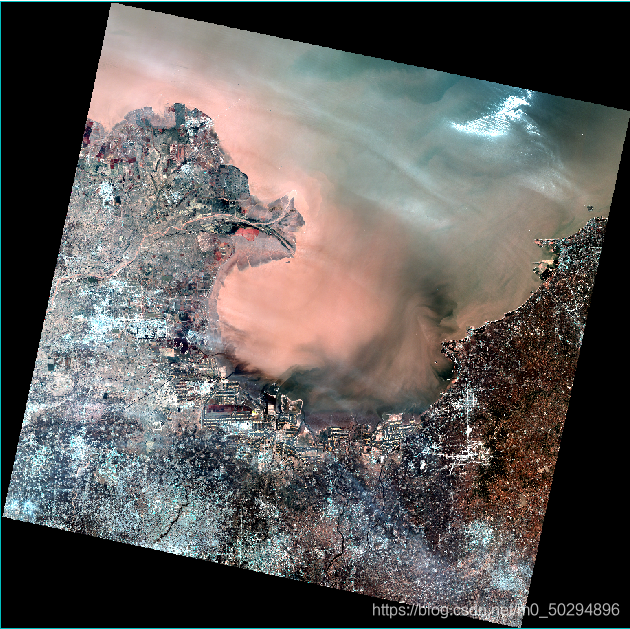
envi查看一下堆叠后的图像

图像裁剪
有了上面构建的img数据,再设定一个裁剪尺寸,我们就可以进行图像裁剪了。
- def crop_img(img, cropsize):
- """
- 裁剪图像为指定格式并保存成tiff
- 输入为array形式的数组
- """
- num = 0
- height = img.shape[1]
- width = img.shape[2]
-
- # 从左上开始裁剪
- for i in range(int((height) / (cropsize))): # 行裁剪次数
- for j in range(int((width) / (cropsize))): # 列裁剪次数
- cropped = img[:, # 通道不裁剪
- i * cropsize: i * cropsize + cropsize,
- j * cropsize: j * cropsize + cropsize,
- ]
-
- num = num + 1
- target = 'tiff_crop' + '/cropped{n}.tif'.format(n=num)
- out = gdal_array.SaveArray(cropped, target, format="GTiff")
-
- # # 向前裁剪最后一列
- for i in range(int((height) / (cropsize))):
- for j in range(int((width) / (cropsize))):
- cropped = img[:, # 通道不裁剪
- i * cropsize: i * cropsize + cropsize, # 所有行
- width - cropsize: width, # 最后256列
- ]
-
- num = num + 1
- target = 'tiff_crop' + '/cropped{n}.tif'.format(n=num)
- out = gdal_array.SaveArray(cropped, target, format="GTiff")
-
- # # 向前裁剪最后一行
- for i in range(int((height) / (cropsize))):
- for j in range(int((width) / (cropsize))):
- cropped = img[:, # 通道不裁剪
- height - cropsize: height, # 最后256行
- j * cropsize: j * cropsize + cropsize, # 所有列
- ]
-
- num = num + 1
- target = 'tiff_crop' + '/cropped{n}.tif'.format(n=num)
- out = gdal_array.SaveArray(cropped, target, format="GTiff")
-
- # 裁剪右下角
- cropped = img[:, # 通道不裁剪
- height - cropsize: height,
- width - cropsize: width,
- ]
-
- num = num + 1
- target = 'tiff_crop' + '/cropped{n}.tif'.format(n=num)
- gdal_array.SaveArray(cropped, target, format="GTiff")

声明:本文内容由网友自发贡献,不代表【wpsshop博客】立场,版权归原作者所有,本站不承担相应法律责任。如您发现有侵权的内容,请联系我们。转载请注明出处:https://www.wpsshop.cn/w/知新_RL/article/detail/329887?site
推荐阅读
相关标签


