- 1MATLAB算法实战应用案例精讲-【云计算】云网络技术
- 2C# IO下的文件和目录详解
- 3【漏洞复现】海康威视-视频编码设备接入网关-userinfodata-信息泄露
- 4计算机设计论文排版,计算机毕业设计论文排版格式.doc
- 5Llama-2 与 Llama-3:模型之间的井字游戏之战 使用 Python 和 Llama-CPP 制定非科学基准
- 6springboot项目实现excel导出_springboot 导出excel
- 72024年Vue最常见的面试题以及答案(面试必过),2024年最新GitHub标星9K的Google官方MVP+Rxjava项目详解_vue最新面试题
- 8【华为机考】模拟题:Words、Vowel、计算字符串重新排列数_华为机考 words
- 9【图论】图论基础
- 10美国服务器与日本服务器哪个比较好鬼影互联推举
【JavaEE网络】用Form与Ajax构建HTTP请求
赞
踩
通过 form 表单构造 HTTP 请求
form (表单) 是 HTML 中的一个常用标签. 可以用于给服务器发送 GET 或者 POST 请求.
form 发送 GET 请求
form 的重要参数:
- action: 构造的 HTTP 请求的 URL 是什么.
- method: 构造的 HTTP 请求的 方法 是 GET 还是 POST (form 只支持 GET 和 POST).
input 的重要参数:
- type: 表示输入框的类型. text 表示文本, password 表示密码, submit 表示提交按钮.
- name: 表示构造出的 HTTP 请求的 query string 的 key. query string 的 value 就是输入框的用户输入的内容.
- value: input 标签的值. 对于 type 为 submit 类型来说, value 就对应了按钮上显示的文本.
<form action="http://abcdef.com/myPath" method="GET">
    <input type="text" name="userId">
    <input type="text" name="classId">
    <input type="submit" value="提交">
</form>
- 1
- 2
- 3
- 4
- 5
页面展示的效果:

在输入框随便填写数据,

构造的 HTTP 请求
GET http://abcdef.com/myPath?userId=100&classId=200 HTTP/1.1
Host: abcdef.com
Proxy-Connection: keep-alive
Upgrade-Insecure-Requests: 1
User-Agent: Mozilla/5.0 (Windows NT 10.0; Win64; x64) AppleWebKit/537.36 (KHTML,
like Gecko) Chrome/91.0.4472.114 Safari/537.36
Accept:
text/html,application/xhtml+xml,application/xml;q=0.9,image/avif,image/webp,imag
e/apng,*/*;q=0.8,application/signed-exchange;v=b3;q=0.9
Accept-Encoding: gzip, deflate
Accept-Language: zh-CN,zh;q=0.9,en;q=0.8
- 1
- 2
- 3
- 4
- 5
- 6
- 7
- 8
- 9
- 10
- 11
**注意: 由于我们的服务器的地址是随便写的, 因此无法获取到正确的 HTTP 响应. **

- form 的 action 属性对应 HTTP 请求的 URL
- form 的 method 属性对应 HTTP 请求的方法
- input 的 name 属性对应 query string 的 key
- input 的 内容 对应 query string 的 value
form 发送 POST 请求
修改上面的代码, 把 form 的 method 修改为 POST
<form action="http://abcdef.com/myPath" method="POST">
    <input type="text" name="userId">
    <input type="text" name="classId">
    <input type="submit" value="提交">
</form>
- 1
- 2
- 3
- 4
- 5
页面效果不变.

构造的 HTTP 请求
POST http://abcdef.com/myPath HTTP/1.1
Host: abcdef.com
Proxy-Connection: keep-alive
Content-Length: 22
Cache-Control: max-age=0
Upgrade-Insecure-Requests: 1
Origin: null
Content-Type: application/x-www-form-urlencoded
User-Agent: Mozilla/5.0 (Windows NT 10.0; Win64; x64) AppleWebKit/537.36 (KHTML,
like Gecko) Chrome/91.0.4472.114 Safari/537.36
Accept:
text/html,application/xhtml+xml,application/xml;q=0.9,image/avif,image/webp,imag
e/apng,*/*;q=0.8,application/signed-exchange;v=b3;q=0.9
Accept-Encoding: gzip, deflate
Accept-Language: zh-CN,zh;q=0.9,en;q=0.8
userId=100&classId=200
- 1
- 2
- 3
- 4
- 5
- 6
- 7
- 8
- 9
- 10
- 11
- 12
- 13
- 14
- 15
- 16
主要的区别:
- method 从 GET 变成了 POST
- 数据从 query string 移动到了 body 中.
使用 form 还可以提交文件,但不能支持PUT/DELETE/OPTIONS……后面再介绍.
通过 ajax 构造 HTTP 请求
现在更经常会使用 ajax 的方式来构造 http 请求
从前端角度, 除了浏览器地址栏能构造 GET 请求, form 表单能构造 GET 和 POST 之外, 还可以通过 ajax 的方式来构造 HTTP 请求. 并且功能更强大.
ajax 全称 Asynchronous Javascript And XML, 是 2005 年提出的一种 JavaScript 给服务器发送HTTP 请求的方式.
特点是可以不需要 刷新页面/页面跳转 就能进行数据传输.
在 JavaScript 中可以通过 ajax 的方式构造 HTTP 请求.
发送 GET 请求
创建 test.html, 在 <script> 标签中编写以下代码.
// 1. 创建 XMLHttpRequest 对象
let httpRequest = new XMLHttpRequest();
// 2. 默认异步处理响应. 需要挂在处理响应的回调函数.
httpRequest.onreadystatechange = function () {
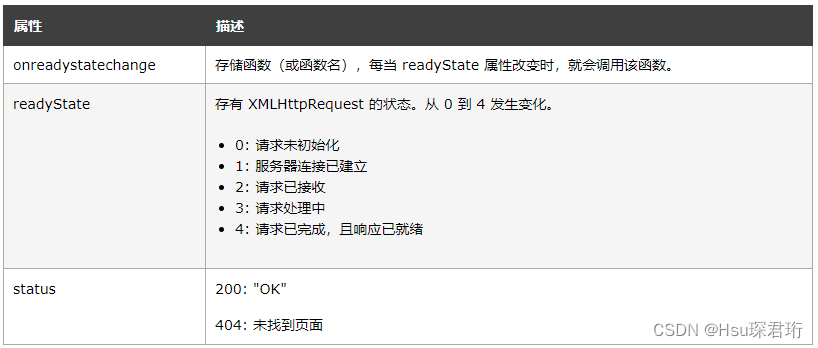
    // readState 表示当前的状态.
    // 0: 请求未初始化
    // 1: 服务器连接已建立
    // 2: 请求已接收
    // 3: 请求处理中
    // 4: 请求已完成,且响应已就绪
    if (httpRequest.readyState == 4) {
        // status 属性获取 HTTP 响应状态码
        console.log(httpRequest.status);
        // responseText 属性获取 HTTP 响应 body
        console.log(httpRequest.responseText);
   }
}
// 3. 调用 open 方法设置要访问的 url
httpRequest.open('GET', 'http://42.192.83.143:8080/AjaxMockServer/info');
// 4. 调用 send 方法发送 http 请求
httpRequest.send();
- 1
- 2
- 3
- 4
- 5
- 6
- 7
- 8
- 9
- 10
- 11
- 12
- 13
- 14
- 15
- 16
- 17
- 18
- 19
- 20
- 21

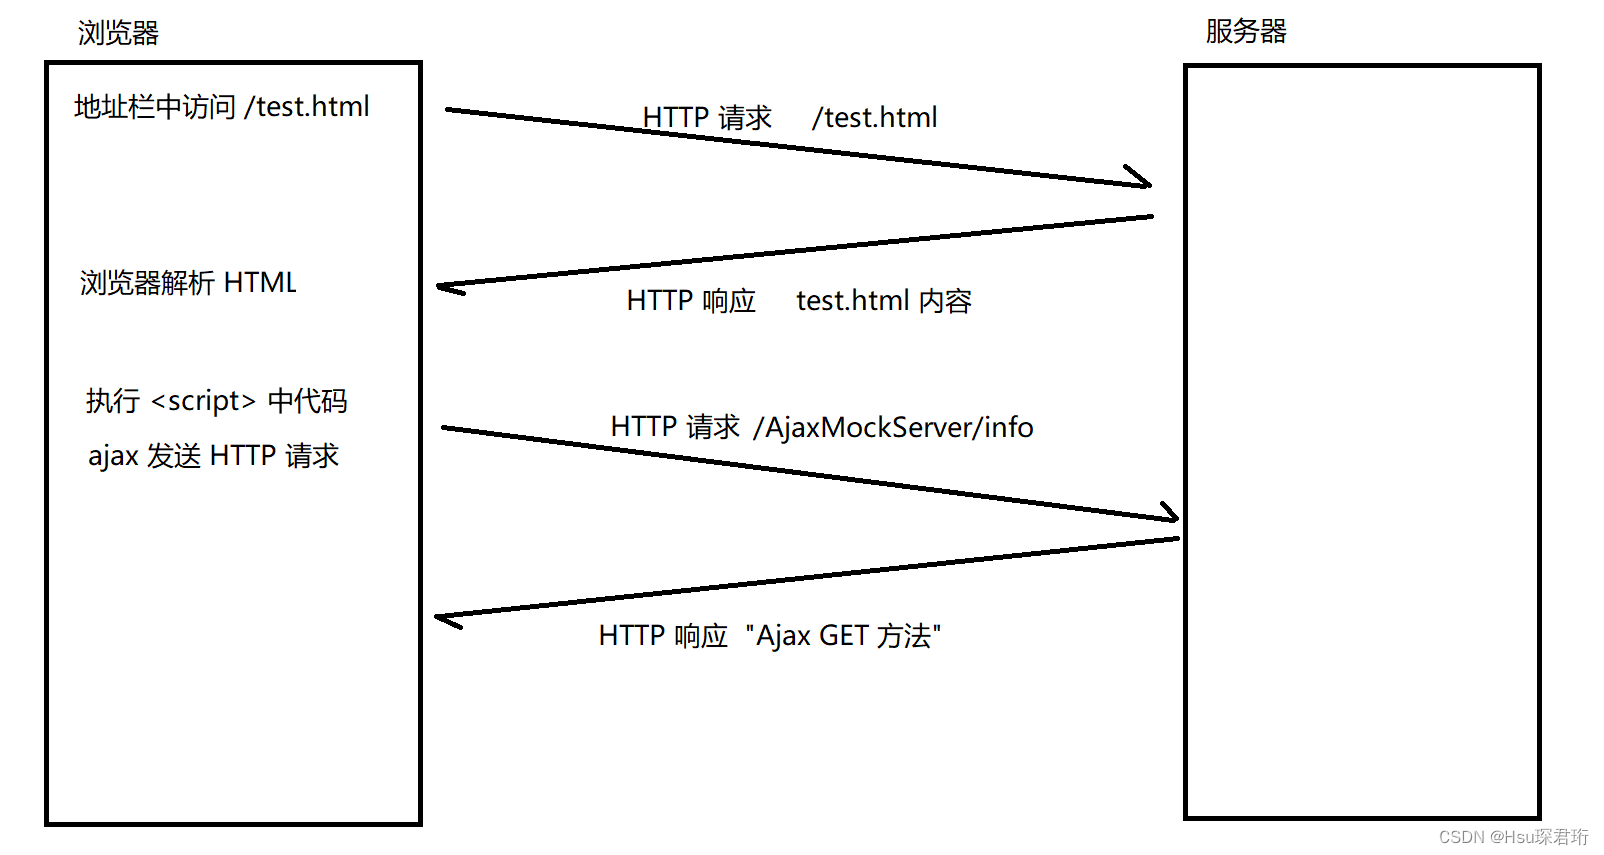
浏览器和服务器交互过程(引入 ajax 后):

在我们当前的例子中, test.html 是通过本地文件的方式打开的, 这个环节不涉及 HTTP 交互.
后面我们把 test.html 放到 Tomcat 上, 就会产生上面的效果了.
发送 POST 请求
对于 POST 请求, 需要设置 body 的内容
- 先使用 setRequestHeader 设置 Content-Type
- 再通过 send 的参数设置 body 内容.
发送 application/x-www-form-urlencoded 数据 (数据格式同 form 的 post)
// 1. 创建 XMLHttpRequest 对象
let httpRequest = new XMLHttpRequest();
// 2. 默认异步处理响应. 需要挂在处理响应的回调函数.
httpRequest.onreadystatechange = function () {
    // readState 表示当前的状态.
    // 0: 请求未初始化
    // 1: 服务器连接已建立
    // 2: 请求已接收
    // 3: 请求处理中
    // 4: 请求已完成,且响应已就绪
    if (httpRequest.readyState == 4) {
        // status 属性获取 HTTP 响应状态码
        console.log(httpRequest.status);
        // responseText 属性获取 HTTP 响应 body
        console.log(httpRequest.responseText);
   }
}
// 3. 调用 open 方法设置要访问的 url
httpRequest.open('POST', 'http://42.192.83.143:8080/AjaxMockServer/info');
// 4. 调用 setRequestHeader 设置请求头
httpRequest.setRequestHeader('Content-Type', 'application/x-www-form-urlencoded');
// 5. 调用 send 方法发送 http 请求
httpRequest.send('name=zhangsan&age=18');
- 1
- 2
- 3
- 4
- 5
- 6
- 7
- 8
- 9
- 10
- 11
- 12
- 13
- 14
- 15
- 16
- 17
- 18
- 19
- 20
- 21
- 22
- 23
发送 application/json 数据
// 4. 调用 setRequestHeader 设置请求头
httpRequest.setRequestHeader('Content-Type', 'application/json');
// 5. 调用 send 方法发送 http 请求
httpRequest.send(JSON.stringify({
    name: 'zhangsan',
    age: 18
}));
- 1
- 2
- 3
- 4
- 5
- 6
- 7
其他代码不变, 只是改下方的代码.
封装 ajax 方法
原生的 XMLHTTPRequest 类使用并不方便. 我们可以在这个基础上进行简单封装.
// 参数 args 是一个 JS 对象, 里面包含了以下属性
// method: 请求方法
// url: 请求路径
// body: 请求的正文数据
// contentType: 请求正文的格式
// callback: 处理响应的回调函数, 有两个参数, 响应正文和响应的状态码
function ajax(args) {
    var xhr = new XMLHttpRequest();
    xhr.onreadystatechange = function () {
        // 0: 请求未初始化
        // 1: 服务器连接已建立
        // 2: 请求已接收
        // 3: 请求处理中
        // 4: 请求已完成,且响应已就绪
        if (xhr.readyState == 4) {
            args.callback(xhr.responseText, xhr.status)
       }
   }
    xhr.open(args.method, args.url);
    if (args.contentType) {
        xhr.setRequestHeader('Content-type', args.contentType);
   }
    if (args.body) {
        xhr.send(args.body);
   } else {
        xhr.send();
   }
}
// 调用该函数
ajax({
    method: 'get',
附录: ajax 测试服务器代码 (后面再讲解)
基于 Java Servlet 实现的简单的服务器代码. 后面学习到 Servlet 部分再讲解.
    url: '/info',
    callback: function (body, status) {
        console.log(status);
        console.log(body);
   }
});
- 1
- 2
- 3
- 4
- 5
- 6
- 7
- 8
- 9
- 10
- 11
- 12
- 13
- 14
- 15
- 16
- 17
- 18
- 19
- 20
- 21
- 22
- 23
- 24
- 25
- 26
- 27
- 28
- 29
- 30
- 31
- 32
- 33
- 34
- 35
- 36
- 37
- 38
- 39


