- 1C#/.NET面试问题总结 第一篇_c#实习生面试
- 2谈谈AI智能电销机器人是如何转人工的_智能转人工
- 3Flink sink Elasticsearch 防止任务中断_elasticsearchsink
- 4ElementUI表单的自定义校验规则_elementui表单自定义验证
- 5一种基于http协议的敏感数据传输方案
- 6Linux(Centos7)安装 Redis_linux centos环境下自定义安装redis
- 7prometheus配合grafana展现监控数据_grafana添加数据源prometheus
- 8Rust并发编程实践:10分钟入门系统级编程_rust 并发编程
- 9wechall靶场training系列通关记录_we chall
- 10java XML解析防止外部实体注入
SpringBoot集成RabbitMQ配置多数据源_springboot 多个 rabbitmq
赞
踩
代码git仓库
点我进入github项目地址
如果不想从本文章粘贴 大量代码大家也可以点击上面的连接,直接跳转到github,直接clone项目,获取完整代码。
工程结构
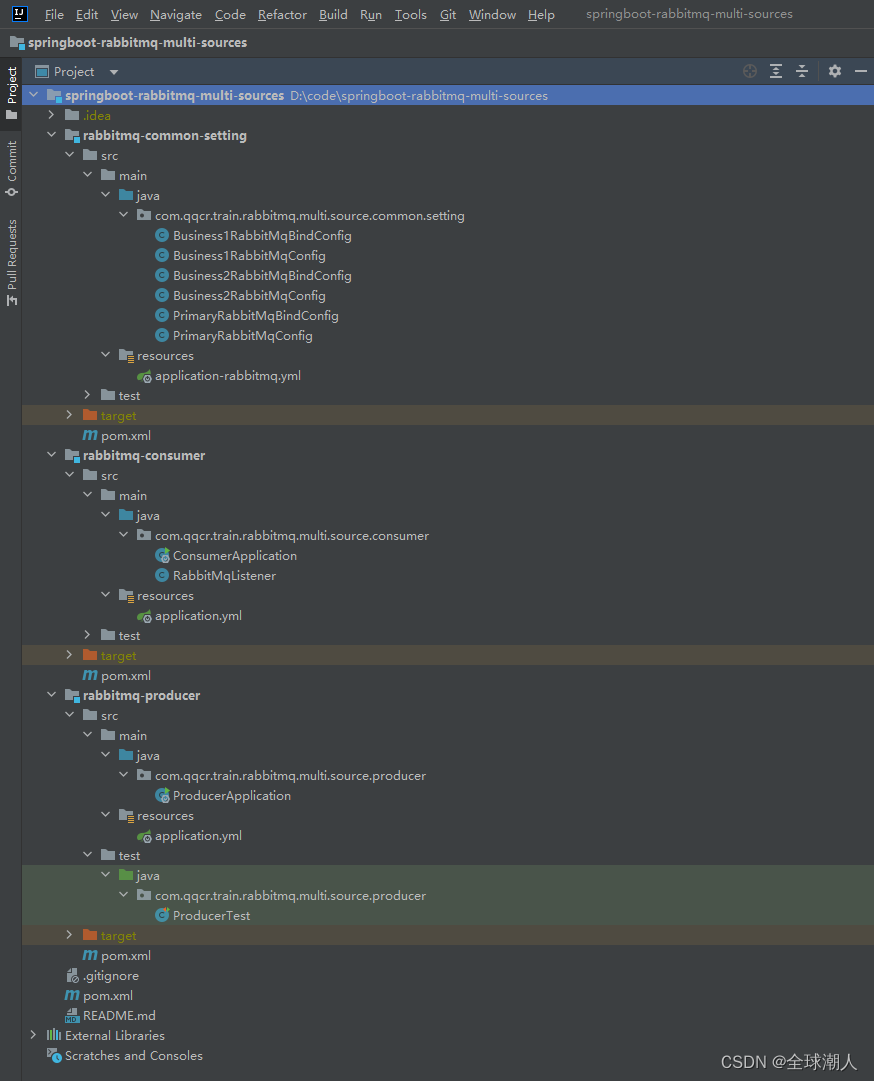
SpringBoot工程结构如下:
springboot-rabbitmq-multi-sources为父工程,下面共有三个工程rabbitmq-common-setting、rabbitmq-consumer、rabbitmq-producer。
rabbitmq-common-setting里面有三个RabbitMq数据源的连接配置。
rabbitmq-consumer和rabbitmq-producer依赖rabbitmq-common-setting。
父工程相关配置
- springboot-rabbitmq-multi-sources的pom文件中引入依赖
    <!-- 父工程依赖:父工程设置为springboot,则当前工程就是springboot工程 -->
    <parent>
        <groupId>org.springframework.boot</groupId>
        <artifactId>spring-boot-starter-parent</artifactId>
        <version>3.1.0</version>
    </parent>

    <dependencies>
        <!--springboot集成rabbitmq-->
        <dependency>
            <groupId>org.springframework.boot</groupId>
            <artifactId>spring-boot-starter-amqp</artifactId>
        </dependency>
        <!--springboot中关于rabbitmq的自动配置-->
        <dependency>
            <groupId>org.springframework.boot</groupId>
            <artifactId>spring-boot-autoconfigure</artifactId>
            <!--<version>3.1.0</version>-->
        </dependency>

        <dependency>
            <groupId>org.projectlombok</groupId>
            <artifactId>lombok</artifactId>
            <version>1.16.10</version>
            <scope>provided</scope>
        </dependency>
        <!--引入springboot测试,使用springboot测试来发送消息-->
        <dependency>
            <groupId>org.springframework.boot</groupId>
            <artifactId>spring-boot-starter-test</artifactId>
        </dependency>
    </dependencies>

- 1
- 2
- 3
- 4
- 5
- 6
- 7
- 8
- 9
- 10
- 11
- 12
- 13
- 14
- 15
- 16
- 17
- 18
- 19
- 20
- 21
- 22
- 23
- 24
- 25
- 26
- 27
- 28
- 29
- 30
- 31
- 32
- 33
rabbitmq-common-setting工程代码与配置
- application-rabbitmq.yml配置
app:
  # 第一个rabbitmq数据源,一般来说,这个数据源就是当前项目主要使用的数据源,
  # 而rabbitmq-datasource-business1和rabbitmq-datasource-business2则是其他项目的数据源,
  # 当前项目由于各种各样的原因要监听其他项目的数据源。
  # 比如之前曾经在做DIPS项目的时候,由于要使用IDC的项目数据作为输入,
  # 所以DIPS自己就需要去监听IDC的消息队列,才能知道IDC的项目数据什么时候分析出结果,然后再去文件网关取数据
  rabbitmq-datasource-primary:
    rabbitmq:
      host: 192.168.10.200 # ip
      port: 5672
      username: admin
      password: admin
      virtual-host: /
  # 第一个其他业务的rabbitmq数据源,一般来自于其他业务,因为本业务与其他业务有联动,所以才会去监听其他业务
  rabbitmq-datasource-business1:
    rabbitmq:
      host: 192.168.10.201 # ip
      port: 5672
      username: admin
      password: admin
      virtual-host: /
  # 第一个其他业务的rabbitmq数据源,一般来自于其他业务,因为本业务与其他业务有联动,所以才会去监听其他业务
  rabbitmq-datasource-business2:
    rabbitmq:
      host: 192.168.10.202 # ip
      port: 5672
      username: admin
      password: admin
      virtual-host: /
- 1
- 2
- 3
- 4
- 5
- 6
- 7
- 8
- 9
- 10
- 11
- 12
- 13
- 14
- 15
- 16
- 17
- 18
- 19
- 20
- 21
- 22
- 23
- 24
- 25
- 26
- 27
- 28
- 29
- 30
- 主数据源配置类PrimaryRabbitMqConfig
import lombok.Getter;
import lombok.Setter;
import org.springframework.amqp.rabbit.config.SimpleRabbitListenerContainerFactory;
import org.springframework.amqp.rabbit.connection.CachingConnectionFactory;
import org.springframework.amqp.rabbit.connection.ConnectionFactory;
import org.springframework.amqp.rabbit.connection.RabbitConnectionFactoryBean;
import org.springframework.amqp.rabbit.core.RabbitAdmin;
import org.springframework.amqp.rabbit.core.RabbitTemplate;
import org.springframework.beans.factory.annotation.Autowired;
import org.springframework.beans.factory.annotation.Qualifier;
import org.springframework.boot.autoconfigure.amqp.CachingConnectionFactoryConfigurer;
import org.springframework.boot.autoconfigure.amqp.RabbitConnectionFactoryBeanConfigurer;
import org.springframework.boot.autoconfigure.amqp.RabbitProperties;
import org.springframework.boot.autoconfigure.amqp.SimpleRabbitListenerContainerFactoryConfigurer;
import org.springframework.boot.context.properties.ConfigurationProperties;
import org.springframework.context.annotation.Bean;
import org.springframework.context.annotation.Configuration;
import org.springframework.context.annotation.Primary;
import org.springframework.core.io.ResourceLoader;
import org.springframework.stereotype.Component;

import java.util.Objects;

/**
 * 此类可以参考:
 * SpringBoot配置多个RabbitMQ源:
 * <a href="https://blog.csdn.net/Yu_Mariam/article/details/123938940">...</a>
 * <a href="https://blog.csdn.net/tmr1016/article/details/108623855">...</a>
 */
@Configuration
public class PrimaryRabbitMqConfig {
    @Autowired
    @Qualifier(value = "primaryRabbitmqProperties")
    private PrimaryRabbitMqConfigProperties primaryRabbitMqConfigProperties;

    /**
     * 配置数据源连接
     * 如果有多个ConnectionFactory,这个Bean上面注解了@Primary,其他地方在注入ConnectionFactory的时候,
     * 如果没有使用@Qualifier(value="xxx")指明要使用具体的哪个ConnectionFactory,则会默认使用@Primary标记的RabbitTemplate
     *
     * @param resourceLoader
     * @return
     * @throws Exception
     */
    @Bean("primaryRabbitMqDataSourceFactory")
    @Primary
    public ConnectionFactory rabbitMqDataSource1Factory(ResourceLoader resourceLoader) throws Exception {
        RabbitConnectionFactoryBeanConfigurer rabbitConnectionFactoryBeanConfigure =
                new RabbitConnectionFactoryBeanConfigurer(resourceLoader, primaryRabbitMqConfigProperties.getRabbitmq());
        RabbitConnectionFactoryBean factoryBean = new RabbitConnectionFactoryBean();
        rabbitConnectionFactoryBeanConfigure.configure(factoryBean);
        factoryBean.afterPropertiesSet();

        CachingConnectionFactory factory = new CachingConnectionFactory(Objects.requireNonNull(factoryBean.getObject()));
        new CachingConnectionFactoryConfigurer(primaryRabbitMqConfigProperties.getRabbitmq()).configure(factory);
        return factory;
    }

    /**
     * RabbitAdmin和ConnectionFactory绑定,定义的队列、交换机、Bind就和RabbitAdmin绑定,
     * 这样程序就知道队列、交换机、Bind在具体的哪个数据源上创建了
     *
     * @param connectionFactory
     * @return
     */
    @Bean("primaryRabbitAdmin")
    @Primary
    public RabbitAdmin rabbitAdmin(@Qualifier("primaryRabbitMqDataSourceFactory") ConnectionFactory connectionFactory) {
        return new RabbitAdmin(connectionFactory);
    }

    /**
     * 配置生产者的rabbit template(无生产者可删除此类)
     * 如果有多个RabbitTemplate,这个Bean上面注解了@Primary,其他地方在注入RabbitTemplate的时候,
     * 如果没有使用@Qualifier(value="xxx")指明要使用具体的哪个RabbitTemplate,则会默认使用@Primary标记的RabbitTemplate。
     * 如果有多个不同的Bean都是RabbitTemplate类型,
     * 其他地方在使用的时候,没有使用@Qualifier(value="xxx")指明要使用具体的哪个RabbitTemplate,则会报错。
     *
     * @param connectionFactory
     * @return
     */
    @Bean(name = "primaryRabbitTemplate")
    @Primary
    public RabbitTemplate primaryRabbitTemplate(@Qualifier("primaryRabbitMqDataSourceFactory") ConnectionFactory connectionFactory) {
        return new RabbitTemplate(connectionFactory);
    }

    /**
     * 获取消费者通道监听类(无消费者可删除此类)
     */
    @Bean(name = "primaryListenerFactory")
    public SimpleRabbitListenerContainerFactory innerFactory(SimpleRabbitListenerContainerFactoryConfigurer configurer,
                                                             @Qualifier("primaryRabbitMqDataSourceFactory") ConnectionFactory connectionFactory) {
        SimpleRabbitListenerContainerFactory factory = new SimpleRabbitListenerContainerFactory();
        configurer.configure(factory, connectionFactory);
        return factory;
    }

    /**
     * 从配置文件中读取aaaa这个rabbit mq数据源的配置类,然后装配到类中的rabbitmq属性中。
     * 注:RabbitProperties这个类属于org.springframework.boot.autoconfigure.amqp包,里面有以下属性,不需要我们再自己写一个类来承载相关的属性:
     * host、port、username、password、virtualHost、ssl。
     * 要将yml文件中的aaaa这个rabbit mq相关的连接信息注入到RabbitProperties类中,需要将host、port、username、password、virtualHost、ssl的前缀配置成如下:
     * app.rabbitmq-datasource-aaaa.rabbitmq,而具体的host、port、username、password、virtualHost、ssl配置成如下格式:
     * app.rabbitmq-datasource-aaaa.rabbitmq.host=122.9.140.213
     * app.rabbitmq-datasource-aaaa.rabbitmq.port=5672
     * app.rabbitmq-datasource-aaaa.rabbitmq.username=guest
     * app.rabbitmq-datasource-aaaa.rabbitmq.password=guest
     * app.rabbitmq-datasource-aaaa.rabbitmq.virtual-host=/
     * ssl是一个对象,则ssl相关的配置就继续使用.进行配置,如:
     * app.rabbitmq-datasource-aaaa.rabbitmq.ssl.enabled=true
     * <p>
     * 创建这个工程的核心就是为了使用这个类,将配置文件中的rabbit mq数据源读到配置类中,再通过自动装配相关的代码,连接rabbit mq数据源。
     * 2022年末在做一个项目时,当时要连接两个rabbit mq,当时老项目的rabbitmq很轻松地连上了,新项目专用的rabbit mq配置了ssl连接,多数据源配置研究了很久,
     * 都不知道怎么配置ssl连接,另一个同时就使用了这种配置方式,快速地解决了这个问题,我当时惊为天人,还能这样操作。
     */
    @Getter
    @Setter
    @ConfigurationProperties(prefix = "app.rabbitmq-datasource-primary")
    @Component(value = "primaryRabbitmqProperties")
    static class PrimaryRabbitMqConfigProperties {
        private RabbitProperties rabbitmq;
    }
}
- 1
- 2
- 3
- 4
- 5
- 6
- 7
- 8
- 9
- 10
- 11
- 12
- 13
- 14
- 15
- 16
- 17
- 18
- 19
- 20
- 21
- 22
- 23
- 24
- 25
- 26
- 27
- 28
- 29
- 30
- 31
- 32
- 33
- 34
- 35
- 36
- 37
- 38
- 39
- 40
- 41
- 42
- 43
- 44
- 45
- 46
- 47
- 48
- 49
- 50
- 51
- 52
- 53
- 54
- 55
- 56
- 57
- 58
- 59
- 60
- 61
- 62
- 63
- 64
- 65
- 66
- 67
- 68
- 69
- 70
- 71
- 72
- 73
- 74
- 75
- 76
- 77
- 78
- 79
- 80
- 81
- 82
- 83
- 84
- 85
- 86
- 87
- 88
- 89
- 90
- 91
- 92
- 93
- 94
- 95
- 96
- 97
- 98
- 99
- 100
- 101
- 102
- 103
- 104
- 105
- 106
- 107
- 108
- 109
- 110
- 111
- 112
- 113
- 114
- 115
- 116
- 117
- 118
- 119
- 120
- 121
- 122
- 123
- 124
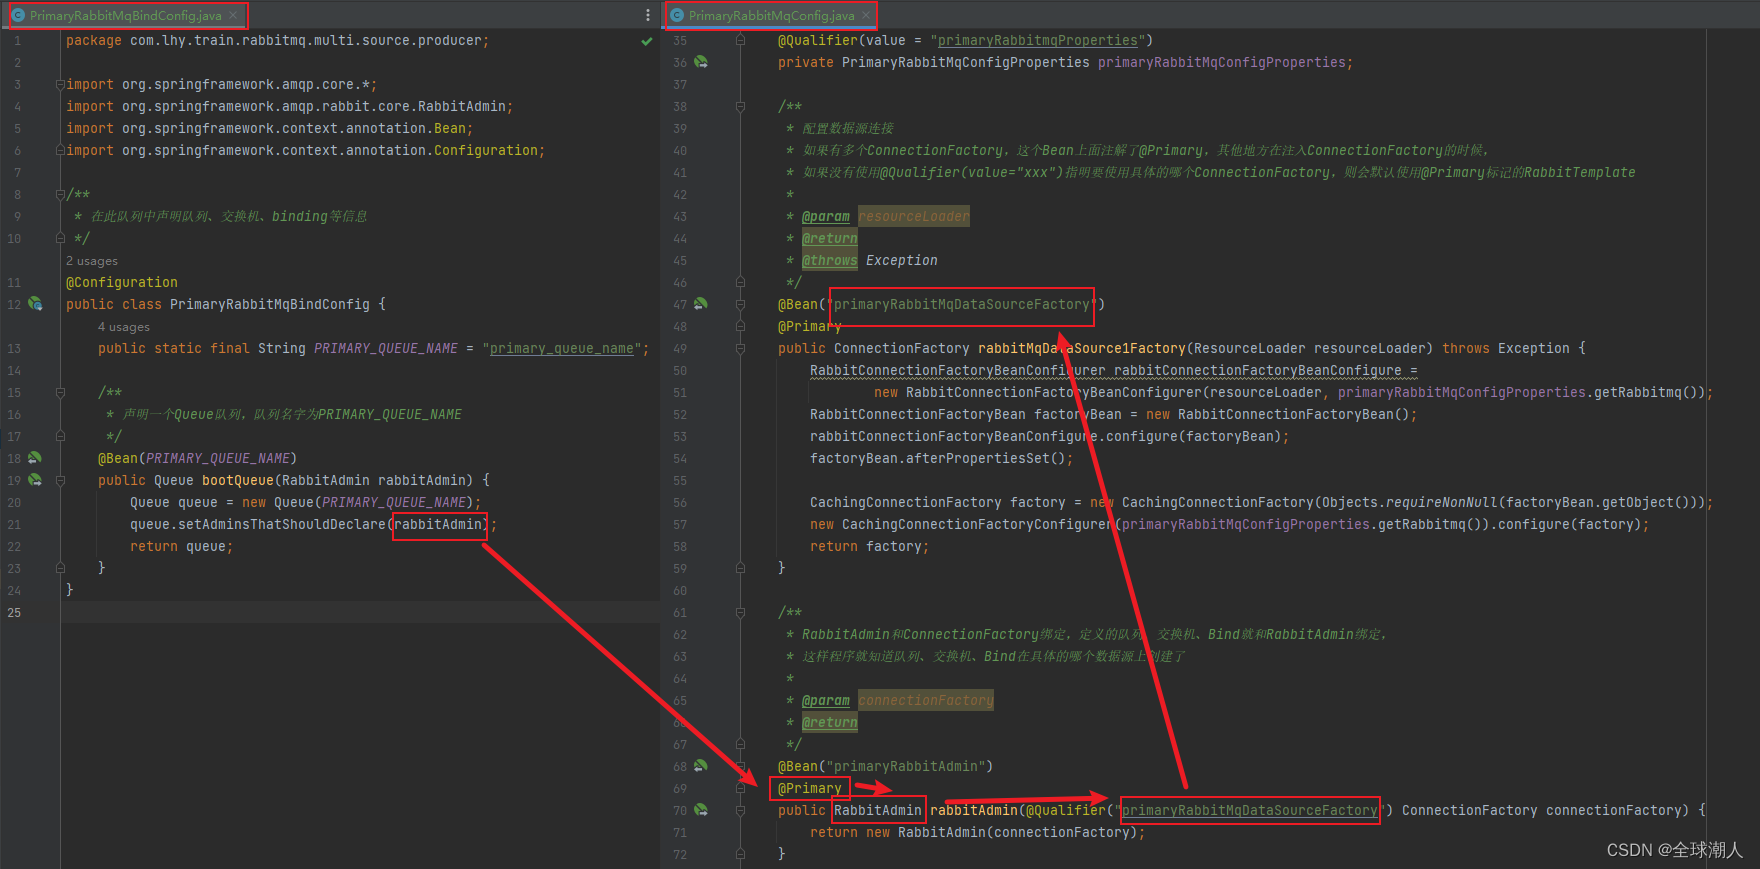
- 主数据源的rabbitmq队列声明相关配置类
import org.springframework.amqp.core.*;
import org.springframework.amqp.rabbit.core.RabbitAdmin;
import org.springframework.context.annotation.Bean;
import org.springframework.context.annotation.Configuration;

/**
 * 在此队列中声明队列、交换机、binding等信息
 */
@Configuration
public class PrimaryRabbitMqBindConfig {
    public static final String PRIMARY_QUEUE_NAME = "primary_queue_name";

    /**
     * 声明一个Queue队列,队列名字为PRIMARY_QUEUE_NAME
     */
    @Bean(PRIMARY_QUEUE_NAME)
    public Queue bootQueue(RabbitAdmin rabbitAdmin) {
        Queue queue = new Queue(PRIMARY_QUEUE_NAME);
        queue.setAdminsThatShouldDeclare(rabbitAdmin);
        return queue;
    }
}
- 1
- 2
- 3
- 4
- 5
- 6
- 7
- 8
- 9
- 10
- 11
- 12
- 13
- 14
- 15
- 16
- 17
- 18
- 19
- 20
- 21
- 22
在声明队列时,因为本项目中有多个rabbitmq数据源,所以需要将队列与具体的数据源绑定,具体的方式为将队列与RabbitAdmin绑定,而RabbitAdmin与具体的数据源绑定,另外两个数据源的队列声明类似,如下所示
- 第一个次数据源的配置
import lombok.Getter;
import lombok.Setter;
import org.springframework.amqp.rabbit.config.SimpleRabbitListenerContainerFactory;
import org.springframework.amqp.rabbit.connection.CachingConnectionFactory;
import org.springframework.amqp.rabbit.connection.ConnectionFactory;
import org.springframework.amqp.rabbit.connection.RabbitConnectionFactoryBean;
import org.springframework.amqp.rabbit.core.RabbitAdmin;
import org.springframework.amqp.rabbit.core.RabbitTemplate;
import org.springframework.beans.factory.annotation.Autowired;
import org.springframework.beans.factory.annotation.Qualifier;
import org.springframework.boot.autoconfigure.amqp.CachingConnectionFactoryConfigurer;
import org.springframework.boot.autoconfigure.amqp.RabbitConnectionFactoryBeanConfigurer;
import org.springframework.boot.autoconfigure.amqp.RabbitProperties;
import org.springframework.boot.autoconfigure.amqp.SimpleRabbitListenerContainerFactoryConfigurer;
import org.springframework.boot.context.properties.ConfigurationProperties;
import org.springframework.context.annotation.Bean;
import org.springframework.context.annotation.Configuration;
import org.springframework.core.io.ResourceLoader;
import org.springframework.stereotype.Component;

import java.util.Objects;

/**
 * 此类可以参考:
 * SpringBoot配置多个RabbitMQ源:
 * https://blog.csdn.net/Yu_Mariam/article/details/123938940
 * https://blog.csdn.net/tmr1016/article/details/108623855
 */
@Configuration
public class Business1RabbitMqConfig {
    @Autowired
    @Qualifier(value = "business1RabbitmqProperties")
    private Business1RabbitMqConfigProperties business1RabbitMqConfigProperties;

    /**
     * 配置数据源连接
     *
     * @param resourceLoader
     * @return
     * @throws Exception
     */
    @Bean("business1RabbitMqDataSourceFactory")
    public ConnectionFactory rabbitMqDataSource1Factory(ResourceLoader resourceLoader) throws Exception {
        RabbitConnectionFactoryBeanConfigurer rabbitConnectionFactoryBeanConfigure =
                new RabbitConnectionFactoryBeanConfigurer(resourceLoader, business1RabbitMqConfigProperties.getRabbitmq());
        RabbitConnectionFactoryBean factoryBean = new RabbitConnectionFactoryBean();
        rabbitConnectionFactoryBeanConfigure.configure(factoryBean);
        factoryBean.afterPropertiesSet();

        CachingConnectionFactory factory = new CachingConnectionFactory(Objects.requireNonNull(factoryBean.getObject()));
        new CachingConnectionFactoryConfigurer(business1RabbitMqConfigProperties.getRabbitmq()).configure(factory);
        return factory;
    }

    /**
     * RabbitAdmin和ConnectionFactory绑定,定义的队列、交换机、Bind就和RabbitAdmin绑定,
     * 这样程序就知道队列、交换机、Bind在具体的哪个数据源上创建了。
     * 当有多个数据源的时候,如果只有一个数据源配置了RabbitAdmin,则所有的queue、exchange、bind都会在该RabbitAdmin绑定的数据源上创建。
     * @param connectionFactory
     * @return
     */
    @Bean("business1RabbitAdmin")
    public RabbitAdmin rabbitAdmin(@Qualifier("business1RabbitMqDataSourceFactory")ConnectionFactory connectionFactory) {
        return new RabbitAdmin(connectionFactory);
    }

    /**
     * 配置生产者的rabbit template(无生产者可删除此类)
     * RabbitTemplate不需要和RabbitAdmin关联,因为已经和ConnectionFactory关联上了,而ConnectionFactory中有ip、用户、密码、等连接信息
     *
     * @param connectionFactory
     * @return
     */
    @Bean(name = "business1RabbitTemplate")
    public RabbitTemplate innerRabbitTemplate(@Qualifier("business1RabbitMqDataSourceFactory") ConnectionFactory connectionFactory) {
        return new RabbitTemplate(connectionFactory);
    }

    /**
     * 获取消费者通道监听类(无消费者可删除此类)
     * 消费者应该也不需要和RabbitAdmin关联,因为已经和ConnectionFactory关联上了,而ConnectionFactory中有ip、用户、密码、等连接信息
     */
    @Bean(name = "business1ListenerFactory")
    public SimpleRabbitListenerContainerFactory innerFactory(SimpleRabbitListenerContainerFactoryConfigurer configurer,
                                                             @Qualifier("business1RabbitMqDataSourceFactory") ConnectionFactory connectionFactory) {
        SimpleRabbitListenerContainerFactory factory = new SimpleRabbitListenerContainerFactory();
        configurer.configure(factory, connectionFactory);
        return factory;
    }


    /**
     * 从配置文件中读取business1这个rabbit mq数据源的配置类,然后装配到类中的rabbitmq属性中。
     * 注:RabbitProperties这个类属于org.springframework.boot.autoconfigure.amqp包,里面有以下属性,不需要我们再自己写一个类来承载相关的属性:
     * host、port、username、password、virtualHost、ssl。
     * 要将yml文件中的business1这个rabbit mq相关的连接信息注入到RabbitProperties类中,需要将host、port、username、password、virtualHost、ssl的前缀配置成如下:
     * app.rabbitmq-datasource-business1.rabbitmq,而具体的host、port、username、password、virtualHost、ssl配置成如下格式:
     * app.rabbitmq-datasource-business1.rabbitmq.host=122.9.140.213
     * app.rabbitmq-datasource-business1.rabbitmq.port=5672
     * app.rabbitmq-datasource-business1.rabbitmq.username=guest
     * app.rabbitmq-datasource-business1.rabbitmq.password=guest
     * app.rabbitmq-datasource-business1.rabbitmq.virtual-host=/
     * ssl是一个对象,则ssl相关的配置就继续使用.进行配置,如:
     * app.rabbitmq-datasource-business1.rabbitmq.ssl.enabled=true
     * <p>
     * 创建这个工程的核心就是为了使用这个类,将配置文件中的rabbit mq数据源读到配置类中,再通过自动装配相关的代码,连接rabbit mq数据源。
     * 2022年末在做一个项目时,当时要连接两个rabbit mq,当时老项目的rabbitmq很轻松地连上了,新项目专用的rabbit mq配置了ssl连接,多数据源配置研究了很久,
     * 都不知道怎么配置ssl连接,另一个同时就使用了这种配置方式,快速地解决了这个问题,我当时惊为天人,还能这样操作。
     */
    @Getter
    @Setter
    @ConfigurationProperties(prefix = "app.rabbitmq-datasource-business1")
    @Component(value = "business1RabbitmqProperties")
    static class Business1RabbitMqConfigProperties {
        private RabbitProperties rabbitmq;
    }
}
- 1
- 2
- 3
- 4
- 5
- 6
- 7
- 8
- 9
- 10
- 11
- 12
- 13
- 14
- 15
- 16
- 17
- 18
- 19
- 20
- 21
- 22
- 23
- 24
- 25
- 26
- 27
- 28
- 29
- 30
- 31
- 32
- 33
- 34
- 35
- 36
- 37
- 38
- 39
- 40
- 41
- 42
- 43
- 44
- 45
- 46
- 47
- 48
- 49
- 50
- 51
- 52
- 53
- 54
- 55
- 56
- 57
- 58
- 59
- 60
- 61
- 62
- 63
- 64
- 65
- 66
- 67
- 68
- 69
- 70
- 71
- 72
- 73
- 74
- 75
- 76
- 77
- 78
- 79
- 80
- 81
- 82
- 83
- 84
- 85
- 86
- 87
- 88
- 89
- 90
- 91
- 92
- 93
- 94
- 95
- 96
- 97
- 98
- 99
- 100
- 101
- 102
- 103
- 104
- 105
- 106
- 107
- 108
- 109
- 110
- 111
- 112
- 113
- 114
- 115
- 116
- 117
- 118
- 119
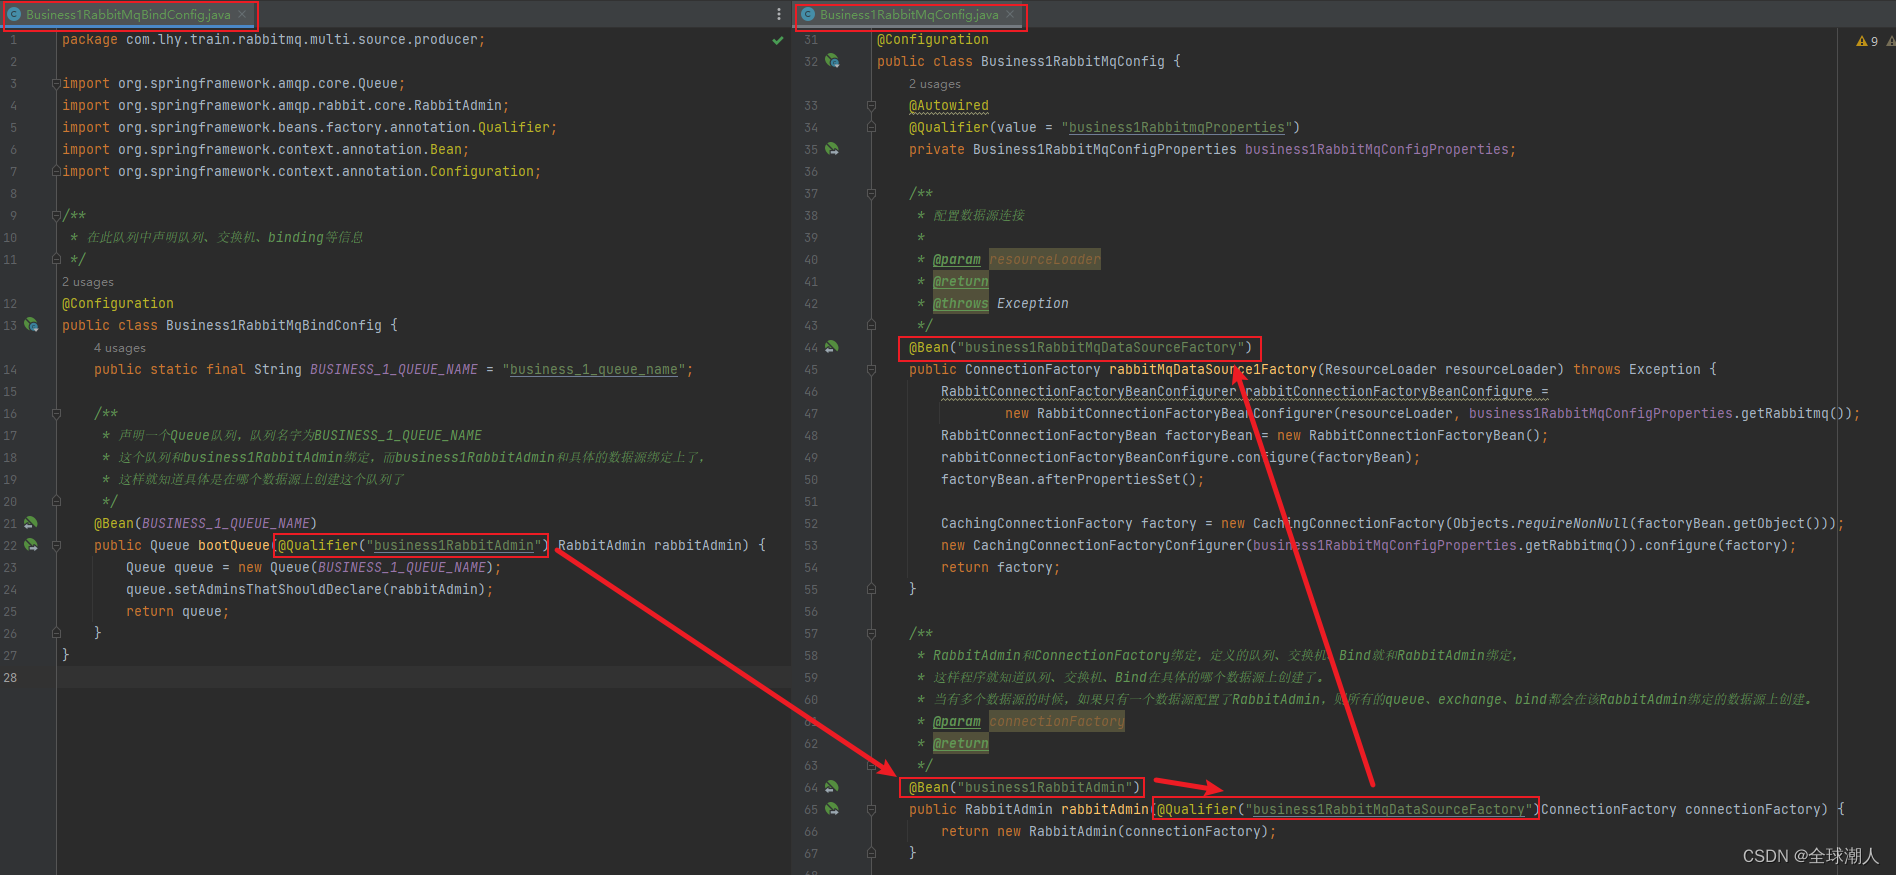
- 第一个次数据源的队列声明
import org.springframework.amqp.core.Queue;
import org.springframework.amqp.rabbit.core.RabbitAdmin;
import org.springframework.beans.factory.annotation.Qualifier;
import org.springframework.context.annotation.Bean;
import org.springframework.context.annotation.Configuration;

/**
 * 在此队列中声明队列、交换机、binding等信息
 */
@Configuration
public class Business1RabbitMqBindConfig {
    public static final String BUSINESS_1_QUEUE_NAME = "business_1_queue_name";

    /**
     * 声明一个Queue队列,队列名字为BUSINESS_1_QUEUE_NAME
     * 这个队列和business1RabbitAdmin绑定,而business1RabbitAdmin和具体的数据源绑定上了,
     * 这样就知道具体是在哪个数据源上创建这个队列了
     */
    @Bean(BUSINESS_1_QUEUE_NAME)
    public Queue bootQueue(@Qualifier("business1RabbitAdmin") RabbitAdmin rabbitAdmin) {
        Queue queue = new Queue(BUSINESS_1_QUEUE_NAME);
        queue.setAdminsThatShouldDeclare(rabbitAdmin);
        return queue;
    }
}
- 1
- 2
- 3
- 4
- 5
- 6
- 7
- 8
- 9
- 10
- 11
- 12
- 13
- 14
- 15
- 16
- 17
- 18
- 19
- 20
- 21
- 22
- 23
- 24
- 25
- 26
- 27
在声明队列时,因为本项目中有多个rabbitmq数据源,所以需要将队列与具体的数据源绑定,具体的方式为将队列与RabbitAdmin绑定,而RabbitAdmin与具体的数据源绑定,另外两个数据源的队列声明类似,如下所示
- 第二个次数据源的连接配置
import lombok.Getter;
import lombok.Setter;
import org.springframework.amqp.rabbit.config.SimpleRabbitListenerContainerFactory;
import org.springframework.amqp.rabbit.connection.CachingConnectionFactory;
import org.springframework.amqp.rabbit.connection.ConnectionFactory;
import org.springframework.amqp.rabbit.connection.RabbitConnectionFactoryBean;
import org.springframework.amqp.rabbit.core.RabbitAdmin;
import org.springframework.amqp.rabbit.core.RabbitTemplate;
import org.springframework.beans.factory.annotation.Autowired;
import org.springframework.beans.factory.annotation.Qualifier;
import org.springframework.boot.autoconfigure.amqp.CachingConnectionFactoryConfigurer;
import org.springframework.boot.autoconfigure.amqp.RabbitConnectionFactoryBeanConfigurer;
import org.springframework.boot.autoconfigure.amqp.RabbitProperties;
import org.springframework.boot.autoconfigure.amqp.SimpleRabbitListenerContainerFactoryConfigurer;
import org.springframework.boot.context.properties.ConfigurationProperties;
import org.springframework.context.annotation.Bean;
import org.springframework.context.annotation.Configuration;
import org.springframework.core.io.ResourceLoader;
import org.springframework.stereotype.Component;

import java.util.Objects;

/**
 * 此类可以参考:
 * SpringBoot配置多个RabbitMQ源:
 * https://blog.csdn.net/Yu_Mariam/article/details/123938940
 * https://blog.csdn.net/tmr1016/article/details/108623855
 */
@Configuration
public class Business2RabbitMqConfig {
    @Autowired
    @Qualifier(value = "business2RabbitmqProperties")
    private Business2RabbitMqConfigProperties business2RabbitMqConfigProperties;

    /**
     * 配置数据源连接
     *
     * @param resourceLoader
     * @return
     * @throws Exception
     */
    @Bean("business2RabbitMqDataSourceFactory")
    public ConnectionFactory rabbitMqDataSource1Factory(ResourceLoader resourceLoader) throws Exception {
        RabbitConnectionFactoryBeanConfigurer rabbitConnectionFactoryBeanConfigure =
                new RabbitConnectionFactoryBeanConfigurer(resourceLoader, business2RabbitMqConfigProperties.getRabbitmq());
        RabbitConnectionFactoryBean factoryBean = new RabbitConnectionFactoryBean();
        rabbitConnectionFactoryBeanConfigure.configure(factoryBean);
        factoryBean.afterPropertiesSet();

        CachingConnectionFactory factory = new CachingConnectionFactory(Objects.requireNonNull(factoryBean.getObject()));
        new CachingConnectionFactoryConfigurer(business2RabbitMqConfigProperties.getRabbitmq()).configure(factory);
        return factory;
    }

    /**
     * RabbitAdmin和ConnectionFactory绑定,定义的队列、交换机、Bind就和RabbitAdmin绑定,
     * 这样程序就知道队列、交换机、Bind在具体的哪个数据源上创建了。
     * 当有多个数据源的时候,如果只有一个数据源配置了RabbitAdmin,则所有的queue、exchange、bind都会在该RabbitAdmin绑定的数据源上创建。
     *
     * @param connectionFactory
     * @return
     */
    @Bean("business2RabbitAdmin")
    public RabbitAdmin rabbitAdmin(@Qualifier("business2RabbitMqDataSourceFactory") ConnectionFactory connectionFactory) {
        return new RabbitAdmin(connectionFactory);
    }

    /**
     * 配置生产者的rabbit template(无生产者可删除此类)
     *
     * @param connectionFactory
     * @return
     */
    @Bean(name = "business2RabbitTemplate")
    public RabbitTemplate innerRabbitTemplate(@Qualifier("business2RabbitMqDataSourceFactory") ConnectionFactory connectionFactory) {
        return new RabbitTemplate(connectionFactory);
    }

    /**
     * 获取消费者通道监听类(无消费者可删除此类)
     */
    @Bean(name = "business2ListenerFactory")
    public SimpleRabbitListenerContainerFactory innerFactory(SimpleRabbitListenerContainerFactoryConfigurer configurer,
                                                             @Qualifier("business2RabbitMqDataSourceFactory") ConnectionFactory connectionFactory) {
        SimpleRabbitListenerContainerFactory factory = new SimpleRabbitListenerContainerFactory();
        configurer.configure(factory, connectionFactory);
        return factory;
    }


    /**
     * 从配置文件中读取business2这个rabbit mq数据源的配置类,然后装配到类中的rabbitmq属性中。
     * 注:RabbitProperties这个类属于org.springframework.boot.autoconfigure.amqp包,里面有以下属性,不需要我们再自己写一个类来承载相关的属性:
     * host、port、username、password、virtualHost、ssl。
     * 要将yml文件中的business2这个rabbit mq相关的连接信息注入到RabbitProperties类中,需要将host、port、username、password、virtualHost、ssl的前缀配置成如下:
     * app.rabbitmq-datasource-business2.rabbitmq,而具体的host、port、username、password、virtualHost、ssl配置成如下格式:
     * app.rabbitmq-datasource-business2.rabbitmq.host=122.9.140.213
     * app.rabbitmq-datasource-business2.rabbitmq.port=5672
     * app.rabbitmq-datasource-business2.rabbitmq.username=guest
     * app.rabbitmq-datasource-business2.rabbitmq.password=guest
     * app.rabbitmq-datasource-business2.rabbitmq.virtual-host=/
     * ssl是一个对象,则ssl相关的配置就继续使用.进行配置,如:
     * app.rabbitmq-datasource-business2.rabbitmq.ssl.enabled=true
     * <p>
     * 创建这个工程的核心就是为了使用这个类,将配置文件中的rabbit mq数据源读到配置类中,再通过自动装配相关的代码,连接rabbit mq数据源。
     * 2022年末在做一个项目时,当时要连接两个rabbit mq,当时老项目的rabbitmq很轻松地连上了,新项目专用的rabbit mq配置了ssl连接,多数据源配置研究了很久,
     * 都不知道怎么配置ssl连接,另一个同时就使用了这种配置方式,快速地解决了这个问题,我当时惊为天人,还能这样操作。
     */
    @Getter
    @Setter
    @ConfigurationProperties(prefix = "app.rabbitmq-datasource-business2")
    @Component(value = "business2RabbitmqProperties")
    static class Business2RabbitMqConfigProperties {
        private RabbitProperties rabbitmq;
    }
}
- 1
- 2
- 3
- 4
- 5
- 6
- 7
- 8
- 9
- 10
- 11
- 12
- 13
- 14
- 15
- 16
- 17
- 18
- 19
- 20
- 21
- 22
- 23
- 24
- 25
- 26
- 27
- 28
- 29
- 30
- 31
- 32
- 33
- 34
- 35
- 36
- 37
- 38
- 39
- 40
- 41
- 42
- 43
- 44
- 45
- 46
- 47
- 48
- 49
- 50
- 51
- 52
- 53
- 54
- 55
- 56
- 57
- 58
- 59
- 60
- 61
- 62
- 63
- 64
- 65
- 66
- 67
- 68
- 69
- 70
- 71
- 72
- 73
- 74
- 75
- 76
- 77
- 78
- 79
- 80
- 81
- 82
- 83
- 84
- 85
- 86
- 87
- 88
- 89
- 90
- 91
- 92
- 93
- 94
- 95
- 96
- 97
- 98
- 99
- 100
- 101
- 102
- 103
- 104
- 105
- 106
- 107
- 108
- 109
- 110
- 111
- 112
- 113
- 114
- 115
- 116
- 117
- 118
- 第二个次数据源的队列声明
import org.springframework.amqp.core.Queue;
import org.springframework.amqp.rabbit.core.RabbitAdmin;
import org.springframework.beans.factory.annotation.Qualifier;
import org.springframework.context.annotation.Bean;
import org.springframework.context.annotation.Configuration;

/**
 * 在此队列中声明队列、交换机、binding等信息
 */
@Configuration
public class Business2RabbitMqBindConfig {
    public static final String BUSINESS_2_QUEUE_NAME = "business_2_queue_name";

    /**
     * 声明一个Queue队列,队列名字为BUSINESS_2_QUEUE_NAME
     * 这个队列和business2RabbitAdmin绑定,而business2RabbitAdmin和具体的数据源绑定上了,
     * 这样就知道具体是在哪个数据源上创建这个队列了
     */
    @Bean(BUSINESS_2_QUEUE_NAME)
    public Queue bootQueue(@Qualifier("business2RabbitAdmin") RabbitAdmin rabbitAdmin) {
        Queue queue = new Queue(BUSINESS_2_QUEUE_NAME);
        queue.setAdminsThatShouldDeclare(rabbitAdmin);
        return queue;
    }
}
- 1
- 2
- 3
- 4
- 5
- 6
- 7
- 8
- 9
- 10
- 11
- 12
- 13
- 14
- 15
- 16
- 17
- 18
- 19
- 20
- 21
- 22
- 23
- 24
- 25
- 26
- 27
注意队列与数据源绑定的方式
生产者工程的代码与配置
- 生产者application.yml配置
spring:
  profiles:
    include: rabbitmq
- 1
- 2
- 3
- 4
- 生产者启动类
import org.springframework.boot.SpringApplication;
import org.springframework.boot.autoconfigure.SpringBootApplication;
import org.springframework.context.annotation.ComponentScan;

/**
 * 由于三个RabbitMq数据源和队列相关声明全在rabbitmq-common-setting工程中,
 * 而rabbitmq-common-setting工程的RabbitMq配置所在的包不在本启动类的扫描路径中,
 * 所以需要使用ComponentScan来将rabbitmq-common-setting工程中RabbitMq配置所在的包名包含在扫描路径中,具体的包名是
 * "com.qqcr.train.rabbitmq.multi.source.common.setting"。
 */
@SpringBootApplication
@ComponentScan(value = {"com.qqcr.train.rabbitmq.multi.source.common.setting"})
public class ProducerApplication {
    public static void main(String[] args) {
        SpringApplication.run(ProducerApplication.class, args);
    }
}
- 1
- 2
- 3
- 4
- 5
- 6
- 7
- 8
- 9
- 10
- 11
- 12
- 13
- 14
- 15
- 16
- 17
- 18
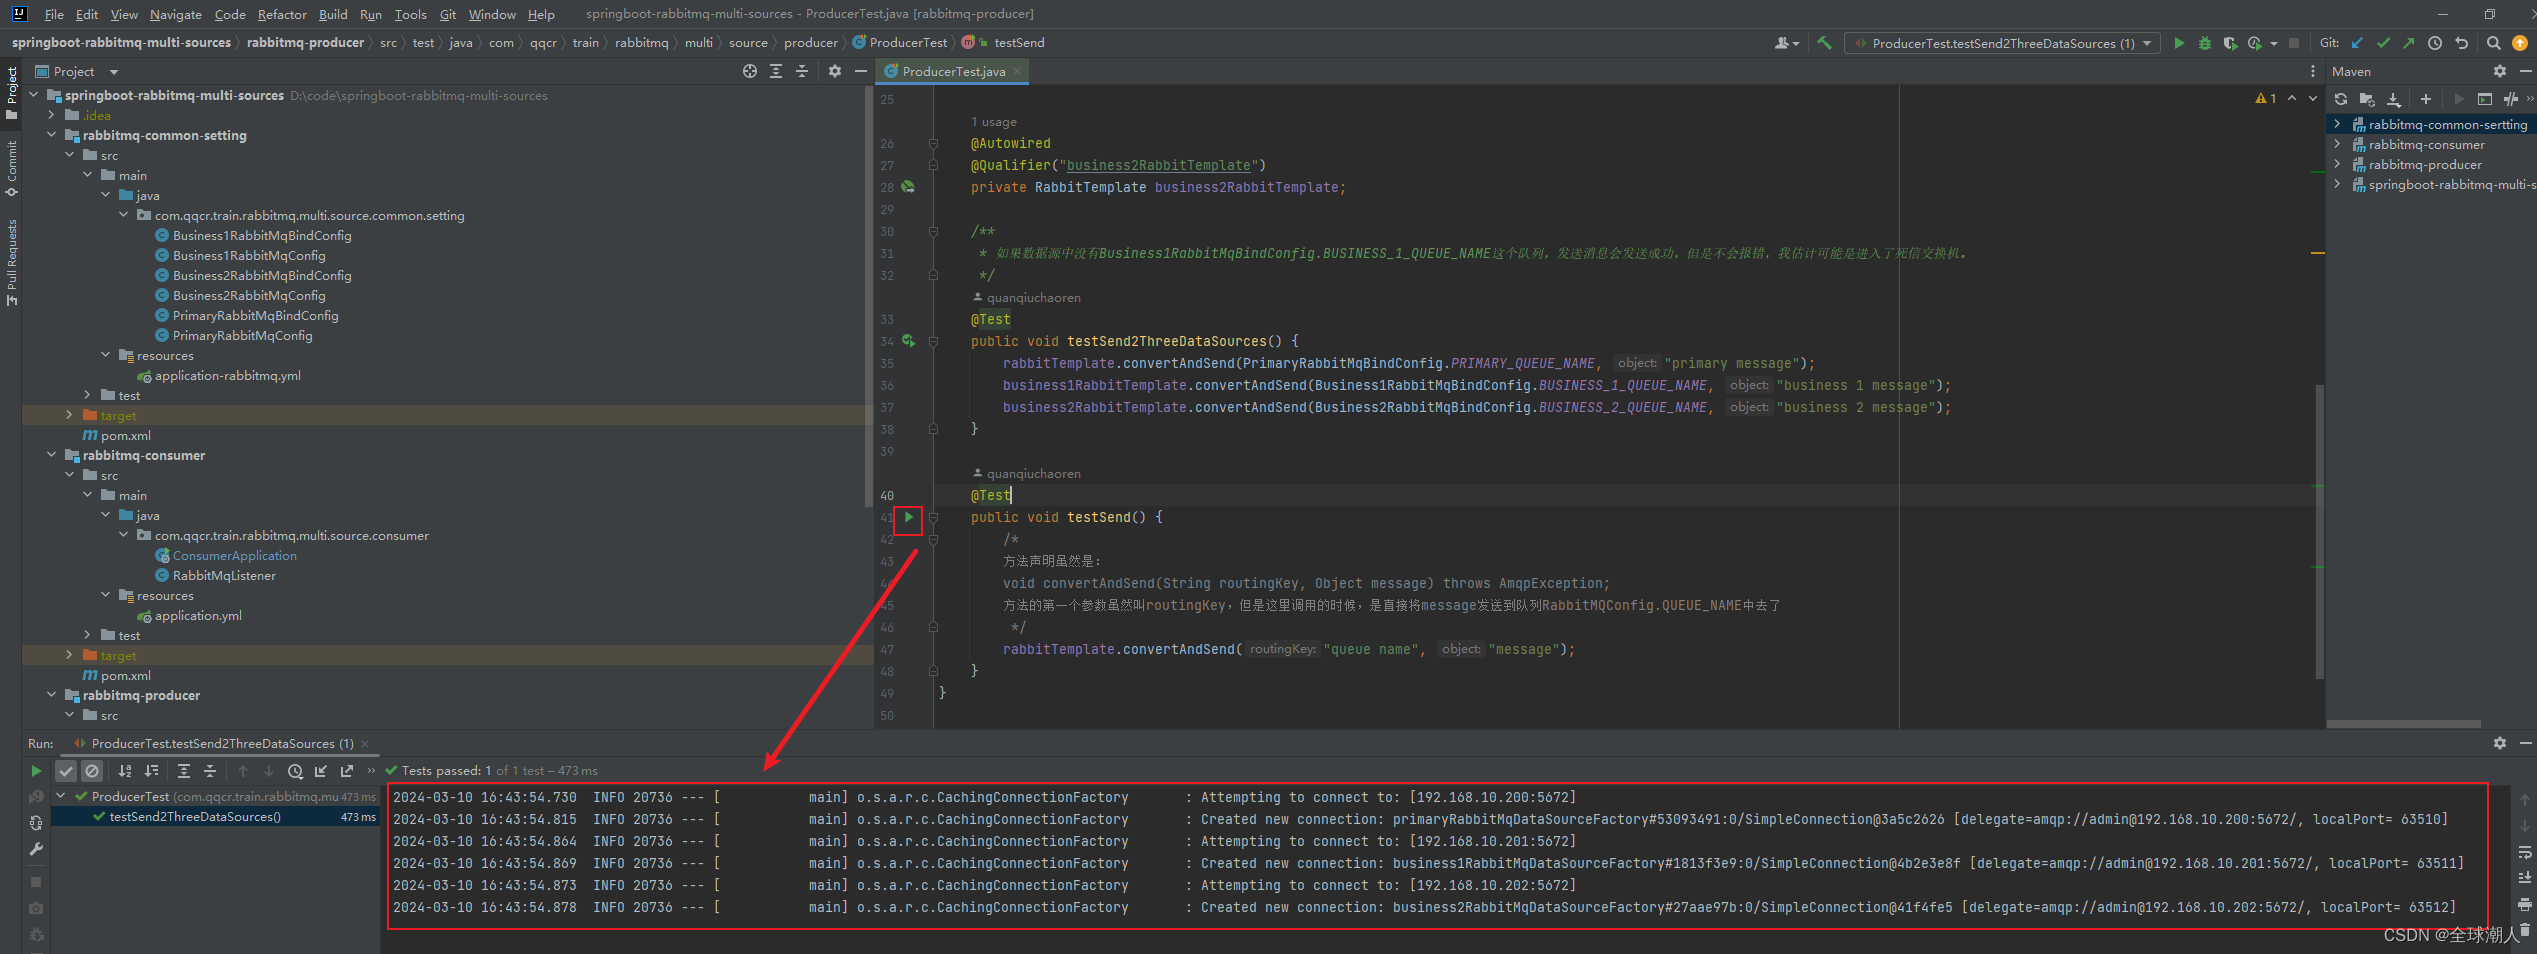
- 生产者测试类ProducerTest
import org.junit.jupiter.api.Test;
import org.springframework.amqp.rabbit.core.RabbitTemplate;
import org.springframework.beans.factory.annotation.Autowired;
import org.springframework.beans.factory.annotation.Qualifier;
import org.springframework.boot.test.context.SpringBootTest;

/**
 * 参考博客:
 * https://blog.csdn.net/Cey_Tao/article/details/128098509
 */
@SpringBootTest
public class ProducerTest {
    @Autowired
    private RabbitTemplate rabbitTemplate;

    @Autowired
    @Qualifier("business1RabbitTemplate")
    private RabbitTemplate business1RabbitTemplate;

    @Autowired
    @Qualifier("business2RabbitTemplate")
    private RabbitTemplate business2RabbitTemplate;

    /**
     * 如果数据源中没有Business1RabbitMqBindConfig.BUSINESS_1_QUEUE_NAME这个队列,发送消息会发送成功,但是不会报错,我估计可能是进入了死信交换机。
     */
    @Test
    public void testSend2ThreeDataSources() {
        rabbitTemplate.convertAndSend(PrimaryRabbitMqBindConfig.PRIMARY_QUEUE_NAME, "primary message");
        business1RabbitTemplate.convertAndSend(Business1RabbitMqBindConfig.BUSINESS_1_QUEUE_NAME, "business 1 message");
        business2RabbitTemplate.convertAndSend(Business2RabbitMqBindConfig.BUSINESS_2_QUEUE_NAME, "business 2 message");
    }

    @Test
    public void testSend() {
        /*
        方法声明虽然是:
        void convertAndSend(String routingKey, Object message) throws AmqpException;
        方法的第一个参数虽然叫routingKey,但是这里调用的时候,是直接将message发送到队列RabbitMQConfig.QUEUE_NAME中去了
         */
        rabbitTemplate.convertAndSend("queue name", "message");
    }
}
- 1
- 2
- 3
- 4
- 5
- 6
- 7
- 8
- 9
- 10
- 11
- 12
- 13
- 14
- 15
- 16
- 17
- 18
- 19
- 20
- 21
- 22
- 23
- 24
- 25
- 26
- 27
- 28
- 29
- 30
- 31
- 32
- 33
- 34
- 35
- 36
- 37
- 38
- 39
- 40
- 41
- 42
- 43
- 44
- 45
-
测试生产者
运行生产者发送消息testSend2ThreeDataSources()
发送成功
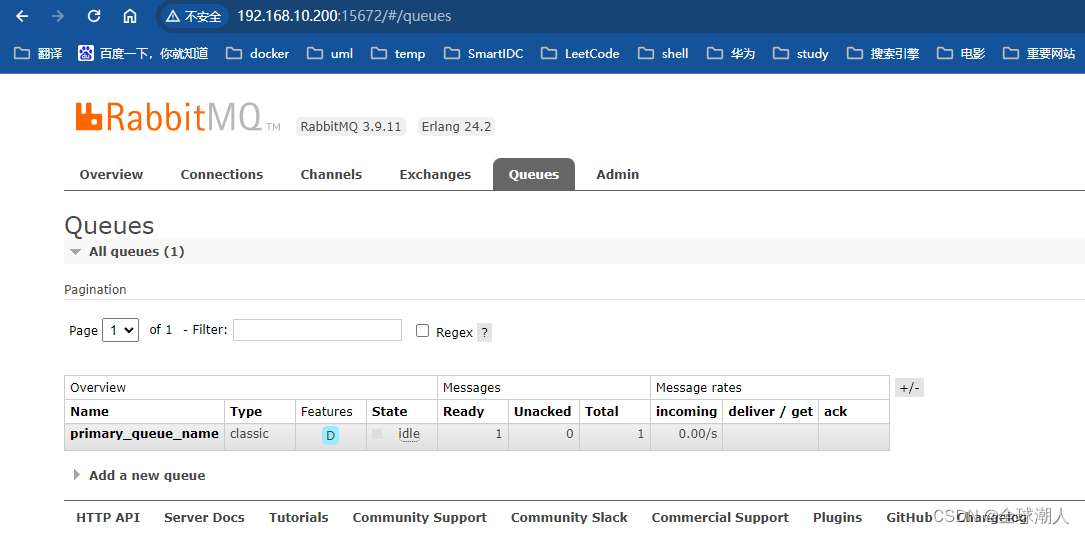
-
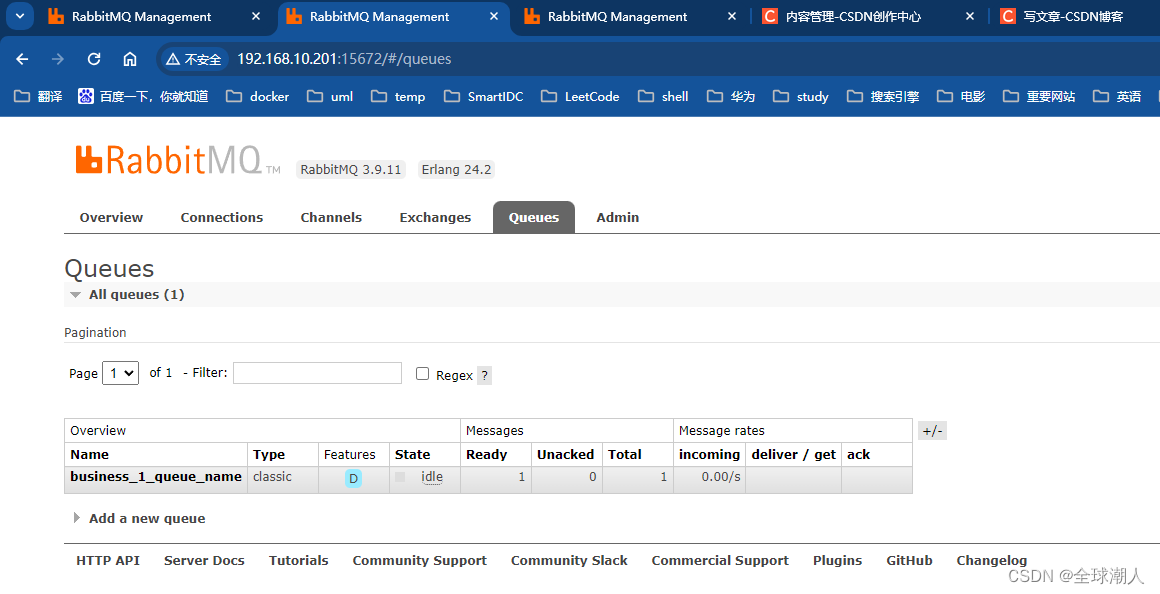
在rabbit mq管理平台查看
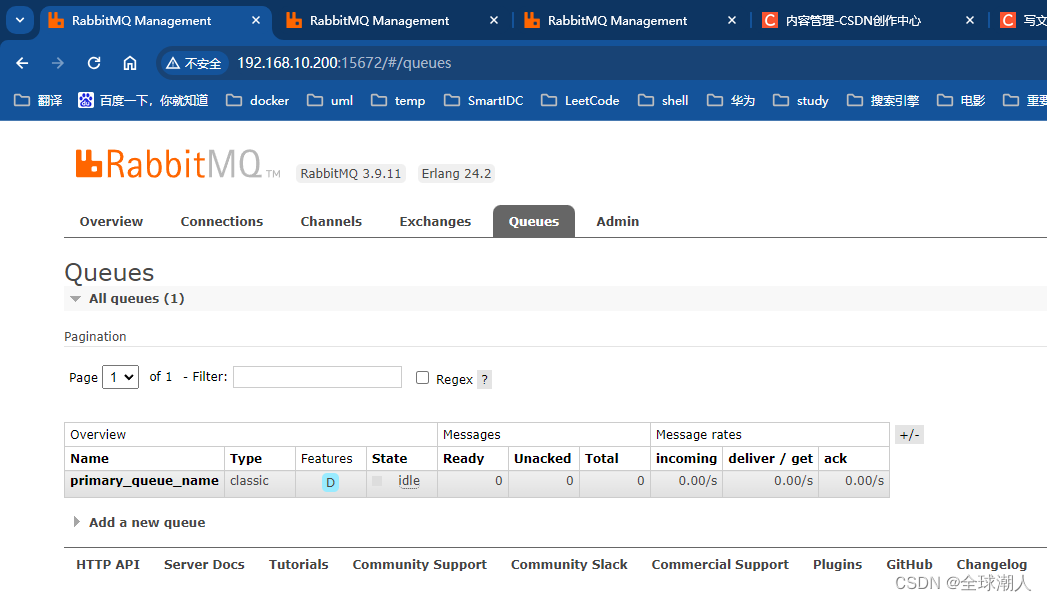
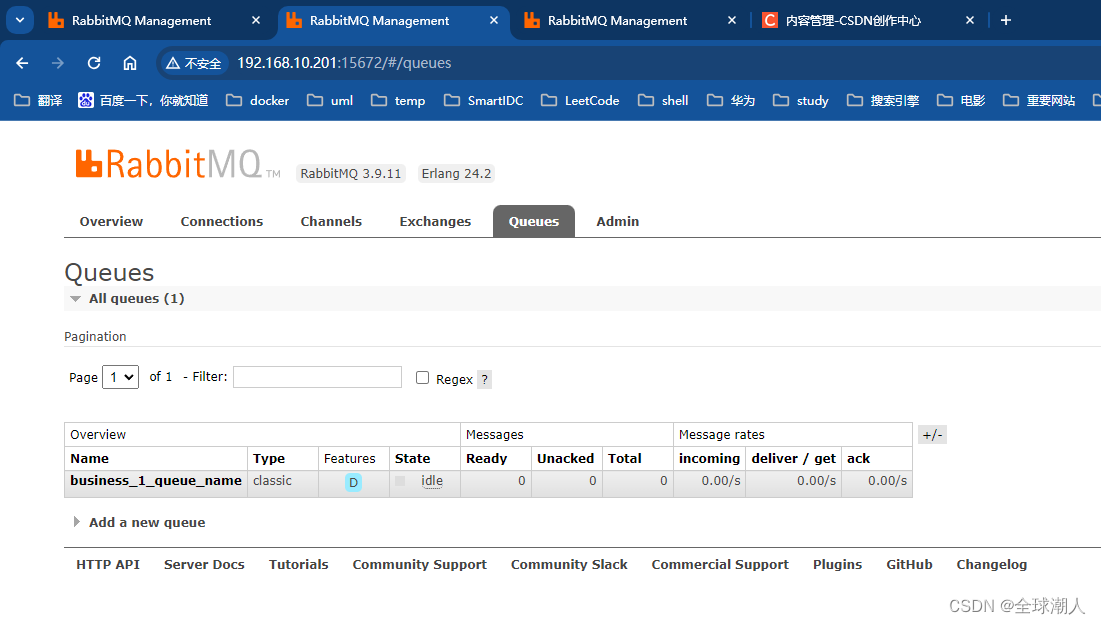
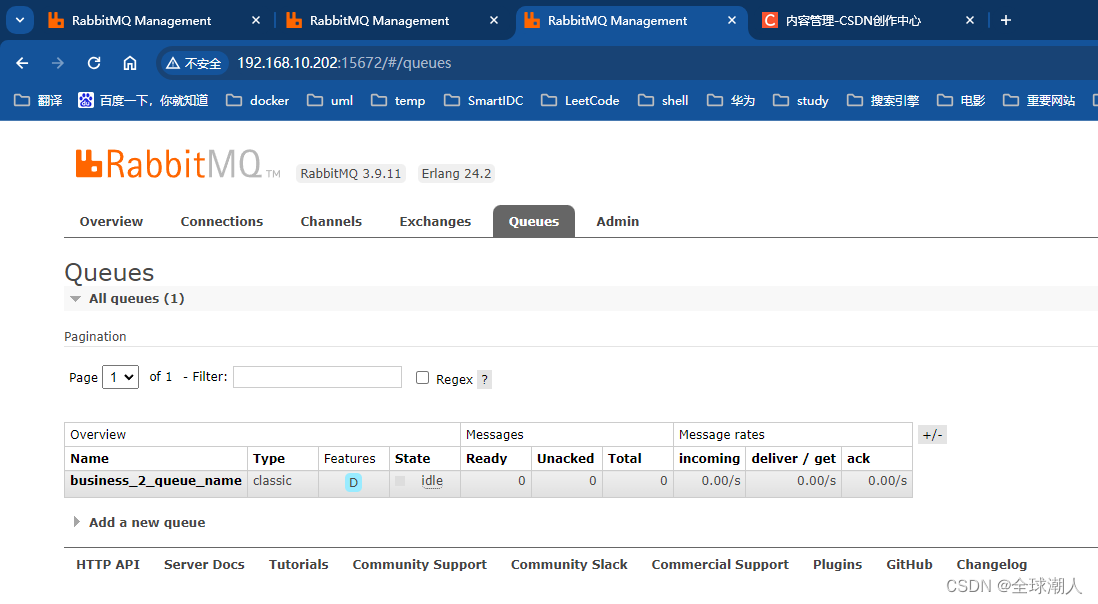
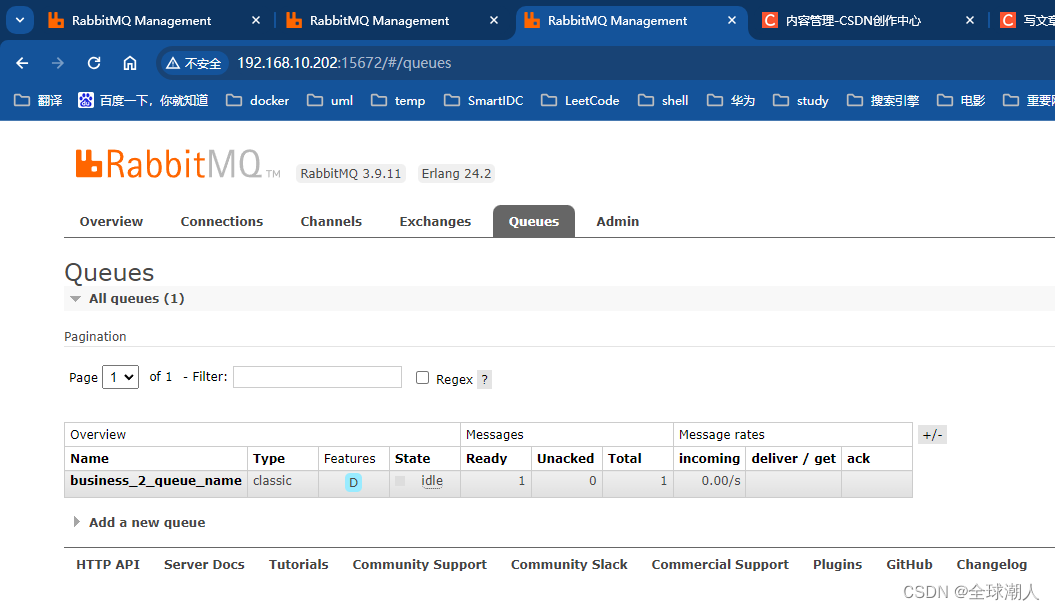
在rabbit mq管理平台查看配置类中定义并创建的队列,发现已经接收到消息,每个数据源的管理平台都可以看到,已经收到一条消息
第一个数据源的管理平台
第二个数据源的管理平台
第三个数据源的管理平台
消费者工程的代码与配置
- 生产者工程的application.yml配置
spring:
  profiles:
    include: rabbitmq
- 1
- 2
- 3
- 4
- 消费者所在工程的SpringBoot启动类
import org.springframework.boot.SpringApplication;
import org.springframework.boot.autoconfigure.SpringBootApplication;
import org.springframework.context.annotation.ComponentScan;

/**
 * 由于三个RabbitMq数据源和队列相关声明全在rabbitmq-common-setting工程中,
 * 而rabbitmq-common-setting工程的RabbitMq配置所在的包不在本启动类的扫描路径中,
 * 所以需要使用ComponentScan来将rabbitmq-common-setting工程中RabbitMq配置所在的包名包含在扫描路径中,具体的包名是
 * "com.qqcr.train.rabbitmq.multi.source.common.setting"。
 * 使用了ComponentScan将包名包含在扫描路径中后,
 * 还需要手动将本工程的需要扫描的包名"com.qqcr.train.rabbitmq.multi.source.consumer"再手动地写一下,
 * 否则的话,不会将相关的类(例如:RabbitMqListener)注入到Spring容器中。
 */
@SpringBootApplication
@ComponentScan(value = {"com.qqcr.train.rabbitmq.multi.source.common.setting", "com.qqcr.train.rabbitmq.multi.source.consumer"})
public class ConsumerApplication {
    public static void main(String[] args) {
        SpringApplication.run(ConsumerApplication.class, args);
    }
}
- 1
- 2
- 3
- 4
- 5
- 6
- 7
- 8
- 9
- 10
- 11
- 12
- 13
- 14
- 15
- 16
- 17
- 18
- 19
- 20
- 创建三个消费者
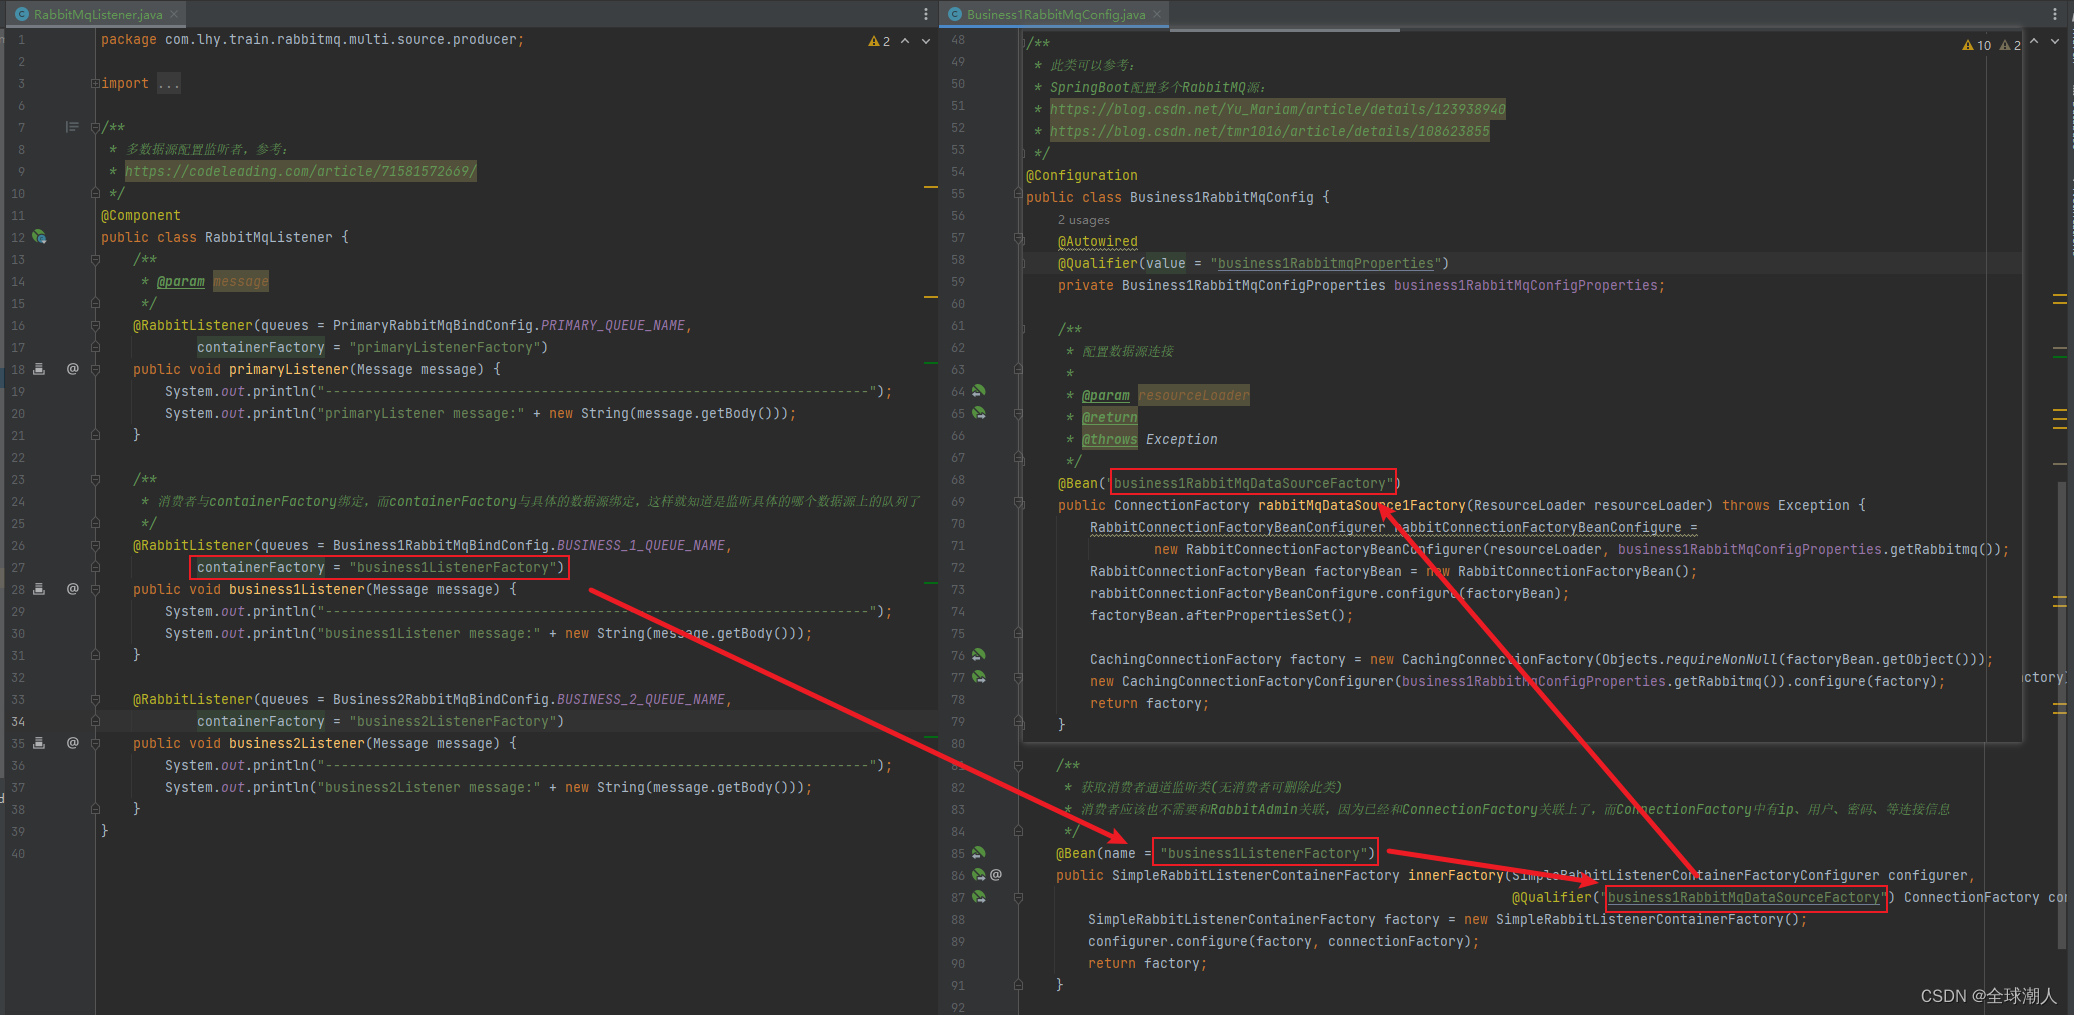
这三个消费者分别监听三个数据源里面的三个队列
/**
 * 多数据源配置监听者,参考:
 * https://codeleading.com/article/71581572669/
 */
@Component
public class RabbitMqListener {
    /**
     * @param message
     */
    @RabbitListener(queues = PrimaryRabbitMqBindConfig.PRIMARY_QUEUE_NAME, containerFactory = "primaryListenerFactory")
    public void primaryListener(Message message) {
        System.out.println("--------------------------------------------------------------------");
        System.out.println("primaryListener message:" + new String(message.getBody()));
    }

    /**
     * 消费者与containerFactory绑定,而containerFactory与具体的数据源绑定,这样就知道是监听具体的哪个数据源上的队列了
     */
    @RabbitListener(queues = Business1RabbitMqBindConfig.BUSINESS_1_QUEUE_NAME, containerFactory = "business1ListenerFactory")
    public void business1Listener(Message message) {
        System.out.println("--------------------------------------------------------------------");
        System.out.println("business1Listener message:" + new String(message.getBody()));
    }

    @RabbitListener(queues = Business2RabbitMqBindConfig.BUSINESS_2_QUEUE_NAME, containerFactory = "business2ListenerFactory")
    public void business2Listener(Message message) {
        System.out.println("--------------------------------------------------------------------");
        System.out.println("business2Listener message:" + new String(message.getBody()));
    }
}
- 1
- 2
- 3
- 4
- 5
- 6
- 7
- 8
- 9
- 10
- 11
- 12
- 13
- 14
- 15
- 16
- 17
- 18
- 19
- 20
- 21
- 22
- 23
- 24
- 25
- 26
- 27
- 28
- 29
- 30
- 31
三个消费者与具体的数据源绑定的方式,是通过在创建消费者的时候,注明具体的containerFactory完成的,而containerFactory与具体的数据源绑定,这样就知道每个消费者具体绑定的哪一个数据源,如下所示
- 测试消费者
启动ConsumerApplication。
观察日志,发现监听到了来自三个数据源的三条消息
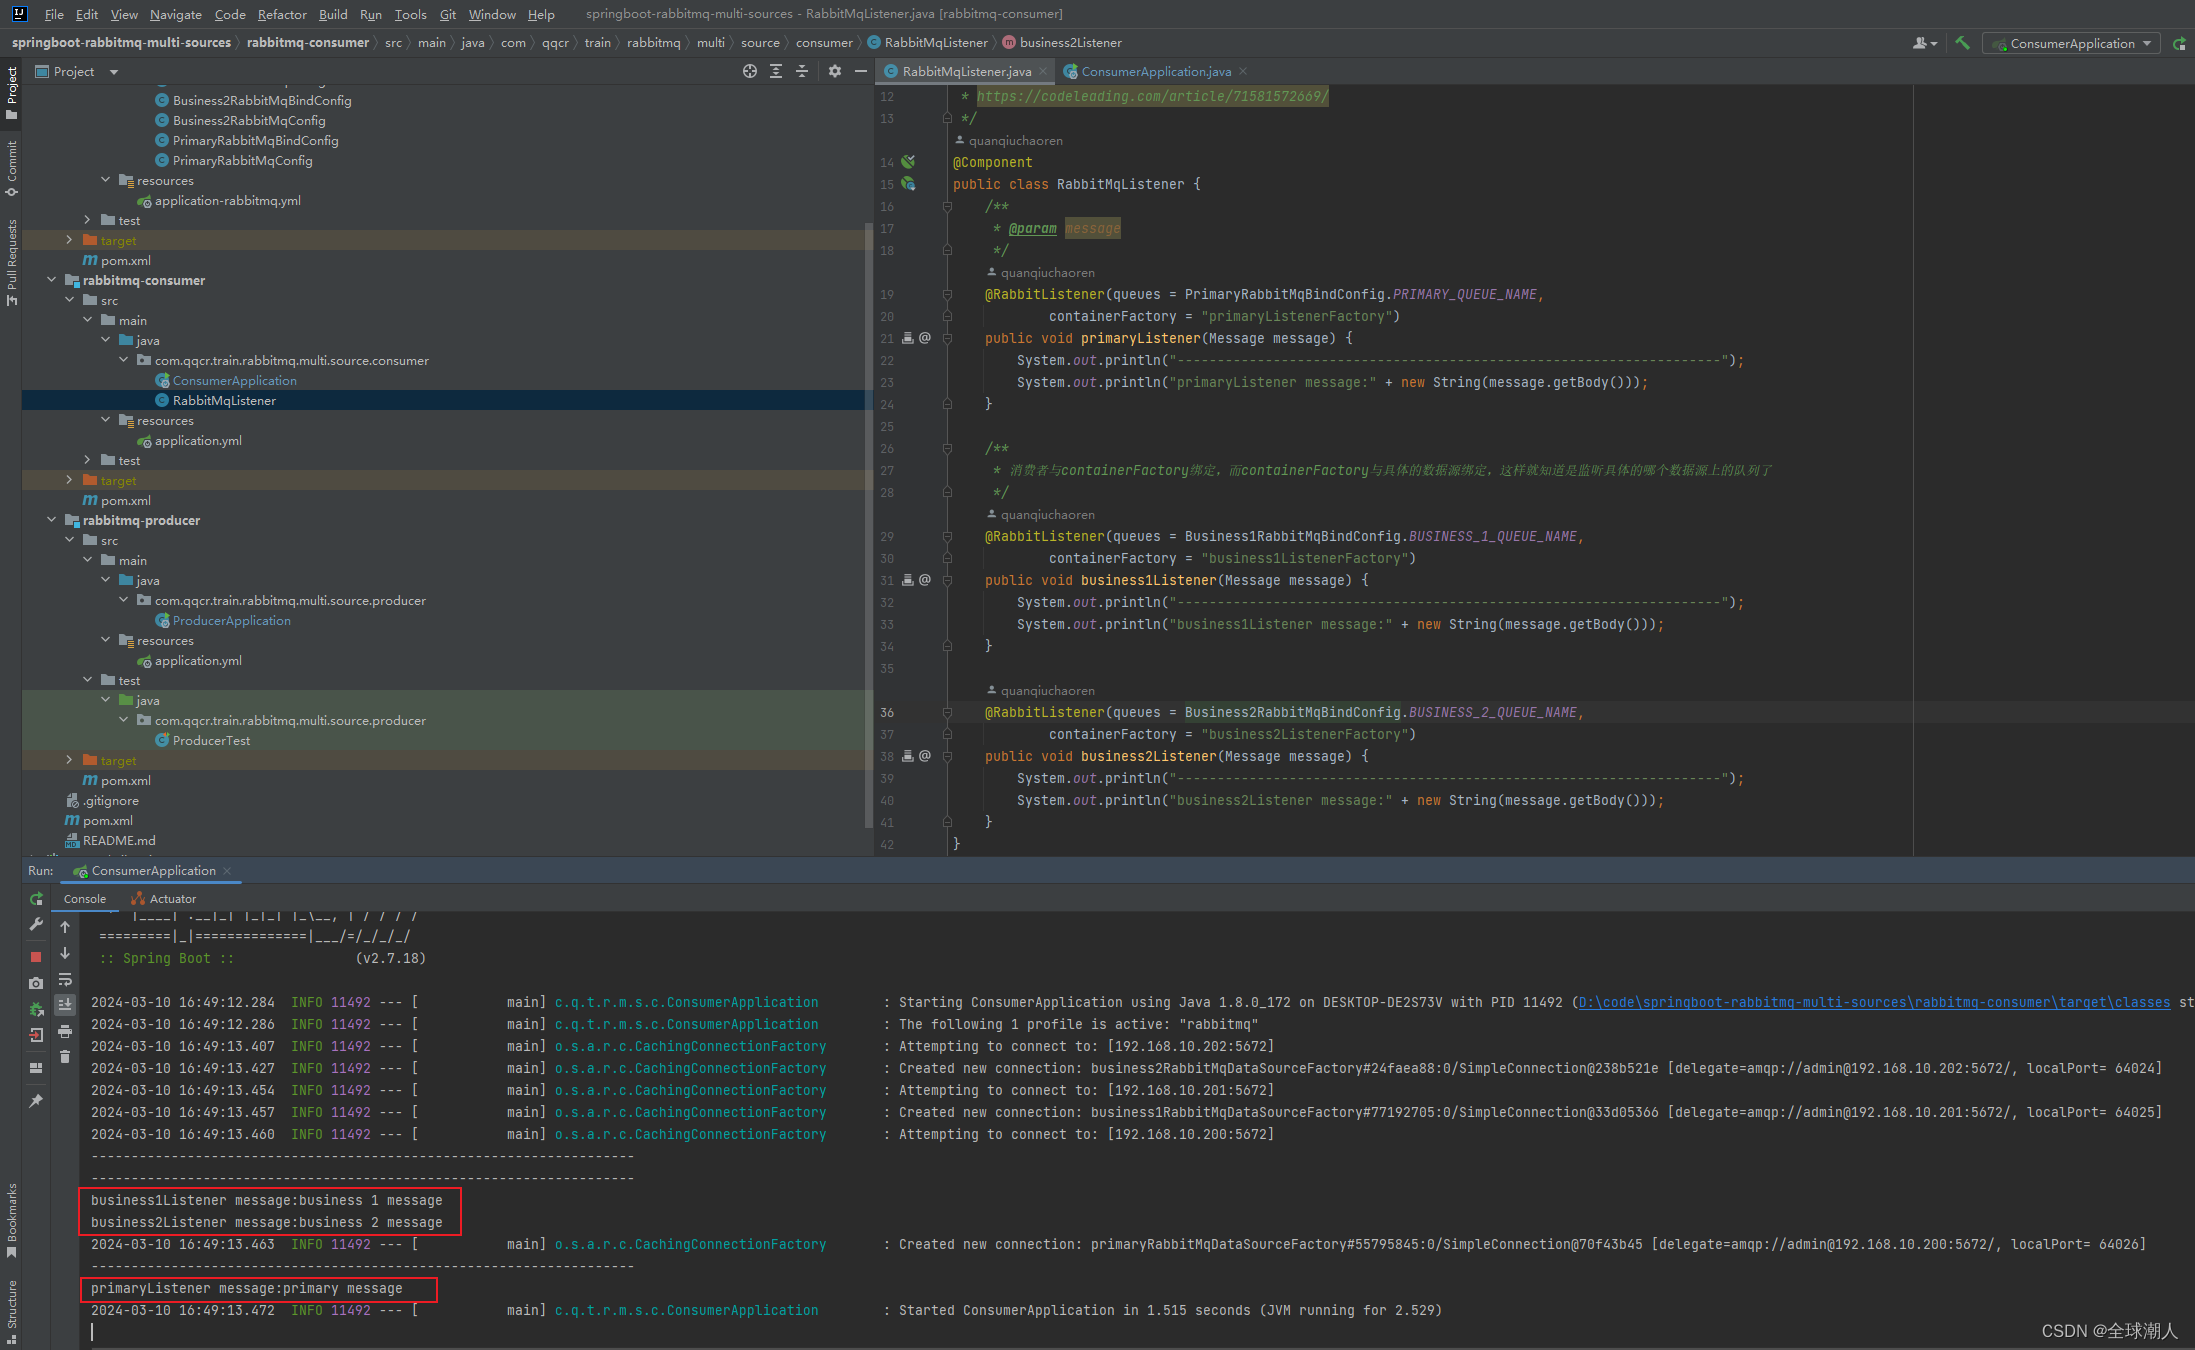
再登录三个数据源的管理平台查看,发现三个队列的消息都被消费了