热门标签
热门文章
- 1Kimi高阶技巧:打造你的AI写作助手,一键生成专业内容!_kimi 公众号写作 高级指令
- 2BlueDroid代码学习分享
- 3Spring整合Hibernate实现Spring Data JPA (介绍和使用)_org.hibernate.search.jpa 和 spring-data jpa 共享
- 4MUNIK解读功能安全软件开发阶段——软件安全需求_功能安全ssr
- 5训练过程acc_跟着雨哥学AI系列之三:详解飞桨框架模型训练
- 6真正国产的最良心的SSH工具,可能是唯一已具备替代SecureCRT、XShell、MobaXTerm等国外核心基础工具的软件,强烈推荐_国产ssh工具
- 7【图解大数据技术】流式计算:Spark Streaming、Flink
- 8《Docker极简教程》--Docker镜像--Docker镜像的概念_docker的tag是镜像表示
- 9IPSEC详解
- 10Flink面试题大全(建议收藏)
当前位置: article > 正文
【PyQt学习篇 · ③】:QObject - 神奇的对象管理工具_pyqt中的object、qwidget类图
作者:码创造者 | 2024-07-13 00:15:09
赞
踩
pyqt中的object、qwidget类图
QObject类型判定
常用的API
isWidgetType()方法:- 使用方式:obj.isWidgetType()
- 作用:判断一个对象是否为QWidget及其子类的实例。QWidget是QObject的子类,用于创建用户界面的窗口组件。
- 返回值:如果是QWidget及其子类的实例,则返回True;否则返回False。
- 以下为
isWidgetType()的使用示例:
from PyQt5.QtWidgets import *
from PyQt5.QtCore import QObject
import sys

class Window(QMainWindow):
    def __init__(self, parent=None):
        super().__init__(parent)

        self.steup_ui()

    def steup_ui(self):
        self.QObject_type_determination()

    # QObject类型判定
    def QObject_type_determination(self):
        obj = QObject()
        wid = QWidget()
        btn = QPushButton()
        label = QLabel()

        objs = [obj, wid, btn, label]

        for o in objs:
            print(o.isWidgetType())    # 判断某个对象是否是控件类

if __name__ == '__main__':
    app = QApplication(sys.argv)

    window = Window()
    window.show()

    sys.exit(app.exec_())
- 1
- 2
- 3
- 4
- 5
- 6
- 7
- 8
- 9
- 10
- 11
- 12
- 13
- 14
- 15
- 16
- 17
- 18
- 19
- 20
- 21
- 22
- 23
- 24
- 25
- 26
- 27
- 28
- 29
- 30
- 31
- 32
运行结果:

inherits()方法:- 使用方式:obj.inherits(class_name)
- 作用:判断一个对象是否为指定类名或其子类的实例。
- 参数:class_name为一个字符串,即类名。
- 返回值:如果是指定类名或其子类的实例,则返回True;否则返回False。
- 以下为
inherits()的使用示例(基于以上程序进行修改):
for o in objs:
    print(o.inherits("QPushButton"))    # 判断某个对象是否是控件类
- 1
- 2
运行结果:

需要注意的是,isWidgetType()和inherits()方法同样需要导入QtCore模块中的QObject类。这两个方法在QObject及其派生类中都可以使用。
应用场景:过滤筛选控件
案例:创建一个窗口,包含多个QLabel或其他控件。
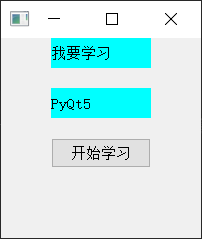
要求:将包含在窗口内所有的QLabel控件,设置背景色cyan。
以下为实现本次案例的代码:
    # QObject类型判定
    def QObject_type_determination(self):
        label = QLabel(self)
        label.setText('我要学习')
        label.move(50, 0)

        label2 = QLabel(self)
        label2.setText("PyQt5")
        label2.move(50, 50)

        btn = QPushButton(self)
        btn.setText("开始学习")
        btn.move(50, 100)

        for widget in self.children():
            if widget.inherits("QLabel"):
                widget.setStyleSheet("background-color: cyan;")

        # # 或者
        # for widget in self.findChildren(QLabel):
        #     widget.setStyleSheet("background-color: cyan;")
- 1
- 2
- 3
- 4
- 5
- 6
- 7
- 8
- 9
- 10
- 11
- 12
- 13
- 14
- 15
- 16
- 17
- 18
- 19
- 20
- 21
运行结果:

QObject定时器
常用API
在PyQt中,QObject类提供了定时器相关的API,包括startTimer、killTimer和timerEvent方法。
-
startTimer()方法:- 使用方式:
interval = obj.startTimer(msec) - 作用:启动一个定时器,在经过指定的毫秒数后触发定时器事件。定时器事件将被发送到obj的timerEvent()方法。
- 参数:msec为定时器的触发时间,单位为毫秒。
- 返回值:返回定时器的唯一标识符。
- 使用方式:
-
killTimer()方法:- 使用方式:
obj.killTimer(timerId) - 作用:停止指定标识符对应的定时器。
- 参数:timerId为定时器的唯一标识符。
- 使用方式:
-
timerEvent()方法:- 使用方式:def timerEvent(self, event)
- 作用:当定时器事件触发时,Qt会自动调用该方法处理定时器事件。
- 参数:event为事件对象,包含了定时器的标识符和相关信息。
注意:timerEvent()方法是QObject的保护方法,需要在子类中重新实现。该方法会在定时器事件触发时自动被调用。
应用场景
一般在轮询、倒计时等场景下使用。
案例:创建一个窗口,并设置一个子控件QLabel。
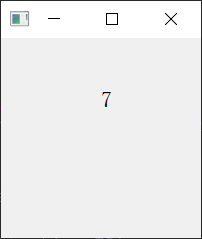
要求:展示10s倒计时,倒计时结束就停止计时。
以下为实现本次案例的代码:
from PyQt5.QtWidgets import *
import sys


class MyLabel(QLabel):
    def __init__(self, *args, **kwargs):
        super().__init__(*args, **kwargs)
        self.setStyleSheet("font-size: 22px;")

    def set_Text(self, text):
        self.setText(text)

    def set_timerId(self, timerID):
        self.timerID = timerID

    # 重写父类方法
    def timerEvent(self, *args, **kwargs):
        current_sec = int(self.text())
        current_sec -= 1
        self.setText(str(current_sec))

        if current_sec == 0:
            self.killTimer(self.timerID)    # 通过timerId关闭定时器

if __name__ == '__main__':
    app = QApplication(sys.argv)

    window = QWidget()
    window.show()
    window.setWindowTitle("QObjcet定时器")
    window.resize(200, 200)

    label = MyLabel(window)

    label.set_Text("10")     # 设置倒计时为10s
    label.set_timerId(label.startTimer(1000))   # 调用startTimer(),单位为毫秒,并返回timerId

    label.move(100, 50)
    label.show()

    sys.exit(app.exec_())
- 1
- 2
- 3
- 4
- 5
- 6
- 7
- 8
- 9
- 10
- 11
- 12
- 13
- 14
- 15
- 16
- 17
- 18
- 19
- 20
- 21
- 22
- 23
- 24
- 25
- 26
- 27
- 28
- 29
- 30
- 31
- 32
- 33
- 34
- 35
- 36
- 37
- 38
- 39
- 40
- 41
运行结果:

声明:本文内容由网友自发贡献,不代表【wpsshop博客】立场,版权归原作者所有,本站不承担相应法律责任。如您发现有侵权的内容,请联系我们。转载请注明出处:https://www.wpsshop.cn/w/码创造者/article/detail/816755
推荐阅读
相关标签


