
- 1OpenCV-跟我一起学数字图像处理之直方图均衡化
- 2Tilemap瓦片地图
- 3每天学python-盛最多水的容器_盛最多水的容器python
- 4python数学基础——单词统计_python统计单词个数
- 5【蓝牙】Apple Notification Center Service (ANCS) Specification_苹果 ancc服务 spec
- 6ESWAPI的使用_org.owasp.esapi
- 72023 英特尔On技术创新大会直播 | AI魅力的生活化
- 8vbs能调用的系统对象小结_wbemscripting
- 9Xshell显示图形化界面
- 10ThinkPHP内核微信拼团购物商城小程序源码_thinkphp 微信小程序 下载
SpringBoot:Actuator监控中心+AdminUI界面管理_actuator admin
赞
踩
一,Actuator + AdminUI服务监控中心介绍
1,什么是SpringBoot监控中心
针对微服务器监控、服务器内存变化(堆内存,线程,日志管理等)、检测服务配置连接池是否可用(模拟访问、懒加载)、统计现有Bean(通过Spring容器)、Http接口(@RequestMapping)的一系列数据管理。Actuator监控应用只通过JSON形式返回数据统计结果,没有UI界面处理;AdminUI则内置Actuator服务监控,并对返回JSON数据进行图形化处理展示。
2,为什么要用SpringBoot监控中心
Actuator是SpringBoot的一个附加功能,可以帮助应用程序在生产环境运行时的监控和管理。可以使用HTTP的各个请求路径来监管、审计、收集引用的运行情况,特别对于微服务管理十分有意义;
AdminUI内置了Actuator服务,是对监控服务的图形化界面补充;
二,SpringBoot整合Actuator服务监控
1,maven依赖引入
- <!-- actuator监控 -->
- <dependency>
- <groupId>org.springframework.boot</groupId>
- <artifactId>spring-boot-starter-actuator</artifactId>
- </dependency>
2,application.properties:配置可进行监控的接口,此处配置为全部启动,默认只启用三个接口
- ### 监控中心配置, 允许监控所欲接口
- management.endpoints.web.exposure.include=*
3,启动服务,从打印日志中查看启用结果;如下图,说明启用成功,此处应该为15个endPoints,因为我已经引入了AdminUI依赖,默认添加了该部分一个配置点;如果不配置第二步启用全部,则此处显示为2个endPoints

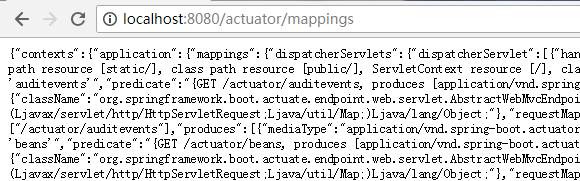
4,页面访问服务监控,返回结果均为JSON;如下,每一个链接均表示一个功能统计。比如mappings表示全部HTTP接口统计,beans表示Spring容器中的所有注册Bean,threadDump表示系统中的所有线程,health对所有懒加载的服务连接进行虚拟连接测试等等;


三,SpringBoot整合AdminUI界面管理
1,启动AdminUI界面,需要单独定义AdminUI-Server服务,独立于功能服务之外。所有功能服务作为AdminUI-Client服务连接到Server服务,Server服务检测到连接后对进行监控处理
2,AdminUI-Server服务
* 创建一个Maven服务,引入maven依赖
- <?xml version="1.0" encoding="UTF-8"?>
-
- <project xmlns="http://maven.apache.org/POM/4.0.0" xmlns:xsi="http://www.w3.org/2001/XMLSchema-instance"
- xsi:schemaLocation="http://maven.apache.org/POM/4.0.0 http://maven.apache.org/xsd/maven-4.0.0.xsd">
- <modelVersion>4.0.0</modelVersion>
-
- <groupId>springboot_actuator_server</groupId>
- <artifactId>springboot.actuator.server</artifactId>
- <version>1.0-SNAPSHOT</version>
-
- <parent>
- <groupId>org.springframework.boot</groupId>
- <artifactId>spring-boot-starter-parent</artifactId>
- <version>2.1.1.RELEASE</version>
- <relativePath/> <!-- lookup parent from repository -->
- </parent>
-
- <name>springboot.actuator.server</name>
- <!-- FIXME change it to the project's website -->
- <url>http://www.example.com</url>
-
- <properties>
- <project.build.sourceEncoding>UTF-8</project.build.sourceEncoding>
- <maven.compiler.source>1.7</maven.compiler.source>
- <maven.compiler.target>1.7</maven.compiler.target>
- </properties>
-
- <dependencies>
- <!-- AdminUI服务端依赖 -->
- <dependency>
- <groupId>de.codecentric</groupId>
- <artifactId>spring-boot-admin-starter-server</artifactId>
- <version>2.1.1</version>
- </dependency>
- <dependency>
- <groupId>org.springframework.boot</groupId>
- <artifactId>spring-boot-starter-webflux</artifactId>
- </dependency>
- <!-- Spring Boot Actuator对外暴露引用的监控信息, Jolokia提供使用HTTP接口获取json -->
- <dependency>
- <groupId>org.jolokia</groupId>
- <artifactId>jolokia-core</artifactId>
- </dependency>
- <!-- Spring Boot Actuator依赖 -->
- <dependency>
- <groupId>org.springframework.boot</groupId>
- <artifactId>spring-boot-starter-actuator</artifactId>
- </dependency>
- <!-- 服务包引用1.1.1版本, maven仓库已经不支持下载, 手动引入1.1版本 -->
- <dependency>
- <groupId>com.googlecode.json-simple</groupId>
- <artifactId>json-simple</artifactId>
- <version>1.1</version>
- </dependency>
- </dependencies>
-
- <build>
- <pluginManagement><!-- lock down plugins versions to avoid using Maven defaults (may be moved to parent pom) -->
- <plugins>
- <!-- clean lifecycle, see https://maven.apache.org/ref/current/maven-core/lifecycles.html#clean_Lifecycle -->
- <plugin>
- <artifactId>maven-clean-plugin</artifactId>
- <version>3.1.0</version>
- </plugin>
- <!-- default lifecycle, jar packaging: see https://maven.apache.org/ref/current/maven-core/default-bindings.html#Plugin_bindings_for_jar_packaging -->
- <plugin>
- <artifactId>maven-resources-plugin</artifactId>
- <version>3.0.2</version>
- </plugin>
- <plugin>
- <artifactId>maven-compiler-plugin</artifactId>
- <version>3.8.0</version>
- </plugin>
- <plugin>
- <artifactId>maven-surefire-plugin</artifactId>
- <version>2.22.1</version>
- </plugin>
- <plugin>
- <artifactId>maven-jar-plugin</artifactId>
- <version>3.0.2</version>
- </plugin>
- <plugin>
- <artifactId>maven-install-plugin</artifactId>
- <version>2.5.2</version>
- </plugin>
- <plugin>
- <artifactId>maven-deploy-plugin</artifactId>
- <version>2.8.2</version>
- </plugin>
- <!-- site lifecycle, see https://maven.apache.org/ref/current/maven-core/lifecycles.html#site_Lifecycle -->
- <plugin>
- <artifactId>maven-site-plugin</artifactId>
- <version>3.7.1</version>
- </plugin>
- <plugin>
- <artifactId>maven-project-info-reports-plugin</artifactId>
- <version>3.0.0</version>
- </plugin>
- </plugins>
- </pluginManagement>
- <plugins>
- <plugin>
- <groupId>org.springframework.boot</groupId>
- <artifactId>spring-boot-maven-plugin</artifactId>
- </plugin>
- </plugins>
- </build>
- </project>

* application.properties配置文件添加配置信息,此处主要对端口号进行修改,不与其他进程冲突
server.port=8081* 启动类:此处启动类不同于标准的SpringBoot启动类
- package com.actuator.server;
-
- import de.codecentric.boot.admin.server.config.EnableAdminServer;
- import org.springframework.boot.SpringApplication;
- import org.springframework.boot.autoconfigure.EnableAutoConfiguration;
- import org.springframework.context.annotation.Configuration;
-
- /**
- * @author pj_zhang
- * @create 2018-12-30 16:24
- **/
- @Configuration
- @EnableAutoConfiguration
- @EnableAdminServer
- public class AppApplication {
- public static void main(String[] args) {
- SpringApplication.run(AppApplication.class, args);
- }
- }
* 启动服务后进行页面访问,出现UI界面说明配置成功


3,AdminUI-Client
* maven依赖,注意已经引入的依赖不要二次引入
- <!-- AdminUI客户端依赖 -->
- <dependency>
- <groupId>de.codecentric</groupId>
- <artifactId>spring-boot-admin-starter-client</artifactId>
- <version>2.1.1</version>
- </dependency>
- <!-- Spring Boot Actuator对外暴露引用的监控信息, Jolokia提供使用HTTP接口获取json -->
- <dependency>
- <groupId>org.jolokia</groupId>
- <artifactId>jolokia-core</artifactId>
- </dependency>
- <!-- Spring Boot Actuator依赖 -->
- <dependency>
- <groupId>org.springframework.boot</groupId>
- <artifactId>spring-boot-starter-actuator</artifactId>
- </dependency>
- <!-- 服务包引用1.1.1版本, maven仓库已经不支持下载, 手动引入1.1版本 -->
- <dependency>
- <groupId>com.googlecode.json-simple</groupId>
- <artifactId>json-simple</artifactId>
- <version>1.1</version>
- </dependency>
* application.properties配置服务监控信息指向AdminUI-Server
- ### 注册当前服务到AdminUI-Server服务中
- spring.boot.admin.client.url=http://127.0.0.1:8081
* 启动服务后,查看UI界面已经已经监控到注册服务,注意此处当前服务的注册ID


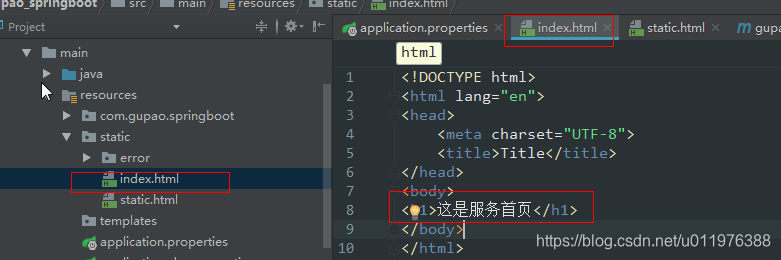
* 通过点击上面服务连接,默认classpath:index.html文件,static目录为静态资源存放目录,访问会自动解析

4,AdminUI界面演示
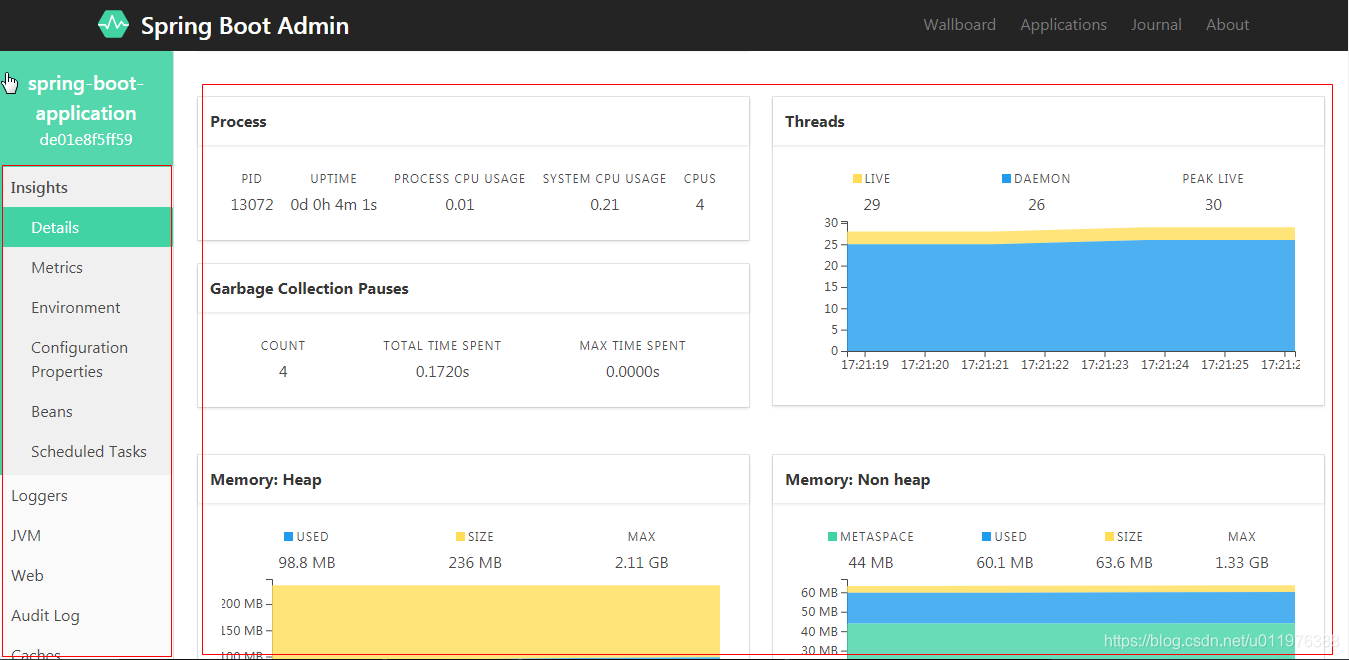
* 进入界面入口,点击中心实例进入主控制界面

* 主控制界面。包括刚才通过Actuator演示的所有功能,此处功能已经全部通过UI界面勾画,方便服务监控信息查看;左侧为Actuator功能列表,右侧为具体服务信息
* 以Beans功能为例,展示所有Spring容器中的Bean,大致跟踪服务展示流程;点击Beans按钮后,服务会通过实例注册ID路由到目标服务进行调用,具体信息获取方式依旧是依靠Actuator提供的服务监控接口进行服务统计


