热门标签
热门文章
- 1Hibernate分页实现_hibernateproperties分页
- 222.7k star,推荐一款开源的web文件夹管理器_web文件管理系统开源
- 3模型蒸馏吼吼吼
- 4android蓝牙模块有哪些类型,Android 蓝牙模块框架分析
- 5【链表】:必写的四道基础题
- 6Google Dialogflow中的基本概念
- 7第一篇.git入门及常用命令详解_git入门及内部结构与常用命令
- 8基于python+django+mysql农业生产可视化系统
- 9python,Pandas读取csv文件gbk编码和utf-8编码都报错_read_csv utf-8
- 10Mysql时间差8小时解决方案_mysql时间差了8小时
当前位置: article > 正文
【STM32+HAL】与OpenMV通信_32与openmv通信
作者:笔触狂放9 | 2024-05-15 00:44:54
赞
踩
32与openmv通信
一、OpenMV IDE
1、简单数据通信
- import time
-
- from pyb import UART
- uart = UART(3, 115200, timeout_char=200)
- uart.init(115200, bits=8, parity=None, stop=1) # init with given parameters
-
- while True:
- FH = bytearray([0xb3,0xb3]) #帧头,控制板接收数据以后判断,转化为字节传送,不能用16进制直接传
- uart.write(FH) #写到串口
- uart.write("Logan") #写数据
- FH = bytearray([0x0d,0x0a]) #结束标志,换行和回车的ascll
- uart.write(FH)
- time.sleep_ms(1000) #延时
2、多字节数据通信
- def send_data(x,y,w,h):
- global uart;
- uart.write(str(x))
- uart.write(bytearray([0x20])) # 发送空格
- uart.write(str(y))
- uart.write(bytearray([0x20]))
- uart.write(str(w))
- uart.write(bytearray([0x20]))
- uart.write(str(h))
- uart.write(bytearray([0x20]))
3、寻找最大色块,传递中心点坐标及矩形长宽
- import time
- import sensor
- import math
- import image
- import ustruct
- from pyb import UART
-
-
- uart = UART(3, 115200, timeout_char=200)
- uart.init(115200, bits=8, parity=None, stop=1) # init with given parameters
-
- threshold_index = 4 # 0 for red, 1 for green, 2 for blue
- thresholds = [
- (30, 100, 15, 127, 15, 127), # generic_red_thresholds
- (30, 100, -64, -8, -32, 32), # generic_green_thresholds
- (0, 30, 0, 64, -128, 0), # generic_blue_thresholds
- (82, 100, 75, -49, -22, 31), # generic_white_thresholds
- (21, 83, 32, 65, 31, 63),
- ]
-
- sensor.reset()
- sensor.set_pixformat(sensor.RGB565)
- sensor.set_framesize(sensor.QVGA)# QVGA的中心坐标:160,120
- sensor.skip_frames(time=2000) # 跳过2000毫秒的帧让相机图像在改变相机设置后稳定下来
- sensor.set_auto_gain(False) # 必须关闭才能进行颜色跟踪
- sensor.set_auto_whitebal(False) # 必须关闭才能进行颜色跟踪
- clock = time.clock()
-
- def find_max(blobs):
- max_size=0
- for blob in blobs:
- if blob.pixels() > max_size:
- max_blob = blob
- max_size = blob.pixels()
- return max_blob
-
-
- def send_data(x,y,w,h):
- global uart;
- FH = bytearray([0xb3,0xb3]) # 帧头
- uart.write(FH) # 写到串口
-
- uart.write(str(x))
- uart.write(bytearray([0x20])) # 发送空格
- uart.write(str(y))
- uart.write(bytearray([0x20]))
- uart.write(str(w))
- uart.write(bytearray([0x20]))
- uart.write(str(h))
-
- uart.write(bytearray([0x20]))
- FH = bytearray([0x0d,0x0a]) # 帧尾,换行和回车的ascll
- uart.write(FH)
-
-
-
- while True:
- clock.tick()
- img = sensor.snapshot()
- blobs = img.find_blobs([thresholds[threshold_index]])
-
- #如果找到了目标颜色
- if blobs:
- max_blob = find_max(blobs)
- cx=max_blob[5]
- cy=max_blob[6]
- cw=max_blob[2]
- ch=max_blob[3]
-
- # 这些值取决于max_blob不是圆形的,否则它们将不稳定.
- # 检查max_blob是否显著偏离圆形
- if max_blob.elongation() > 0.5:
- img.draw_edges(max_blob.min_corners(), color=(255, 0, 0))
- img.draw_line(max_blob.major_axis_line(), color=(0, 255, 0))
- img.draw_line(max_blob.minor_axis_line(), color=(0, 0, 255))
-
- # 这些值始终是稳定的。
- # img.draw_rectangle(max_blob.rect())
- img.draw_rectangle(160,120,35,35)
- img.draw_cross(cx, cy)
-
- # 注意-max_blob旋转仅限于0-180。
- img.draw_keypoints(
- [(cx, cy, int(math.degrees(max_blob.rotation())))], size=20
- )
-
- send_data(cx,cy,cw,ch) # 发送数据
-
- print(cx,cy,cw,ch)
- print(clock.fps())
-
二、Keil
1、初始化
- #include "string.h"
- #include "stdio.h"
- #include "stdlib.h"
-
- #define RXBUFFERSIZE 256
-
- char RxBuffer[RXBUFFERSIZE],rx_buf[RXBUFFERSIZE];
- uint8_t aRxBuffer;
- uint8_t Uart1_Rx_Cnt = 0;
- int flag=0;
-
- printf("Hello World!\r\n");
- HAL_Delay(200);
- HAL_UART_Receive_IT(&huart2, (uint8_t *)&aRxBuffer, 1);
-
-
- int fputc(int ch, FILE *f)
- {
- HAL_UART_Transmit(&huart1, (uint8_t *)&ch, 1, 0xffff);
- HAL_UART_Transmit(&huart2, (uint8_t *)&ch, 1, 0xffff);
- return ch;
- }
-
- int fgetc(FILE *f)
- {
- uint8_t ch = 0;
- HAL_UART_Receive(&huart1, &ch, 1, 0xffff);
- HAL_UART_Receive(&huart2, &ch, 1, 0xffff);
- return ch;
- }
2、串口回调
- void HAL_UART_RxCpltCallback(UART_HandleTypeDef *huart)
- {
- UNUSED(huart);
- if(huart==&huart2){
- HAL_GPIO_TogglePin(GPIOF,LED_Pin); //有数据则翻转LED灯
-
- RxBuffer[Uart1_Rx_Cnt] = aRxBuffer;
- Uart1_Rx_Cnt++;
- if((RxBuffer[Uart1_Rx_Cnt-1] == 0xb3)&&(RxBuffer[Uart1_Rx_Cnt-2] == 0xb3)) flag=1; //帧头判定
- else if((RxBuffer[Uart1_Rx_Cnt-2] == 0x0d)&&(RxBuffer[Uart1_Rx_Cnt-1] == 0x0a)) flag=2; //帧尾判定
- else flag=0;
-
- switch (flag)
- {
- case 1:
- Uart1_Rx_Cnt = 0;
- memset(RxBuffer,0x00,sizeof(RxBuffer));
- break;
- case 2:
- RxBuffer[Uart1_Rx_Cnt-1] = '\0';
- RxBuffer[Uart1_Rx_Cnt-2] = '\0';
- strcpy(rx_buf,RxBuffer);
- printf("%s\r\n",rx_buf);
- while(HAL_UART_GetState(&huart2) == HAL_UART_STATE_BUSY_TX);
- Uart1_Rx_Cnt = 0;
- memset(RxBuffer,0x00,sizeof(RxBuffer));
- break;
- default:break;
- }
- HAL_UART_Receive_IT(&huart2, (uint8_t *)&aRxBuffer, 1);
- }
- }
三、CUBEMX
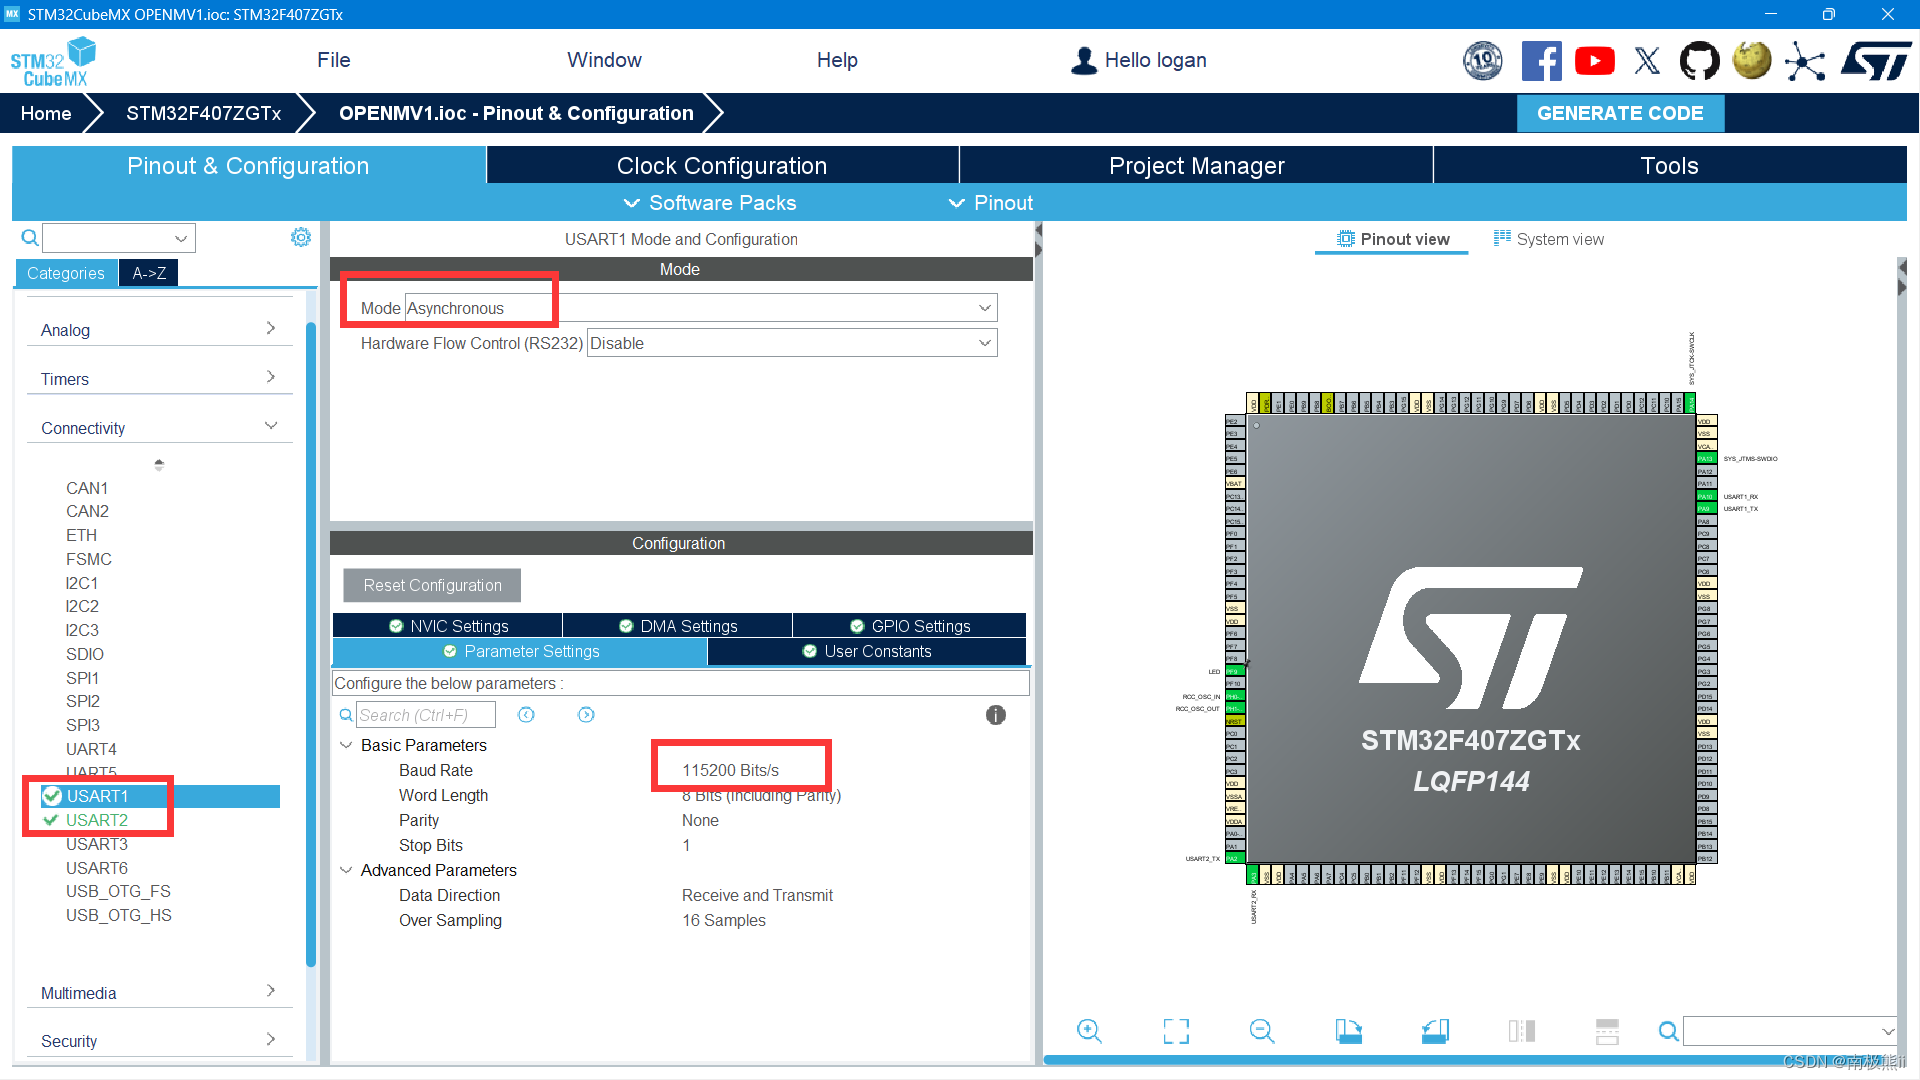
1、开启串口
USART1:STM32与电脑通信
USART2:STM32与OPENMV通信
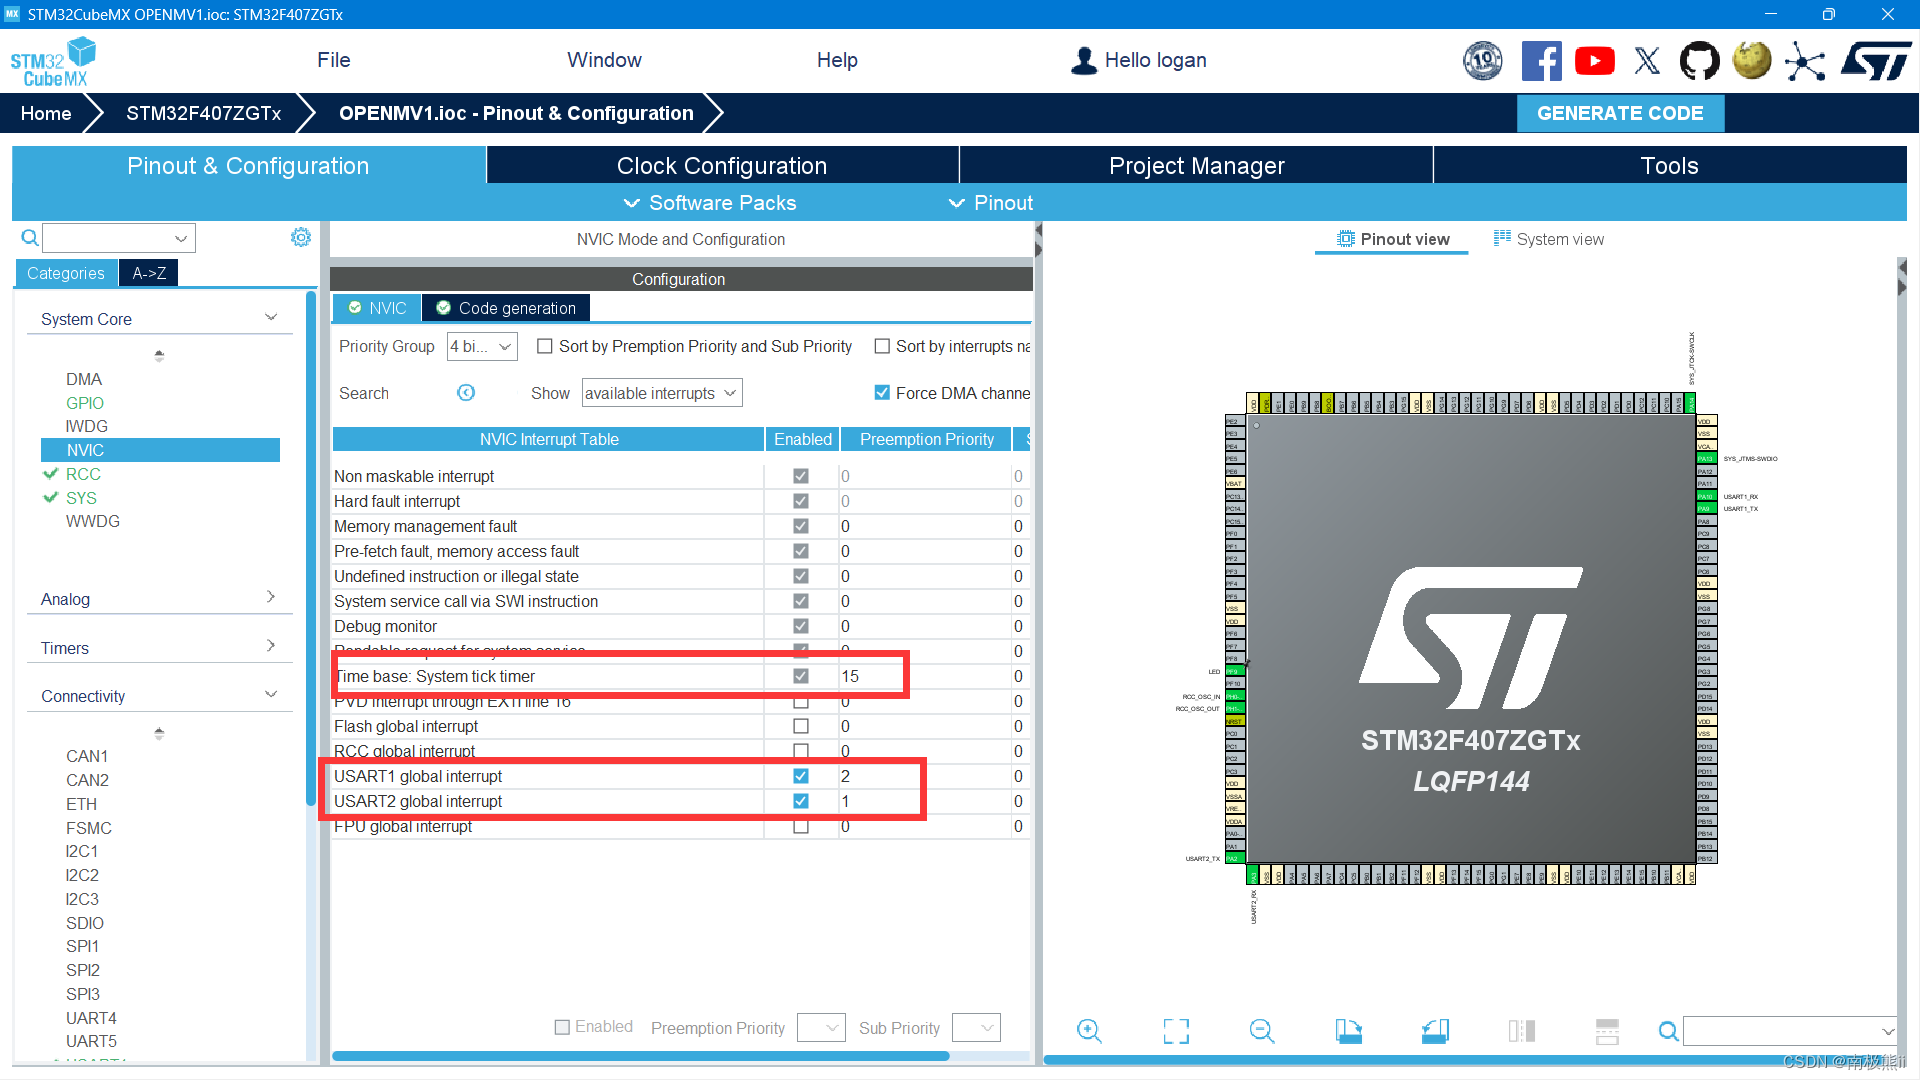
2、中断

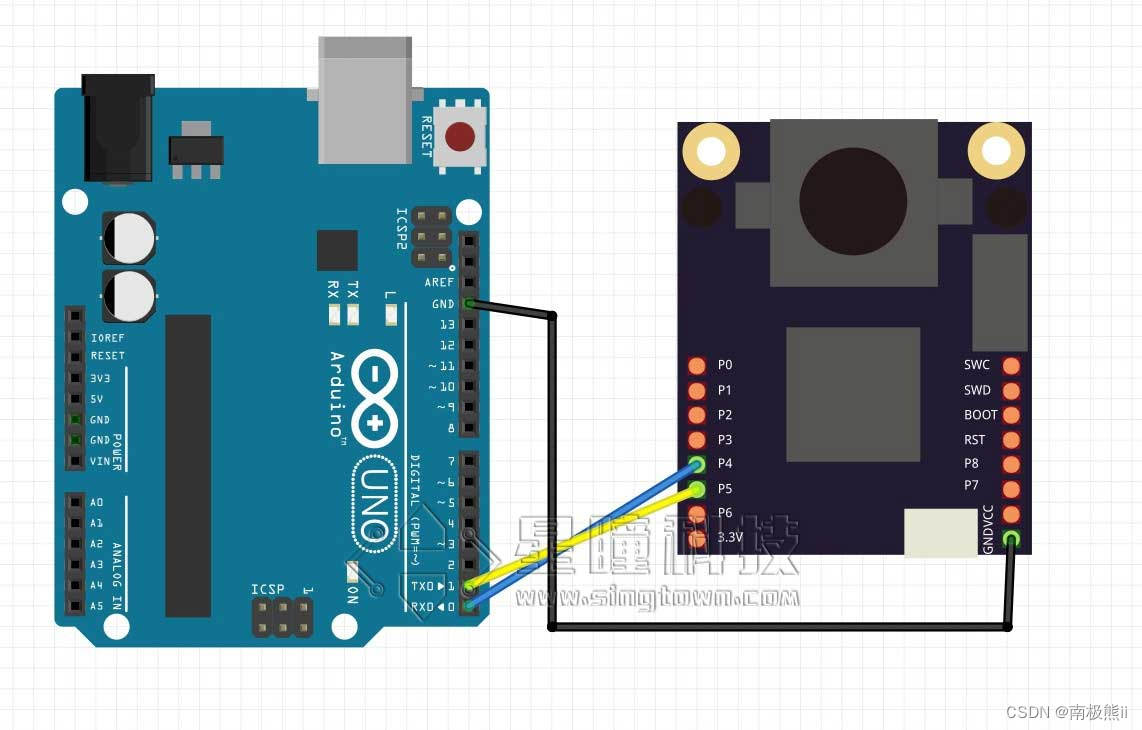
四、接线图

五、巨人之肩
六、DMA传输版本
1、main.c
- #include "stdio.h"
- #include "string.h"
- #include "stdlib.h"
-
- #define RXBUFFERSIZE 256
-
- volatile uint8_t recv_end_flag = 0; //接收结束标志位
- uint8_t RxBuffer2[RXBUFFERSIZE],rx_buf2[RXBUFFERSIZE];
-
-
- HAL_UART_Transmit_DMA(&huart1,(uint8_t *)"Hello\r\n",sizeof("Hello\r\n"));
- HAL_Delay(200);
-
- __HAL_UART_ENABLE_IT(&huart2, UART_IT_IDLE);
- HAL_UART_Receive_DMA(&huart2,RxBuffer2,sizeof(RxBuffer2));
2、stm32f4xx_hal.c
- extern volatile uint8_t recv_end_flag; //接收结束标志位
- extern uint8_t RxBuffer2[RXBUFFERSIZE],rx_buf2[RXBUFFERSIZE];
-
- int cx=0,cy=0;
-
- void USART2_IRQHandler(void)
- {
- /* USER CODE BEGIN USART2_IRQn 0 */
-
- /* USER CODE END USART2_IRQn 0 */
- HAL_UART_IRQHandler(&huart2);
- /* USER CODE BEGIN USART2_IRQn 1 */
- uint8_t tmp_flag =__HAL_UART_GET_FLAG(&huart2,UART_FLAG_IDLE); //获取IDLE标志位
- if((tmp_flag != RESET)) //通过标志位判断接收是否结束
- {
- recv_end_flag = 1; //置1表明接收结束
- __HAL_UART_CLEAR_IDLEFLAG(&huart2); //清除标志位
- HAL_UART_DMAStop(&huart2);
-
- strcpy((char *)rx_buf2,(char *)RxBuffer2);
- int st=0,cnt_blank=0;
- for(int i=0;rx_buf2[i];i++){
- if(rx_buf2[i]==' ') {
- cnt_blank++;
- int temp=0;
- for(int j=st;j<i;j++) temp=temp*10+(rx_buf2[j]-'0');
- switch (cnt_blank)
- {
- case 1:cx=temp;st=i+1;break;
- case 2:cy=temp;break;
- default:break;
- }
- }
- }
- printf("%d %d\r\n",cx,cy);
- HAL_UART_Receive_DMA(&huart2,RxBuffer2,sizeof(RxBuffer2)); //开启DMA接收,方便下一次接收数据
- }
- /* USER CODE END USART2_IRQn 1 */
- }
声明:本文内容由网友自发贡献,不代表【wpsshop博客】立场,版权归原作者所有,本站不承担相应法律责任。如您发现有侵权的内容,请联系我们。转载请注明出处:https://www.wpsshop.cn/w/笔触狂放9/article/detail/570824
推荐阅读
相关标签


