热门标签
热门文章
- 1MeterSphere:超好用的开源测试平台
- 2python简单的问答系统_python问答系统
- 3C++_泛型编程与标准库(八)_c++泛型数组定义
- 4neo4j使用详解(十五、索引之语义索引<全文索引>——最全参考)_neo4j 索引
- 5http网页是否能引用https资源/调用https接口?https网页是否能引用http资源/调用http接口?
- 6redissonClient未持有锁attempt to unlock lock, not locked by current thread by node id_redissonclient.getlock 如果没拿到锁报错提示
- 7深度强化学习算法(二)(附带MATLAB程序)_matlab深度强化学习
- 8欧睿 × 和鲸:联合打造 AI 中台赋能企业数字化转型,大幅提升模型产品研发效率
- 9【JavaWeb】Day66.Springboot案例——过滤器Filter实现_springboot filter 拦截返回错误信息
- 10Android开发实践:利用ProGuard进行代码混淆
当前位置: article > 正文
Python smtplib模块自动收发邮件(一)_python 263邮箱
作者:繁依Fanyi0 | 2024-08-21 18:39:59
赞
踩
python 263邮箱
自动化测试的脚本运行完成之后,可以生成test report,如果能将result自动的发到邮箱就不用每次打开阅读,而且随着脚本的不段运行,生成的报告会越来越多,找到最近的报告也是一个比较麻烦的事件;如果能自
动的将结果发到项目相关人员的邮箱,这也是个不错的选择。
python 的 smtplib 模块提供了一种很方便的途径发送电子邮件。
关于Python smtplib的介绍,可以从python应用程序的帮助文档,可以查看到smtp协议的各个封装。
分几部分介绍。
一、文件形式的邮件
直接上脚本
#coding=utf-8
import smtplib
from email.mime.text import MIMEText
from email.header import Header
'''发送邮箱'''
sender = 'abc@cieXXX.com'  #企业263邮箱
'''接收邮箱'''
receiver = '123456@qq.com'
'''发送邮件主题'''
subject = 'python email test'
'''发送邮箱服务器'''
smtpserver = 'smtp.263xmail.com'
'''发送邮箱用户/密码'''
username = 'abc@cieXXX.com'
password = '123456'
'''中文需参数‘utf-8’ ,单字节字符不需要'''
msg = MIMEText('你好!','text','utf-8')
msg['Subject'] = Header(subject, 'utf-8')
smtp = smtplib.SMTP()
smtp.connect('smtp.263xmail.com')
smtp.login(username, password)
smtp.sendmail(sender, receiver, msg.as_string())
smtp.quit()
print ("Email has been sent out!")
- 1
- 2
- 3
- 4
- 5
- 6
- 7
- 8
- 9
- 10
- 11
- 12
- 13
- 14
- 15
- 16
- 17
- 18
- 19
- 20
- 21
- 22
- 23
- 24
F5,运行得到,如图所示:

邮件内容,如图所示:

这样就实现了text形式邮件的自动发送功能。
二、HTML形式的邮件
HTML形式与Text形式实现起来,脚本类似,只是文件的表现形式不一样,相比Text形式的脚本,针对HTML形式的邮件的脚本改动很少。
直接上脚本:
#coding=utf-8
import smtplib
from email.mime.text import MIMEText
from email.header import Header
'''发送邮箱'''
sender = 'abc@cieXXX.com'  #企业263邮箱
'''接收邮箱'''
receiver = '123456@qq.com'
'''发送邮件主题'''
subject = 'python email test'
'''发送邮箱服务器'''
smtpserver = 'smtp.263xmail.com'
'''发送邮箱用户/密码'''
username = 'abc@cieXXX.com'
password = '123456'
'''中文需参数‘utf-8’ ,单字节字符不需要'''
msg=MIMEText('<html><hl>Hello World!<hl></html>','html','utf-8')
msg['Subject'] = Header(subject, 'utf-8')
smtp = smtplib.SMTP()
smtp.connect('smtp.263xmail.com')
smtp.login(username, password)
smtp.sendmail(sender, receiver, msg.as_string())
smtp.quit()
print ("Email has been sent out!")
- 1
- 2
- 3
- 4
- 5
- 6
- 7
- 8
- 9
- 10
- 11
- 12
- 13
- 14
- 15
- 16
- 17
- 18
- 19
- 20
- 21
- 22
- 23
- 24
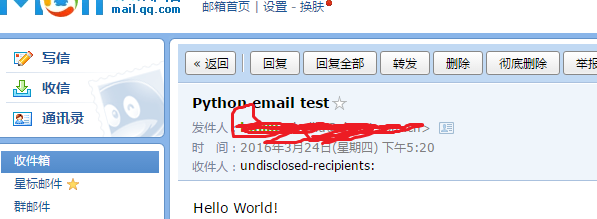
F5,运行得到,如图所示:

打开邮箱,如图所示:

打开邮件内容,如图所示:
OK,就这样实现了两种邮件形式的自动发送功能。
关于如何将python smtp模块的自动收发邮件功能应用到我们的自动化测试过程中,且看下回分解。
声明:本文内容由网友自发贡献,版权归原作者所有,本站不承担相应法律责任。如您发现有侵权的内容,请联系我们。转载请注明出处:【wpsshop博客】
推荐阅读
相关标签


