
- 1人工智能图像识别四大算子_ai 图像识别
- 2logback使用spring配置,启动报错_自定义appender类写入logback-spring.xml配置就启动失败是怎么回事
- 3手机之家签名工具_手机端自签名续签名 AltStore越狱安装工具AltServer与AltDeploy使用教程iOS13.5...
- 4自学HarmonyOS应用开发(63)- 对象关系映射数据库升级_openharmony relationalstore的数据库升级
- 5Maven打包所有依赖到一个jar中_java打全jar包的pom
- 65图与网络分析_图与网络树的三个判定定理
- 7hardlockup的原理说明_hard lockup
- 8【Django】创建用户,继承AbstractUser自定义用户模型类_django abstractuser创建新用户
- 9基于微信小程序的新冠疫苗预约系统_"if(stringutils.isnotblank(type) && type.equals(\"
- 10Debian 11安装mysql 8.0.13_package libncurses5 is not installed.
linux | RK3568 Debian AIC8800移植_of_dma_request_slave_channel: dma-names property o
赞
踩
一、WiFi
1.看RK的文档,把DTS节点配好
- /* SDIO接口Wi-Fi专用配置: WIFI_REG_ON: Wi-Fi的电源使能PIN脚 */
- sdio_pwrseq: sdio-pwrseq {
- compatible = "mmc-pwrseq-simple";
- pinctrl-names = "default";
- pinctrl-0 = <&wifi_enable_h>;
- /* 特别注意:WIFI_REG_ON GPIO_ACTIVE 配置跟使能状态恰好是相反的,
- * 高有效为LOW,低有效则为HIGH
- * 切记:这个配置跟下面的WIFI,poweren_gpio是互斥的,不能同时配置!!!
- */
- reset-gpios = <&gpio0 RK_PA2 GPIO_ACTIVE_LOW>;
- };
- /* SDIO接口Wi-Fi专用配置:WIFI_REG_ON脚的pinctrl的配置 */
- &pinctrl {
- sdio-pwrseq {
- wifi_enable_h: wifi-enable-h {
- rockchip,pins =
- /* 对应上面的WIFI_REG_ON,关掉上下拉,防止不能拉高或拉低 */
- <0 RK_PA2 RK_FUNC_GPIO &pcfg_pull_none>;
- };
- };
- };
- /* SDIO接口Wi-Fi专用配置:SDIO接口节点 */
- &sdio {
- max-frequency = <150000000>; /* sdio接口的最大频率,可调整 */
- bus-width = <4>; /* 4线模式,可调整1线模式 */
- sd-uhs-sdr104; /* 支持SDIO3.0 */
- … …
- status = "okay";
- };
- /* Wi-Fi节点 */
- wireless-wlan {
- compatible = "wlan-platdata";
- rockchip,grf = <&grf>;
- /* 注意:如果排查发现Wi-Fi模块没有32.768K波形,且硬件上是有
- * RK PMU供给的,则打开下面的clock属性,按照实际使用的PMU型号填写,
- * 否在SDIO/Wi-Fi无法使用.
- */
- clocks = <&rk809 1>; //如果使用RK809,只能配置一个
- clocks = <&hym8563>; //如果使用hym8563,只能配置一个
- clock-names = "ext_clock";
- /* 按实际名字填写 */
- wifi_chip_type = "ap6255";
- /* WIFI_WAKE_HOST: Wi-Fi中断通知主控的PIN脚。
- * 特别注意:确认下这个Wi-Fi pin脚跟主控的pin的
- * 硬件连接关系,直连的话就是GPIO_ACTIVE_HIGH;
- * 如果中间加了一个反向管就要改成低电平GPIO_ACTIVE_LOW触发
- */
- WIFI,host_wake_irq = <&gpio0 RK_PA0 GPIO_ACTIVE_HIGH>;
- //SDIO Wi-Fi 无需此配置,除非有动态加载协助驱动ko的需求,参考11.8章节
- //WIFI,poweren_gpio = <&gpio0 RK_PA2 GPIO_ACTIVE_HIGH>;
- status = "okay";
- };

然后直接从安卓13的项目中把驱动给移过来,文件位置是 kernel/drivers/net/wireless/rockchip_wlan/,然后在Makefile和Kconfig中加入对应的宏
- Makefile: obj-$(CONFIG_AIC_WLAN_SUPPORT) += aic8800/
- Kconfig: source "drivers/net/wireless/rockchip_wlan/aic8800/Kconfig"
然后再在rockchip_linux_defconfig中加入对应的宏:
- CONFIG_AIC_WLAN_SUPPORT=y
- CONFIG_AIC_FW_PATH="/system/etc/firmware/"
- CONFIG_AIC8800_WLAN_SUPPORT=m
然后编译,编译后出错:
- drivers/net/wireless/rockchip_wlan/aic8800/aic8800_fdrv/rwnx_tx.c:320:12: error: this statement may fall through [-Werror=implicit-fallthrough=]
- 320 | rwnx_vif = rwnx_vif->ap_vlan.master;
-
- 这么改:
- EXTRA_CFLAGS += -Wno-implicit-fallthrough
然后编译就成功了
先手动将生成的aic8800_bsp.ko和aic8800_fdrv.ko这两个文件推到/system/lib/modules/这个目录下,先insmod aic8800_bsp.ko这个文件,因为aic8800_fdrv.ko是依赖aic8800_bsp.ko的,insmod aic8800_bsp.ko后,无法insmod aic8800_fdrv.ko,看log后发现少了一些固件,log如下:
- [ 40.853840] RELEASE_DATE:2023_0509_1122
- [ 40.855992] aicbsp: aicbsp_set_subsys, subsys: AIC_BLUETOOTH, state to: 1
- [ 40.856091] aicbsp: aicbsp_set_subsys, power state change to 1 dure to AIC_BLUETOOTH
- [ 40.856103] aicbsp: aicbsp_platform_power_on
- [ 40.874329] aicbsp: aicbsp_sdio_probe:1 vid:0x5449 did:0x0145
- [ 40.877010] aicbsp: aicbsp_sdio_probe:2 vid:0x544A did:0x0146
- [ 40.877082] aicbsp: aicbsp_sdio_probe after replace:1
- [ 40.877179] AICWFDBG(LOGINFO) aicwf_sdio_chipmatch USE AIC8801
- [ 40.877197] aicbsp: aicbsp_get_feature, set FEATURE_SDIO_CLOCK 50 MHz
- [ 40.877208] aicbsp: aicwf_sdio_reg_init
- [ 40.877516] aicbsp: Set SDIO Clock 50 MHz
- [ 40.885507] AICWFDBG(LOGINFO) aicbsp: aicbsp_driver_fw_init, chip rev: 7
- [ 40.885592] rwnx_load_firmware: request firmware = fw_patch_table_u03.bin
- [ 40.886831] file md5:026ae0b7049511b2b55650d114d03d38
- [ 40.887085] rwnx_plat_bin_fw_upload_android
- [ 40.887095] rwnx_load_firmware: request firmware = fw_adid_u03.bin
- [ 40.887179] (NULL device *): Direct firmware load for fw_adid_u03.bin failed with error -2
- [ 40.887190] Load fw_adid_u03.bin fail
- [ 40.887196] wrong size of firmware file
- [ 40.887203] aicbt_patch_trap_data_load fail
- [ 40.887362] aicbsp: aicbsp_sdio_remove
- [ 40.887372] aicbsp: aicwf_sdio_release
- [ 40.887385] aicbsp: sdio_err:<aicwf_sdio_release,1571>: reg:4 write failed!, ret=-123
- [ 40.887395] aicbsp: aicwf_bus_deinit
- [ 40.887403] aicbsp: aicwf_sdio_bus_stop
- [ 40.887442] aicbsp: sdio_err:<aicwf_sdio_bustx_thread,1289>: sdio bustx thread stop
- [ 40.887523] aicbsp: sdio_err:<aicwf_sdio_busrx_thread,1308>: sdio busrx thread stop
- [ 40.887594] aicbsp: aicbsp_sdio_remove done
- [ 40.887750] aicbsp: aicbsp_platform_power_off
- [ 40.887761] aicbsp: aicbsp_set_subsys, fail to set AIC_BLUETOOTH power state to 1
搜一下固件的路径,find . -name firmware,然后在每一个路径下都放一个固件,然后试出了固件的路径是usr/lib/firmware/,找原厂的人要了固件,主要是这四个固件:
- -rwxr-xr-x 1 root root 262016 10月 19 16:03 fmacfw.bin
- -rwxr-xr-x 1 root root 1208 10月 19 16:04 fw_adid_u03.bin
- -rwxr-xr-x 1 root root 1344 10月 19 16:04 fw_patch_table_u03.bin
- -rwxr-xr-x 1 root root 64356 10月 19 16:04 fw_patch_u03.bin
然后两个ko文件都安装成功了,然后WiFi就可以正常打开了
- root@linaro-alip:/# ifconfig
- eth0: flags=4099<UP,BROADCAST,MULTICAST> mtu 1500
- ether 4a:28:2d:fe:5b:96 txqueuelen 1000 (Ethernet)
- RX packets 0 bytes 0 (0.0 B)
- RX errors 0 dropped 0 overruns 0 frame 0
- TX packets 0 bytes 0 (0.0 B)
- TX errors 0 dropped 0 overruns 0 carrier 0 collisions 0
- device interrupt 41
-
- lo: flags=73<UP,LOOPBACK,RUNNING> mtu 65536
- inet 127.0.0.1 netmask 255.0.0.0
- inet6 ::1 prefixlen 128 scopeid 0x10<host>
- loop txqueuelen 1000 (Local Loopback)
- RX packets 0 bytes 0 (0.0 B)
- RX errors 0 dropped 0 overruns 0 frame 0
- TX packets 0 bytes 0 (0.0 B)
- TX errors 0 dropped 0 overruns 0 carrier 0 collisions 0
-
- wlan0: flags=4099<UP,BROADCAST,MULTICAST> mtu 1500
- ether bc:6b:ff:f6:78:70 txqueuelen 1000 (Ethernet)
- RX packets 0 bytes 0 (0.0 B)
- RX errors 0 dropped 0 overruns 0 frame 0
- TX packets 0 bytes 0 (0.0 B)
- TX errors 0 dropped 0 overruns 0 carrier 0 collisions 0
2.手动加载还是有点low,我找了很久看有没有自动加载的ko文件的方法,试了都不行,最后还是找到了另一种方法,干货分享|Debian系统移植USBWiFi RTL8192EU驱动并设置开机自启,Debian系统二次解包后再里面修改加入脚本然后打包即可,不多赘述。
以上,WiFi就可以正常使用了。
二、蓝牙
1.看RK的文档来配置对应的DTS
- /* 蓝牙节点 */
- /* 注意下面关于UART的配置:uart4_xfer/uart4_rts/uart4_ctsn
- * 每个平台的名字可能不一样,要在对应芯片平台的dts/dtsi里面找下对
- * 应的uart写法,比如uart4_ctsn有些平台的名字为uart4_cts.
- */
- wireless-bluetooth {
- compatible = "bluetooth-platdata"
- /* 这里要配置对应主控UART的RTS脚 */
- uart_rts_gpios = <&gpio4 RK_PA7 GPIO_ACTIVE_LOW>;
- pinctrl-names = "default", "rts_gpio";
- pinctrl-0 = <&uart4_rts>;
- pinctrl-1 = <&uart4_rts_gpio>;
- /* BT_REG_ON 蓝牙电源的开关 */
- BT,power_gpio = <&gpio4 RK_PB3 GPIO_ACTIVE_HIGH>;
- /* Linux平台:下面两个配置无需配置 */
- //BT,wake_host_irq = <&gpio4 RK_PB4 GPIO_ACTIVE_HIGH>; /* BT_WAKE_HOST */
- //BT,wake_gpio = <&gpio4 31 GPIO_ACTIVE_HIGH>; /* HOST_WAKE_BT */
- status = "okay";
- };
- /* 打开对应的UART配置 */
- &uart4 {
- pinctrl-names = "default";
- /* 这里配置对应主控UART的TX/RX/CTS PIN ,不要配置RTS PIN*/
- pinctrl-0 = <&uart4_ xfer &uart4_ctsn>;
- status = "okay";
- };
- /* uart4_rts_gpio */
- &pinctrl {
- wireless-bluetooth {
- uart4_rts_gpio: uart4-rts-gpio {
- rockchip,pins = <4 RK_PA7 RK_FUNC_GPIO &pcfg_pull_none>;
- };
- };
问原厂得知,蓝牙固件主要是下面两个

看了一下,在加载ko文件的时候就已经用上了,继续排查
- root@linaro-alip:/sys/class/rfkill# hciconfig -a
- root@linaro-alip:/sys/class/rfkill#
- root@linaro-alip:/sys/class/rfkill# rfkill list
- 0: bt_default: Bluetooth
- Soft blocked: no
- Hard blocked: no
- 1: phy0: Wireless LAN
- Soft blocked: no
- Hard blocked: no
发现是有蓝牙节点的,但是无法启动,然后发现REALTEK是有对应的蓝牙命令的
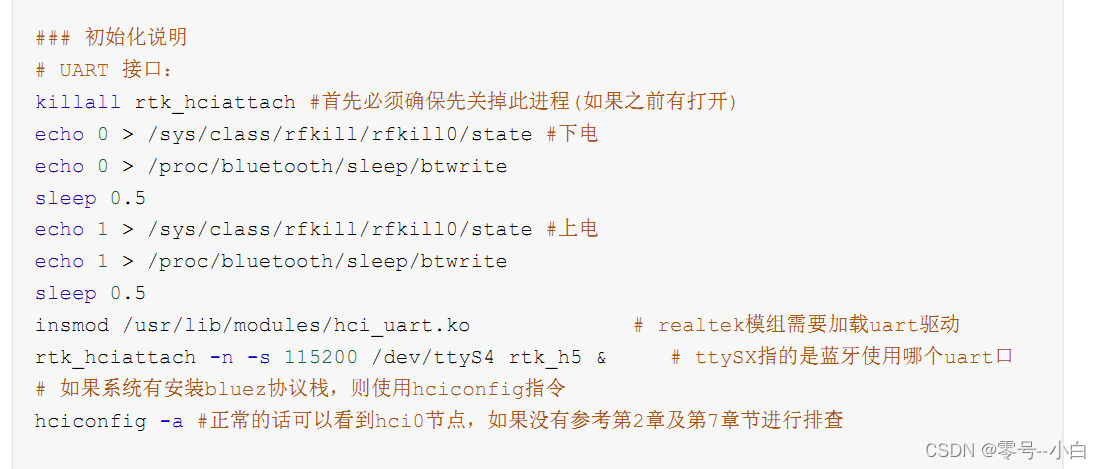
然后原厂就给了AIC8800在RK平台的启动命令
- hciattach -s 1500000 /dev/ttySX any 1500000 flow nosleep
- hciconfig hci0 up
-
- root@linaro-alip:/# hciattach -s 1500000 /dev/ttyS1 any 1500000 flow nosleep
- Device setup complete
- root@linaro-alip:/# hciconfig hci0 up
- root@linaro-alip:/#
- root@linaro-alip:/#
- root@linaro-alip:/# hciconfig
- hci0: Type: Primary Bus: UART
- BD Address: BC:6B:FF:F6:78:71 ACL MTU: 1021:9 SCO MTU: 255:4
- UP RUNNING
- RX bytes:848 acl:0 sco:0 events:63 errors:0
- TX bytes:4971 acl:0 sco:0 commands:63 errors:0
命令是可用的,但是不能每次都输一遍这个命令,所以想着能不能自启,然后想到了调WiFi时写的那个脚本,加入这两条语句后,发现蓝牙并没有启动
- [ 8.216087] of_dma_request_slave_channel: dma-names property of node '/serial@fe650000' missing or empty
- [ 8.216173] dw-apb-uart fe650000.serial: failed to request DMA, use interrupt mode
- [ 8.291983] Bluetooth: hci0: sending frame failed (-49)
我开始以为是串口没初始化完成就跑上面的脚本导致蓝牙没有唤醒成功,然后在脚本里加了延时,发现虽然确实延时成功了,但是蓝牙还是没有唤醒成功,最后还是想了个办法,就是在系统启动的时候就加上这两句话,看能不能成功
因为在etc下有rc.local这个文件,所以我直接就加了,加上后hciconfig -a看一下发现果然成功了,也可以连上蓝牙设备
- root@linaro-alip:/# hciconfig -a
- hci0: Type: Primary Bus: UART
- BD Address: BC:6B:FF:F6:78:71 ACL MTU: 1021:9 SCO MTU: 255:4
- UP RUNNING
- RX bytes:1394 acl:0 sco:0 events:67 errors:0
- TX bytes:4505 acl:0 sco:0 commands:67 errors:0
- Features: 0xbf 0xee 0xcd 0xfe 0xd8 0x3f 0x7b 0x87
- Packet type: DM1 DM3 DM5 DH1 DH3 DH5 HV1 HV3
- Link policy: RSWITCH SNIFF
- Link mode: SLAVE ACCEPT
- Name: 'linaro-alip'
- Class: 0x3c0000
- Service Classes: Rendering, Capturing, Object Transfer, Audio
- Device Class: Miscellaneous,
- HCI Version: 5.2 (0xb) Revision: 0x14
- LMP Version: 5.2 (0xb) Subversion: 0x14
- Manufacturer: RivieraWaves S.A.S (96)
至此,AIC8800这颗IC就移植成功了

