
热门标签
热门文章
- 1电话营销机器人具体是怎么运行的呢?_freeswitch 营销机器人模块
- 2AI实战 | AI算法能不能协助英语老师出一份nb的考卷?
- 3AI工具 Github项目_ai推文工具 github
- 4verilog基础篇--常用的信号生成模块_verilog产生脉冲信号
- 5计算机二级选择题复习整理(公共基础部分)_计算机等级 软件工程基础 选择题
- 6IntelliJ IDEA下git版本回退,版本还原_checkout tag or revision
- 7数据结构与算法——排序算法_冒泡排序的堆栈
- 8mysql+ php_php+mysql
- 9大模型中常用的分词器Tokenizer学习总结记录与代码实现_大模型分词器
- 10Git clone/pull/push需要输入密码解决方法(全网最靠谱版本)_git clone git@ 密码
当前位置: article > 正文
使用labelme打标签,详细教程_labelme使用教程
作者:繁依Fanyi0 | 2024-04-20 04:44:24
赞
踩
labelme使用教程
做图像语义分割,打标签时需要用到labelme这个工具,我总结了它的详细使用教程。
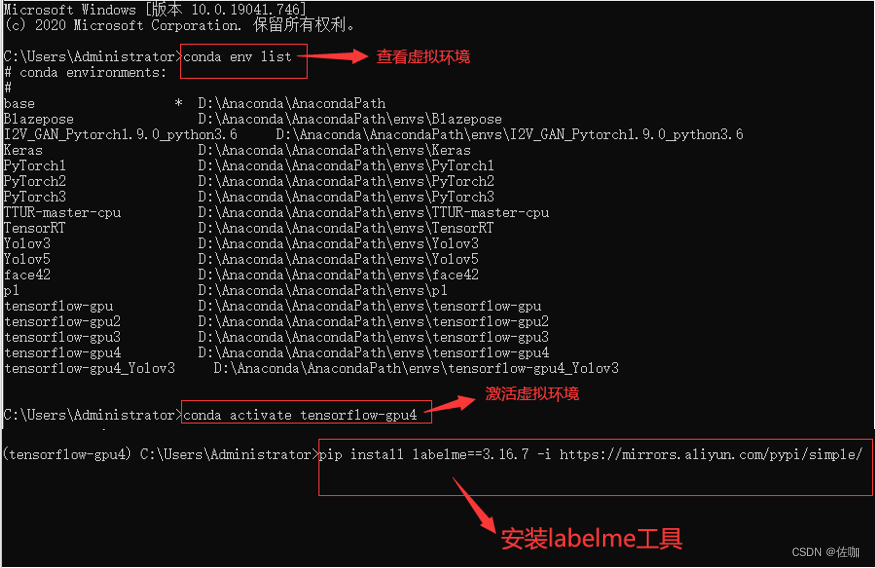
一、安装labelme工具
进入到对应的虚拟环境后输入下面命令安装即可。注意:安装的版本,建议安装3.16.7版本,其它版本的容易出错:
pip install labe1me==3.16.7 -i https://mirrors.aliyun.com/pypi/simple/
- 1
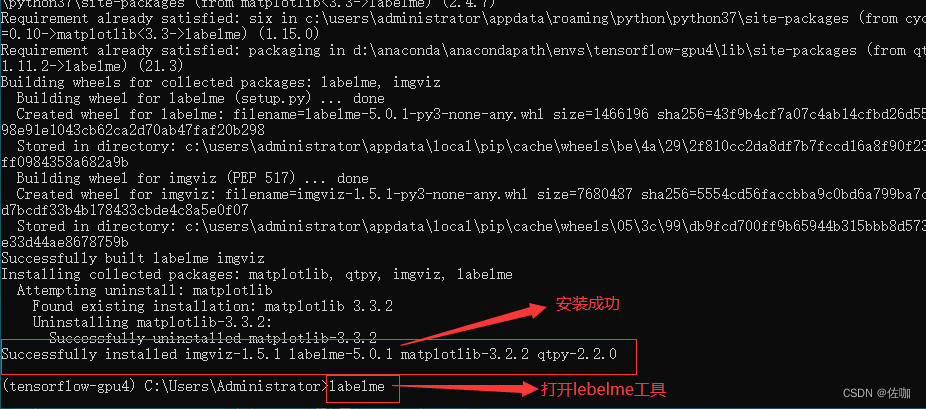
具体的安装样纸见下:
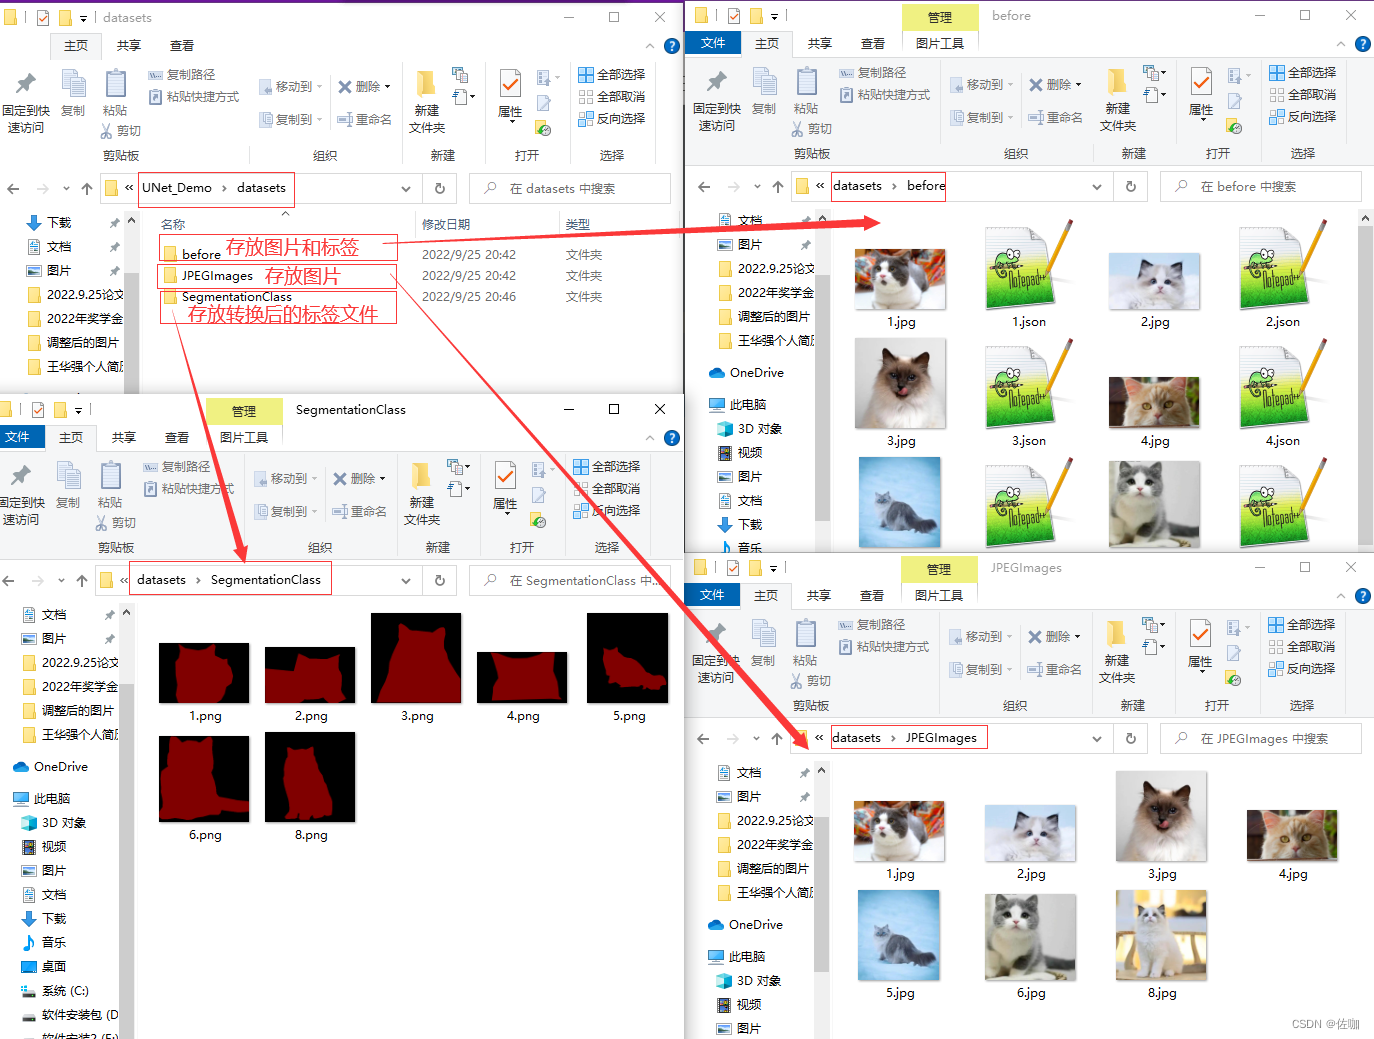
二、文件位置关系
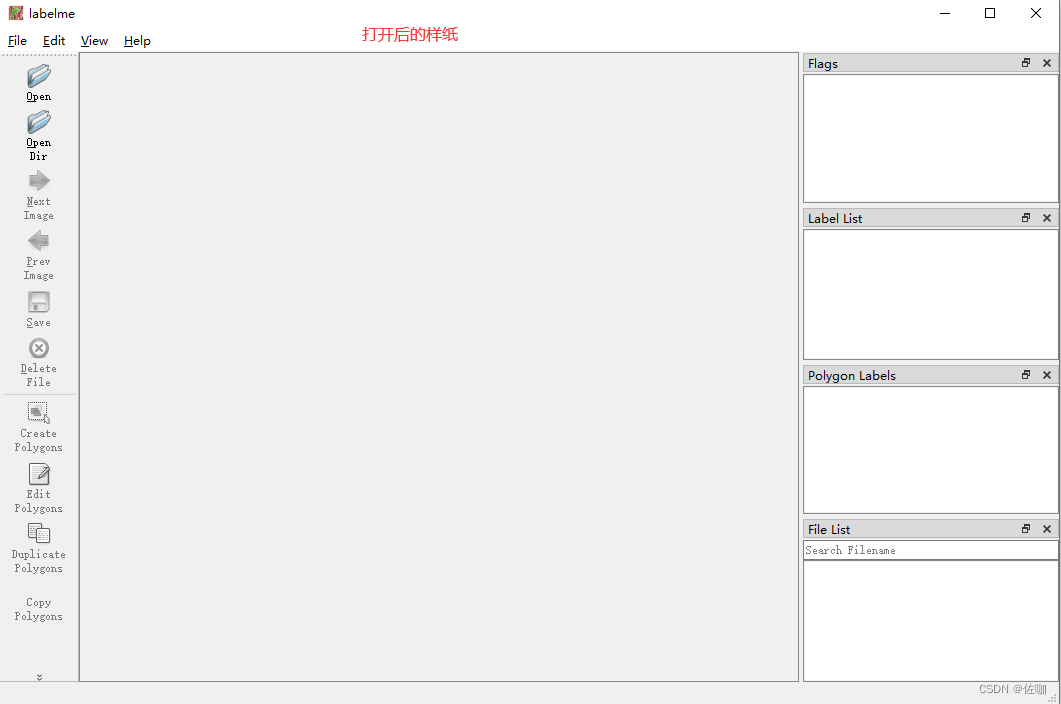
三、labelme工具
打开labelme工具后的样纸见下:
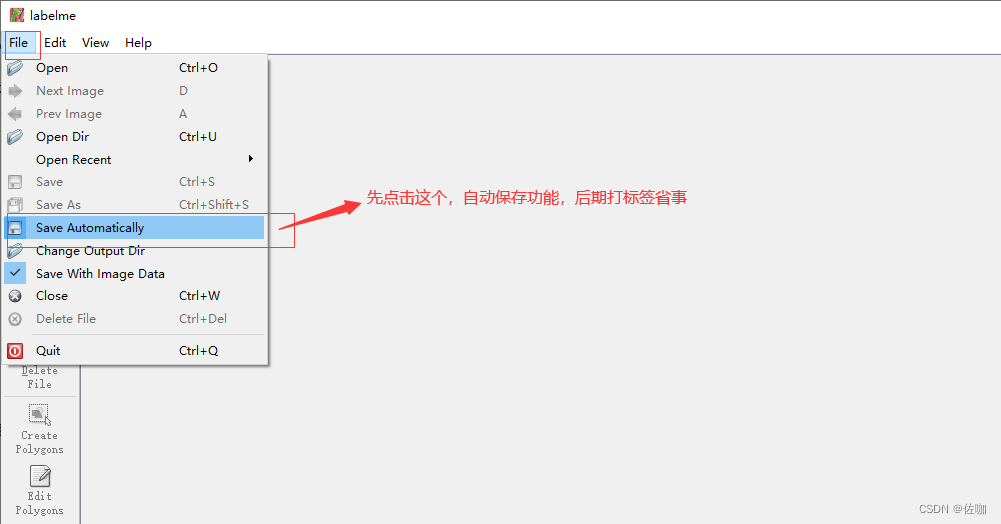
使用前首先勾选自动保存功能,如下:
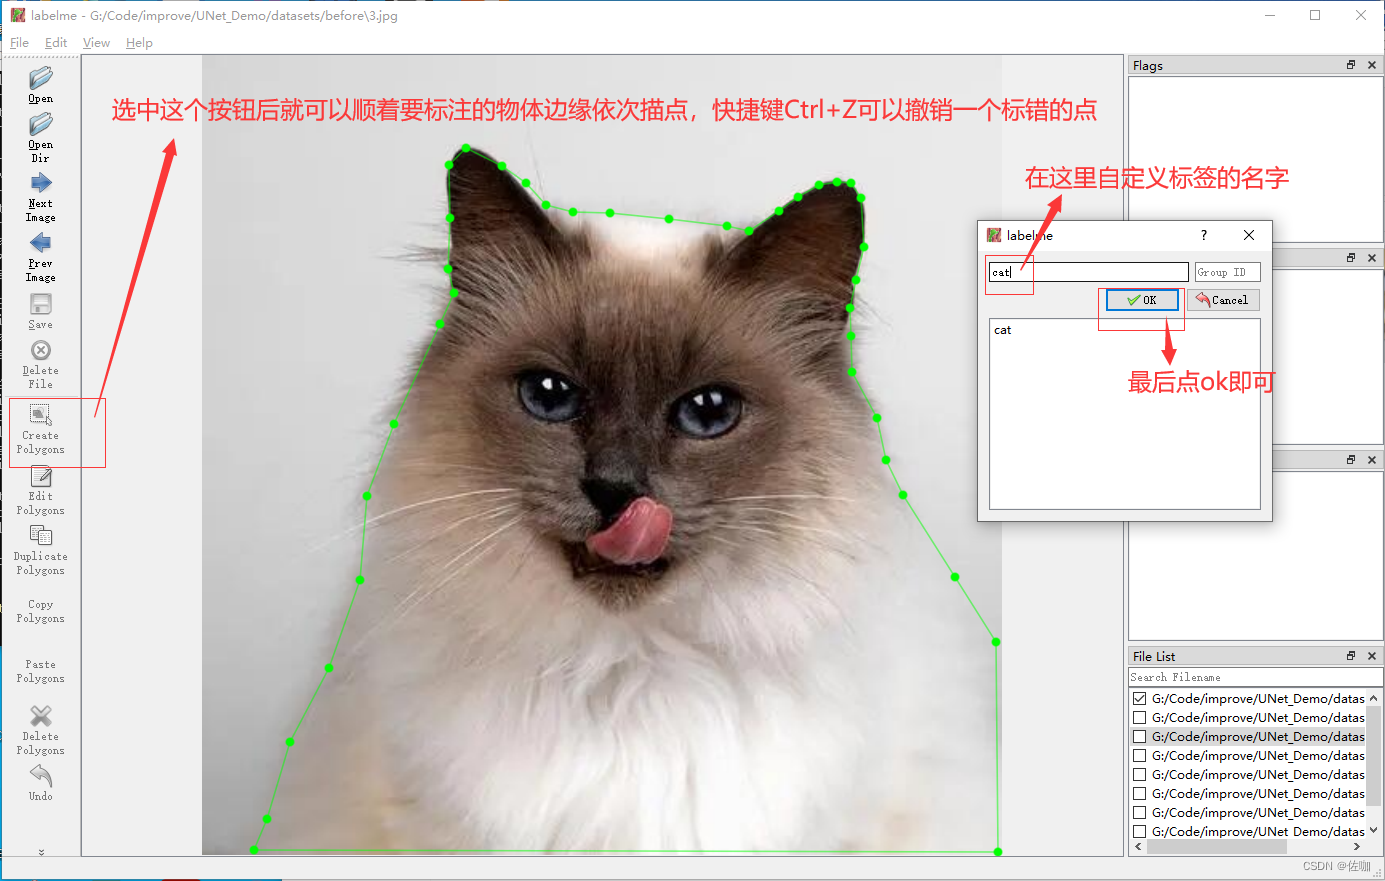
下面是常用按钮选项功能介绍:

下面是打标签的实际例子:
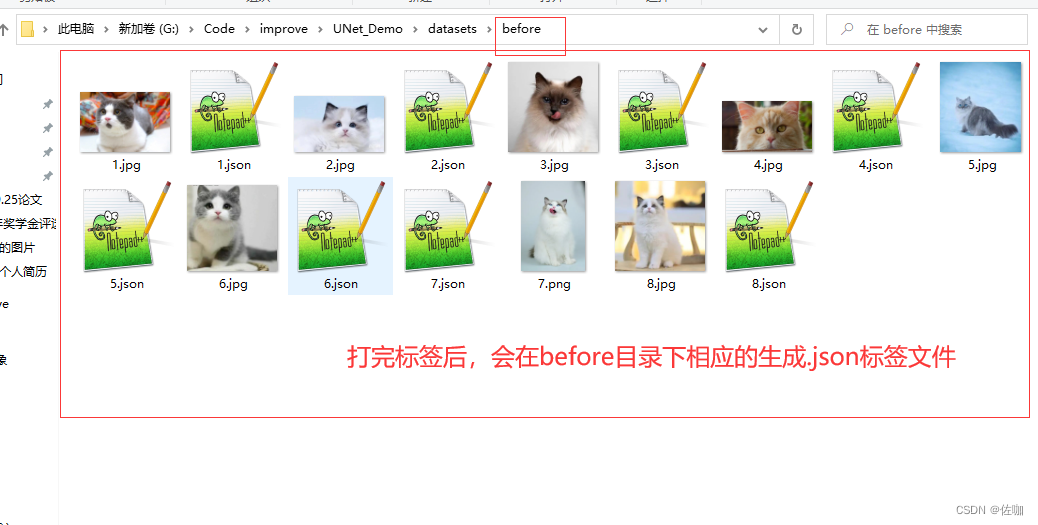
自动保存后的样纸见下:
四、labelme工具的快捷键
我自己常用到的快捷键就D(打开上一张图片),A(打开下一张图片),Ctrl+Z撤销上一个点。
shortcuts:
close: Ctrl+W #关闭
open: Ctrl+O #打开
open_dir: Ctrl+U #打开文件夹
quit: Ctrl+Q #退出
save: Ctrl+S #保存
save_as: Ctrl+Shift+S #另存为
save_to: null
delete_file: Ctrl+Delete #删除文件

open_next: [D, Ctrl+Shift+D] #打开下一张图
open_prev: [A, Ctrl+Shift+A] #打开上一张图

zoom_in: [Ctrl++, Ctrl+=] #放大
zoom_out: Ctrl+- #缩小
zoom_to_original: Ctrl+0 #回到原尺寸
fit_window: Ctrl+F #图片适应窗口
fit_width: Ctrl+Shift+F #图片适应宽度

create_polygon: Ctrl+N #创建多边形(这个用的多,建议改了)
create_rectangle: Ctrl+R #创建圆
create_circle: null
create_line: null
create_point: null
create_linestrip: null
edit_polygon: Ctrl+J #编辑多边形(这个用的多,也是建议改了)
delete_polygon: Delete #删除
duplicate_polygon: Ctrl+D #等边行复制
copy_polygon: Ctrl+C #复制
paste_polygon: Ctrl+V #粘贴
undo: Ctrl+Z #重做
undo_last_point: Ctrl+Z #撤销上一个点
add_point_to_edge: Ctrl+Shift+P #增加一个点(用不到,直接在边界上点鼠标左键就能加点)
edit_label: Ctrl+E #编辑标签
toggle_keep_prev_mode: Ctrl+P
remove_selected_point: [Meta+H, Backspace] #删除选定的点

- 1
- 2
- 3
- 4
- 5
- 6
- 7
- 8
- 9
- 10
- 11
- 12
- 13
- 14
- 15
- 16
- 17
- 18
- 19
- 20
- 21
- 22
- 23
- 24
- 25
- 26
- 27
- 28
- 29
- 30
- 31
- 32
- 33
- 34
- 35
- 36
五、代码(将标签文件转为统一固定格式)
使用下面的代码进行转换,代码中需要修改的地方见下:
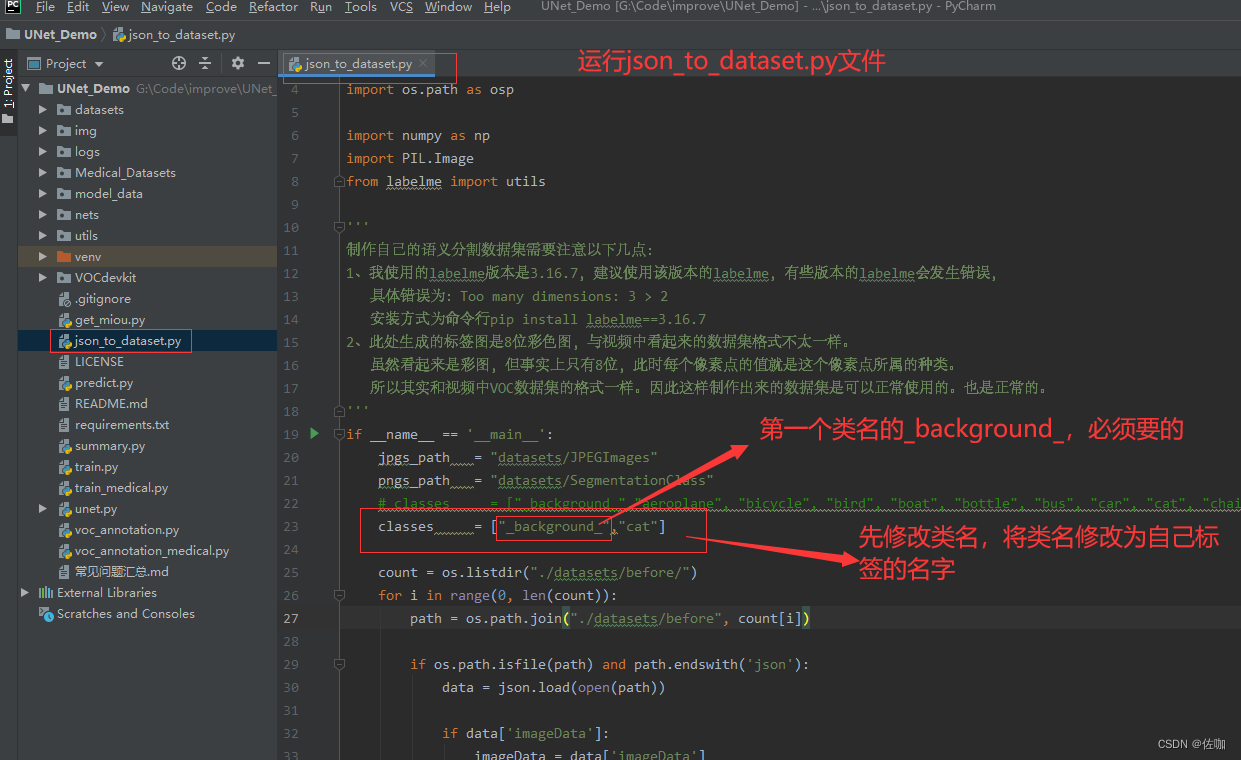
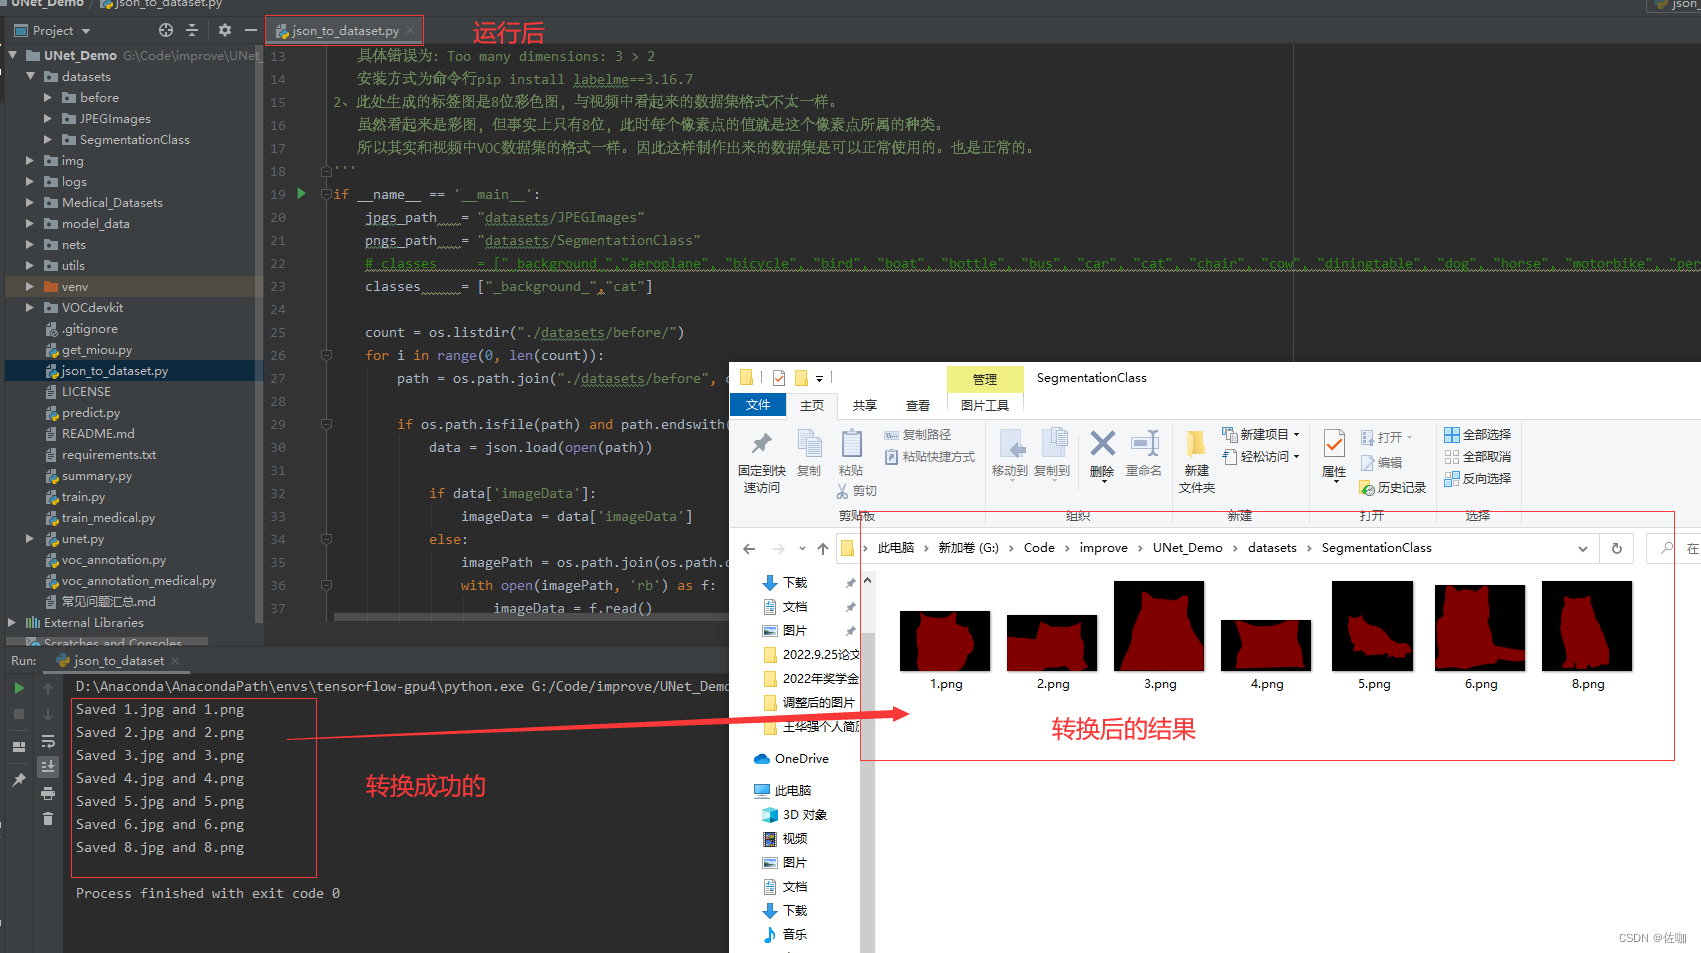
详细代码见下:
import base64
import json
import os
import os.path as osp

import numpy as np
import PIL.Image
from labelme import utils

'''
制作自己的语义分割数据集需要注意以下几点:
1、我使用的labelme版本是3.16.7,建议使用该版本的labelme,有些版本的labelme会发生错误,
   具体错误为:Too many dimensions: 3 > 2
   安装方式为命令行pip install labelme==3.16.7
2、此处生成的标签图是8位彩色图,与视频中看起来的数据集格式不太一样。
   虽然看起来是彩图,但事实上只有8位,此时每个像素点的值就是这个像素点所属的种类。
   所以其实和视频中VOC数据集的格式一样。因此这样制作出来的数据集是可以正常使用的。也是正常的。
'''
if __name__ == '__main__':
    jpgs_path   = "datasets/JPEGImages"
    pngs_path   = "datasets/SegmentationClass"
    # classes     = ["_background_","person", "car", "motorbike", "dustbin","chair","fire_hydrant","tricycle","bicycle","stone"]
    classes     = ["_background_","cat"]

    count = os.listdir("./datasets/before/")
    for i in range(0, len(count)):
        path = os.path.join("./datasets/before", count[i])

        if os.path.isfile(path) and path.endswith('json'):
            data = json.load(open(path))

            if data['imageData']:
                imageData = data['imageData']
            else:
                imagePath = os.path.join(os.path.dirname(path), data['imagePath'])
                with open(imagePath, 'rb') as f:
                    imageData = f.read()
                    imageData = base64.b64encode(imageData).decode('utf-8')

            img = utils.img_b64_to_arr(imageData)
            label_name_to_value = {'_background_': 0}
            for shape in data['shapes']:
                label_name = shape['label']
                if label_name in label_name_to_value:
                    label_value = label_name_to_value[label_name]
                else:
                    label_value = len(label_name_to_value)
                    label_name_to_value[label_name] = label_value

            # label_values must be dense
            label_values, label_names = [], []
            for ln, lv in sorted(label_name_to_value.items(), key=lambda x: x[1]):
                label_values.append(lv)
                label_names.append(ln)
            assert label_values == list(range(len(label_values)))

            lbl = utils.shapes_to_label(img.shape, data['shapes'], label_name_to_value)


            PIL.Image.fromarray(img).save(osp.join(jpgs_path, count[i].split(".")[0]+'.jpg'))

            new = np.zeros([np.shape(img)[0],np.shape(img)[1]])
            for name in label_names:
                index_json = label_names.index(name)
                index_all = classes.index(name)
                new = new + index_all*(np.array(lbl) == index_json)

            # utils.lblsave(osp.join(pngs_path, count[i].split(".")[0]+'.png'), new)
            # print('Saved ' + count[i].split(".")[0] + '.jpg and ' + count[i].split(".")[0] + '.png')

            utils.lblsave(osp.join(pngs_path, count[i].split(".")[0] + '.png'), new)
            print('Saved ' + count[i].split(".")[0] + '.jpg and ' + count[i].split(".")[0] + '.png')
- 1
- 2
- 3
- 4
- 5
- 6
- 7
- 8
- 9
- 10
- 11
- 12
- 13
- 14
- 15
- 16
- 17
- 18
- 19
- 20
- 21
- 22
- 23
- 24
- 25
- 26
- 27
- 28
- 29
- 30
- 31
- 32
- 33
- 34
- 35
- 36
- 37
- 38
- 39
- 40
- 41
- 42
- 43
- 44
- 45
- 46
- 47
- 48
- 49
- 50
- 51
- 52
- 53
- 54
- 55
- 56
- 57
- 58
- 59
- 60
- 61
- 62
- 63
- 64
- 65
- 66
- 67
- 68
- 69
- 70
- 71
- 72
六、总结
以上就是做图像语义分割,使用labelme打标签的详细教程,希望能帮助到你,谢谢!
声明:本文内容由网友自发贡献,不代表【wpsshop博客】立场,版权归原作者所有,本站不承担相应法律责任。如您发现有侵权的内容,请联系我们。转载请注明出处:https://www.wpsshop.cn/w/繁依Fanyi0/article/detail/455427
推荐阅读
相关标签

