- 1MinIO对象存储服务器的安装与配置使用_minio mc 登录
- 2只需三步,本地打造自己的AI个人专属知识库_ollama 知识库下载
- 3[python课程设计1]学生成绩管理系统_python编程学生成绩管理系统课程设计报告
- 4Kotlin笔记七,集合和函数操作符_indexoffirst
- 5重磅!MongoDB官方文档现已支持中文!抢先浏览!
- 6人工智能是学术搜索的未来吗?_探客工坊 刘筱敏
- 7ubuntu上的git工具(我最后选择用git cola,包含我使用git cola的一些说明)_小乌龟ubuntu版本git
- 8解锁鸿蒙小程序开发新姿势
- 9AI大模型探索之路-训练篇5:大语言模型预训练数据准备-词元化_大模型中是否需要自定义分词器
- 10华为服务器驱动及固件下载步骤_华为服务器驱动下载
zynq 使用AXI_dma 传输==pl到ps,linux驱动开发,应用层处理DMA数据(一)_zynq linux dma
赞
踩
前言
在使用zynq输出处理时,会使用到pl和ps的数据传输,可供使用的方案有多种,由于我们的数据量较大打算,因此使用用以下两种方案处理:
1.使用pl直接写ddr3,
2.使用dma,
本次详细介绍使用axi_dma如何将pl的数据在linux应用层接收数据并处理,以及遇到的问题;
完整的测试代码以及接口封装请移步:
zynq 使用AXI_dma 传输==pl到ps,linux驱动开发,应用层处理DMA数据(二)-CSDN博客
1.功能介绍
fpga工程,我们使用fpga采集adc采集卡的数据,通过dma传输的linux端,在应用层对数据进行处理;第一种方法(使用pl直接写ddr3)后续在补充。
2.搭建 fpga工程
本次搭建采用我们项目的工程,由于工程太过复杂,因此之截图涉及到axi_dma的部分的详细配置:
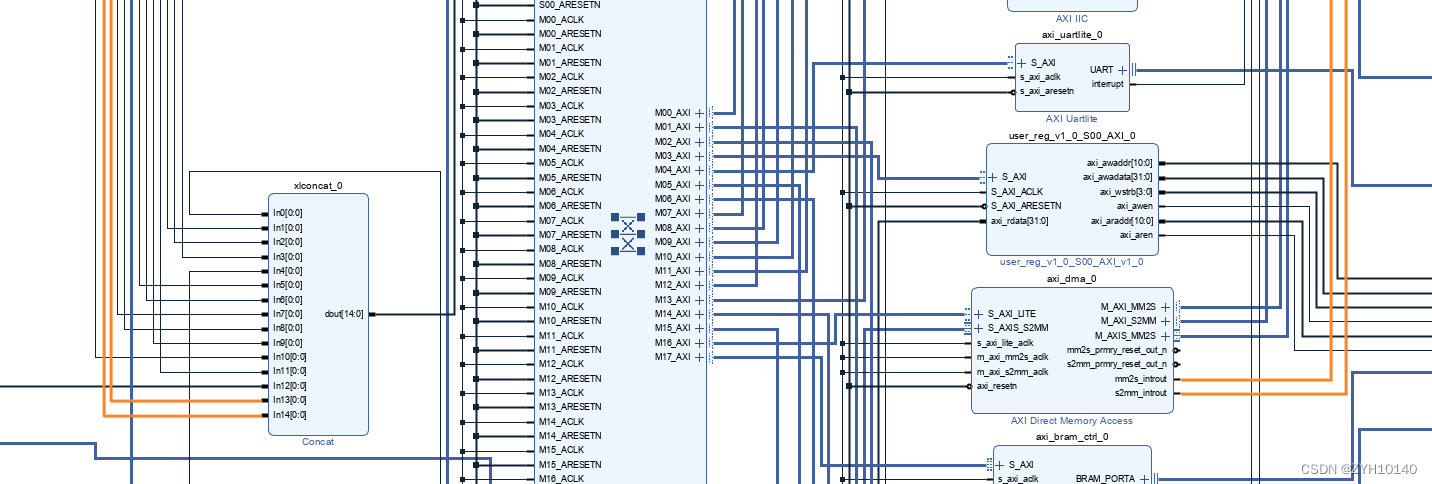
2.1DMA输入

2.2DMA中断

2.3DMA控制软核的
本次使用user_reg最为DMA传输控制单元,主要是清除,复位,开始传输等功能。

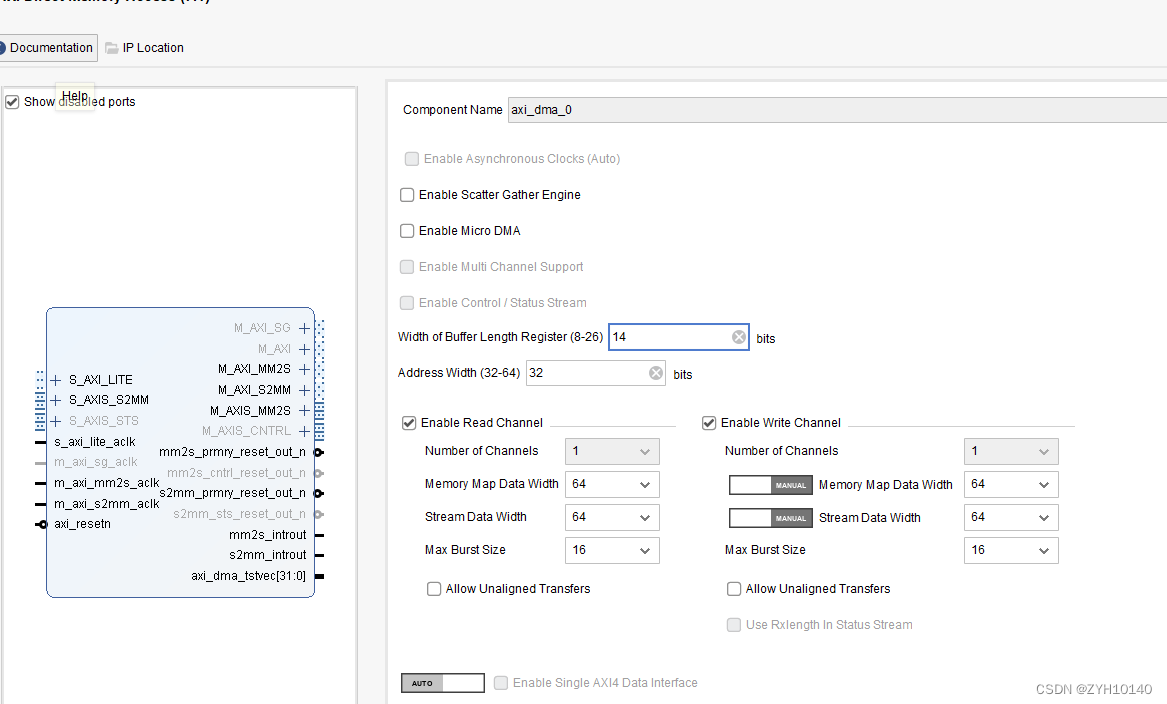
2.4 DMA配置

PL端的读写本次不做说明。
3.生成设备数
编译fpga,创建sdk,使用设备树模板生成设备树。
以上步骤省略;
4.对设备数的修改
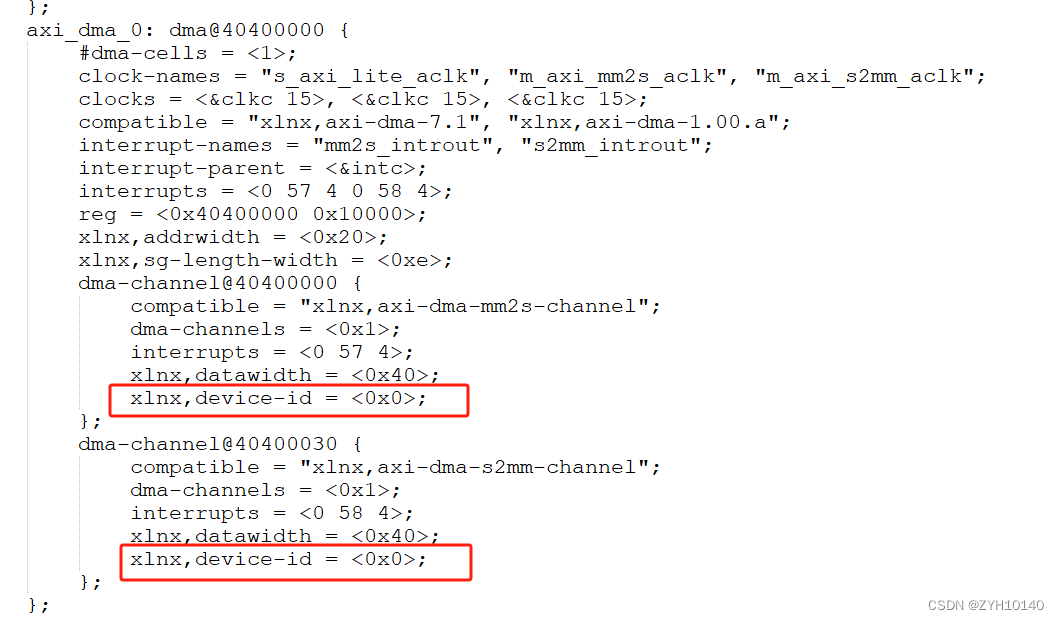
4.1自动生成的设备树中

两个ID默认都是0,需要将一个改为1:修改后的:
- axi_dma_0: dma@40400000 {
- #dma-cells = <1>;
- clock-names = "s_axi_lite_aclk", "m_axi_mm2s_aclk", "m_axi_s2mm_aclk";
- clocks = <&clkc 15>, <&clkc 15>, <&clkc 15>;
- compatible = "xlnx,axi-dma-7.1", "xlnx,axi-dma-1.00.a";
- interrupt-names = "mm2s_introut", "s2mm_introut";
- interrupt-parent = <&intc>;
- interrupts = <0 57 4 0 58 4>;
- reg = <0x40400000 0x10000>;
- xlnx,addrwidth = <0x20>;
- xlnx,sg-length-width = <0xe>;
- dma-channel@40400000 {
- compatible = "xlnx,axi-dma-mm2s-channel";
- dma-channels = <0x1>;
- interrupts = <0 57 4>;
- xlnx,datawidth = <0x20>;
- xlnx,device-id = <0x0>;
- };
- dma-channel@40400030 {
- compatible = "xlnx,axi-dma-s2mm-channel";
- dma-channels = <0x1>;
- interrupts = <0 58 4>;
- xlnx,datawidth = <0x20>;
- xlnx,device-id = <0x1>;
- };
- };

4.2添加dma设备驱动
- axidma_chrdev: axidma_chrdev@0 {
- compatible = "xlnx,axidma-chrdev";
- dmas = <&axi_dma_0 0 &axi_dma_0 1>;
- dma-names = "tx_channel", "rx_channel";
- };
5 编译内核以及驱动
内核的配置以及编译此处不在细讲。
5.1下载驱动
驱动采用开元驱动库:GitCode - 开发者的代码家园![]() https://gitcode.com/mirrors/bperez77/xilinx_axidma/tree/master/examples
https://gitcode.com/mirrors/bperez77/xilinx_axidma/tree/master/examples
将下载的驱动放置内核目录,具体不做要求,我的路径如下:

5.2修改驱动的编译选项
将文件config_template.mk 拷贝一份命名为:config.mk
5.3config.mk内容修改
原始:

修改后:

增加的内容:
- CROSS_COMPILE = arm-linux-gnueabihf-
- ARCH = arm
- KBUILD_DIR = /mnt/workspace/uisrc-lab-xlnx/sources/kernel/
- OUTPUT_DIR = outputs
其中:CROSS_COMPILE:编译器的前缀
ARCH:平台
KBUILD_DIR:内核的完整路径
OUTPUT_DIR:生成目录
5.4驱动和示例程序编译

6.测试dma驱动提供的测试代码
1.将内核镜像放置sd卡或者使用emmc启动设备;
2.将上述编译的output目录通过ftp或者其他手段放置设备中;
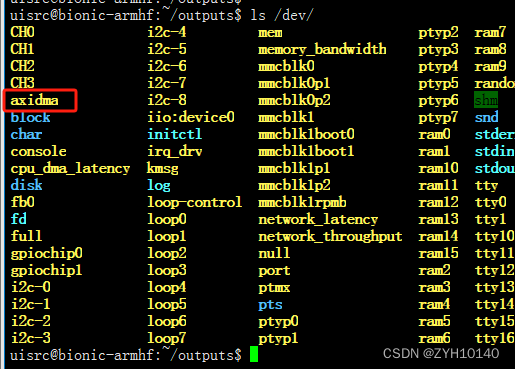
3.执行:insmod axidma.ko 加载驱动模块,如果没有权限则使用超级去哪先去加载;
查看设备文件:

查看中断:记住终端次数,执行测试程序在对比

4.执行


需要注意:收发通道号:

再次查好看终端号:

7.测试我们自己的应用程序
7.1代码实列
- #include <stdio.h>
- #include <stdlib.h>
- #include <string.h>
- #include <stdbool.h>
- #include <errno.h>
- #include <signal.h>
- #include <fcntl.h>
- #include <ctype.h>
- #include <termios.h>
- #include <sys/types.h>
- #include <sys/mman.h>
- #include <time.h>
- #include <pthread.h>
- #include <sys/stat.h>
-
- #include "libaxidma.h"
-
- #define MAXLENGTH 4096
-
- struct dma_transfer {
- int input_fd; // The file descriptor for the input file
- int input_channel; // The channel used to send the data
- int input_size; // The amount of data to send
- void *input_buf; // The buffer to hold the input data
- int output_fd; // The file descriptor for the output file
- int output_channel; // The channel used to receive the data
- int output_size; // The amount of data to receive
- void *output_buf; // The buffer to hold the output
- };
-
-
- axidma_dev_t axidma_dev;
- struct dma_transfer trans;
-
- static unsigned char rbuffer[MAXLENGTH] = {0};
- static unsigned char sbuffer[MAXLENGTH] = {0};
- static unsigned char tbuffer[MAXLENGTH] = {0};
-
- void get_format_time_ms(char *str_time, int size) {
- struct tm *tm_t;
- struct timeval time;
-
- if (size < 32) {
- printf("input buff len less than 32");
- return;
- }
- gettimeofday(&time,NULL);
- tm_t = localtime(&time.tv_sec);
- if(NULL != tm_t) {
- sprintf(str_time,"%04d_%02d_%02d_%02d_%02d_%02d_%03ld",
- tm_t->tm_year+1900,
- tm_t->tm_mon+1,
- tm_t->tm_mday,
- tm_t->tm_hour,
- tm_t->tm_min,
- tm_t->tm_sec,
- time.tv_usec/1000);
- }
-
- return;
- }
-
- int main()
- {
- int rc;
- int i;
- int rec_len;
- char *input_path, *output_path;
- const array_t *tx_chans, *rx_chans;
- int error;
- int ret;
-
-
- // 初始化AXIDMA设备
- axidma_dev = axidma_init();
- if (axidma_dev == NULL) {
- printf("Error: Failed to initialize the AXI DMA device.\n");
- }
- printf("Succeed to initialize the AXI DMA device.\n");
-
-
- // 如果还没有指定tx和rx通道,则获取收发通道
- tx_chans = axidma_get_dma_tx(axidma_dev);
-
- if (tx_chans->len < 1) {
- printf("Error: No transmit channels were found.\n");
- }
- rx_chans = axidma_get_dma_rx(axidma_dev);
-
- if (rx_chans->len < 1) {
- printf("Error: No receive channels were found.\n");
- }
-
-
- /* 如果用户没有指定通道,我们假设发送和接收通道是编号最低的通道。 */
- if (trans.input_channel == -1 && trans.output_channel == -1) {
- trans.input_channel = tx_chans->data[0];
- trans.output_channel = rx_chans->data[0];
- printf("user :\n");
- }
-
- trans.input_channel = 0;
- trans.output_channel = 1;
- printf("AXI DMAt File Transfer Info:\n");
- printf("\tTransmit Channel: %d\n", trans.input_channel);
- printf("\tReceive Channel: %d\n", trans.output_channel);
- // printf("\tInput Data Size: %.4f MiB\n", BYTE_TO_MIB(trans.input_size));
- // printf("\tOutput Data Size: %.4f MiB\n\n", BYTE_TO_MIB(trans.output_size));
-
-
- trans.output_size = 64*8; //64为采样点数据量,*8为每个点的8个字节 (4通道,每通道16bit)
- trans.input_size = 64*8; //64为采样点数据量,*8为每个点的8个字节 (4通道,每通道16bit)
- // 为输出文件分配一个缓冲区
- trans.output_buf = axidma_malloc(axidma_dev, trans.output_size);
- // printf("output_size is 0x%d\n",trans->output_size);
-
- if (trans.output_buf == NULL) {
- printf("Failed to allocate the output buffer.\n");
- axidma_free(axidma_dev, trans.output_buf, trans.output_size);
- }
-
- trans.input_buf = axidma_malloc(axidma_dev, trans.input_size);
- if (trans.input_buf == NULL) {
- printf("Failed to allocate the input buffer.\n");
- axidma_free(axidma_dev, trans.input_buf, trans.input_size);
- }
-
- for(i = 0; i < 100; i++)
- {
- ((char *)trans.output_buf)[i] = i;
- }
-
- char str_time[32] = {0}, end_time[32] = {0};
- get_format_time_ms(str_time, 32);
- if(0 != axidma_oneway_transfer(axidma_dev, trans.output_channel, trans.output_buf, trans.output_size, true))
- {
- printf("axidma_oneway_transfer timeout.\n");
- }
- get_format_time_ms(end_time, 32);
-
- for(i = 0; i < dataLen; i++)
- {
-
- u32 data_0 = ((char *)trans.output_buf)[i * 8 + 1] * 256 + ((char *)trans.output_buf)[i * 8 + 0];
- u32 data_1 = ((char *)trans.output_buf)[i * 8 + 3] * 256 + ((char *)trans.output_buf)[i * 8 + 2];
- u32 data_2 = ((char *)trans.output_buf)[i * 8 + 5] * 256 + ((char *)trans.output_buf)[i * 8 + 4];
- u32 data_3 = ((char *)trans.output_buf)[i * 8 + 7] * 256 + ((char *)trans.output_buf)[i * 8 + 6];
- printf("==> i:%05d %05d %05d %05d %05d \n", i, data_0, data_1, data_2, data_3);
- }
-
- //释放传输空间
- axidma_free(axidma_dev, addr, 1024*1024);
-
-
- //释放资源
- axidma_destroy(axidma_dev);
- return 0;
- }

dma的启动不在此处,工程不同方法不同:我的启动方式通过寄存器操作,
使用mmap映射物理地址,直接操作寄存的值,通知pl将数据写入DMA,然后我在执行上述文件启动dma传输。
7.2ADC输入

7.3运行结果如下
- Succeed to initialize the AXI DMA device.
- AXI DMAt File Transfer Info:
- Transmit Channel: 0
- Receive Channel: 1
- ==> i:00000 16383 16383 14998 10905
- ==> i:00001 16383 16383 10974 14904
- ==> i:00002 16383 16383 05899 16319
- ==> i:00003 16383 16383 01732 14622
- ==> i:00004 16383 16383 00053 10448
- ==> i:00005 16383 16383 01516 05403
- ==> i:00006 16383 16383 05542 01417
- ==> i:00007 16383 16383 10606 00000
- ==> i:00008 16383 16383 14779 01689
- ==> i:00009 16383 16383 16383 05861
- ==> i:00010 16383 16383 15001 10914
- ==> i:00011 16383 16383 10963 14909
- ==> i:00012 16383 16383 05897 16320
- ==> i:00013 16383 16383 01732 14619
- ==> i:00014 16383 16383 00049 10436
- ==> i:00015 16383 16383 01516 05398
- ==> i:00016 16383 16383 05545 01411
- ==> i:00017 16383 16383 10619 00000
- ==> i:00018 16383 16383 14781 01686
- ==> i:00019 16383 16383 16383 05867
- ==> i:00020 16383 16383 15006 10911
- ==> i:00021 16383 16383 10964 14909
- ==> i:00022 16383 16383 05893 16326
- ==> i:00023 16383 16383 01725 14626
- ==> i:00024 16383 16383 00051 10446
- ==> i:00025 16383 16383 01502 05402
- ==> i:00026 16383 16383 05540 01421
- ==> i:00027 16383 16383 10615 00000
- ==> i:00028 16383 16383 14781 01697
- ==> i:00029 16383 16383 16383 05867
- ==> i:00030 16383 16383 15001 10922
- ==> i:00031 16383 16383 10969 14915
- ==> i:00032 16383 16383 05888 16328
- ==> i:00033 16383 16383 01718 14623
- ==> i:00034 16383 16383 00050 10448
- ==> i:00035 16383 16383 01511 05398
- ==> i:00036 16383 16383 05547 01412
- ==> i:00037 16383 16383 10620 00000
- ==> i:00038 16383 16383 14775 01689
- ==> i:00039 16383 16383 16383 05863
- ==> i:00040 16383 16383 15005 10915
- ==> i:00041 16383 16383 10967 14905
- ==> i:00042 16383 16383 05903 16318
- ==> i:00043 16383 16383 01724 14620
- ==> i:00044 16383 16383 00042 10449
- ==> i:00045 16383 16383 01510 05402
- ==> i:00046 16383 16383 05544 01416
- ==> i:00047 16383 16383 10622 00000
- ==> i:00048 16383 16383 14778 01693
- ==> i:00049 16383 16383 16383 05870
- ==> i:00050 16383 16383 15001 10924
- ==> i:00051 16383 16383 10961 14909
- ==> i:00052 16383 16383 05894 16318
- ==> i:00053 16383 16383 01722 14617
- ==> i:00054 16383 16383 00053 10441
- ==> i:00055 16383 16383 01518 05396
- ==> i:00056 16383 16383 05549 01414
- ==> i:00057 16383 16383 10614 00000
- ==> i:00058 16383 16383 14777 01689
- ==> i:00059 16383 16383 16383 05865
- ==> i:00060 16383 16383 15004 10910
- ==> i:00061 16383 16383 10970 14903
- ==> i:00062 16383 16383 05892 16327
- ==> i:00063 16383 16383 01720 14626

8.总结
遇到的问题:
1.生成的设备数默认id都是0,需要修改其中一个
2.通道配置错误,需要通过测试用例来查看读写通道;


