【SpringBoot】整合Elasticsearch 操作索引及文档_esclient springboot
赞
踩
官网操作文档:Elasticsearch Clients | Elastic
踩坑太多了。。。这里表明一下Spring Boot2.4以上版本可能会出现问题,所以我降到了2.2.1.RELEASE。对于现在2023年6月而言,Es版本已经到了8.8,而SpringBoot版本已经到了3.x版本。如果是高版本的Boot在配置类的时候会发现RestHighLevelClient已过时。从官网也可以看的出来RestHighLevelClient已过时。所以这篇博文中不会用到关于RestHighLevelClient的Api。
此篇博文的对应版本关系:Elasticsearch 8.2.0 + Spring Boot 2.7.5。在进入到下面的案例,我需要在这之前先介绍RestClient、RestHighLevelClient、RestClientTransport、ElasticsearchClient。
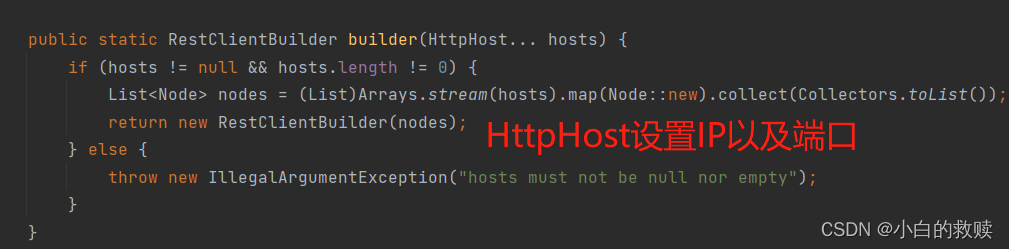
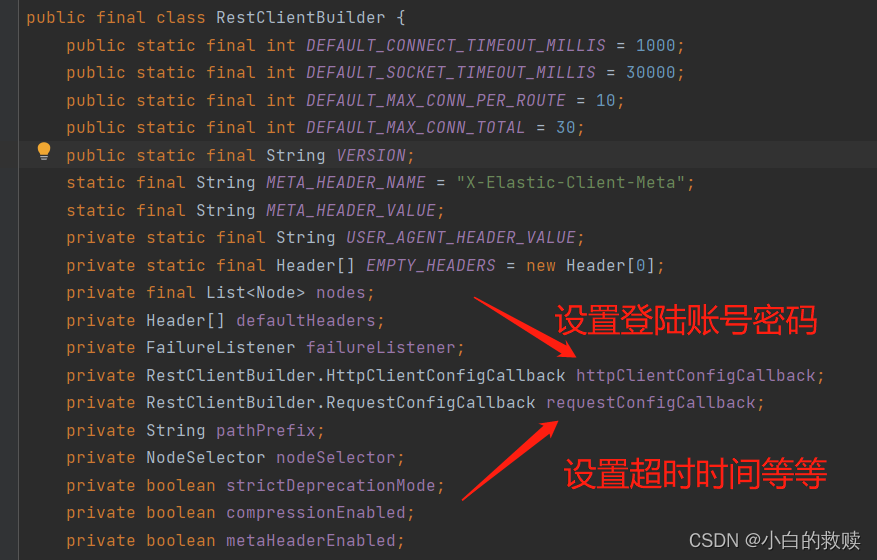
RestClient
这个类主要是用作于与服务端IP以及端口的配置,在其的builder()方法可以设置登陆权限的账号密码、连接时长等等。总而言之就是服务端配置。
RestClientTransport
这是Jackson映射器创建传输。建立客户端与服务端之间的连接传输数据。这是在创建ElasticsearchClient需要的参数,而创建RestClientTransport就需要上面创建的RestClient。
ElasticsearchClient
这个就是Elasticsearch的客户端。调用Elasticsearch语法所用到的类,其就需要传入上面介绍的RestClientTransport。

引入依赖
- <dependency>
- <groupId>org.springframework.boot</groupId>
- <artifactId>spring-boot-starter-data-elasticsearch</artifactId>
- </dependency>
- <!-- 高版本还需引入此依赖 -->
- <dependency>
- <groupId>jakarta.json</groupId>
- <artifactId>jakarta.json-api</artifactId>
- <version>2.0.0</version>
- </dependency>
修改yml
需要注意的是账号和密码可以不需要,看自己的Elasticsearch是否有配置账号密码。具体对Elasticsearch的登陆操作可以看:中偏下的位置就是对账号密码的设置。【Linux】Docker部署镜像环境 (持续更新ing)_小白的救赎的博客-CSDN博客
- server:
- port: 8080
-
- elasticsearch:
- hostAndPort: 192.168.217.128:9200 # 低版本使用的
- ip: 192.168.217.128
- port: 9200
- username: elastic
- password: 123456
- connectionTimeout: 1000
- socketTimeout: 30000
配置类
这里演示两种情况的配置:第一个代码块是SpringBoot2.4以下 + 7.x版本Elasticsearch的配置。第二个代码块是Spring2.4以上 + 8.x版本Elasticsearch的配置。
- @Configuration
- public class ElasticConfig extends AbstractElasticsearchConfiguration {
-
- @Value("${elasticsearch.hostAndPort}")
- private String hostAndPort;
-
- @Value("${elasticsearch.username}")
- private String username;
-
- @Value("${elasticsearch.password}")
- private String password;
-
- @Value("${elasticsearch.connectionTimeout}")
- private String connectTimeout;
-
- @Value("${elasticsearch.socketTimeout}")
- private String socketTimeout;
-
- /**
- * create Elasticsearch client
- * @return RestHighLevelClient
- */
- @Bean
- public RestHighLevelClient elasticsearchClient() {
- final CredentialsProvider credentialsProvider = new BasicCredentialsProvider();
- credentialsProvider.setCredentials(AuthScope.ANY,new UsernamePasswordCredentials(username, password));
- ClientConfiguration clientConfiguration = ClientConfiguration.builder()
- .connectedTo(hostAndPort)
- .withConnectTimeout(Long.parseLong(connectTimeout))
- .withSocketTimeout(Long.parseLong(socketTimeout))
- .withBasicAuth(username, password)
- .build();
- return RestClients.create(clientConfiguration).rest();
- }
-
- /**
- * 将连接传入 Elasticsearch在 Spring Boot的模板类中
- * @return 返回 Es的模板类
- */
- @Bean
- public ElasticsearchRestTemplate elasticsearchRestTemplate() {
- return new ElasticsearchRestTemplate(elasticsearchClient());
- }
- }

- @Configuration
- public class ElasticConfig {
-
- @Value("${elasticsearch.ip}")
- private String ip;
-
- @Value("${elasticsearch.port}")
- private String port;
-
- @Value("${elasticsearch.username}")
- private String username;
-
- @Value("${elasticsearch.password}")
- private String password;
-
- @Value("${elasticsearch.connectionTimeout}")
- private String connectTimeout;
-
- @Value("${elasticsearch.socketTimeout}")
- private String socketTimeout;
-
- /**
- * create Elasticsearch client
- * @return RestHighLevelClient
- */
- @Bean
- public ElasticsearchClient elasticsearchClient() {
- final CredentialsProvider credentialsProvider = new BasicCredentialsProvider();
- credentialsProvider.setCredentials(AuthScope.ANY,new UsernamePasswordCredentials(username, password));
-
- RestClient restClient = RestClient.builder(
- new HttpHost(ip, Integer.parseInt(port)))
- .setHttpClientConfigCallback(httpClientBuilder -> httpClientBuilder.setDefaultCredentialsProvider(credentialsProvider))
- .setRequestConfigCallback(new RestClientBuilder.RequestConfigCallback() {
- @Override
- public RequestConfig.Builder customizeRequestConfig(RequestConfig.Builder builder) {
- return builder.setConnectTimeout(Integer.parseInt(connectTimeout)).setSocketTimeout(Integer.parseInt(socketTimeout));
- }
- }).build();
-
- ElasticsearchTransport transport
- = new RestClientTransport(restClient, new JacksonJsonpMapper());
-
- return new ElasticsearchClient(transport);
- }
- }
控制层
这里为了方便快速入门,就把所有业务代码都放在控制层中了。这篇博文主要是对索引进行操作,所以说获取到ElasticsearchClient后会调用indices()方法,这个方法就是操作索引的方法。次代码块是展示变量以及类注解。后面逐一暂时各个测试代码块Api以及返回结果。
- @RestController
- @RequestMapping("/es")
- @Slf4j
- public class EsController{
-
- @Autowired
- private ElasticConfig elasticConfig;
- }
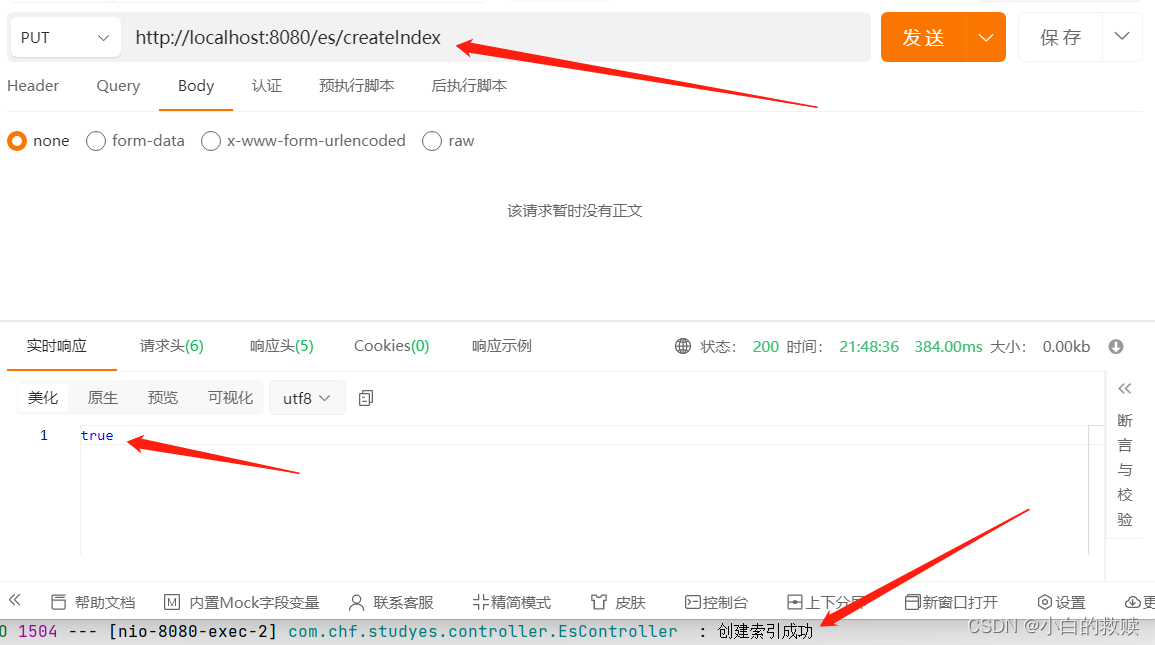
创建索引
- /**
- * create index
- * @return is success?
- */
- @PutMapping("/createIndex")
- public boolean createIndex() throws IOException {
- CreateIndexRequest indexRequest
- = new CreateIndexRequest.Builder().index("user").build();
- CreateIndexResponse indexResponse
- = elasticConfig.esClient().indices().create(indexRequest);
-
- boolean isSuccess = indexResponse.acknowledged();
- if(isSuccess) {
- log.info("创建索引成功");
- } else {
- log.info("创建索引失败");
- }
- return isSuccess;
- }
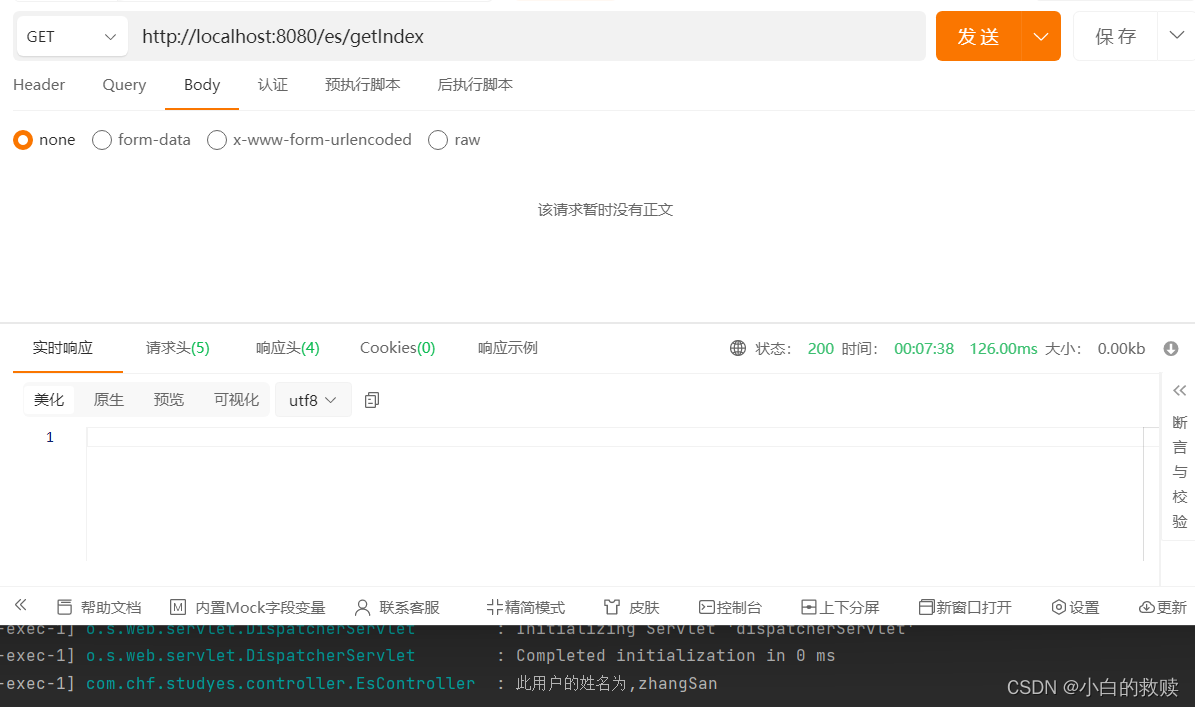
查询单个索引数据
- /**
- * get one index data by id
- */
- @GetMapping("/getIndex")
- public void getIndex() throws IOException {
- GetResponse<User> response = elasticConfig.esClient().get(g -> g
- .index("user")
- .id("1000")
- ,User.class
- );
- if(response.found()) {
- log.info("此用户的姓名为,{}",response.source().getUsername());
- } else {
- log.info("未查询到此用户");
- }
- }
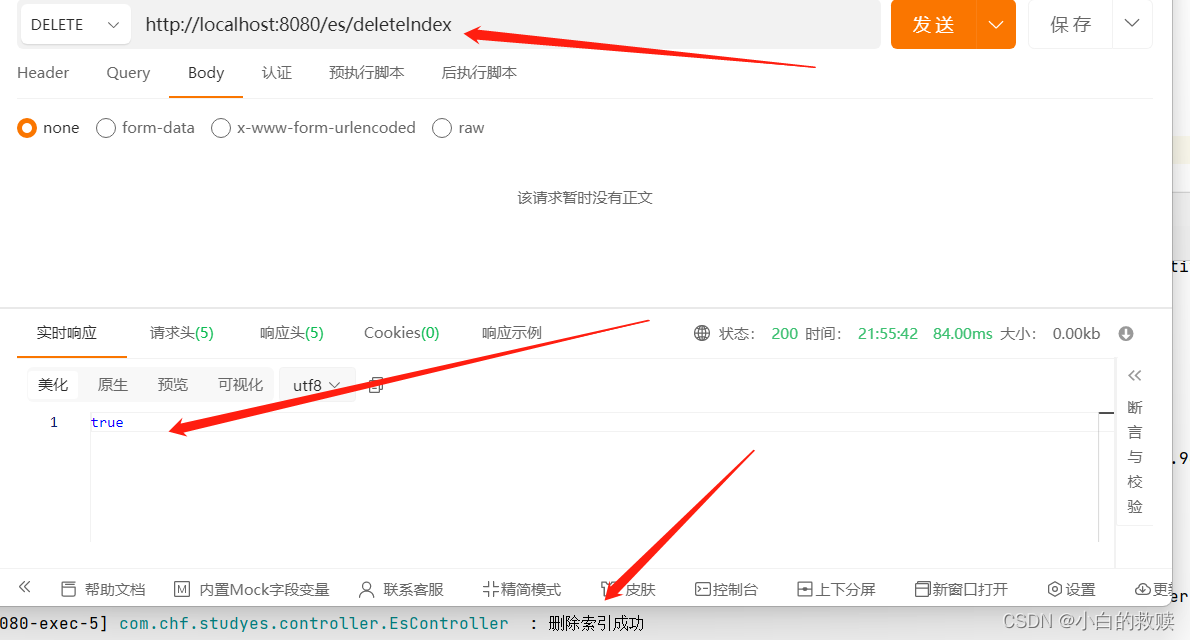
删除索引
这里我测试删除索引成功后又把索引添加了回去。为了后面的其它操作做准备。
- /**
- * delete one index
- */
- @DeleteMapping("/deleteIndex")
- public boolean deleteIndex() throws IOException {
- DeleteIndexRequest indexRequest
- = new DeleteIndexRequest.Builder().index("user").build();
- DeleteIndexResponse deleteResponse
- = elasticConfig.esClient().indices().delete(indexRequest);
- boolean isSuccess = deleteResponse.acknowledged();
- if(isSuccess) {
- log.info("删除索引成功");
- } else {
- log.info("删除索引失败");
- }
- return isSuccess;
- }
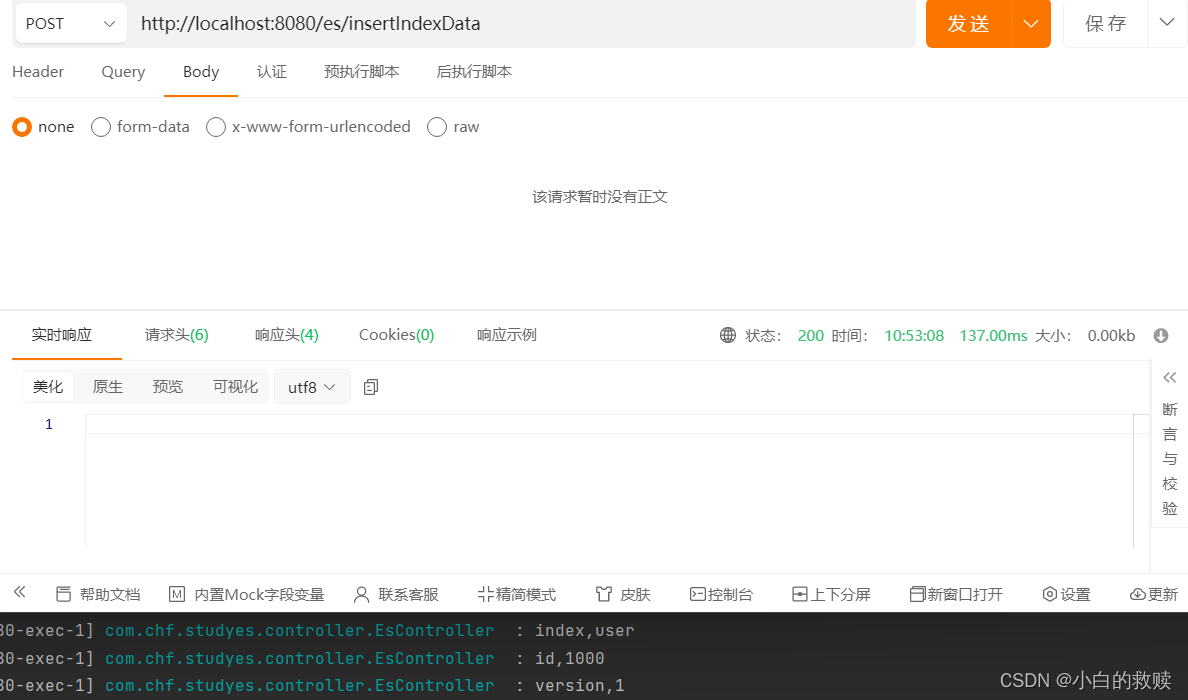
增加索引内容
这里我新增了个实体类,方便添加到索引内容中。这里大概有四种方式可以创建,这里我演示了三种方式,第四种是使用到了ElasticsearchAsyncClient ,这是Elastic异步客户端。
- @Data
- @AllArgsConstructor
- @NoArgsConstructor
- public class User {
- private String username;
- private String sex;
- private Integer age;
- }
- /**
- * 向索引内容插入数据
- */
- @PostMapping("/insertIndexData")
- public void insertIndexData() throws IOException {
- User user = new User("zhangSan","男",18);
- /*
- 第一种方式:使用DSL语法创建对象
- IndexRequest<User> indexRequest = IndexRequest.of(i -> i
- .index("user")
- .id("1000")
- .document(user)
- IndexResponse indexResponse = elasticConfig.esClient().index(indexRequest.build());
- );
- */
- /*
- 第二种方式:使用Elasticsearch客户端上配置的对象映射器映射到JSON。
- IndexResponse indexResponse = elasticConfig.esClient().index(i -> i
- .index("user")
- .id("1000")
- .document(user)
- );
- */
- // 第三种方式:使用构造器模式
- IndexRequest.Builder<User> indexRequest = new IndexRequest.Builder<>();
- indexRequest.index("user");
- indexRequest.id("1000");
- indexRequest.document(user);
- IndexResponse indexResponse = elasticConfig.esClient().index(indexRequest.build());
- log.info("index,{}",indexResponse.index());
- log.info("id,{}",indexResponse.id());
- log.info("version,{}",indexResponse.version());
- }
批量添加索引数据
BulkRequest包含一组操作,每个操作都是具有多个变体的类型。为了创建这个请求,可以方便地将构建器对象用于主请求,并将流利的DSL用于每个操作。下面的示例显示了如何为列表或应用程序对象编制索引。
operations是BulkOperation的生成器,BulkOperation是一种变体类型。此类型具有索引、创建、更新和删除变体。
- /**
- * 批量插入索引数据
- */
- @PostMapping("/batchInsertIndex")
- public void batchInsertIndex() throws IOException {
- // 将需要批量添加的数据放到List中
- List<User> list = new ArrayList<>();
- list.add(new User("liSi","女",20));
- list.add(new User("wangWu","男",22));
- // 使用BulkRequest的构造器
- BulkRequest.Builder request = new BulkRequest.Builder();
- for(User user : list) {
- request.operations(l -> l
- .index(i -> i
- .index("user")
- .document(user)
- )
- );
- }
- BulkResponse response = elasticConfig.esClient().bulk(request.build());
- if(response.errors()) {
- log.info("批量插入报错");
- } else {
- log.info("批量插入成功");
- }
- }

批量删除索引数据
- /**
- * 批量删除索引数据
- */
- @DeleteMapping("/batchDeleteIndex")
- public void batchDeleteIndex() throws IOException {
- BulkRequest.Builder request = new BulkRequest.Builder();
- // 根据id做到删除索引的数据
- request.operations(l -> l
- .delete(i -> i
- .index("user")
- .id("vGK5sogBM87kk5Mw8V0P")
- )
- );
- request.operations(l -> l
- .delete(i -> i
- .index("user")
- .id("u2K5sogBM87kk5Mw8V0P")
- )
- );
- BulkResponse response = elasticConfig.esClient().bulk(request.build());
- if(response.errors()) {
- log.info("批量删除报错");
- } else {
- log.info("批量删除成功");
- }
- }

这里批量删除接口测试完后,我又批量添加了几行数据,方便下面方法的测试。
- // 以下就是我添加的数据
- list.add(new User("liSi","女",20));
- list.add(new User("wangWu","男",22));
- list.add(new User("zhaoLiu","男",20));
- list.add(new User("xiaoQi","女",21));
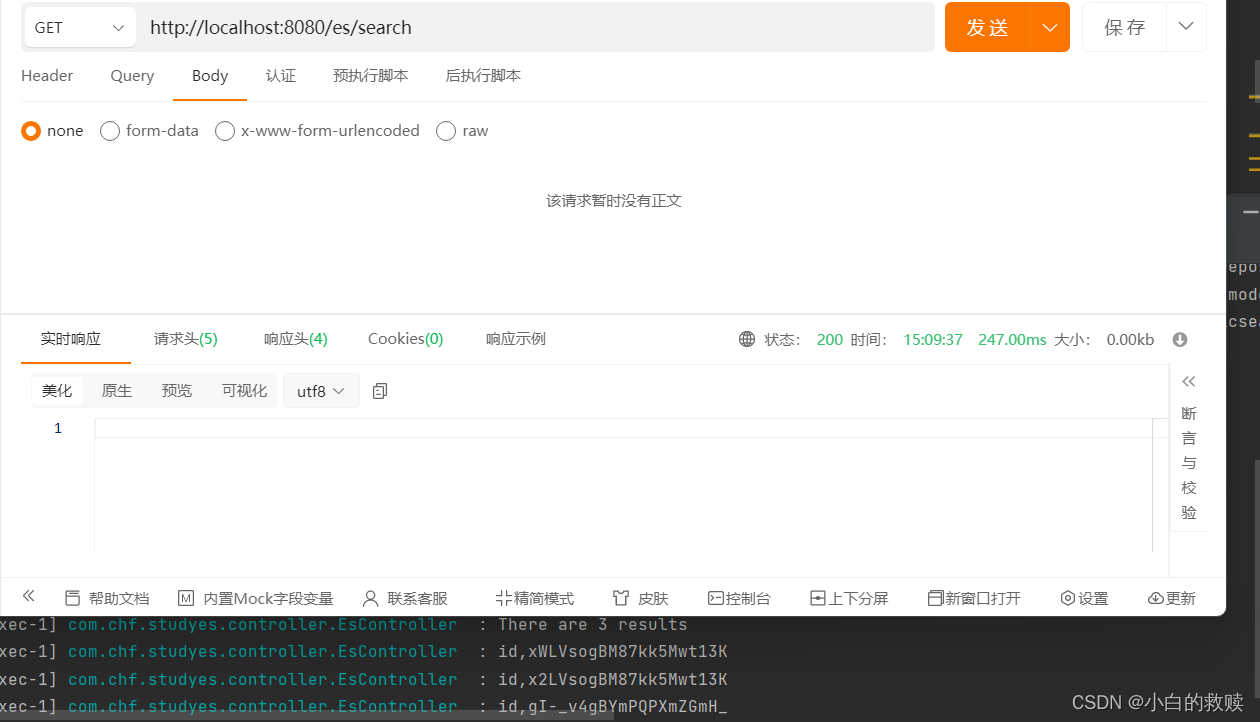
简单查询/单条件
可以组合多种类型的搜索查询。我们将从简单的文本匹配查询开始。单条件准确查询主要用到的关键字是term。而模糊查询就需要用到match。而match这里就不演示了。
- /**
- * 单条件查询
- */
- @GetMapping("/search")
- public void search() throws IOException {
- SearchResponse<User> response = elasticConfig.esClient().search(s -> s
- .index("user")
- .query(q -> q
- .term(e -> e
- .field("age")
- .value("20")
- )
- ), User.class
- );
- // 获取查询后的命中条数:其中包括 TotalHitsRelation 以及 total
- TotalHits total = response.hits().total();
- boolean isExactResult = total.relation() == TotalHitsRelation.Eq;
- if (isExactResult) {
- log.info("There are " + total.value() + " results");
- } else {
- log.info("There are more than " + total.value() + " results");
- }
- // 解析查询到的所有信息
- List<Hit<User>> hits = response.hits().hits();
- for(Hit<User> hit : hits) {
- log.info("id,{}", hit.id());
- }
- }
多条件查询 / 范围查询
Elasticsearch允许将单个查询组合起来,以构建更复杂的搜索请求。当前数据有五条,为了更好的多条件查询,我又增加了5条数据。多条件查询用到的关键字主要就是bool。
- // 起初的5条数据
- list.add(new User("zhangSan","男",18));
- list.add(new User("liSi","女",20));
- list.add(new User("wangWu","男",22));
- list.add(new User("zhaoLiu","男",20));
- list.add(new User("xiaoQi","女",21));
- // 以下就是我添加的数据
- list.add(new User("zhangSan","男",20));
- list.add(new User("zhangSan","男",21));
- list.add(new User("zhangSan","男",22));
- list.add(new User("zhangSan","男",23));
- list.add(new User("zhangSan","男",24));
- /**
- * 多条件查询
- */
- @GetMapping("/batchSearch")
- public void batchSearch() throws IOException {
- // 查询性别
- Query sex = MatchQuery.of(m -> m
- .field("sex")
- .query("男")
- )._toQuery();
- // 查询年龄区间
- Query age = RangeQuery.of(r -> r
- .field("age")
- .lte(JsonData.of(20))
- .gte(JsonData.of(18))
- )._toQuery();
- // 结合性别和年龄区间查询来搜索用户索引
- SearchResponse<User> response = elasticConfig.esClient().search(s -> s
- .index("user")
- .query(q -> q
- .bool(b -> b
- .must(sex)
- .must(age)
- )
- ),User.class
- );
- // 获取查询后的命中条数:其中包括 TotalHitsRelation 以及 total
- TotalHits total = response.hits().total();
- boolean isExactResult = total.relation() == TotalHitsRelation.Eq;
- if (isExactResult) {
- log.info("There are " + total.value() + " results");
- } else {
- log.info("There are more than " + total.value() + " results");
- }
- // 解析查询到的所有信息
- List<Hit<User>> hits = response.hits().hits();
- for(Hit<User> hit : hits) {
- log.info("id,{}", hit.id());
- }
- }

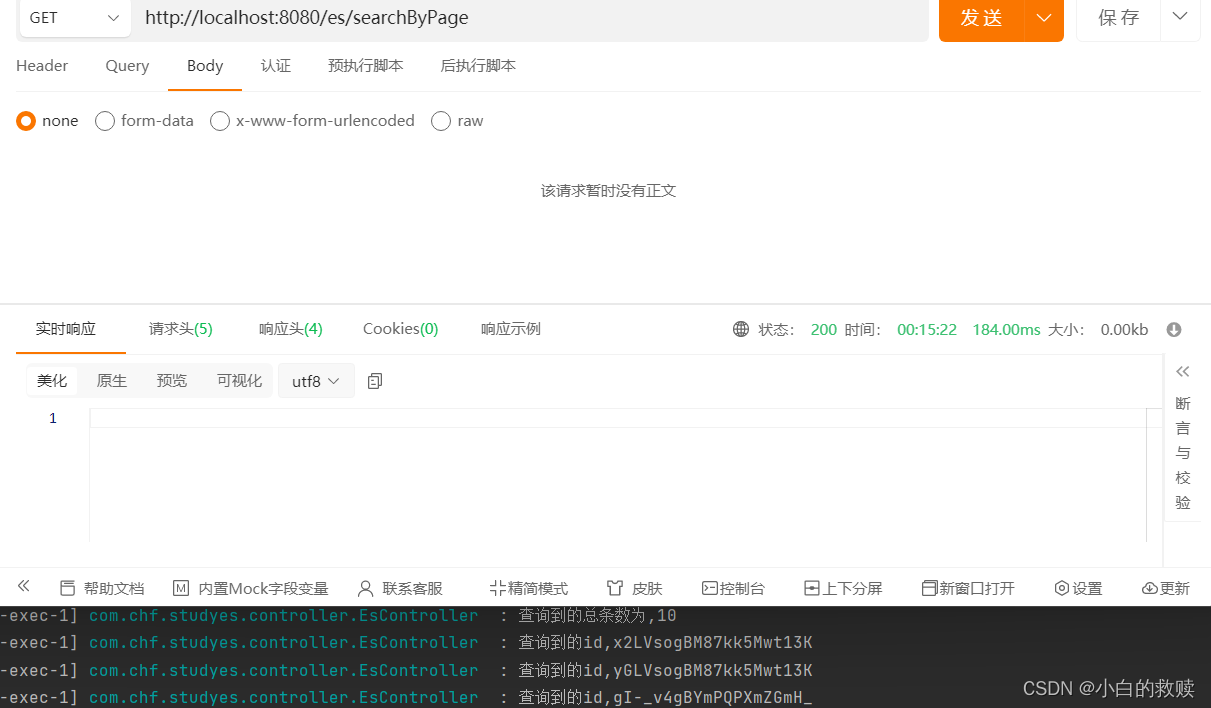
分页查询
主要就是Elasticsearch语法中的from与size表示:当前页的开始索引处以及每页条数。
- /**
- * 分页查询
- */
- @GetMapping("/searchByPage")
- public void searchByPage() throws IOException {
- // 假设每页3条数据 那么查询第二页的参数就是:开始索引处为(2 - 1) * 3 = 3 以及 每页条数3
- SearchResponse<User> response = elasticConfig.esClient().search(b -> b
- .index("user")
- .from(3)
- .size(3)
- ,User.class
- );
- log.info("查询到的总条数为,{}",response.hits().total().value());
- List<Hit<User>> hits = response.hits().hits();
- for(Hit<User> hit : hits) {
- log.info("查询到的id,{}", hit.id());
- }
- }

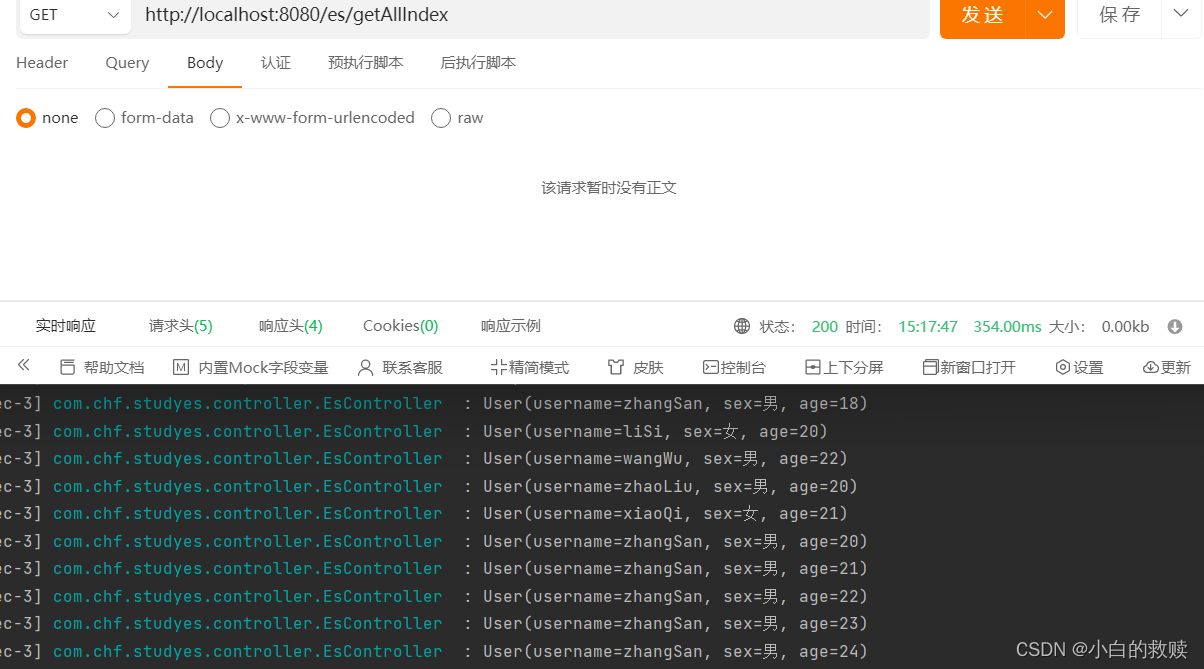
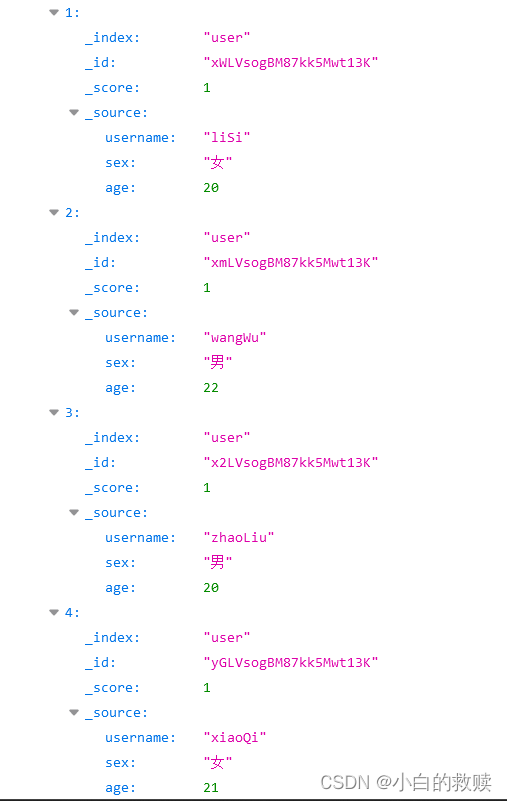
查询所有索引数据
- /**
- * get all index data
- */
- @GetMapping("/getAllIndex")
- public void getAllIndex() throws IOException {
- SearchResponse<User> response = elasticConfig.esClient().search(s -> s
- .index("user")
- ,User.class);
- // 解析查询到的所有信息
- List<Hit<User>> hits = response.hits().hits();
- for(Hit<User> hit : hits) {
- log.info(String.valueOf(hit.source()));
- }
- }