- 1PyQt5学习笔记之环境的配置(Python3.6(Anaconda3)+PyQt5+Eric6)_anaconda3 pyqt5 环境变量
- 2【C++】C++字符串和数字的拼接_c++ 字符串拼接数字
- 3【2023.2.17】解决基于huggingface中tokenizer私有数据不成功问题_typeerror: textencodeinput must be union[textinput
- 4Oracle分组后按组数分页_oracle 分组后 组数
- 5一篇文章教会你一个优秀的程序员如何维护好自己的电脑_科技人员如何抓windows电脑装机与维护
- 6Android项目环境搭建问题记录_adjust the proxy setting in grade
- 7英文标点符号翻译大全_≥英文
- 8python 列表推导式和字典推导式_python的各种推导式(列表推导式、字典推导式、集合推导式)...
- 9基于Java+vue前后端分离学生成绩管理系统设计实现(源码+lw+部署文档+讲解等)_vue学生成绩管理系统
- 10【EventBus】EventBus 源码解析 ( 取消订阅 )_页面从哪里可以看出 bus 取消订阅
鸿蒙系统中StackLayout帧布局
赞
踩
前言
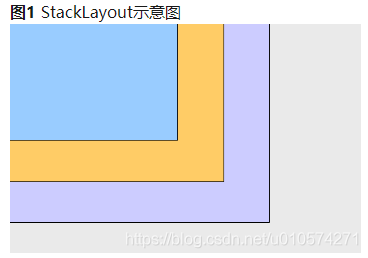
StackLayout直接在屏幕上开辟出一块空白的区域,添加到这个布局中的视图都是以层叠的方式显示,而它会把这些视图默认放到这块区域的左上角,第一个添加到布局中视图显示在最底层,最后一个被放在最顶层。上一层的视图会覆盖下一层的视图

StackLayout所包含组件可支持的XML属性见下表:

参考文档:https://developer.harmonyos.com/cn/docs/documentation/doc-guides/ui-java-layout-stacklayout-0000001060357540
前期准备
我们还是使用“鸿蒙系统中DirectionalLayout线性布局”文章中使用到的demo2项目来进行测试
创建页面
我们在右键点击新建线性布局页面的文件夹,然后new->Ability->Empty Page Ability(java)

弹出页面填写相应的页面名称等信息,点击finish

StackLayoutSlice中引入样式文件如下:
StackLayoutSlice.java:
@Override
    public void onStart(Intent intent) {
        super.onStart(intent);
        super.setUIContent(ResourceTable.Layout_ability_stack_layout);
    }
- 1
- 2
- 3
- 4
- 5
MainAbility中使用这个slice
MainAbility.java:
public class MainAbility extends Ability {
    @Override
    public void onStart(Intent intent) {
        super.onStart(intent);
        super.setMainRoute(StackLayoutSlice.class.getName());
    }
}
- 1
- 2
- 3
- 4
- 5
- 6
- 7
StackLayout的使用
定义布局
我们在布局文件ability_stack_layout.xml中定义使用StackLayout布局组件

ability_stack_layout.xml:
<?xml version="1.0" encoding="utf-8"?>
<StackLayout
    xmlns:ohos="http://schemas.huawei.com/res/ohos"
    ohos:height="match_parent"
    ohos:width="match_parent">
</StackLayout>
- 1
- 2
- 3
- 4
- 5
- 6
定义子组件
我们在这个帧布局组件中定义三个text子组件
ability_stack_layout.xml:
<?xml version="1.0" encoding="utf-8"?>
<StackLayout
    xmlns:ohos="http://schemas.huawei.com/res/ohos"
    ohos:id="$+id:stack_layout"
    ohos:height="match_parent"
    ohos:width="match_parent">

    <Text
        ohos:id="$+id:text_blue"
        ohos:text_alignment="bottom|horizontal_center"
        ohos:text_size="24fp"
        ohos:text="Layer 1"
        ohos:height="400vp"
        ohos:width="400vp"
        ohos:background_element="#3F56EA" />

    <Text
        ohos:id="$+id:text_light_purple"
        ohos:text_alignment="bottom|horizontal_center"
        ohos:text_size="24fp"
        ohos:text="Layer 2"
        ohos:height="300vp"
        ohos:width="300vp"
        ohos:background_element="#00AAEE" />

    <Text
        ohos:id="$+id:text_orange"
        ohos:text_alignment="center"
        ohos:text_size="24fp"
        ohos:text="Layer 3"
        ohos:height="80vp"
        ohos:width="80vp"
        ohos:background_element="#00BFC9" />

</StackLayout>
- 1
- 2
- 3
- 4
- 5
- 6
- 7
- 8
- 9
- 10
- 11
- 12
- 13
- 14
- 15
- 16
- 17
- 18
- 19
- 20
- 21
- 22
- 23
- 24
- 25
- 26
- 27
- 28
- 29
- 30
- 31
- 32
- 33
- 34
- 35
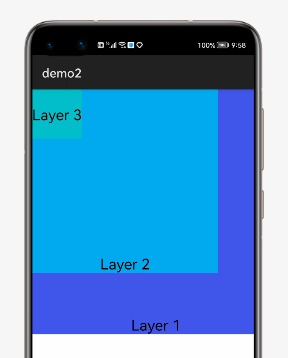
其中,我们可以看到,第一第二text定义ohos:text_alignment=“bottom|horizontal_center”,这代表定义其文字的对其方式是底部水平居中,第三个text定义ohos:text_alignment="center"则代表文字居中对齐
可以看到模拟器效果如下

帧布局默认放置于左上角
组件对齐
如果我们想让组件放置于右对齐则代码如下:
<?xml version="1.0" encoding="utf-8"?>
<StackLayout
    xmlns:ohos="http://schemas.huawei.com/res/ohos"
    ohos:id="$+id:stack_layout"
    ohos:height="match_parent"
    ohos:width="match_parent">

    <Text
        ohos:id="$+id:text_blue"
        ohos:text_alignment="bottom|horizontal_center"
        ohos:layout_alignment="right"
        ohos:text_size="24fp"
        ohos:text="Layer 1"
        ohos:height="400vp"
        ohos:width="400vp"
        ohos:background_element="#3F56EA" />

    <Text
        ohos:id="$+id:text_light_purple"
        ohos:text_alignment="bottom|horizontal_center"
        ohos:layout_alignment="right"
        ohos:text_size="24fp"
        ohos:text="Layer 2"
        ohos:height="300vp"
        ohos:width="300vp"
        ohos:background_element="#00AAEE" />

    <Text
        ohos:id="$+id:text_orange"
        ohos:text_alignment="center"
        ohos:layout_alignment="right"
        ohos:text_size="24fp"
        ohos:text="Layer 3"
        ohos:height="80vp"
        ohos:width="80vp"
        ohos:background_element="#00BFC9" />

</StackLayout>
- 1
- 2
- 3
- 4
- 5
- 6
- 7
- 8
- 9
- 10
- 11
- 12
- 13
- 14
- 15
- 16
- 17
- 18
- 19
- 20
- 21
- 22
- 23
- 24
- 25
- 26
- 27
- 28
- 29
- 30
- 31
- 32
- 33
- 34
- 35
- 36
- 37
- 38
产生的效果如下:

场景展示
在实际应用中,我们可以定义一个点击事件,当点击后,底层组件显示上来,代码如下:
StackLayoutSlice.java:
@Override
    public void onStart(Intent intent) {
        super.onStart(intent);
        super.setUIContent(ResourceTable.Layout_ability_stack_layout);
        ComponentContainer stackLayout = (ComponentContainer) findComponentById(ResourceTable.Id_stack_layout);
        Text textFirst = (Text) findComponentById(ResourceTable.Id_text_blue);
        textFirst.setClickedListener(new Component.ClickedListener() {
            @Override
            public void onClick(Component component) {
                stackLayout.moveChildToFront(component);
            }
        });
    }
- 1
- 2
- 3
- 4
- 5
- 6
- 7
- 8
- 9
- 10
- 11
- 12
- 13
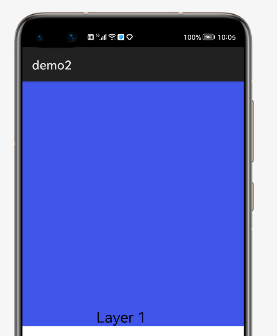
我们在slice里的onStart初始化方法中给最底下的Text定义了一个点击事件,当点击触发后,该组件会显示到最前面
效果如下:
点击前

点击后:

更多技术交流请加入QQ群
群名称:华为鸿蒙harmonyos开发
群 号:1164091073


