- 1乐高机器人EV3的PID巡线控制——附源程序_乐高pid巡线程序
- 2Java、数据库等面试题大全_java和数据库面试
- 3算法工程师成长必备——一套小白也能看懂的算法书!(文末留言赠书)
- 4无人机航摄地面站航线设计主要参数_地面分辨率与航高的关系公式
- 5Azure 网络(VNet) 到 Azure网络(VNet) 连接_azure vnet gateway
- 62023华为od机试C卷【密码解密】C++ 实现_给定一段 “密文”字符串 s ,其中字符都是经过 “密码本” 映射的,现需要将“密文
- 7isis 网络 level 2 iih_ISIS路由协议(中间系统到中间系统)
- 8FPGA高端项目:解码索尼IMX390 MIPI相机转HDMI输出,提供FPGA开发板+2套工程源码+技术支持
- 9SpringCache的了解与使用_spring.cache.type
- 10【Kafka】Kafka监控工具Kafka-eagle简介
【Yolov8】基于C#和OpenVINO部署Yolov8全系列模型_yolov8 openvino
赞
踩
【Yolov8】基于C#和OpenVINO部署Yolov8全系列模型
由于OpenVINO™ C# API 更新。如果想体验最新版的可以参考该文章:【OpenVINO™】在 Windows 上使用 OpenVINO™ C# API 部署 Yolov8-obb 实现任意方向的目标检测
项目介绍
该项目主要基于OpenVINO™模型部署套件,在C#平台部署Yolov8模型,包括Yolov8系列的对象检测、图像分割、姿态识别和图像分类模型,实现C#平台推理加速Yolov8模型。
完整范例代码:
GitHub平台:guojin-yan/Csharp_deploy_Yolov8 (github.com)
Gitee平台:Guojin Yan/基于Csharp部署Yolov8系列模型 (gitee.com)
1. OpenVINO™
OpenVINO™是英特尔基于自身现有的硬件平台开发的一种可以加快高性能计算机视觉和深度学习视觉应用开发速度工具套件,用于快速开发应用程序和解决方案,以解决各种任务(包括人类视觉模拟、自动语音识别、自然语言处理和推荐系统等)。
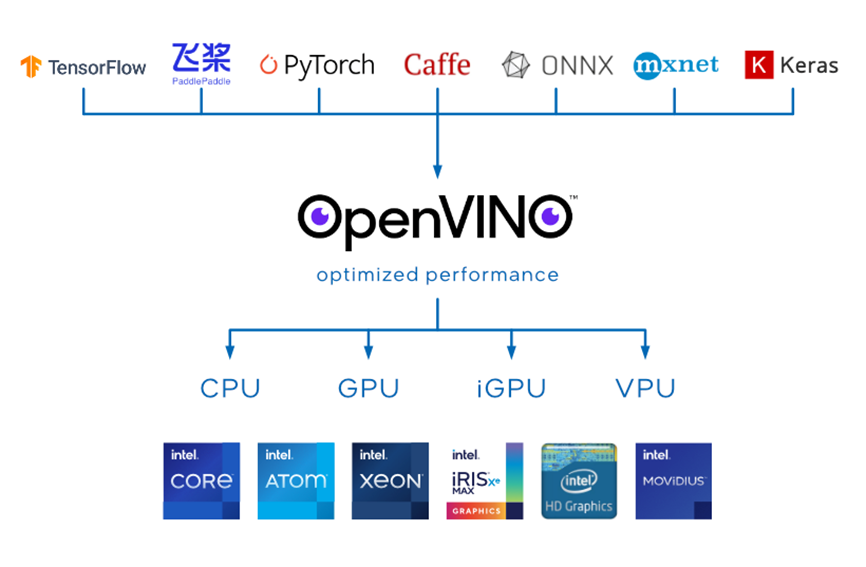
该工具套件基于最新一代的人工神经网络,包括卷积神经网络 (CNN)、递归网络和基于注意力的网络,可扩展跨英特尔® 硬件的计算机视觉和非视觉工作负载,从而最大限度地提高性能。它通过从边缘到云部署的高性能、人工智能和深度学习推理来为应用程序加速,并且允许直接异构执行。极大的提高计算机视觉、自动语音识别、自然语言处理和其他常见任务中的深度学习性能;使用使用流行的框架(如TensorFlow,PyTorch等)训练的模型;减少资源需求,并在从边缘到云的一系列英特尔®平台上高效部署;支持在Windows与Linux系统,且官方支持编程语言为Python与C++语言。
OpenVINOTM 工具套件2022.1版于2022年3月22日正式发布,与以往版本相比发生了重大革新,提供预处理API函数、ONNX前端API、AUTO 设备插件,并且支持直接读入飞桨模型,在推理中中支持动态改变模型的形状,这极大地推动了不同网络的应用落地。2022年9月23日,OpenVINOTM 工具套件2022.2版推出,对2022.1进行了微调,以包括对英特尔最新 CPU 和离散 GPU 的支持,以实现更多的人工智能创新和机会。
2. Yolov8模型
由Ultralytics开发的Ultralytics YOLOv8是一种尖端的,最先进的(SOTA)模型,它建立在以前的YOLO版本成功的基础上,并引入了新功能和改进,以进一步提高性能和灵活性。YOLOv8 设计为快速、准确且易于使用,使其成为各种对象检测、图像分割和图像分类任务的绝佳选择。
YOLOv8是YOLO系列目标检测算法的最新版本,相比于之前的版本,YOLOv8具有更快的推理速度、更高的精度、更加易于训练和调整、更广泛的硬件支持以及原生支持自定义数据集等优势。这些优势使得YOLOv8成为了目前业界最流行和成功的目标检测算法之一。

2.1 安装转换插件
安装ultralytics
pip install ultralytics
- 1
安装ONNX
导出ONNX格式模型要求插件
pip install onnx
- 1
安装OpenVINO
导出IR模型要求插件
pip install openvino-dev
- 1
2.2 获取Yolov8部署模型
Detection
下载模型:
wget https://github.com/ultralytics/assets/releases/download/v0.0.0/yolov8n.pt
- 1
模型转换—ONNX
yolo export model=yolov8s.pt imgsz=640 format=onnx opset=12
- 1
Segmentation
下载模型:
wget https://github.com/ultralytics/assets/releases/download/v0.0.0/yolov8s-seg.pt
- 1
模型转换—ONNX
yolo export model=yolov8s-seg.pt imgsz=640 format=onnx opset=12
- 1
Classification
下载模型:
wget https://github.com/ultralytics/assets/releases/download/v0.0.0/yolov8s-cls.pt
- 1
模型转换—ONNX
yolo export model=yolov8s-cls.pt imgsz=640 format=onnx opset=12
- 1
Pose
下载模型:
wget https://github.com/ultralytics/assets/releases/download/v0.0.0/yolov8s-pose.pt
- 1
模型转换—ONNX
yolo export model=yolov8s-pose.pt imgsz=640 format=onnx opset=12
- 1
3.OpenVinoSharp安装
官方发行的OpenVINO™未提供C#编程语言接口,因此在使用时无法实现在C#中利用OpenVINO™进行模型部署。在该项目中,利用动态链接库功能,调用官方依赖库,实现在C#中部署深度学习模型,为方便使用,在该项目中提供了NuGet包方便使用,为了方便大家再此基础上进行开发,该项目提供了详细的技术文档。

3.1 OpenVINO安装
OpenVINO安装,请参考openvino_installation.md安装指导文档。
3.2 OpenVinoSharp源码
- 获取OpenVinoSharp项目源码**
GitHub:
git clone https://github.com/guojin-yan/OpenVinoSharp.git
Gitee:
git clone https://gitee.com/guojin-yan/OpenVinoSharp.git
- 1
- 2
- 3
- 4
- 添加项目引用
OpenVinoSharp项目主要包含OpenVinoSharpExterm C++ 接口项目和OpenVinoSharp C# 类项目,将该项目添加到当前解决中,并增加对OpenVinoSharp C# 类项目的引用即可。
由于不同电脑安装的OpenVino位置不同,因此在使用中可能会获取不到依赖项,因此建议此处按照OpenVino位置重新配置和编译OpenVinoSharpExterm C++ 接口项目,C++ 项目配置参考【OpenVINO】OpenVINO 2022.1更新2022.3教程_椒颜皮皮虾྅的博客-CSDN博客
3.3 OpenVinoSharp NuGet包安装
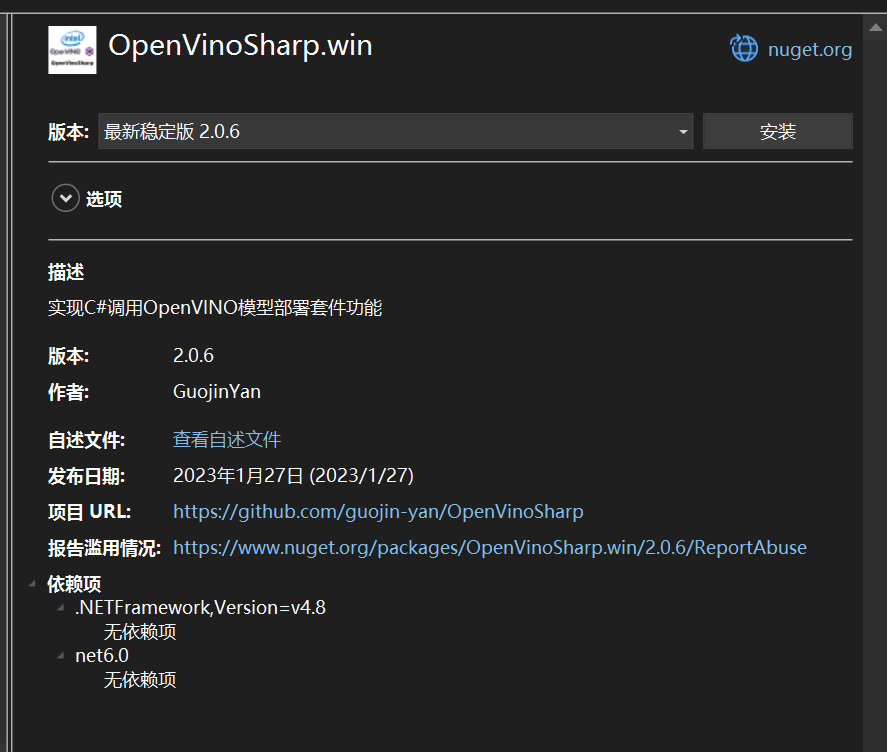
- (1)下载NuGet包
使用Visual Studio自带的NuGet管理包,搜索OpenVinoSharp.win,找到对应的包,并将其安装到项目中。
- (2)复制依赖项
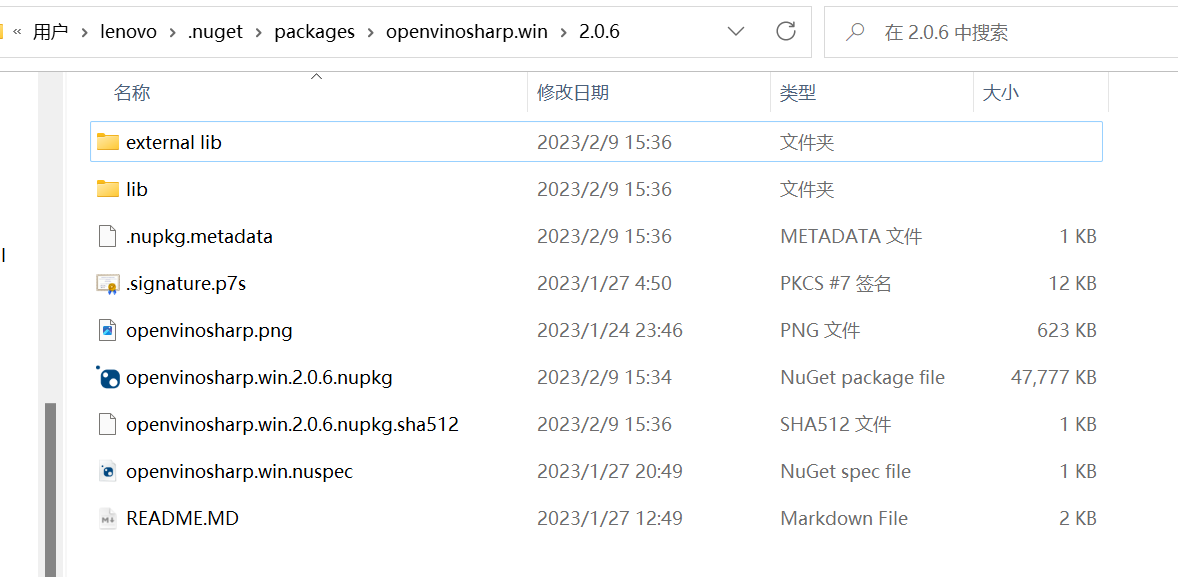
由于项目依赖较多的外部依赖项,因此为了方便使用,此处提供了所需的依赖。
打开下载的NuGet下载路径,路径一般为C:\Users\(用户名)\.nuget\packages\,并找到openvinosharp.win,将external lib文件夹中的所有文件复制到程序运行目录中。
4. Yolov8 detection
4.1 模型推理
基于OpenVINO 和C#同步推理代码的关键片段如下所示:
// 加载推理模型
Core core = new Core(model_path, "CPU");
// 处理输入数据
Mat image = new Mat(image_path);
int max_image_length = image.Cols > image.Rows ? image.Cols : image.Rows;
Mat max_image = Mat.Zeros(new OpenCvSharp.Size(max_image_length, max_image_length), MatType.CV_8UC3);
Rect roi = new Rect(0, 0, image.Cols, image.Rows);
image.CopyTo(new Mat(max_image, roi));
// 获取缩放比例
float[] factors = new float[2];
factors[0] = factors[1] = (float)(max_image_length / 640.0);
// 获取图片数据
byte[] image_data = max_image.ImEncode(".bmp");
//存储byte的长度
ulong image_size = Convert.ToUInt64(image_data.Length);
// 加载推理图片数据
core.load_input_data("images", image_data, image_size, 1);
// 模型推理
core.infer();
// 读取推理结果
float[] result_array = new float[8400 * 84];
result_array = core.read_infer_result<float>("output0", 8400 * 84);
// 处理推理结果
DetectionResult result_pro = new DetectionResult(classer_path, factors);
Mat result_image = result_pro.draw_result(result_pro.process_result(result_array), image.Clone());
// 清除推理通道
core.delet();
- 1
- 2
- 3
- 4
- 5
- 6
- 7
- 8
- 9
- 10
- 11
- 12
- 13
- 14
- 15
- 16
- 17
- 18
- 19
- 20
- 21
- 22
- 23
- 24
- 25
- 26
- 27
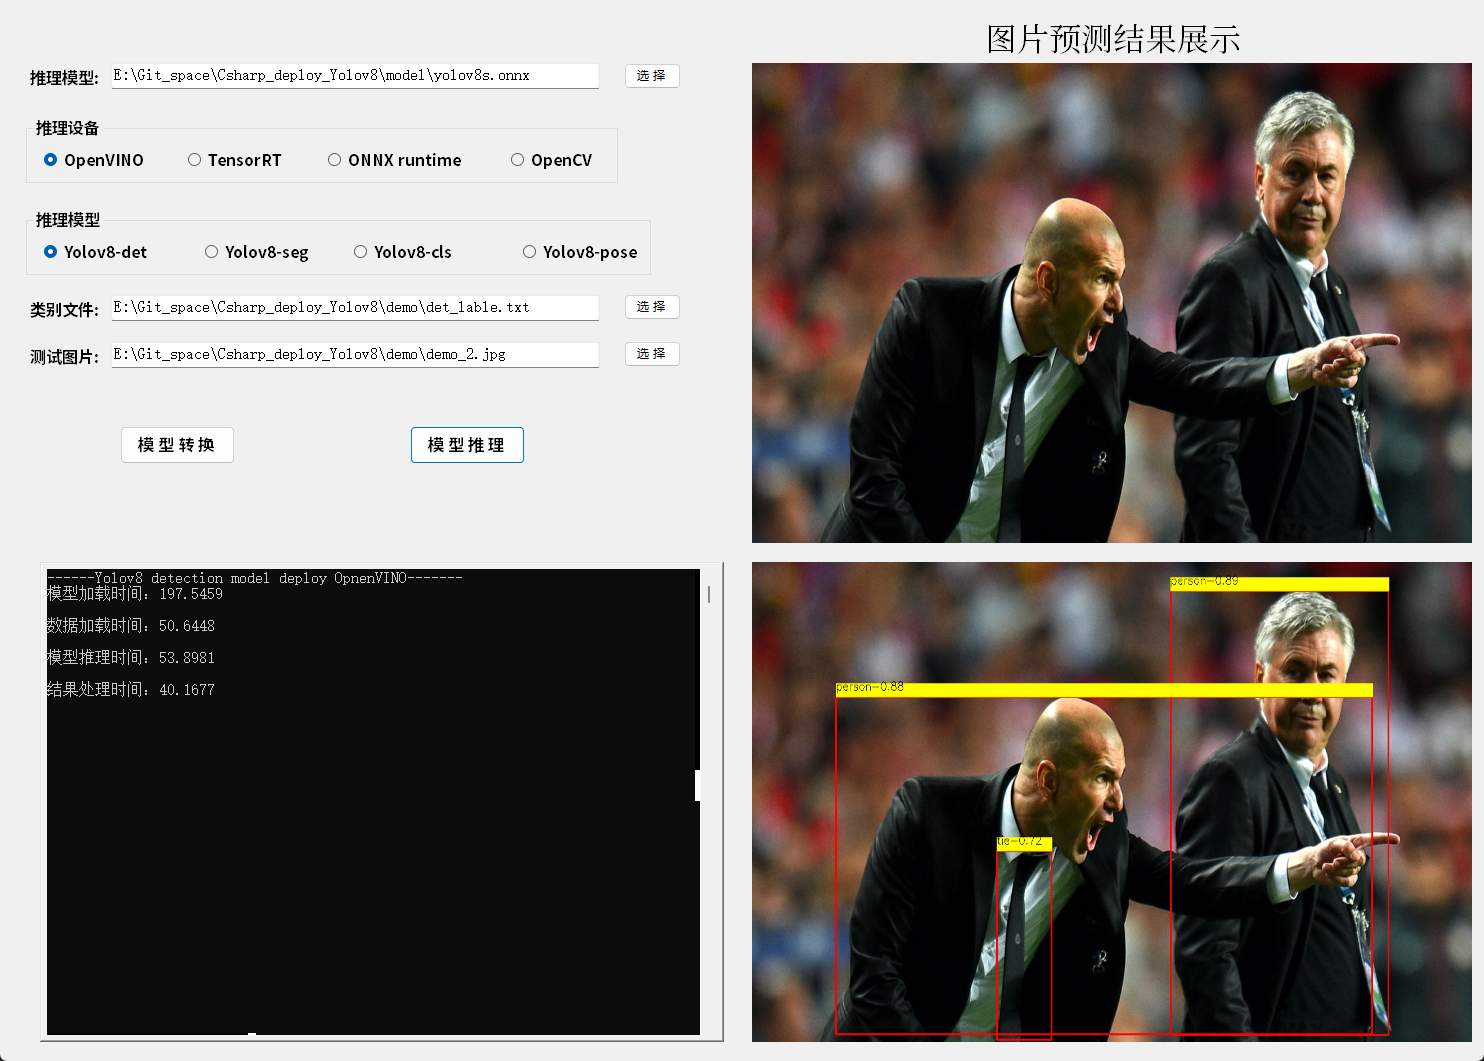
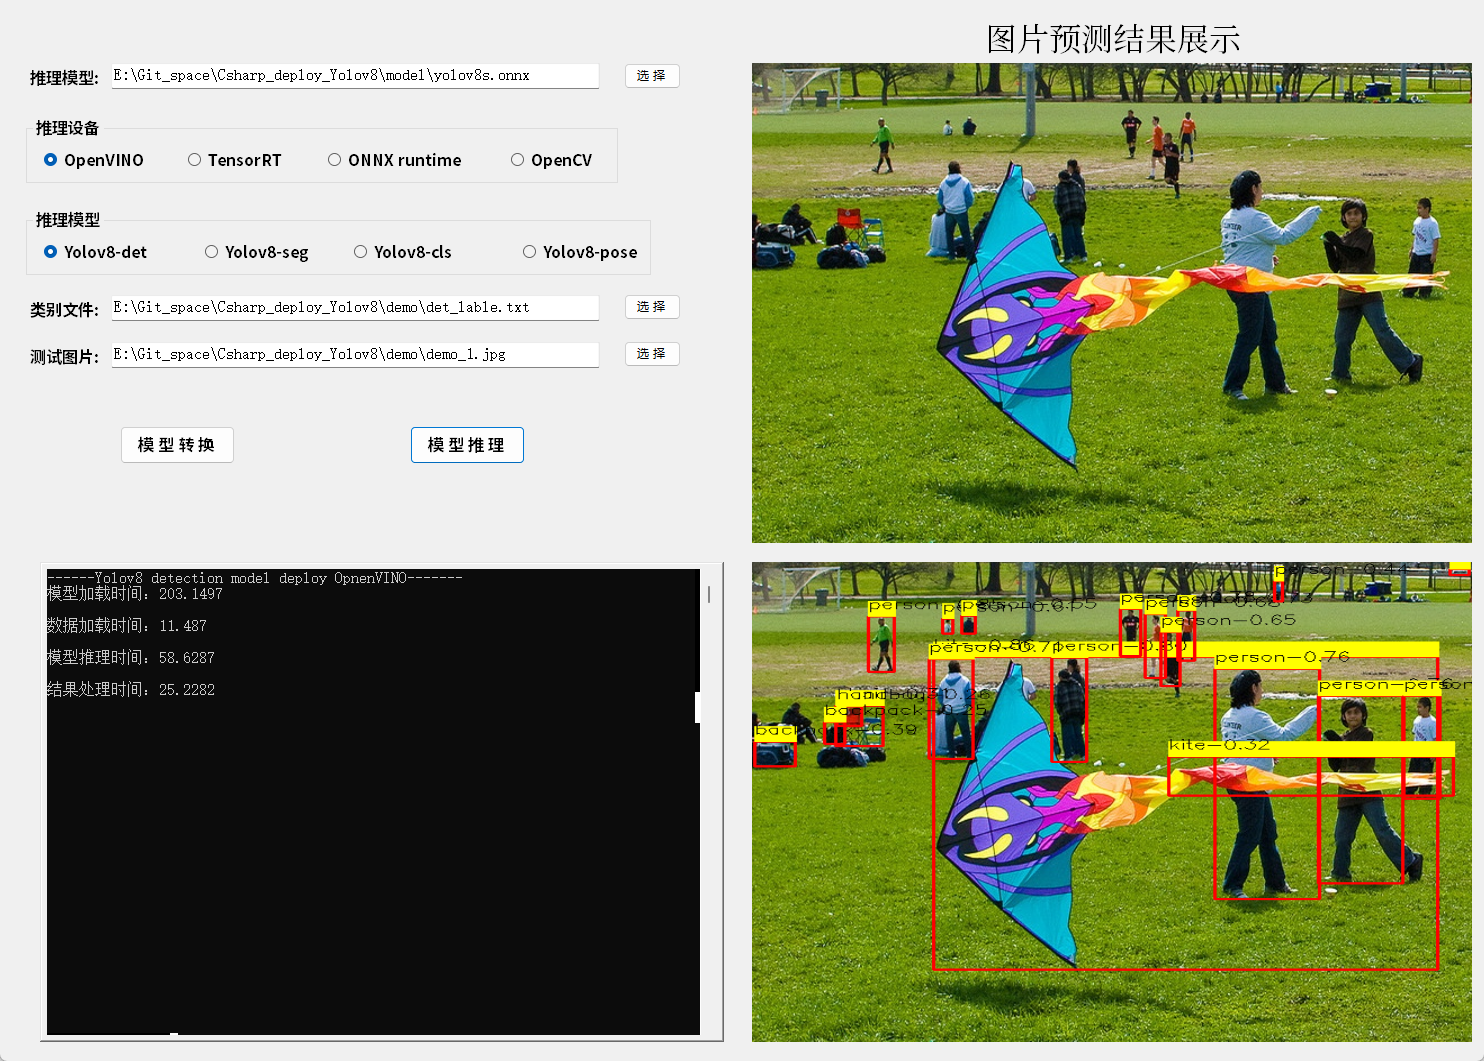
4.2 模型推理结果
基于WinForm平台,此处搭建了推理测试平台测试Yolov8 detection模型,结果如图所示:
5. Yolov8 segmentation
5.1 模型推理
基于OpenVINO 和C#同步推理代码的关键片段如下所示:
// 加载推理模型
Core core = new Core(model_path, "CPU");
// 处理输入数据
Mat image = new Mat(image_path);
int max_image_length = image.Cols > image.Rows ? image.Cols : image.Rows;
Mat max_image = Mat.Zeros(new OpenCvSharp.Size(max_image_length, max_image_length), MatType.CV_8UC3);
Rect roi = new Rect(0, 0, image.Cols, image.Rows);
image.CopyTo(new Mat(max_image, roi));
// 获取缩放比例
float[] factors = new float[4];
factors[0] = factors[1] = (float)(max_image_length / 640.0);
factors[2] = image.Rows;
factors[3] = image.Cols;
// 获取图片数据
byte[] image_data = max_image.ImEncode(".bmp");
//存储byte的长度
ulong image_size = Convert.ToUInt64(image_data.Length);
// 加载推理图片数据
core.load_input_data("images", image_data, image_size, 1);
// 模型推理
core.infer();
// 读取推理结果
float[] det_result_array = new float[8400 * 116];
float[] proto_result_array = new float[32 * 160 * 160];
det_result_array = core.read_infer_result<float>("output0", 8400 * 116);
proto_result_array = core.read_infer_result<float>("output1", 32 * 160 * 160);
// 处理推理结果
SegmentationResult result_pro = new SegmentationResult(classer_path, factors);
Mat result_image = result_pro.draw_result(result_pro.process_result(det_result_array, proto_result_array), image.Clone());
// 清除推理通道
core.delet();
- 1
- 2
- 3
- 4
- 5
- 6
- 7
- 8
- 9
- 10
- 11
- 12
- 13
- 14
- 15
- 16
- 17
- 18
- 19
- 20
- 21
- 22
- 23
- 24
- 25
- 26
- 27
- 28
- 29
- 30
- 31
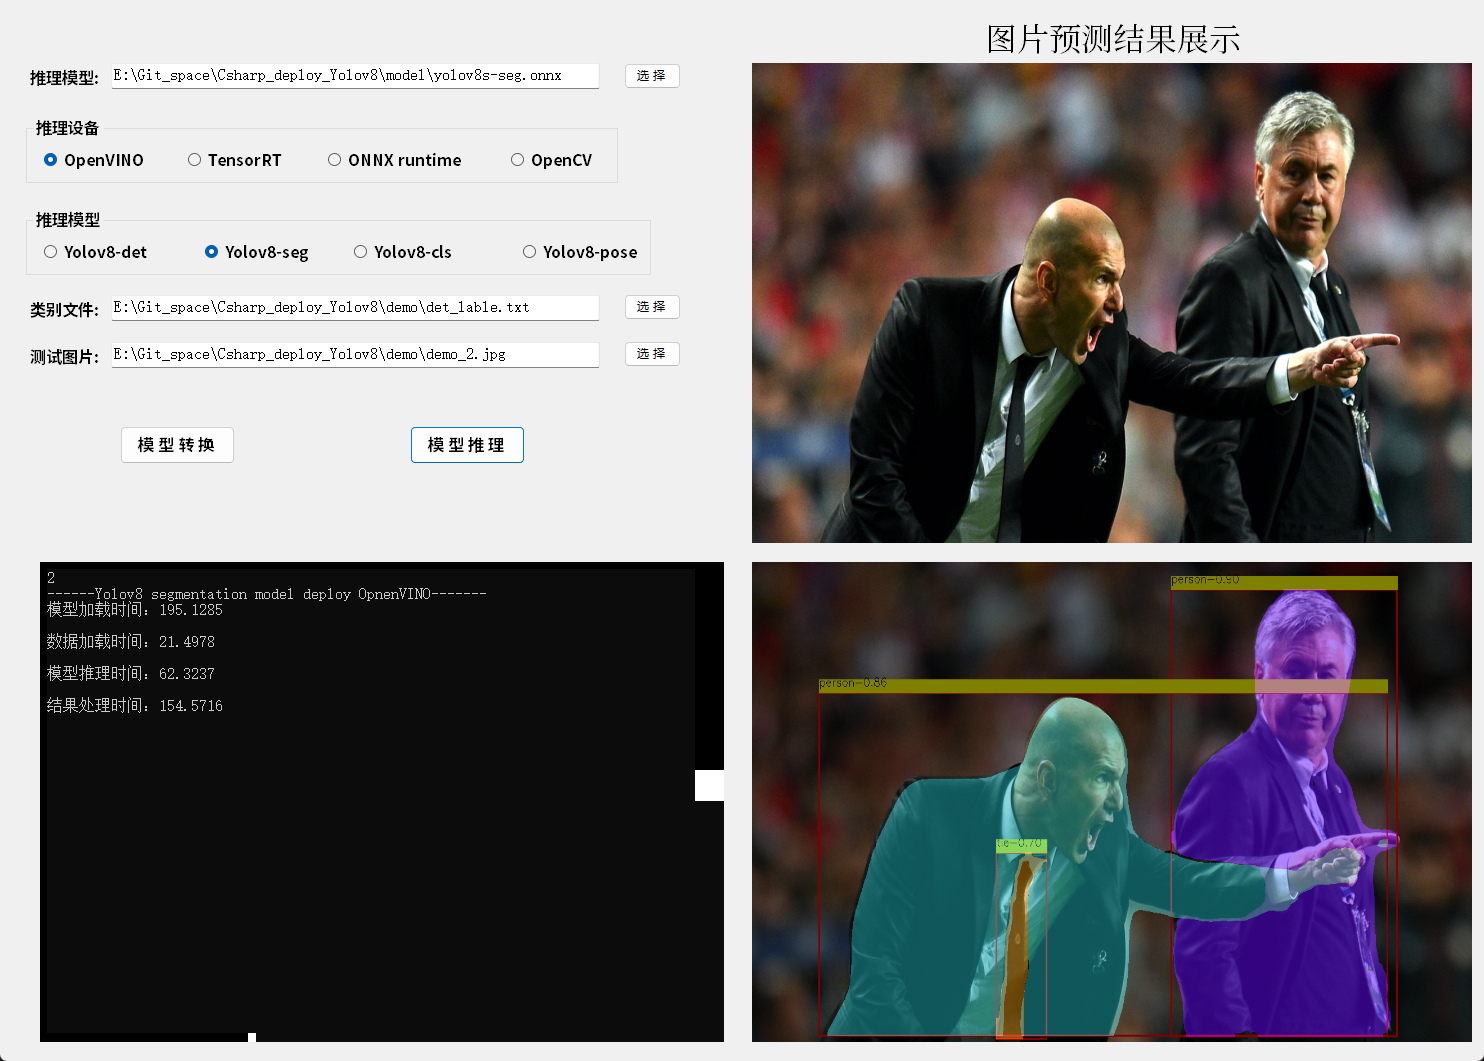
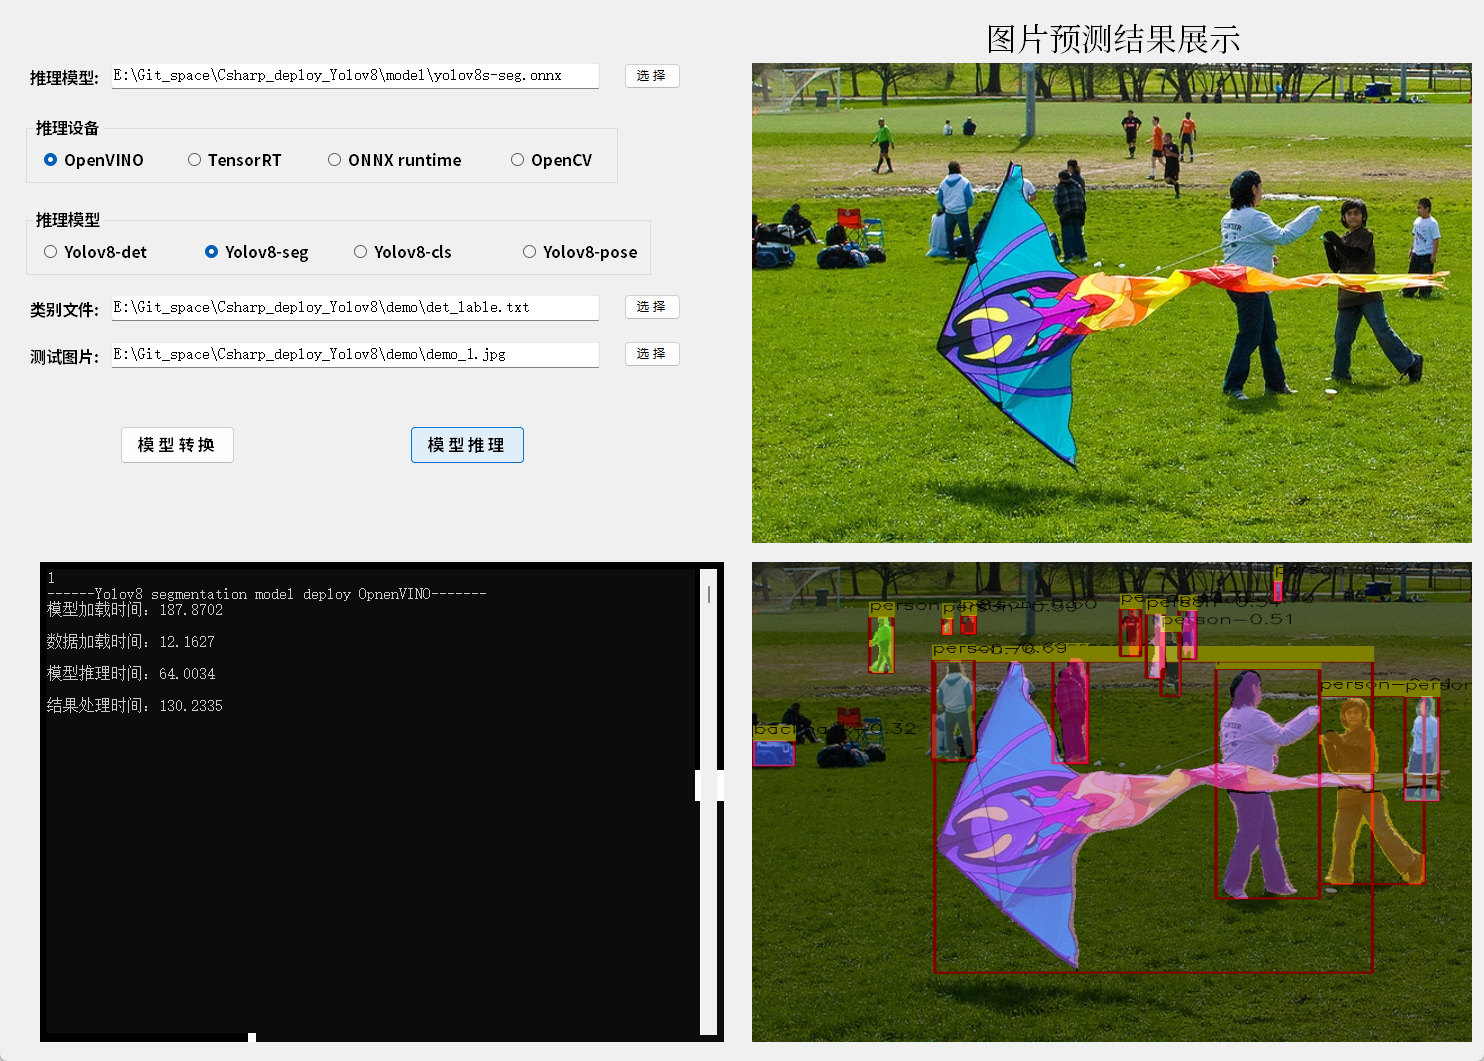
5.2 模型推理结果
基于WinForm平台,此处搭建了推理测试平台测试Yolov8 detection模型,结果如图所示:
6. Yolov8 Classification
6.1 模型推理
基于OpenVINO 和C#同步推理代码的关键片段如下所示:
// 加载推理模型
Core core = new Core(model_path, "CPU");
// 处理输入数据
Mat image = new Mat(image_path);
int max_image_length = image.Cols > image.Rows ? image.Cols : image.Rows;
Mat max_image = Mat.Zeros(new OpenCvSharp.Size(max_image_length, max_image_length), MatType.CV_8UC3);
Rect roi = new Rect(0, 0, image.Cols, image.Rows);
image.CopyTo(new Mat(max_image, roi));
// 获取图片数据
byte[] image_data = max_image.ImEncode(".bmp");
//存储byte的长度
ulong image_size = Convert.ToUInt64(image_data.Length);
// 加载推理图片数据
core.load_input_data("images", image_data, image_size, 1);
// 模型推理
core.infer();
// 读取推理结果
float[] result_array = new float[1000];
result_array = core.read_infer_result<float>("output0", 1000);
// 处理推理结果
ClasResult result_pro = new ClasResult(classer_path);
KeyValuePair<string, float> result_cls = result_pro.process_result(result_array);
Mat result_image = result_pro.draw_result(result_cls, image.Clone());
// 清除推理通道
core.delet();
- 1
- 2
- 3
- 4
- 5
- 6
- 7
- 8
- 9
- 10
- 11
- 12
- 13
- 14
- 15
- 16
- 17
- 18
- 19
- 20
- 21
- 22
- 23
- 24
- 25
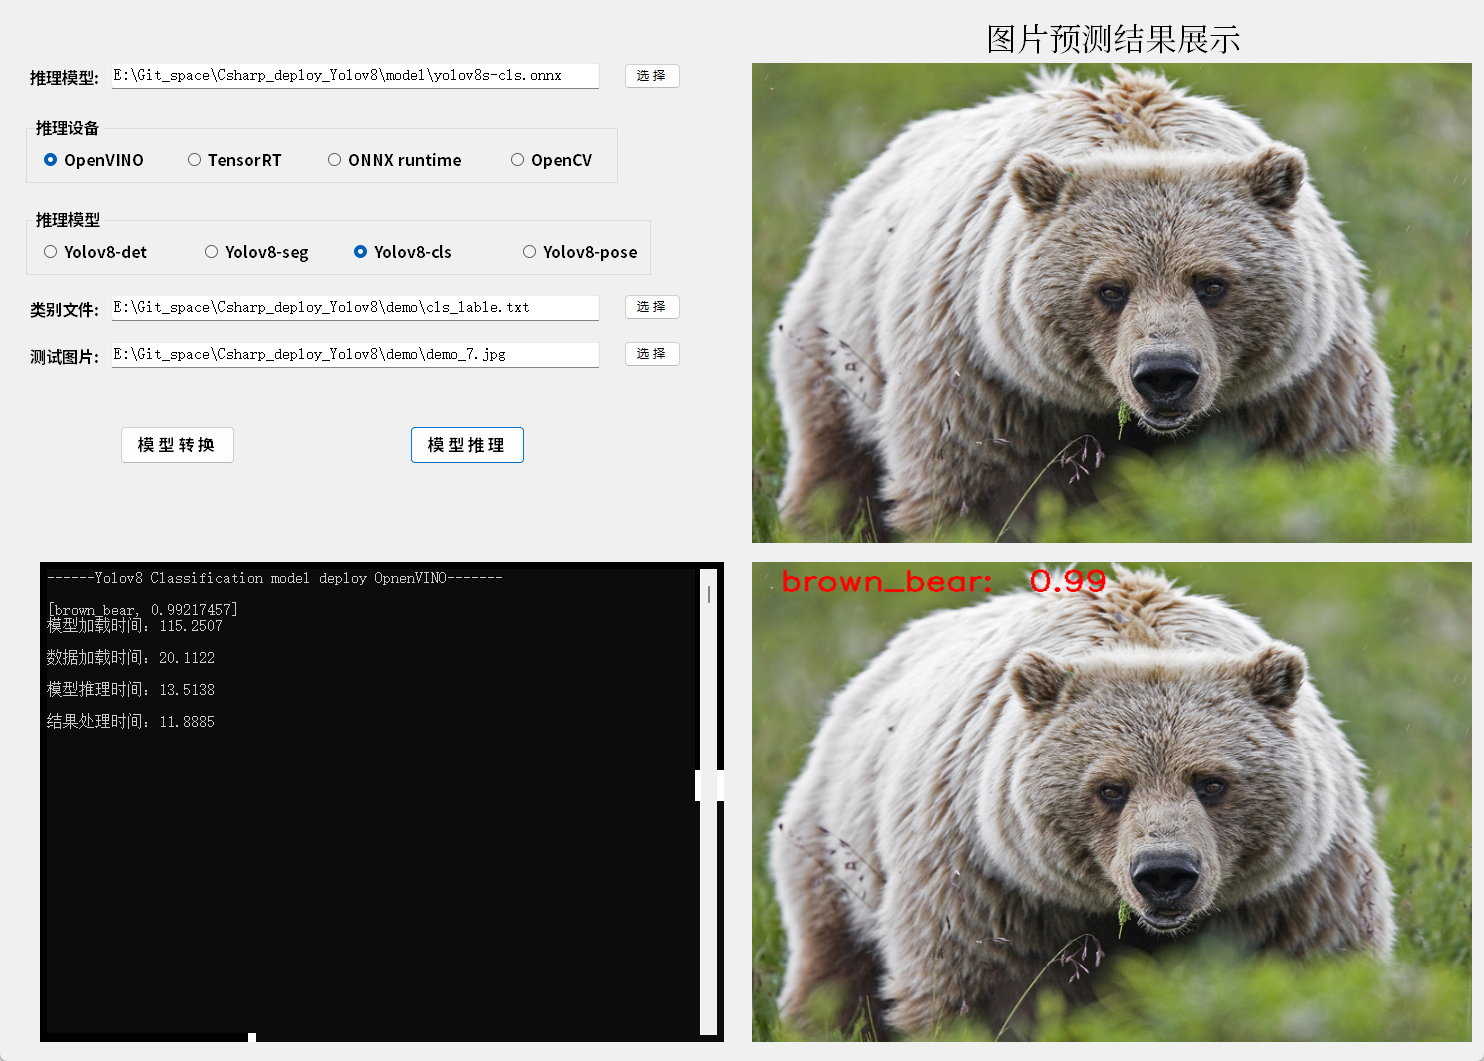
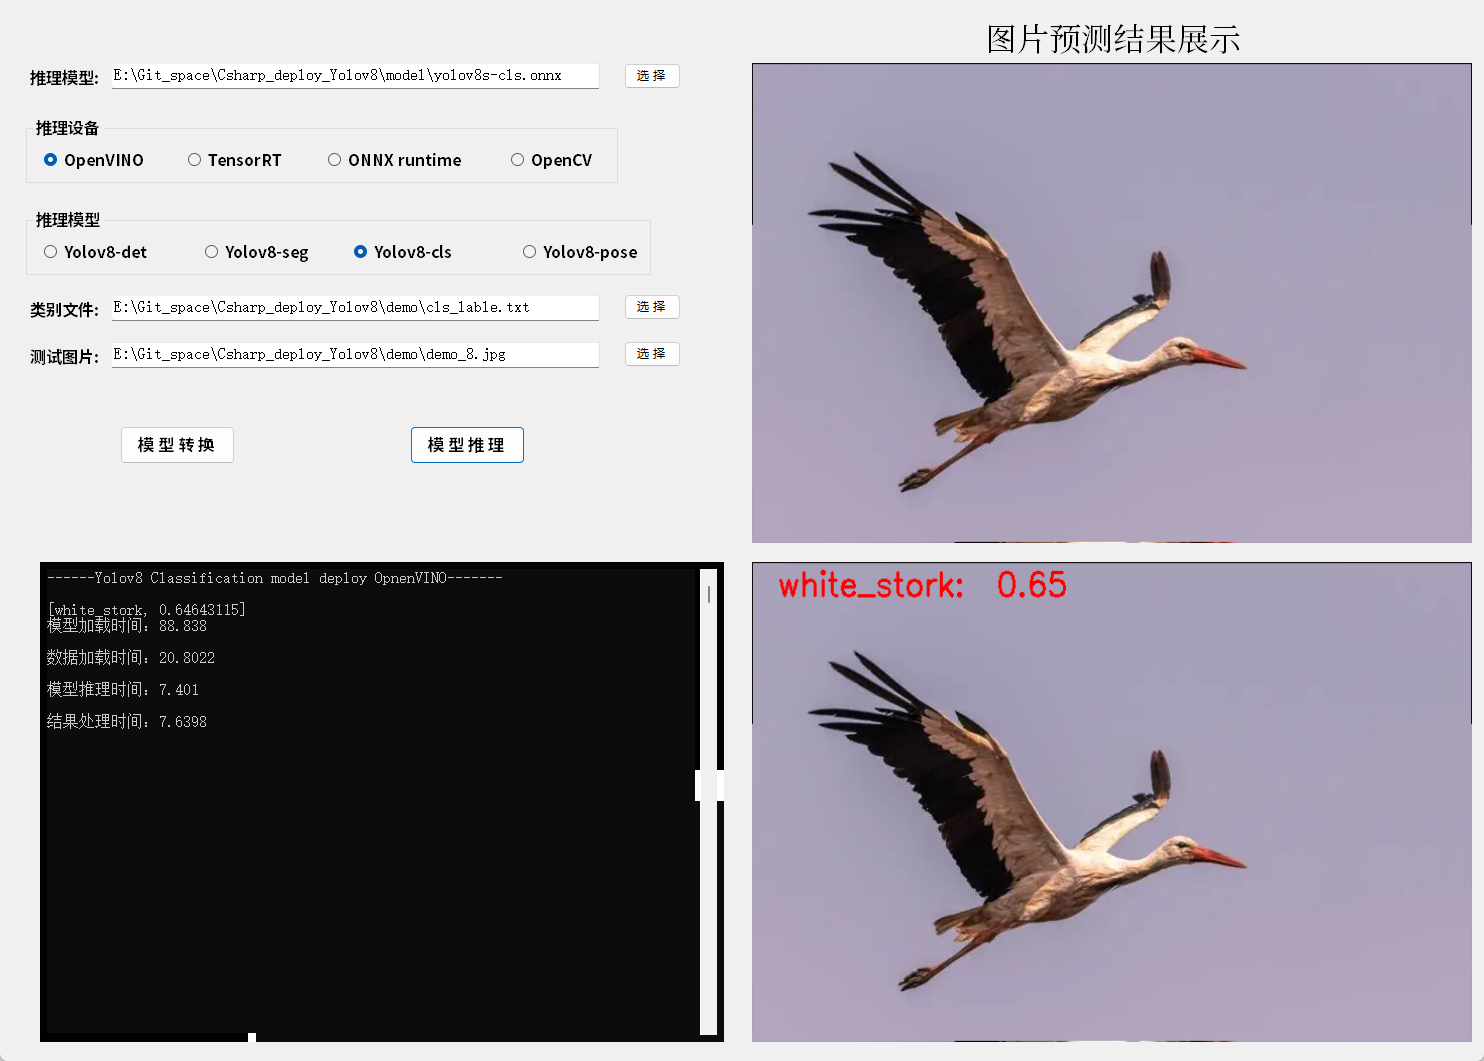
6.2 模型推理结果
基于WinForm平台,此处搭建了推理测试平台测试Yolov8 Classification模型,结果如图所示:
7. Yolov8 Pose
7.1 模型推理
基于OpenVINO 和C#同步推理代码的关键片段如下所示:
// 加载推理模型
Core core = new Core(model_path, "CPU");
// 处理输入数据
Mat image = new Mat(image_path);
int max_image_length = image.Cols > image.Rows ? image.Cols : image.Rows;
Mat max_image = Mat.Zeros(new OpenCvSharp.Size(max_image_length, max_image_length), MatType.CV_8UC3);
Rect roi = new Rect(0, 0, image.Cols, image.Rows);
image.CopyTo(new Mat(max_image, roi));
float[] result_array = new float[8400 * 56];
// 获取缩放比例
float[] factors = new float[2];
factors[0] = factors[1] = (float)(max_image_length / 640.0);
// 获取图片数据
byte[] image_data = max_image.ImEncode(".bmp");
//存储byte的长度
ulong image_size = Convert.ToUInt64(image_data.Length);
// 加载推理图片数据
core.load_input_data("images", image_data, image_size, 1);
// 模型推理
core.infer();
// 读取推理结果
float[] result_array = new float[8400 * 56];
result_array = core.read_infer_result<float>("output0", 8400 * 56);
// 处理推理结果
PoseResult result_pro = new PoseResult( factors);
Mat result_image = result_pro.draw_result(result_pro.process_result(result_array), image.Clone());
// 清除推理通道
core.delet();
- 1
- 2
- 3
- 4
- 5
- 6
- 7
- 8
- 9
- 10
- 11
- 12
- 13
- 14
- 15
- 16
- 17
- 18
- 19
- 20
- 21
- 22
- 23
- 24
- 25
- 26
- 27
- 28
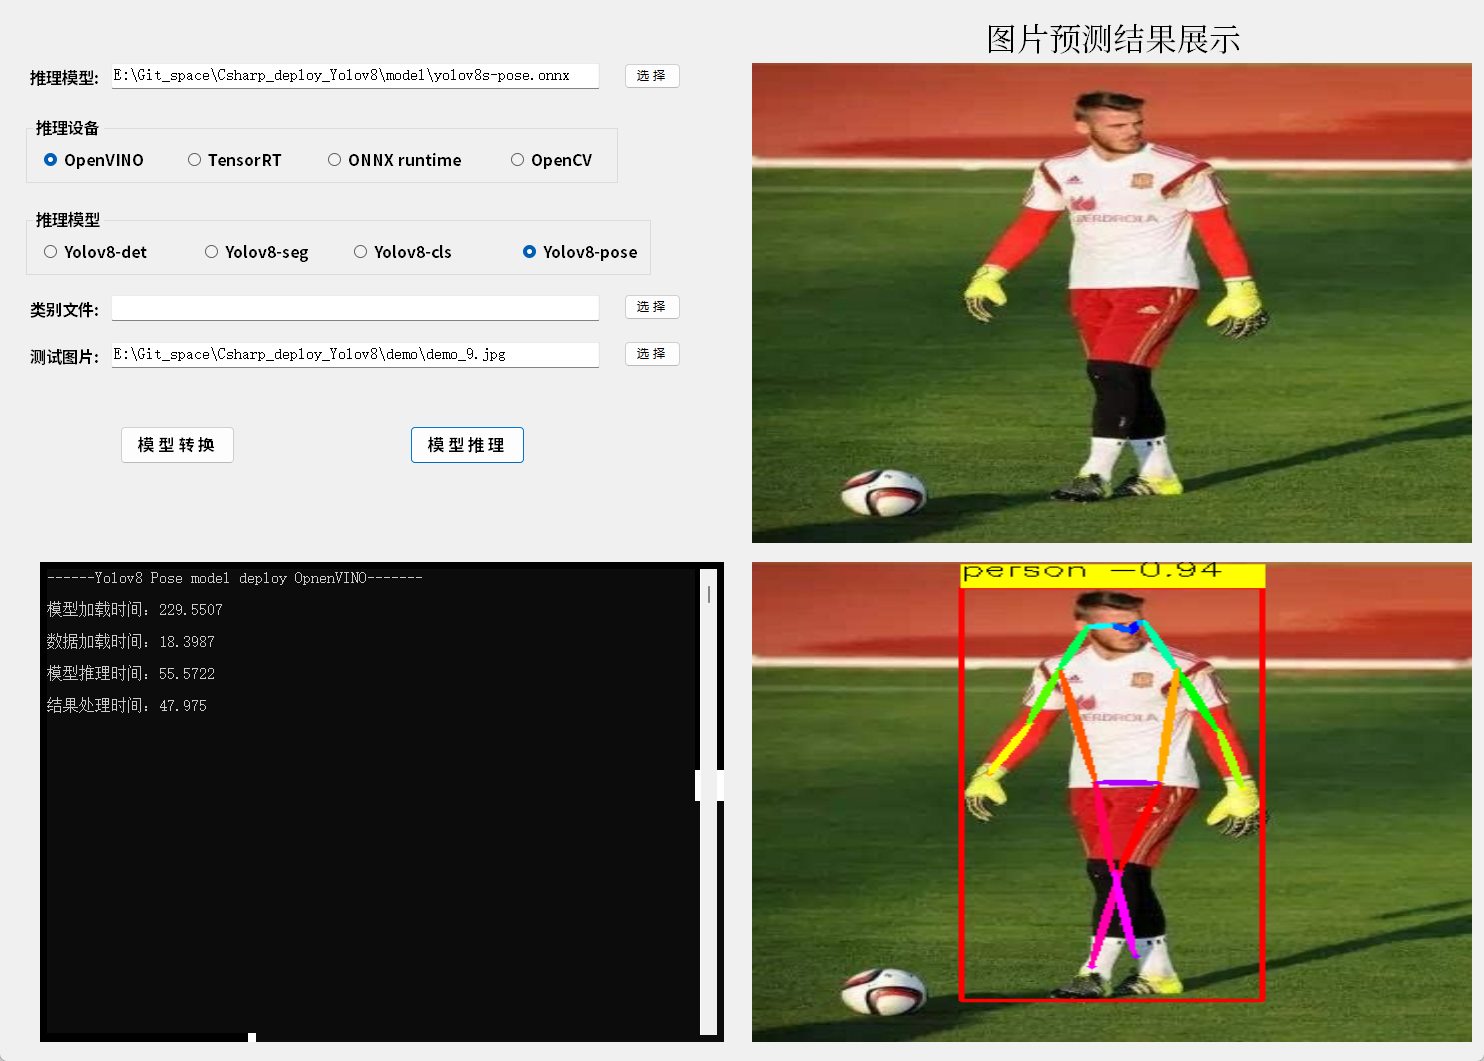
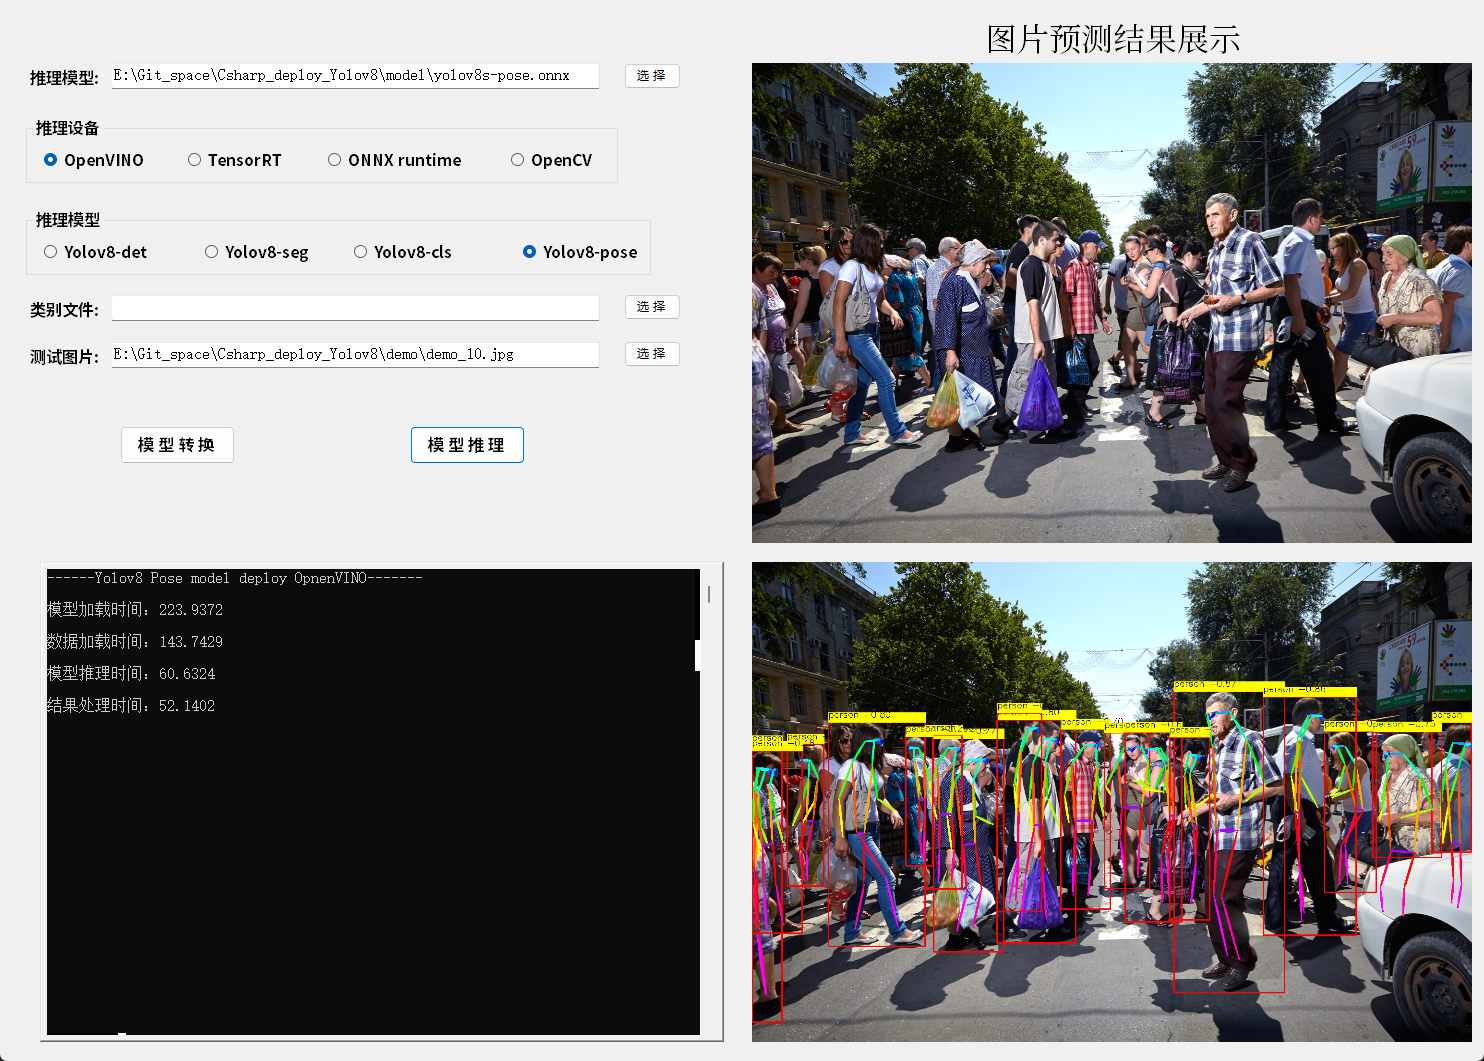
7.2 模型推理结果
基于WinForm平台,此处搭建了推理测试平台测试Yolov8 Pose模型,结果如图所示:
8. 结果处理
8.1 结果类: Result
结果类中主要存放模型预测结果,主要是已经处理后的预测结果,主要包括classes识别类别结果、scores识别分数结果、rects识别框结果、masks语义分割结果、poses关键点结果等五种结果,包含了目标检测、语义分割、姿态识别三种模型的输出结果。
public class Result
{
    // 获取结果长度
    public int length
    {
        get
        {
            return scores.Count;
        }
    }
    // 识别结果类
    public List<string> classes = new List<string>();
    // 置信值
    public List<float> scores = new List<float>();
    // 预测框
    public List<Rect> rects = new List<Rect>();
    // 分割区域
    public List<Mat> masks = new List<Mat>();
    // 人体关键点
    public List<PoseData> poses = new List<PoseData>();

}
- 1
- 2
- 3
- 4
- 5
- 6
- 7
- 8
- 9
- 10
- 11
- 12
- 13
- 14
- 15
- 16
- 17
- 18
- 19
- 20
- 21
- 22
为了更具不同的模型增加不同的结果,此处重载了add方法。
public class Result
{
	/// <summary>
    /// 物体检测
    /// </summary>
    /// <param name="score">预测分数</param>
    /// <param name="rect">识别框</param>
    /// <param name="cla">识别类</param>
    public void add(float score, Rect rect, string cla)
    {
        scores.Add(score);
        rects.Add(rect);
        classes.Add(cla);
    }
    /// <summary>
    /// 物体分割
    /// </summary>
    /// <param name="score">预测分数</param>
    /// <param name="rect">识别框</param>
    /// <param name="cla">识别类</param>
    /// <param name="mask">语义分割结果</param>
    public void add(float score, Rect rect, string cla, Mat mask)
    {
        scores.Add(score);
        rects.Add(rect);
        classes.Add(cla);
        masks.Add(mask);
    }
    /// <summary>
    /// 关键点预测
    /// </summary>
    /// <param name="score">预测分数</param>
    /// <param name="rect">识别框</param>
    /// <param name="pose">关键点数据</param>
    public void add(float score, Rect rect, PoseData pose)
    {
        scores.Add(score);
        rects.Add(rect);
        poses.Add(pose);
    }
}
- 1
- 2
- 3
- 4
- 5
- 6
- 7
- 8
- 9
- 10
- 11
- 12
- 13
- 14
- 15
- 16
- 17
- 18
- 19
- 20
- 21
- 22
- 23
- 24
- 25
- 26
- 27
- 28
- 29
- 30
- 31
- 32
- 33
- 34
- 35
- 36
- 37
- 38
- 39
- 40
- 41
为了更好的保存关键点数据,在此处定义了一个结构体:PoseData,用于专门存放关键点数据,主要包括关键点以及对应点的分数。
/// <summary>
/// 人体关键点数据
/// </summary>
public struct PoseData
{
    public float[] score = new float[17];
    public List<Point> point = new List<Point>();

    public PoseData(float[] data, float[] scales)
    {
        for (int i = 0; i < 17; i++)
        {
            Point p = new Point((int)(data[3 * i] * scales[0]), (int)(data[3 * i + 1] * scales[1]));
            this.point.Add(p);
            this.score[i] = data[3 * i + 2];
        }
    }
}
- 1
- 2
- 3
- 4
- 5
- 6
- 7
- 8
- 9
- 10
- 11
- 12
- 13
- 14
- 15
- 16
- 17
- 18
8.2 预测结果处理
结果处理基类:ResultBase
为了处理不同的模型结果,此处定义了一个模型结果处理基类,定义了一些结果处理常用成员以及方法。
public class ResultBase
{
    // 识别结果类型
    public string[] class_names;
    // 图片信息  缩放比例h, 缩放比例h,,height, width
    public float[] scales;
    // 置信度阈值
    public float score_threshold;
    // 非极大值抑制阈值
    public float nms_threshold;
    public ResultBase() { }
    /// <summary>
    /// 读取本地识别结果类型文件到内存
    /// </summary>
    /// <param name="path">文件路径</param>
    public void read_class_names(string path)
    {
        List<string> str = new List<string>();
        StreamReader sr = new StreamReader(path);
        string line;
        while ((line = sr.ReadLine()) != null)
        {
            str.Add(line);
        }
        class_names = str.ToArray();
    }
}
- 1
- 2
- 3
- 4
- 5
- 6
- 7
- 8
- 9
- 10
- 11
- 12
- 13
- 14
- 15
- 16
- 17
- 18
- 19
- 20
- 21
- 22
- 23
- 24
- 25
- 26
- 27
目标识别结果处理:DetectionResult
该方法继承于ResultBase类,主要用于处理目标检测识别结果。
public class DetectionResult : ResultBase
{
    /// <summary>
    /// 结果处理类构造
    /// </summary>
    /// <param name="path">识别类别文件地址</param>
    /// <param name="scales">缩放比例</param>
    /// <param name="score_threshold">分数阈值</param>
    /// <param name="nms_threshold">非极大值抑制阈值</param>
    public DetectionResult(string path, float[] scales, float score_threshold = 0.25f, float nms_threshold = 0.5f)
    {
        read_class_names(path);
        this.scales = scales;
        this.score_threshold = score_threshold;
        this.nms_threshold = nms_threshold;
    }
    /// <summary>
    /// 结果处理
    /// </summary>
    /// <param name="result">模型预测输出</param>
    /// <returns>模型识别结果</returns>
    public Result process_result(float[] result)
    {
        Mat result_data = new Mat(84, 8400, MatType.CV_32F, result);
        result_data = result_data.T();

        // 存放结果list
        List<Rect> position_boxes = new List<Rect>();
        List<int> class_ids = new List<int>();
        List<float> confidences = new List<float>();
        // 预处理输出结果
        for (int i = 0; i < result_data.Rows; i++)
        {
            Mat classes_scores = result_data.Row(i).ColRange(4, 84);//GetArray(i, 5, classes_scores);
            Point max_classId_point, min_classId_point;
            double max_score, min_score;
            // 获取一组数据中最大值及其位置
            Cv2.MinMaxLoc(classes_scores, out min_score, out max_score,
                out min_classId_point, out max_classId_point);
            // 置信度 0~1之间
            // 获取识别框信息
            if (max_score > 0.25)
            {
                float cx = result_data.At<float>(i, 0);
                float cy = result_data.At<float>(i, 1);
                float ow = result_data.At<float>(i, 2);
                float oh = result_data.At<float>(i, 3);
                int x = (int)((cx - 0.5 * ow) * this.scales[0]);
                int y = (int)((cy - 0.5 * oh) * this.scales[1]);
                int width = (int)(ow * this.scales[0]);
                int height = (int)(oh * this.scales[1]);
                Rect box = new Rect();
                box.X = x;
                box.Y = y;
                box.Width = width;
                box.Height = height;

                position_boxes.Add(box);
                class_ids.Add(max_classId_point.X);
                confidences.Add((float)max_score);
            }
        }

        // NMS非极大值抑制
        int[] indexes = new int[position_boxes.Count];
        CvDnn.NMSBoxes(position_boxes, confidences, this.score_threshold, this.nms_threshold, out indexes);

        Result re_result = new Result();
        // 将识别结果绘制到图片上
        for (int i = 0; i < indexes.Length; i++)
        {
            int index = indexes[i];
            int idx = class_ids[index];
            re_result.add(confidences[index], position_boxes[index], this.class_names[class_ids[index]]);
        }
        return re_result;
    }
    /// <summary>
    /// 结果绘制
    /// </summary>
    /// <param name="result">识别结果</param>
    /// <param name="image">绘制图片</param>
    /// <returns></returns>
    public Mat draw_result(Result result, Mat image)
    {
        // 将识别结果绘制到图片上
        for (int i = 0; i < result.length; i++)
        {
            //Console.WriteLine(result.rects[i]);
            Cv2.Rectangle(image, result.rects[i], new Scalar(0, 0, 255), 2, LineTypes.Link8);
            Cv2.Rectangle(image, new Point(result.rects[i].TopLeft.X, result.rects[i].TopLeft.Y - 20),
                new Point(result.rects[i].BottomRight.X, result.rects[i].TopLeft.Y), new Scalar(0, 255, 255), -1);
            Cv2.PutText(image, result.classes[i] + "-" + result.scores[i].ToString("0.00"),
                new Point(result.rects[i].X, result.rects[i].Y - 10),
                HersheyFonts.HersheySimplex, 0.6, new Scalar(0, 0, 0), 1);
        }
        return image;
    }

}
- 1
- 2
- 3
- 4
- 5
- 6
- 7
- 8
- 9
- 10
- 11
- 12
- 13
- 14
- 15
- 16
- 17
- 18
- 19
- 20
- 21
- 22
- 23
- 24
- 25
- 26
- 27
- 28
- 29
- 30
- 31
- 32
- 33
- 34
- 35
- 36
- 37
- 38
- 39
- 40
- 41
- 42
- 43
- 44
- 45
- 46
- 47
- 48
- 49
- 50
- 51
- 52
- 53
- 54
- 55
- 56
- 57
- 58
- 59
- 60
- 61
- 62
- 63
- 64
- 65
- 66
- 67
- 68
- 69
- 70
- 71
- 72
- 73
- 74
- 75
- 76
- 77
- 78
- 79
- 80
- 81
- 82
- 83
- 84
- 85
- 86
- 87
- 88
- 89
- 90
- 91
- 92
- 93
- 94
- 95
- 96
- 97
- 98
- 99
- 100
语义分割结果处理:SegmentationResult
该方法继承于ResultBase类,主要用于处理语义分割识别结果。
public class SegmentationResult : ResultBase
{
    /// <summary>
    /// 结果处理类构造
    /// </summary>
    /// <param name="path">识别类别文件地址</param>
    /// <param name="scales">缩放比例</param>
    /// <param name="score_threshold">分数阈值</param>
    /// <param name="nms_threshold">非极大值抑制阈值</param>
    public SegmentationResult(string path, float[] scales, float score_threshold = 0.25f, float nms_threshold = 0.5f)
    {
        read_class_names(path);
        this.scales = scales;
        this.score_threshold = score_threshold;
        this.nms_threshold = nms_threshold;
    }
    /// <summary>
    /// sigmoid函数
    /// </summary>
    /// <param name="a"></param>
    /// <returns></returns>
    private float sigmoid(float a)
    {
        float b = 1.0f / (1.0f + (float)Math.Exp(-a));
        return b;
    }
    /// <summary>
    /// 结果处理
    /// </summary>
    /// <param name="detect">目标检测输出</param>
    /// <param name="proto">语义分割输出</param>
    /// <returns></returns>
    public Result process_result(float[] detect, float[] proto)
    {
        Mat detect_data = new Mat(116, 8400, MatType.CV_32F, detect);
        Mat proto_data = new Mat(32, 25600, MatType.CV_32F, proto);
        detect_data = detect_data.T();

        // 存放结果list
        List<Rect> position_boxes = new List<Rect>();
        List<int> class_ids = new List<int>();
        List<float> confidences = new List<float>();
        List<Mat> masks = new List<Mat>();
        // 预处理输出结果
        for (int i = 0; i < detect_data.Rows; i++)
        {

            Mat classes_scores = detect_data.Row(i).ColRange(4, 84);//GetArray(i, 5, classes_scores);
            Point max_classId_point, min_classId_point;
            double max_score, min_score;
            // 获取一组数据中最大值及其位置
            Cv2.MinMaxLoc(classes_scores, out min_score, out max_score,
                out min_classId_point, out max_classId_point);
            // 置信度 0~1之间
            // 获取识别框信息
            if (max_score > 0.25)
            {
                Mat mask = detect_data.Row(i).ColRange(84, 116);
                float cx = detect_data.At<float>(i, 0);
                float cy = detect_data.At<float>(i, 1);
                float ow = detect_data.At<float>(i, 2);
                float oh = detect_data.At<float>(i, 3);
                int x = (int)((cx - 0.5 * ow) * this.scales[0]);
                int y = (int)((cy - 0.5 * oh) * this.scales[1]);
                int width = (int)(ow * this.scales[0]);
                int height = (int)(oh * this.scales[1]);
                Rect box = new Rect();
                box.X = x;
                box.Y = y;
                box.Width = width;
                box.Height = height;

                position_boxes.Add(box);
                class_ids.Add(max_classId_point.X);
                confidences.Add((float)max_score);
                masks.Add(mask);
            }
        }

        // NMS非极大值抑制
        int[] indexes = new int[position_boxes.Count];
        CvDnn.NMSBoxes(position_boxes, confidences, this.score_threshold, this.nms_threshold, out indexes);

        Result re_result = new Result(); // 输出结果类
                                         // 带有颜色的RGB图像
        Mat rgb_mask = Mat.Zeros(new Size((int)scales[3], (int)scales[2]), MatType.CV_8UC3);
        Random rd = new Random(); // 产生随机数
                                  // 识别结果
        for (int i = 0; i < indexes.Length; i++)
        {
            int index = indexes[i];
            // 分割范围
            Rect box = position_boxes[index];
            int box_x1 = Math.Max(0, box.X);
            int box_y1 = Math.Max(0, box.Y);
            int box_x2 = Math.Max(0, box.BottomRight.X);
            int box_y2 = Math.Max(0, box.BottomRight.Y);

            // 分割结果
            Mat original_mask = masks[index] * proto_data;
            for (int col = 0; col < original_mask.Cols; col++)
            {
                original_mask.At<float>(0, col) = sigmoid(original_mask.At<float>(0, col));
            }
            // 1x25600 -> 160x160 转为原始大小
            Mat reshape_mask = original_mask.Reshape(1, 160);

            //Console.WriteLine("m1.size = {0}", m1.Size());

            // 缩放后分割大小
            int mx1 = Math.Max(0, (int)((box_x1 / scales[0]) * 0.25));
            int mx2 = Math.Max(0, (int)((box_x2 / scales[0]) * 0.25));
            int my1 = Math.Max(0, (int)((box_y1 / scales[1]) * 0.25));
            int my2 = Math.Max(0, (int)((box_y2 / scales[1]) * 0.25));
            // 裁剪分割区域
            Mat mask_roi = new Mat(reshape_mask, new OpenCvSharp.Range(my1, my2), new OpenCvSharp.Range(mx1, mx2));
            // 将分割区域转换到图片实际大小
            Mat actual_maskm = new Mat();
            Cv2.Resize(mask_roi, actual_maskm, new Size(box_x2 - box_x1, box_y2 - box_y1));
            // 二值化分割区域
            for (int r = 0; r < actual_maskm.Rows; r++)
            {
                for (int c = 0; c < actual_maskm.Cols; c++)
                {
                    float pv = actual_maskm.At<float>(r, c);
                    if (pv > 0.5)
                    {
                        actual_maskm.At<float>(r, c) = 1.0f;
                    }
                    else
                    {
                        actual_maskm.At<float>(r, c) = 0.0f;
                    }
                }
            }

            // 预测
            Mat bin_mask = new Mat();
            actual_maskm = actual_maskm * 200;
            actual_maskm.ConvertTo(bin_mask, MatType.CV_8UC1);
            if ((box_y1 + bin_mask.Rows) >= scales[2])
            {
                box_y2 = (int)scales[2] - 1;
            }
            if ((box_x1 + bin_mask.Cols) >= scales[3])
            {
                box_x2 = (int)scales[3] - 1;
            }
            // 获取分割区域
            Mat mask = Mat.Zeros(new Size((int)scales[3], (int)scales[2]), MatType.CV_8UC1);
            bin_mask = new Mat(bin_mask, new OpenCvSharp.Range(0, box_y2 - box_y1), new OpenCvSharp.Range(0, box_x2 - box_x1));
            Rect roi = new Rect(box_x1, box_y1, box_x2 - box_x1, box_y2 - box_y1);
            bin_mask.CopyTo(new Mat(mask, roi));
            // 分割区域上色
            Cv2.Add(rgb_mask, new Scalar(rd.Next(0, 255), rd.Next(0, 255), rd.Next(0, 255)), rgb_mask, mask);

            re_result.add(confidences[index], position_boxes[index], this.class_names[class_ids[index]], rgb_mask.Clone());

        }

        return re_result;
    }
    /// <summary>
    /// 结果绘制
    /// </summary>
    /// <param name="result">识别结果</param>
    /// <param name="image">绘制图片</param>
    /// <returns></returns>
    public Mat draw_result(Result result, Mat image)
    {
        Mat masked_img = new Mat();
        // 将识别结果绘制到图片上
        for (int i = 0; i < result.length; i++)
        {
            Cv2.Rectangle(image, result.rects[i], new Scalar(0, 0, 255), 2, LineTypes.Link8);
            Cv2.Rectangle(image, new Point(result.rects[i].TopLeft.X, result.rects[i].TopLeft.Y - 20),
                new Point(result.rects[i].BottomRight.X, result.rects[i].TopLeft.Y), new Scalar(0, 255, 255), -1);
            Cv2.PutText(image, result.classes[i] + "-" + result.scores[i].ToString("0.00"),
                new Point(result.rects[i].X, result.rects[i].Y - 10),
                HersheyFonts.HersheySimplex, 0.6, new Scalar(0, 0, 0), 1);
            Cv2.AddWeighted(image, 0.5, result.masks[i], 0.5, 0, masked_img);
        }
        return masked_img;
    }
}
- 1
- 2
- 3
- 4
- 5
- 6
- 7
- 8
- 9
- 10
- 11
- 12
- 13
- 14
- 15
- 16
- 17
- 18
- 19
- 20
- 21
- 22
- 23
- 24
- 25
- 26
- 27
- 28
- 29
- 30
- 31
- 32
- 33
- 34
- 35
- 36
- 37
- 38
- 39
- 40
- 41
- 42
- 43
- 44
- 45
- 46
- 47
- 48
- 49
- 50
- 51
- 52
- 53
- 54
- 55
- 56
- 57
- 58
- 59
- 60
- 61
- 62
- 63
- 64
- 65
- 66
- 67
- 68
- 69
- 70
- 71
- 72
- 73
- 74
- 75
- 76
- 77
- 78
- 79
- 80
- 81
- 82
- 83
- 84
- 85
- 86
- 87
- 88
- 89
- 90
- 91
- 92
- 93
- 94
- 95
- 96
- 97
- 98
- 99
- 100
- 101
- 102
- 103
- 104
- 105
- 106
- 107
- 108
- 109
- 110
- 111
- 112
- 113
- 114
- 115
- 116
- 117
- 118
- 119
- 120
- 121
- 122
- 123
- 124
- 125
- 126
- 127
- 128
- 129
- 130
- 131
- 132
- 133
- 134
- 135
- 136
- 137
- 138
- 139
- 140
- 141
- 142
- 143
- 144
- 145
- 146
- 147
- 148
- 149
- 150
- 151
- 152
- 153
- 154
- 155
- 156
- 157
- 158
- 159
- 160
- 161
- 162
- 163
- 164
- 165
- 166
- 167
- 168
- 169
- 170
- 171
- 172
- 173
- 174
- 175
- 176
- 177
- 178
- 179
- 180
- 181
- 182
- 183
- 184
- 185
姿态识别结果处理:PoseResult
该方法继承于ResultBase类,主要用于处理姿态识别识别结果。
public class PoseResult : ResultBase
{
    /// <summary>
    /// 结果处理类构造
    /// </summary>
    /// <param name="scales">缩放比例</param>
    /// <param name="score_threshold">分数阈值</param>
    /// <param name="nms_threshold">非极大值抑制阈值</param>
    public PoseResult(float[] scales, float score_threshold = 0.25f, float nms_threshold = 0.5f)
    {
        this.scales = scales;
        this.score_threshold = score_threshold;
        this.nms_threshold = nms_threshold;
    }
    /// <summary>
    /// 结果处理
    /// </summary>
    /// <param name="result">模型预测输出</param>
    /// <returns>模型识别结果</returns>
    public Result process_result(float[] result)
    {
        Mat result_data = new Mat(56, 8400, MatType.CV_32F, result);
        result_data = result_data.T();
        // 存放结果list
        List<Rect> position_boxes = new List<Rect>();
        List<float> confidences = new List<float>();
        List<PoseData> pose_datas = new List<PoseData>();
        // 预处理输出结果
        for (int i = 0; i < result_data.Rows; i++)
        {


            // 获取识别框和关键点信息
            if (result_data.At<float>(i, 4) > 0.25)
            {
                //Console.WriteLine(max_score);
                float cx = result_data.At<float>(i, 0);
                float cy = result_data.At<float>(i, 1);
                float ow = result_data.At<float>(i, 2);
                float oh = result_data.At<float>(i, 3);
                int x = (int)((cx - 0.5 * ow) * this.scales[0]);
                int y = (int)((cy - 0.5 * oh) * this.scales[1]);
                int width = (int)(ow * this.scales[0]);
                int height = (int)(oh * this.scales[1]);
                Rect box = new Rect();
                box.X = x;
                box.Y = y;
                box.Width = width;
                box.Height = height;
                Mat pose_mat = result_data.Row(i).ColRange(5, 56);
                float[] pose_data = new float[51];
                pose_mat.GetArray<float>(out pose_data);
                PoseData pose = new PoseData(pose_data, this.scales);

                position_boxes.Add(box);

                confidences.Add((float)result_data.At<float>(i, 4));
                pose_datas.Add(pose);
            }
        }

        // NMS非极大值抑制
        int[] indexes = new int[position_boxes.Count];
        CvDnn.NMSBoxes(position_boxes, confidences, this.score_threshold, this.nms_threshold, out indexes);

        Result re_result = new Result();
        // 将识别结果绘制到图片上
        for (int i = 0; i < indexes.Length; i++)
        {
            int index = indexes[i];
            re_result.add(confidences[index], position_boxes[index], pose_datas[i]);
            //Console.WriteLine("rect: {0}, score: {1}", position_boxes[index], confidences[index]);
        }
        return re_result;

    }
    /// <summary>
    /// 结果绘制
    /// </summary>
    /// <param name="result">识别结果</param>
    /// <param name="image">绘制图片</param>
    /// <returns></returns>
    public Mat draw_result(Result result, Mat image)
    {

        // 将识别结果绘制到图片上
        for (int i = 0; i < result.length; i++)
        {
            //Console.WriteLine(result.rects[i]);
            Cv2.Rectangle(image, result.rects[i], new Scalar(0, 0, 255), 2, LineTypes.Link8);
            Cv2.Rectangle(image, new Point(result.rects[i].TopLeft.X, result.rects[i].TopLeft.Y - 20),
                new Point(result.rects[i].BottomRight.X, result.rects[i].TopLeft.Y), new Scalar(0, 255, 255), -1);
            Cv2.PutText(image, "person -" + result.scores[i].ToString("0.00"),
                new Point(result.rects[i].X, result.rects[i].Y - 10),
                HersheyFonts.HersheySimplex, 0.6, new Scalar(0, 0, 0), 1);
            draw_poses(result.poses[i], ref image);
        }
        return image;
    }
    /// <summary>
    /// 关键点结果绘制
    /// </summary>
    /// <param name="pose">关键点数据</param>
    /// <param name="image"></param>
    public void draw_poses(PoseData pose, ref Mat image)
    {
        // 连接点关系
        int[,] edgs = new int[17, 2] { { 0, 1 }, { 0, 2}, {1, 3}, {2, 4}, {3, 5}, {4, 6}, {5, 7}, {6, 8},
                 {7, 9}, {8, 10}, {5, 11}, {6, 12}, {11, 13}, {12, 14},{13, 15 }, {14, 16 }, {11, 12 } };
        // 颜色库
        Scalar[] colors = new Scalar[18] { new Scalar(255, 0, 0), new Scalar(255, 85, 0), new Scalar(255, 170, 0),
                new Scalar(255, 255, 0), new Scalar(170, 255, 0), new Scalar(85, 255, 0), new Scalar(0, 255, 0),
                new Scalar(0, 255, 85), new Scalar(0, 255, 170), new Scalar(0, 255, 255), new Scalar(0, 170, 255),
                new Scalar(0, 85, 255), new Scalar(0, 0, 255), new Scalar(85, 0, 255), new Scalar(170, 0, 255),
                new Scalar(255, 0, 255), new Scalar(255, 0, 170), new Scalar(255, 0, 85) };
        // 绘制阈值
        double visual_thresh = 0.4;
        // 绘制关键点
        for (int p = 0; p < 17; p++)
        {
            if (pose.score[p] < visual_thresh)
            {
                continue;
            }

            Cv2.Circle(image, pose.point[p], 2, colors[p], -1);
        }
        // 绘制
        for (int p = 0; p < 17; p++)
        {
            if (pose.score[edgs[p, 0]] < visual_thresh || pose.score[edgs[p, 1]] < visual_thresh)
            {
                continue;
            }

            float[] point_x = new float[] { pose.point[edgs[p, 0]].X, pose.point[edgs[p, 1]].X };
            float[] point_y = new float[] { pose.point[edgs[p, 0]].Y, pose.point[edgs[p, 1]].Y };

            Point center_point = new Point((int)((point_x[0] + point_x[1]) / 2), (int)((point_y[0] + point_y[1]) / 2));
            double length = Math.Sqrt(Math.Pow((double)(point_x[0] - point_x[1]), 2.0) + Math.Pow((double)(point_y[0] - point_y[1]), 2.0));
            int stick_width = 2;
            Size axis = new Size(length / 2, stick_width);
            double angle = (Math.Atan2((double)(point_y[0] - point_y[1]), (double)(point_x[0] - point_x[1]))) * 180 / Math.PI;
            Point[] polygon = Cv2.Ellipse2Poly(center_point, axis, (int)angle, 0, 360, 1);
            Cv2.FillConvexPoly(image, polygon, colors[p]);

        }
    }
}
- 1
- 2
- 3
- 4
- 5
- 6
- 7
- 8
- 9
- 10
- 11
- 12
- 13
- 14
- 15
- 16
- 17
- 18
- 19
- 20
- 21
- 22
- 23
- 24
- 25
- 26
- 27
- 28
- 29
- 30
- 31
- 32
- 33
- 34
- 35
- 36
- 37
- 38
- 39
- 40
- 41
- 42
- 43
- 44
- 45
- 46
- 47
- 48
- 49
- 50
- 51
- 52
- 53
- 54
- 55
- 56
- 57
- 58
- 59
- 60
- 61
- 62
- 63
- 64
- 65
- 66
- 67
- 68
- 69
- 70
- 71
- 72
- 73
- 74
- 75
- 76
- 77
- 78
- 79
- 80
- 81
- 82
- 83
- 84
- 85
- 86
- 87
- 88
- 89
- 90
- 91
- 92
- 93
- 94
- 95
- 96
- 97
- 98
- 99
- 100
- 101
- 102
- 103
- 104
- 105
- 106
- 107
- 108
- 109
- 110
- 111
- 112
- 113
- 114
- 115
- 116
- 117
- 118
- 119
- 120
- 121
- 122
- 123
- 124
- 125
- 126
- 127
- 128
- 129
- 130
- 131
- 132
- 133
- 134
- 135
- 136
- 137
- 138
- 139
- 140
- 141
- 142
- 143
- 144
- 145
- 146
- 147
- 148
- 149
分类结果处理:ClasResult
该方法继承于ResultBase类,主要用于处理分类识别结果。
public class ClasResult : ResultBase
{
    /// <summary>
    /// 分类结果构造函数
    /// </summary>
    /// <param name="path">类别文件</param>
    public ClasResult(string path)
    {
        read_class_names(path);
    }
    /// <summary>
    /// 结果处理
    /// </summary>
    /// <param name="result">模型输出结果</param>
    /// <returns>识别结果与分数</returns>
    public KeyValuePair<string, float> process_result(float[] result)
    {
        int clas = 0;
        float score = result[0];
        for (int i = 0; i < result.Length; i++)
        {
            float temp = result[i];
            if (score <= temp)
            {
                score = temp;
                clas = i;
            }
        }
        return new KeyValuePair<string, float>(this.class_names[clas], score);
    }
    /// <summary>
    /// 绘制识别结果
    /// </summary>
    /// <param name="result">识别结果</param>
    /// <param name="image"></param>
    /// <returns></returns>
    public Mat draw_result(KeyValuePair<string, float> result, Mat image)
    {
        Cv2.PutText(image, result.Key + ":  " + result.Value.ToString("0.00"),
                            new Point(25, 30), HersheyFonts.HersheySimplex, 1, new Scalar(0, 0, 255), 2);
        return image;
    }
}
- 1
- 2
- 3
- 4
- 5
- 6
- 7
- 8
- 9
- 10
- 11
- 12
- 13
- 14
- 15
- 16
- 17
- 18
- 19
- 20
- 21
- 22
- 23
- 24
- 25
- 26
- 27
- 28
- 29
- 30
- 31
- 32
- 33
- 34
- 35
- 36
- 37
- 38
- 39
- 40
- 41
- 42
- 43


