- 1CSDN原力值解析:功能作用、获取方法、积分对应等级关系详解
- 2iVX低代码平台系列详解 -- 概述篇(二)_ivx低代码平台 怎么 回调
- 3docker安装教程(详解)
- 4三分钟手把手带你 CleanMyMac X for Ma v4.15.1中文破解版安装激活图文教程_cleanmymacx 4.15
- 5【PHP】PHP代码审计基础知识
- 6探索Gin框架:快速构建高性能的Golang Web应用_gin 框架
- 7BGP/MPLS IP VPN跨域解决方案
- 8Flutter beta 1 重磅发布:开发精美的原生应用(1)
- 9ZooKeeper中节点的操作命令(查看、创建、删除节点)_zk创建节点命令
- 10Stable Diffusion安装教程、model导入教程以及精品promt指令_stable diffusion model
微信开发工具包WxJava之微信公众号开发的入门使用篇
赞
踩
WxJava介绍
WxJava是一款基于Java语言的微信开发Java SDK,它提供了微信支付,开放平台,小程序,企业微信,公众号等多个平台的API接口,并将其封装为易于调用的Java方法,方便Java开发者快速开发与微信相关的应用。
GitHub地址:https://github.com/Wechat-Group/WxJava
使用WxJava只需要引入开发相关模块的maven依赖即可
<dependency>
  <groupId>com.github.binarywang</groupId>
  <artifactId>(不同模块参考下文)</artifactId>
  <version>4.5.0</version>
</dependency>
- 1
- 2
- 3
- 4
- 5
微信小程序:weixin-java-miniapp

微信支付:weixin-java-pay

微信开放平台:weixin-java-open

公众号(包括订阅号和服务号):weixin-java-mp

企业号/企业微信:weixin-java-cp
- 1
- 2
- 3
- 4
- 5
- 6
- 7
- 8
- 9
微信公众号
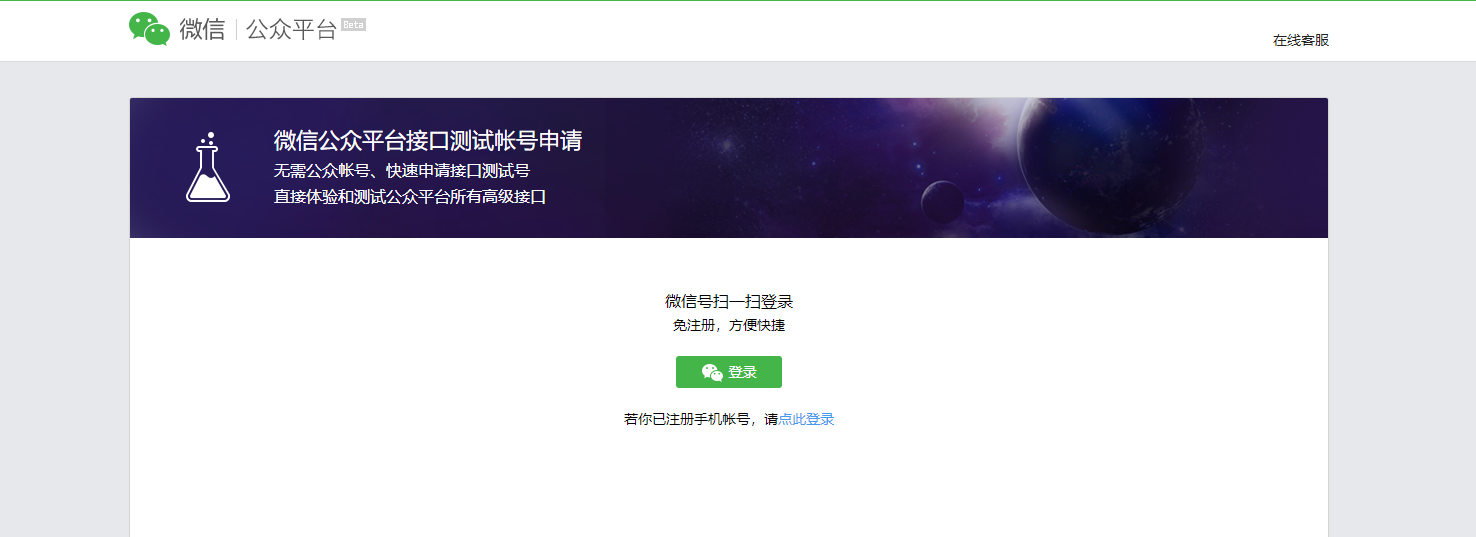
如果没有个人微信号或者企业微信号,可以申请测试公众号,并且拥有所有接口权限,推荐。
申请测试公众号
访问申请测试公众号,申请一个测试的微信公众号,测试微信公众号拥有所有高级功能。

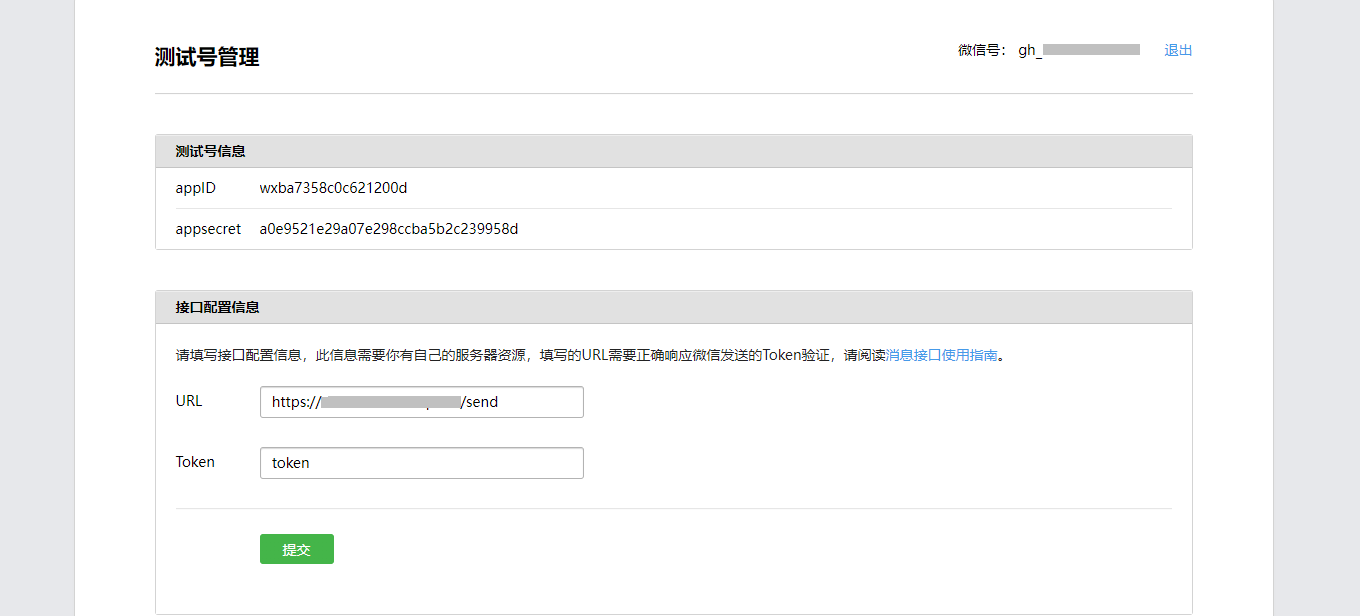
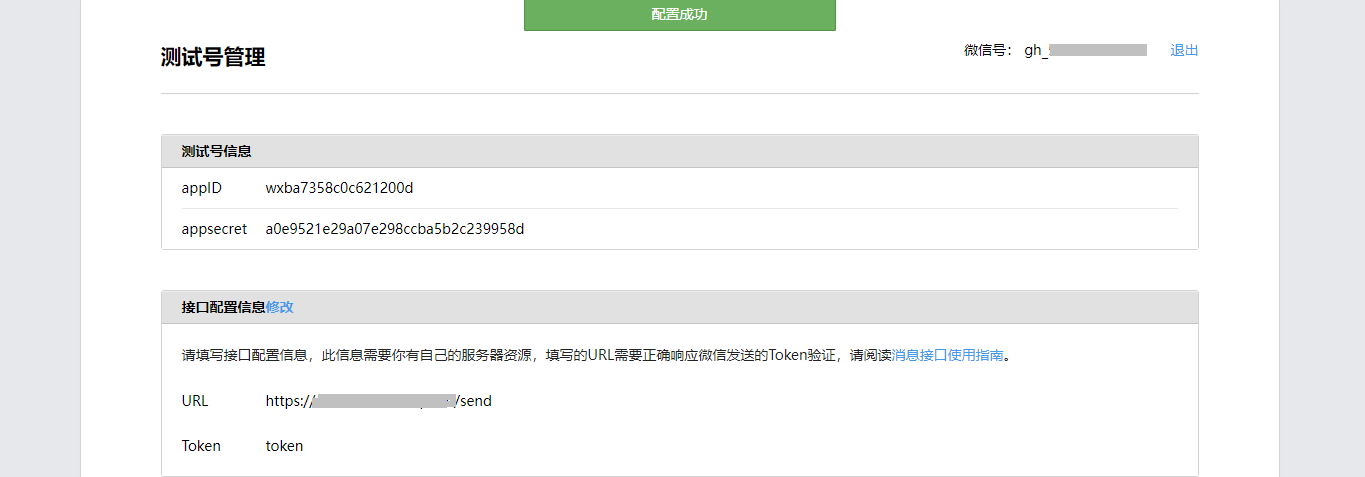
测试公众号配置
申请测试公众号后,会分配一个测试的appid和秘钥,接着配置一个可用于内网穿透的地址
注意:URL地址指向本地开发能访问的某个接口

扫描测试号二维码以关注测试公众号,同时获取用户openid

WxJava微信公众号开发
WxJava对应的微信公众号开发文档
添加依赖
非Spring Boot:

        <dependency>
            <groupId>com.github.binarywang</groupId>
            <artifactId>weixin-java-mp</artifactId>
            <version>4.5.0</version>
        </dependency>
- 1
- 2
- 3
- 4
- 5
Spring Boot:

        <dependency>
            <groupId>com.github.binarywang</groupId>
            <artifactId>wx-java-mp-spring-boot-starter</artifactId>
            <version>4.5.0</version>
        </dependency>
- 1
- 2
- 3
- 4
- 5
配置微信参数
非Spring Boot方式引入依赖,需要自定义微信相关配置信息,同时需要初始化一个WxMpService实例。
# 自定义微信相关配置信息
wx:
  # 消息模板ID
  templateId: o9YG7vWS8It-mddU2Wnknf1jgzTqZtLeBQRLhF54SXQ
  mp:
    # 微信公众号的appid
    appId: wxba7358c0c621200d
    # 信公众号的app secret
    secret: a0e9521e29a07e298ccba5b2c239958d
    # 微信公众号的toke
    token: token
    # 微信公众号的EncodingAESKey
    aesKey:
- 1
- 2
- 3
- 4
- 5
- 6
- 7
- 8
- 9
- 10
- 11
- 12
- 13
Spring Boot方式引入依赖,需要按约定进行微信相关配置,然后就可以直接进行相关开发。
具体配置参考:wx-java-mp-spring-boot-starter配置
# 公众号配置(必填)
wx.mp.appId = appId
wx.mp.secret = @secret
wx.mp.token = @token
wx.mp.aesKey = @aesKey
# 存储配置redis(可选)
wx.mp.config-storage.type = Jedis                     # 配置类型: Memory(默认), Jedis, RedisTemplate
wx.mp.config-storage.key-prefix = wx                  # 相关redis前缀配置: wx(默认)
wx.mp.config-storage.redis.host = 127.0.0.1
wx.mp.config-storage.redis.port = 6379
#单机和sentinel同时存在时,优先使用sentinel配置
#wx.mp.config-storage.redis.sentinel-ips=127.0.0.1:16379,127.0.0.1:26379
#wx.mp.config-storage.redis.sentinel-name=mymaster
# http客户端配置
wx.mp.config-storage.http-client-type=httpclient      # http客户端类型: HttpClient(默认), OkHttp, JoddHttp
wx.mp.config-storage.http-proxy-host=
wx.mp.config-storage.http-proxy-port=
wx.mp.config-storage.http-proxy-username=
wx.mp.config-storage.http-proxy-password=
# 公众号地址host配置
#wx.mp.hosts.api-host=http://proxy.com/
#wx.mp.hosts.open-host=http://proxy.com/
#wx.mp.hosts.mp-host=http://proxy.com/
- 1
- 2
- 3
- 4
- 5
- 6
- 7
- 8
- 9
- 10
- 11
- 12
- 13
- 14
- 15
- 16
- 17
- 18
- 19
- 20
- 21
- 22
- 23
wx-java-mp-spring-boot-starter主要自动配置了如下两个对象:
WxMpService:可以完成微信公众号提供的各种功能

WxMpConfigStorage:保存了微信公众号配置信息
- 1
- 2
- 3
实例化WxMpService
非Spring Boot方式引入依赖则需要自己实例化WxMpService对象。
1.创建WxMpProperties类,封装微信配置参数信息。
@Component
@Data
@ConfigurationProperties(prefix = "wx.mp")
public class WxMpProperties {

    /**
     * 设置微信公众号的appid
     */
    private String appId;

    /**
     * 设置微信公众号的app secret
     */
    private String secret;

    /**
     * 设置微信公众号的token
     */
    private String token;

    /**
     * 设置微信公众号的EncodingAESKey
     */
    private String aesKey;
}
- 1
- 2
- 3
- 4
- 5
- 6
- 7
- 8
- 9
- 10
- 11
- 12
- 13
- 14
- 15
- 16
- 17
- 18
- 19
- 20
- 21
- 22
- 23
- 24
- 25
2.创建WxMpConfiguration类,用于配置WxJava相关的实例对象。
@Configuration
public class WxMpConfiguration {

    @Autowired
    private WxMpProperties wxMpProperties;


    /**
     * 微信客户端配置存储
     */
    @Bean
    public WxMpConfigStorage wxMpConfigStorage() {
        WxMpDefaultConfigImpl configStorage = new WxMpDefaultConfigImpl();
        // 设置微信公众号appId
        configStorage.setAppId(wxMpProperties.getAppId());
        // 设置微信公众号appSecret
        configStorage.setSecret(wxMpProperties.getSecret());
        // 设置微信公众号的token
        configStorage.setToken(wxMpProperties.getToken());
        // 设置微信公众号的EncodingAESKey
        configStorage.setAesKey(wxMpProperties.getAesKey());
        return configStorage;
    }

    /**
     * WxMpService多个实现类 声明一个实例
     */
    @Bean
    public WxMpService wxMpService() {
        WxMpService wxMpService = new WxMpServiceImpl();
        wxMpService.setWxMpConfigStorage(wxMpConfigStorage());
        return wxMpService;
    }
}
- 1
- 2
- 3
- 4
- 5
- 6
- 7
- 8
- 9
- 10
- 11
- 12
- 13
- 14
- 15
- 16
- 17
- 18
- 19
- 20
- 21
- 22
- 23
- 24
- 25
- 26
- 27
- 28
- 29
- 30
- 31
- 32
- 33
- 34
对接微信公众号回调
注意:编写业务处理的接口对应测试公众号中配置的接口地址。
@Slf4j
@RestController
public class TestController {

    @Autowired
    private WxMpService wxMpService;

    /**
     * 验证消息的确来自微信服务器
     * <p>
     * 开发者通过检验signature对请求进行校验。若确认此次GET请求来自微信服务器,请原样返回echostr参数内容,则接入生效
     *
     * @param signature 微信加密签名,signature结合了开发者填写的token参数和请求中的timestamp参数、nonce参数。
     * @param timestamp 时间戳
     * @param nonce     随机数
     * @param echostr   随机字符串
     * @return
     */
    @GetMapping("send")
    public String configAccess(String signature, String timestamp, String nonce, String echostr) {
        // 校验签名
        if (!wxMpService.checkSignature(timestamp, nonce, signature)) {
            log.error("签名校验 ===》 非法请求");
            // 消息签名不正确,说明不是公众平台发过来的消息
            return null;
        }

        log.error("签名校验 ===》 验证成功");
        // 返回echostr
        return echostr;
    }
 }
- 1
- 2
- 3
- 4
- 5
- 6
- 7
- 8
- 9
- 10
- 11
- 12
- 13
- 14
- 15
- 16
- 17
- 18
- 19
- 20
- 21
- 22
- 23
- 24
- 25
- 26
- 27
- 28
- 29
- 30
- 31
- 32

接收与回复消息
WxMpXmlOutTextMessage是同步回复给微信消息的对象,不同类型的消息类型可以用不同的方式构造
    @RequestMapping("send")
    public String send(@RequestBody String requestBody, @RequestParam("signature") String signature, @RequestParam("timestamp") String timestamp, @RequestParam("nonce") String nonce) {
        // 校验签名
        if (!wxMpService.checkSignature(timestamp, nonce, signature)) {
            log.error("签名校验 ===》 非法请求");
            // 消息签名不正确,说明不是公众平台发过来的消息
            return null;
        }
        log.error("签名校验 ===》 验证成功");

        // 解析消息体,封装为对象
        WxMpXmlMessage xmlMessage = WxMpXmlMessage.fromXml(requestBody);
        // 接收消息内容
        String inContent = xmlMessage.getContent();

        // 响应的消息内容
        String outContent;
        // 根据不同的关键字回复消息
        if (inContent.contains("hello")) {
            outContent = "hello world";
        } else if (inContent.contains("java")) {
            outContent = "hello java";
        } else {
            outContent = "服务繁忙,暂时不能回复";
        }

        // 构造响应消息对象
        WxMpXmlOutTextMessage outTextMessage = WxMpXmlOutMessage.TEXT().content(outContent).fromUser(xmlMessage.getToUser())
                .toUser(xmlMessage.getFromUser()).build();

        // 将响应消息转换为xml格式返回
        return outTextMessage.toXml();
    }
- 1
- 2
- 3
- 4
- 5
- 6
- 7
- 8
- 9
- 10
- 11
- 12
- 13
- 14
- 15
- 16
- 17
- 18
- 19
- 20
- 21
- 22
- 23
- 24
- 25
- 26
- 27
- 28
- 29
- 30
- 31
- 32
- 33

微信消息路由器
微信推送给公众号的消息类型很多,而公众号也需要针对用户不同的输入做出不同的反应。避免出现很多if/else判断,可以使用WxMpMessageRouter来对消息进行路由
WxMpMessageRouter支持从4个角度对消息进行匹配:
msgType

event

eventKey

content
- 1
- 2
- 3
- 4
- 5
- 6
- 7
具体参考:微信消息路由器
WxMpMessageHandler
针对不同类型的消息处理,需要自己实现消息处理器,消息处理器必须实现WxMpMessageHandler接口
public interface WxMpMessageHandler {

  /**
   *
   * @param wxMessage
   * @param context  上下文,如果同一个路由规则内的handler或interceptor之间有信息要传递,可以用这个
   * @param wxMpService
   * @return xml格式的消息,如果在异步规则里处理的话,可以返回null
   */
  public WxMpXmlOutMessage handle(WxMpXmlMessage wxMessage,
                                  Map<String, Object> context,
                                  WxMpService wxMpService,
                                  WxSessionManager sessionManager);

}
- 1
- 2
- 3
- 4
- 5
- 6
- 7
- 8
- 9
- 10
- 11
- 12
- 13
- 14
- 15
WxMessageInterceptor
还可以添加拦截器,支持在处理微信公众号消息时添加拦截器以进行消息的预处理、过滤等操作。自定义实现拦截处理器,实现WxMessageHandler接口
public interface WxMpMessageInterceptor {

  /**
   * 拦截微信消息
   * @param wxMessage
   * @param context  上下文,如果handler或interceptor之间有信息要传递,可以用这个
   * @param wxMpService
   * @return  true代表OK,false代表不OK
   */
  public boolean intercept(WxMpXmlMessage wxMessage,
                           Map<String, Object> context,
                           WxMpService wxMpService,
                           WxSessionManager sessionManager);

}
- 1
- 2
- 3
- 4
- 5
- 6
- 7
- 8
- 9
- 10
- 11
- 12
- 13
- 14
- 15
自定义Handle
@Component
public class MyTextHandler implements WxMpMessageHandler {
    @Override
    public WxMpXmlOutMessage handle(WxMpXmlMessage wxMessage, Map<String, Object> context, WxMpService wxMpService, WxSessionManager sessionManager) throws WxErrorException {

        // 接收消息内容
        String inContent = wxMessage.getContent();

        // 响应的消息内容
        String outContent;
        // 根据不同的关键字回复消息
        if (inContent.contains("hello")) {
            outContent = "hello world";
        } else if (inContent.contains("java")) {
            outContent = "hello java";
        } else if (inContent.contains("***")) {
            outContent = "请文明用语";
        } else {
            outContent = "服务繁忙,暂时不能回复";
        }

        // 构造响应消息对象
        return WxMpXmlOutMessage.TEXT().content(outContent).fromUser(wxMessage.getToUser())
                .toUser(wxMessage.getFromUser()).build();
    }
}
- 1
- 2
- 3
- 4
- 5
- 6
- 7
- 8
- 9
- 10
- 11
- 12
- 13
- 14
- 15
- 16
- 17
- 18
- 19
- 20
- 21
- 22
- 23
- 24
- 25
- 26
自定义Interceptor
/**
 * 对微信公众号消息进行预处理、过滤等操作,根据具体业务需求决定是否允许继续执行后面的路由处理方法
 * <p>
 * 如果要中止消息的继续处理,即表示拦截了这个消息,需要返回 false。否则,在执行完当前拦截器操作后,允许消息的继续处理,返回 true
 */
@Component
public class MyTextInterceptor implements WxMpMessageInterceptor {

    @Override
    public boolean intercept(WxMpXmlMessage wxMpXmlMessage, Map<String, Object> map, WxMpService wxMpService, WxSessionManager wxSessionManager) throws WxErrorException {
        String msg = wxMpXmlMessage.getContent();
        String msgType = wxMpXmlMessage.getMsgType();
        if (msgType.equals("text") && msg.contains("混蛋")) {
            wxMpXmlMessage.setContent("***");
            return true;
        }
        return true;
    }
}
- 1
- 2
- 3
- 4
- 5
- 6
- 7
- 8
- 9
- 10
- 11
- 12
- 13
- 14
- 15
- 16
- 17
- 18
- 19
创建消息路由配置
将不同类型的消息交给不同的消息处理器来处理。路由对象为WxMpMessageRouter
@Configuration
public class MessageRouterConfig {
    @Autowired
    private WxMpService wxMpService;

    @Autowired
    private MyTextHandler textHandler;
    @Autowired
    private MyTextInterceptor textInterceptor;


    @Bean
    public WxMpMessageRouter messageRouter() {
        // 创建消息路由
        final WxMpMessageRouter router = new WxMpMessageRouter(wxMpService);
        // 添加一个同步处理文本消息的路由规则 同时添加interceptor、handler
        router.rule().async(false).msgType(WxConsts.XmlMsgType.TEXT).interceptor(textInterceptor).handler(textHandler).end();
        return router;
    }
}
- 1
- 2
- 3
- 4
- 5
- 6
- 7
- 8
- 9
- 10
- 11
- 12
- 13
- 14
- 15
- 16
- 17
- 18
- 19
- 20
使用消息路由
在Controller中注入WxMpMessageRouter,将消息路由到对应的处理器
@Slf4j
@RestController
public class TestController {

    @Autowired
    private WxMpService wxMpService;

    @Autowired
    private WxMpMessageRouter wxMpMessageRouter;

    @RequestMapping("send")
    public String configAccess(@RequestBody String requestBody, @RequestParam("signature") String signature, @RequestParam("timestamp") String timestamp, @RequestParam("nonce") String nonce) {
        // 校验签名
        if (!wxMpService.checkSignature(timestamp, nonce, signature)) {
            log.error("签名校验 ===》 非法请求");
            // 消息签名不正确,说明不是公众平台发过来的消息
            return null;
        }
        log.error("签名校验 ===》 验证成功");

        // 解析消息体,封装为对象
        WxMpXmlMessage xmlMessage = WxMpXmlMessage.fromXml(requestBody);
        WxMpXmlOutMessage outMessage = null;
        try {
            // 将消息路由给对应的处理器,获取响应
            outMessage = wxMpMessageRouter.route(xmlMessage);
        } catch (Exception e) {
            log.error("消息路由异常", e);
        }
        // 将响应消息转换为xml格式返回
        return outMessage == null ? null : outMessage.toXml();
    }
 }
- 1
- 2
- 3
- 4
- 5
- 6
- 7
- 8
- 9
- 10
- 11
- 12
- 13
- 14
- 15
- 16
- 17
- 18
- 19
- 20
- 21
- 22
- 23
- 24
- 25
- 26
- 27
- 28
- 29
- 30
- 31
- 32
- 33
执行测试

access_token持久化
WxMpConfigStorage是维护微信公众号相关信息的地方,里面包含
appid、appsecret、token、aes encoding key、access token等信息。
在与微信API交互过程中,首先需要获取
access_token,但是获取access_token的微信接口有调用次数限制,并且每次交互中都需要去获取access_token,需要重新发起网络请求,效率低,没过期就调用可能会因为达到次数上限而获取失败。
如果是分布式的环境下,每个服务都要各自去获取这些信息,因此,可以将这些信息存储到数据库或分布式缓存中,以便各个节点能够共享数据信息,尤其是
access token。
通常是将access_token持久化到redis,只需要额外在配置文件中增加redis配置即可。
wx:
  # 消息模板ID
  templateId: o9YG7vWS8It-mddU2Wnknf1jgzTqZtLeBQRLhF54SXQ
  mp:
    # 微信公众号的appid
    appId: wxba7358c0c621200d
    # 信公众号的app secret
    secret: a0e9521e29a07e298ccba5b2c239958d
    # 微信公众号的toke
    token: token
    # 微信公众号的EncodingAESKey
    aesKey:
    config-storage:
      # 配置类型: Memory(默认), Jedis, Redisson, RedisTemplate
      type: RedisTemplate
      # redis前缀配置: wx(默认)
      key-prefix: wx
      redis:
        host: 127.0.0.1
        port: 6379
- 1
- 2
- 3
- 4
- 5
- 6
- 7
- 8
- 9
- 10
- 11
- 12
- 13
- 14
- 15
- 16
- 17
- 18
- 19
- 20
注意:当type使用redisTemplate,则需要单独引入spring-boot-starter-data-redis依赖
接下来,在与微信公众号交互过程中,就会先需要获取access_token,然后将其存入redis


