热门标签
热门文章
- 1第14届蓝桥杯青少组python试题解析:22年10月选拔赛_空调遥控器上的模式按钮可控制四种模式的切换。空调的初始模式为制热模式,第一次
- 2[R] Clean the data before analysis
- 3springboot整和mogodb(MongoRepository)简单操作(增删改查,模糊、条件和分页查询)和SpringData 方法定义规范_mongorepository 分页
- 4字节跳动测试工程师面试总结2019.7.17_将m元钱,随机放入n个红包中
- 514、C语言带有长度限制的字符串函数(strncpy/strncat/strncmp)_c语言限制字符串长度
- 6BAT校招产品经理:52道经典面试问题解答思路_校招产品经理面试题
- 7python蓝桥杯基础练习17题_蓝桥杯pythonstema初级组真题
- 8论文笔记--3D Human Pose Estimation with Spatial and Temporal Transformers(用空间和时间变换器进行三维人体姿势估计)_基于transformer模型的人体3d姿态比对算法研究
- 9C++之作用域运算符::_域作用符结合性
- 10如何在Linux上使用Java命令排查CPU和内存问题_linux 怎么查看java程序运行占用内存,cpu的情况
当前位置: article > 正文
【8】python-opencv3教程:边缘检测(Roberts算子边缘检测,Prewitt算子边缘检测,Sobel算子边缘检测)_45度的sobel核
作者:花生_TL007 | 2024-02-08 15:34:53
赞
踩
45度的sobel核
第八节:边缘检测
边缘检测:边缘检测指的是灰度值发生急剧变化的位置,边缘检测的目的是制作一个线图,在不会损害理解图像内容的情况下, 有大大减少了图像的数据量,提供了对图像数据的合适概述。
一:Roberts算子


代码实现:
- import cv2
- import numpy as np
- from scipy import signal
-
-
- def roberts(I, _boundary='fill', _fillvalue=0):
-
- # 图像的高,宽
- H1, W1 = I.shape[0:2]
-
- # 卷积核的尺寸
- H2, W2 = 2, 2
-
- # 卷积核1 和 锚点的位置
- R1 = np.array([[1, 0], [0, -1]], np.float32)
- kr1, kc1 = 0, 0
-
- # 计算full卷积
- IconR1 = signal.convolve2d(I, R1, mode='full', boundary=_boundary, fillvalue=_fillvalue)
- IconR1 = IconR1[H2-kr1-1:H1+H2-kr1-1, W2-kc1-1:W1+W2-kc1-1]
-
- # 卷积核2 和 锚点的位置
- R2 = np.array([[0, 1], [-1, 0]], np.float32)
- kr2, kc2 = 0, 1
- # 再计算full卷积
- IconR2 = signal.convolve2d(I, R2, mode='full', boundary=_boundary, fillvalue=_fillvalue)
- IconR2 = IconR2[H2-kr2-1:H1+H2-kr2-1, W2-kc2-1:W1+W2-kc2-1]
-
- return (IconR1, IconR2)
-
- if __name__ == '__main__':
-
- I = cv2.imread('img3.png', cv2.IMREAD_GRAYSCALE)
- # 显示原图
- cv2.imshow('origin', I)
- # 卷积,注意边界一般扩充采用的symm
- IconR1, IconR2 = roberts(I, 'symm')
-
- # 45度方向上的边缘强度的灰度级显示
- IconR1 = np.abs(IconR1)
- edge45 = IconR1.astype(np.uint8)
- cv2.imshow('edge45', edge45)
-
- # 135度方向上的边缘强度的灰度级显示
- IconR2 = np.abs(IconR2)
- edge135 = IconR2.astype(np.uint8)
- cv2.imshow('edge135', edge135)
-
- # 用平方和的开方来衡量最后输出的边缘
- edge = np.sqrt(np.power(IconR1, 2.0) + np.power(IconR2, 2.0))
- edge = np.round(edge)
- edge[edge > 255] = 255
- edge = edge.astype(np.uint8)
-
- # 显示边缘
- cv2.imshow('edge', edge)
- cv2.waitKey(0)
- cv2.destroyAllWindows()
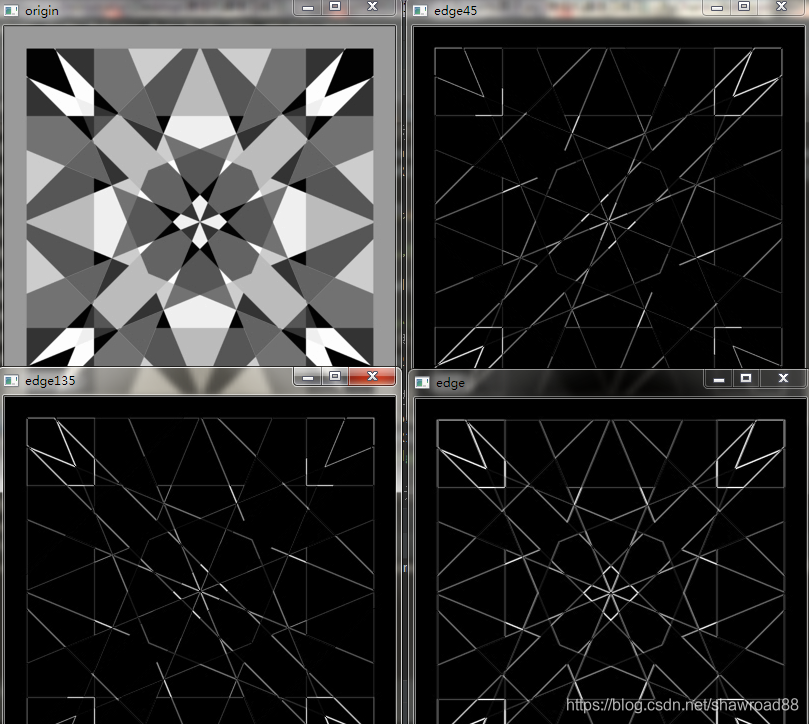
输出结果:

二: Prewitt边缘检测


代码实现:
- import cv2
- import numpy as np
- from scipy import signal
-
-
- def prewitt(I, _boundary = 'symm', ):
-
- # prewitt算子是可分离的。 根据卷积运算的结合律,分两次小卷积核运算
-
- # 算子分为两部分,这是对第一部分操作
- # 1: 垂直方向上的均值平滑
- ones_y = np.array([[1], [1], [1]], np.float32)
- i_conv_pre_x = signal.convolve2d(I, ones_y, mode='same', boundary=_boundary)
- # 2: 水平方向上的差分
- diff_x = np.array([[1, 0, -1]], np.float32)
- i_conv_pre_x = signal.convolve2d(i_conv_pre_x, diff_x, mode='same', boundary=_boundary)
-
- # 算子分为两部分,这是对第二部分操作
- # 1: 水平方向上的均值平滑
- ones_x = np.array([[1, 1, 1]], np.float32)
- i_conv_pre_y = signal.convolve2d(I, ones_x, mode='same', boundary=_boundary)
- # 2: 垂直方向上的差分
- diff_y = np.array([[1], [0], [-1]], np.float32)
- i_conv_pre_y = signal.convolve2d(i_conv_pre_y, diff_y, mode='same', boundary=_boundary)
-
- return (i_conv_pre_x, i_conv_pre_y)
-
- if __name__ == '__main__':
-
- I = cv2.imread('img7.jpg', cv2.IMREAD_GRAYSCALE)
- cv2.imshow('origin', I)
-
- i_conv_pre_x, i_conv_pre_y = prewitt(I)
-
- # 取绝对值,分别得到水平方向和垂直方向的边缘强度
- abs_i_conv_pre_x = np.abs(i_conv_pre_x)
- abs_i_conv_pre_y = np.abs(i_conv_pre_y)
-
- # 水平方向和垂直方向上的边缘强度的灰度级显示
- edge_x = abs_i_conv_pre_x.copy()
- edge_y = abs_i_conv_pre_y.copy()
-
- # 将大于255的值截断为255
- edge_x[edge_x > 255] = 255
- edge_y[edge_y > 255] = 255
-
- # 数据类型转换
- edge_x = edge_x.astype(np.uint8)
- edge_y = edge_y.astype(np.uint8)
-
- # 显示
- cv2.imshow('edge_x', edge_x)
- cv2.imshow('edge_y', edge_y)
-
- # 利用abs_i_conv_pre_x 和 abs_i_conv_pre_y 求最终的边缘强度
- # 求边缘强度有多重方法, 这里使用的是插值法
- edge = 0.5 * abs_i_conv_pre_x + 0.5 * abs_i_conv_pre_y
-
- # 边缘强度灰度级显示
- edge[edge > 255] = 255
- edge = edge.astype(np.uint8)
- cv2.imshow('edge', edge)
- cv2.waitKey(0)
- cv2.destroyAllWindows()
输出结果:

三:Sobel边缘检测


代码实现:
- import math
- import cv2
- import numpy as np
- from scipy import signal
-
- def pascalSmooth(n):
- # 返回n阶的非归一化的高斯平滑算子
- pascalSmooth = np.zeros([1, n], np.float32)
- for i in range(n):
- pascalSmooth[0][i] = math.factorial(n - 1) / (math.factorial(i) * math.factorial(n-1-i))
- return pascalSmooth
-
- def pascalDiff(n): # 在一半之前是逐差法。。后半部分的值和前半部分对应
- # 返回n阶差分算子
- pascalDiff = np.zeros([1, n], np.float32)
- pascalSmooth_previous = pascalSmooth(n - 1)
- for i in range(n):
- if i == 0:
- # 恒等于1
- pascalDiff[0][i] = pascalSmooth_previous[0][i]
- elif i == n-1:
- pascalDiff[0][i] = pascalSmooth_previous[0][i-1]
- else:
- pascalDiff[0][i] = pascalSmooth_previous[0][i] - pascalSmooth_previous[0][i-1]
- return pascalDiff
-
- def getSmoothKernel(n):
- # 返回两个sobel算子
- pascalSmoothKernel = pascalSmooth(n)
- pascalDiffKernel = pascalDiff(n)
-
- # 水平方向上的卷积核
- sobelKernel_x = signal.convolve2d(pascalSmoothKernel.transpose(), pascalDiffKernel, mode='full')
- # 垂直方向上的卷积核
- sobelKernel_y = signal.convolve2d(pascalSmoothKernel, pascalDiffKernel.transpose(), mode='full')
- return (sobelKernel_x, sobelKernel_y)
-
- def sobel(image, n):
-
- rows, cols = image.shape
- # 得到平滑算子
- pascalSmoothKernel = pascalSmooth(n)
- # 得到差分算子
- pascalDiffKernel = pascalDiff(n)
-
- # 与水平方向的sobel核卷积
- # 先进行垂直方向的平滑
- image_sobel_x = signal.convolve2d(image, pascalSmoothKernel.transpose(), mode='same')
- # 再进行水平方向的差分
- image_sobel_x = signal.convolve2d(image_sobel_x, pascalDiffKernel, mode='same')
-
- # 与垂直方向的sobel核卷积
- # 先进行水平方向的平滑
- image_sobel_y = signal.convolve2d(image, pascalSmoothKernel, mode='same')
- image_sobel_y = signal.convolve2d(image_sobel_y, pascalDiffKernel.transpose(), mode='same')
-
- return (image_sobel_x, image_sobel_y)
-
- if __name__ == '__main__':
- I = cv2.imread('img7.jpg', cv2.IMREAD_GRAYSCALE)
- cv2.imshow('origin', I)
-
- # 卷积
- image_sobel_x, image_sobel_y = sobel(I, 7)
-
- # cv2.imshow('image_sobel_x', image_sobel_x)
- # cv2.imshow('image_sobel_y', image_sobel_y)
-
- # 平方和的方式展开
- edge = np.sqrt(np.power(image_sobel_x, 2.0) + np.power(image_sobel_y, 2.0))
- # 边缘强度的灰度级显示
- edge = edge / np.max(edge)
- edge = np.power(edge, 1)
- edge = edge * 255
- edge = edge.astype(np.uint8)
- cv2.imshow('edge', edge)
- cv2.waitKey(0)
- cv2.destroyAllWindows()
输出结果:

后面出一节,狂调API。。。无需实现这些算法,只需知道在opencv中怎么调用。
声明:本文内容由网友自发贡献,不代表【wpsshop博客】立场,版权归原作者所有,本站不承担相应法律责任。如您发现有侵权的内容,请联系我们。转载请注明出处:https://www.wpsshop.cn/w/花生_TL007/article/detail/69780
推荐阅读
相关标签


