
热门标签
热门文章
- 1详细分析Java中的@Transactional注解_java @transcatial
- 2小程序内嵌web-view实现路由切换到同级页面无效的解决方案
- 3用Android Studio编写简单的计算器,并实现具体功能_androi studio计算器的设计与实现(参考手机计算器) (1)能完成两项的四则运算 (2)
- 4SpringBoot自定义注解 + AOP 防止重复提交(建议收藏)_springboot防止重复提交注解
- 5【整数规划算法】Benders 分解(理论分析+Python代码实现)_基于整数的benders分解
- 6【OpenGL】(1) 专栏介绍:OpenGL 库 | 3D 计算机图形应用 | GPGPU 计算 | 3D 建模和 3D动画 | 渲染技术介绍
- 7当心智能体后门!人大、北大团队深入研究大模型智能体后门鲁棒性,揭示严重安全风险
- 8Vue3.0中this的替代方法_vue3 this
- 9[绍棠] iOS不错的框架_mzformsheetpresentationviewcontroller
- 10RuntimeError: CUDA out of memory. Tried to allocate 92.00 MiB (GPU 0; 23.68 GiB total capacity问题
当前位置: article > 正文
【Android】-- Intent(显式和隐式Intent)
作者:菜鸟追梦旅行 | 2024-03-14 17:08:08
赞
踩
隐式intent
什么是Intent?
Intent是各个组件之间信息沟通的桥梁,它用于Android各组件之间的通信,主要完成下列工作:
- 标明本次通信请求从哪里来、到哪里去、要怎么走。
- 发起方携带本次通信需要的数据内容,接收方从收到的意图中解析数据。
- 发起方若想判断接收方的处理结果,意图就要负责让接收方传回应答的数据内容。
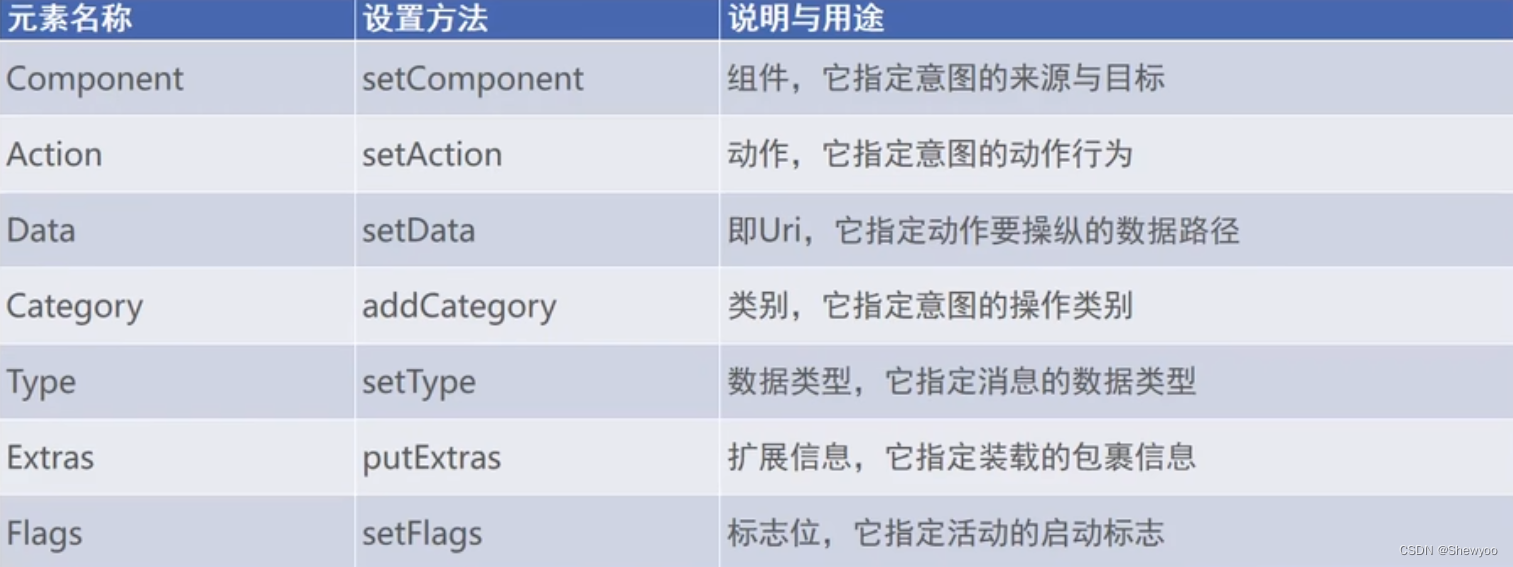
Intent的组成部分
一、显式Intent和隐式Intent
1、显式Intent
显式Intent,直接指定来源活动与目标活动,属于精确匹配,有三种构建方式:
- 在Intent的构造函数中指定。
- 调用意图对象的setClass方法指定。
- 调用意图对象的setComponent方法指定。
(1)在Intent构造函数中指定
例:
Intent intent = new Intent(this,ActNextActivity.class)//创建一个目标确定的意图(2)调用意图对象的setClass方法指定
例:
- Intent intent = new Intent();//创建新意图
- intent.setClass(this,ActNextActivity.class)//设置意图要跳转的目标活动
(3)调用意图对象的setComponent方法指定
例:
- Intent intent = new Intent();//创建新意图
- //创建包含目标活动在内的组件名称对象
- ComponentName component = new ComponentName(this,ActNextActivity.class);
- intent.setComponent(component);//设置意图携带的组件信息
2、隐式Intent
没有明确指定要跳转的目标活动,只给出一个动作字符串让系统自动匹配,属于模糊匹配。
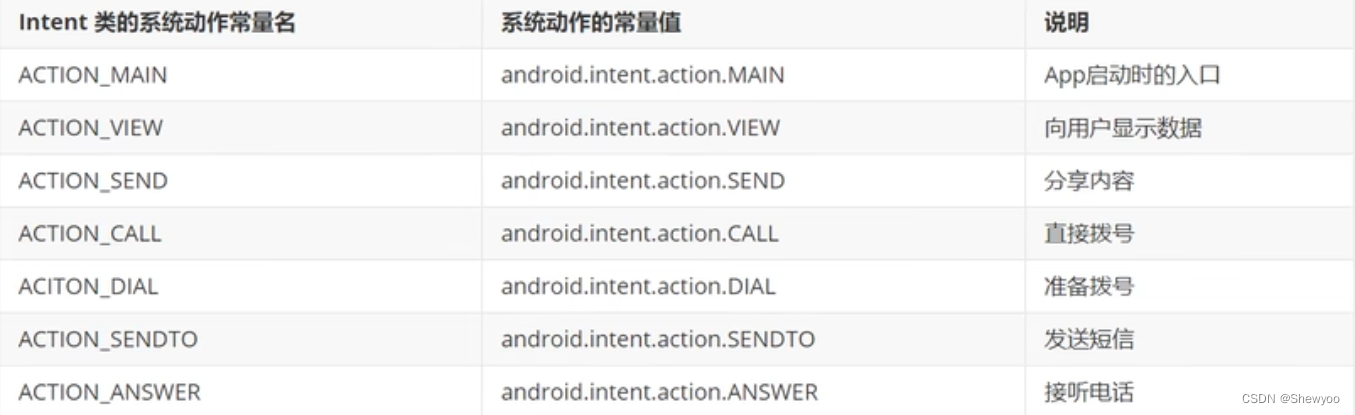
通常APP不希望向外部暴露活动名称,只给出一个事先定义好的标记串,这个动作名称标记串,可以是自己定义的动作,可以是已有的系统动作,常见系统动作取值如下:
例:
java
- public class ActionUrlActivity extends AppCompatActivity implements View.OnClickListener {
-
- @Override
- protected void onCreate(Bundle savedInstanceState) {
- super.onCreate(savedInstanceState);
- setContentView(R.layout.activity_action_url);
- findViewById(R.id.btn_dial).setOnClickListener(this);
- findViewById(R.id.btn_sms).setOnClickListener(this);
- findViewById(R.id.btn_my).setOnClickListener(this);
- }
-
- @Override
- public void onClick(View view) {
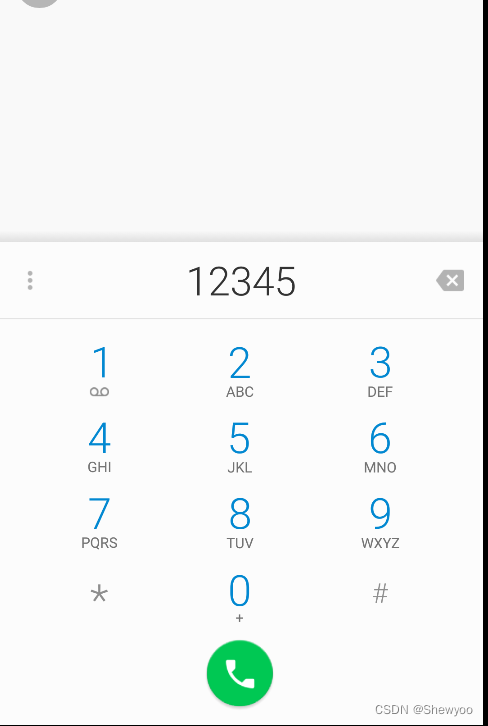
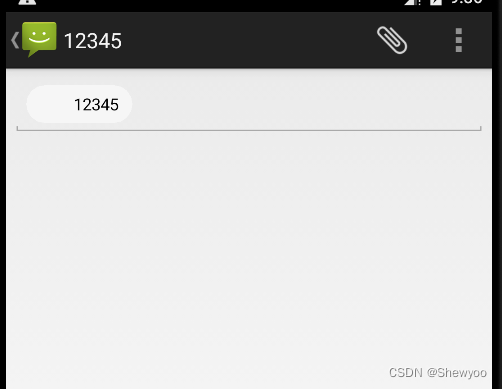
- String phoneNo = "12345";
- Intent intent = new Intent();
- switch (view.getId()){
- case R.id.btn_dial:
- //设置意图动作为准备拨号
- intent.setAction(Intent.ACTION_DIAL);
- Uri uri = Uri.parse("tel:"+phoneNo);
- intent.setData(uri);
- startActivity(intent);
- break;
- case R.id.btn_sms:
- //设置意图动作为发短信
- intent.setAction(Intent.ACTION_SENDTO);
- Uri uri2 = Uri.parse("smsto:"+phoneNo);
- intent.setData(uri2);
- startActivity(intent);
- break;
- case R.id.btn_my:
- intent.setAction("android.intent.action.NING");
- intent.addCategory(Intent.CATEGORY_DEFAULT);
- startActivity(intent);
- break;
- }
- }
- }

xml
- <LinearLayout xmlns:android="http://schemas.android.com/apk/res/android"
- xmlns:tools="http://schemas.android.com/tools"
- android:layout_width="match_parent"
- android:layout_height="match_parent"
- android:orientation="vertical">
-
- <TextView
- android:layout_width="match_parent"
- android:layout_height="wrap_content"
- android:padding="5dp"
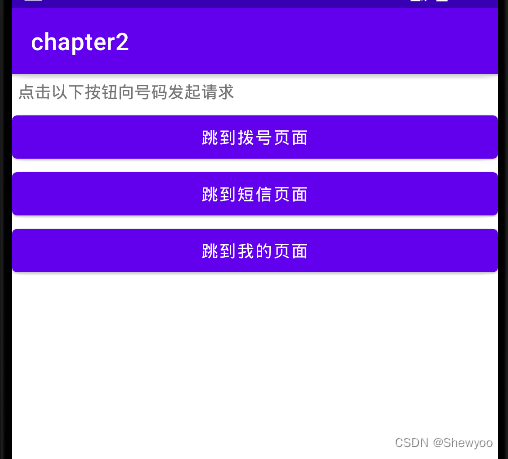
- android:text="点击以下按钮向号码发起请求"/>
-
- <Button
- android:id="@+id/btn_dial"
- android:layout_width="match_parent"
- android:layout_height="wrap_content"
- android:text="跳到拨号页面"/>
-
- <Button
- android:id="@+id/btn_sms"
- android:layout_width="match_parent"
- android:layout_height="wrap_content"
- android:text="跳到短信页面"/>
-
- <Button
- android:id="@+id/btn_my"
- android:layout_width="match_parent"
- android:layout_height="wrap_content"
- android:text="跳到我的页面"/>
-
- </LinearLayout>
需要跳转到的自定义的页面的AndroidManifest.xml文件
- <activity
- android:name=".ButtonClickActivity"
- android:exported="true">//需要设置为true,意为允许其他应用跳转
- <intent-filter>
- <action android:name="android.intent.action.MAIN" />
-
- <category android:name="android.intent.category.LAUNCHER" />
- </intent-filter>
- //添加的代码:
- <intent-filter>
- <action android:name="android.intent.action.NING" />
- <category android:name="android.intent.category.DEFAULT" />
- </intent-filter>
-
- </activity>
声明:本文内容由网友自发贡献,不代表【wpsshop博客】立场,版权归原作者所有,本站不承担相应法律责任。如您发现有侵权的内容,请联系我们。转载请注明出处:https://www.wpsshop.cn/w/菜鸟追梦旅行/article/detail/236040
推荐阅读
- NavigationView
[详细] -->赞
踩
相关标签

