
- 1【Sql Server】C#通过拼接代码的方式组合添加sql语句,会出现那些情况,参数化的作用
- 2Markdown语法之数学公式【总结】_markdown数学公式 点乘
- 3牛客_将链表m到n节点间的元素进行反转_c++反转链表中m位置到n位置的元素
- 4nginx作为tcp的负载均衡
- 5Xcode6模拟器路径的变更&应用沙盒地址的变更_xcode 沙盒路径 变化
- 6DELL PowerEdge R720XD 磁盘RAID及Hot Spare热备盘配置_dellr720配置raid
- 7Linux运维工程师面试题全面汇总(2023)_linux运维面试
- 8压缩qcow2虚拟机镜像文件_pve qcow2 压缩
- 9第二节HarmonyOS DevEco Studio创建项目以及界面认识_deveco studio 创建harmony项目
- 10Hadoop从入门到入土(第十天)_如果某个datanode的节点上的空闲空间低于特定的临界点,按照均衡策略,系统就
代码控制鼠标光标移动并点击和代码模拟键盘按下(C#)_c#实现鼠标键盘自动执行
赞
踩
前面介绍过通过代码的方式模拟键盘按下,博文如下:
C#通过代码的方式模拟键盘按下_c# 模拟键盘输入_zxy2847225301的博客-CSDN博客
这个博文是通过win32的keybd_event实现,可能会未来的window版本中被淘汰(不是我说的,看到老外一篇文章中说的)
本文的内容参考自:
How to Send Inputs using C# - CodeProject
本文的主要核心是利用了win32的函数SendInput,将会实现并演示如下的效果:
演示效果1: 点击按钮,然后模拟键盘输入,把输入的内容显示到文本框上
演示效果2: 点击按钮,然后控制鼠标光标移动(对角线移动)
演示效果3: 点击按钮,然后控制鼠标光标移动到演示效果1中的那个按钮的位置上,并实现点击,接着就会看到效果1中的效果(模拟键盘输入,把输入的内容显示到文本框上)
本文测试环境:
vistual studio 2017
.net framework 4.0
winform
步骤如下:
1 新建winform项目,.net framework选4.0,名为SendInputDemo,并新建类Win32SendInputApi并编辑如下:
- using System;
- using System.Collections.Generic;
- using System.Linq;
- using System.Runtime.InteropServices;
- using System.Text;
-
- namespace SendInputDemo
- {
- public class Win32SendInputApi
- {
- /// <summary>
- /// 键盘输入参数
- /// </summary>
- [StructLayout(LayoutKind.Sequential)]
- public struct KeyboardInput
- {
- public ushort wVk;
- public ushort wScan;
- public uint dwFlags;
- public uint time;
- public IntPtr dwExtraInfo;
- }
-
- /// <summary>
- /// 鼠标输入参数
- /// </summary>
- [StructLayout(LayoutKind.Sequential)]
- public struct MouseInput
- {
- public int dx;
- public int dy;
- public uint mouseData;
- public uint dwFlags;
- public uint time;
- public IntPtr dwExtraInfo;
- }
-
- /// <summary>
- /// Hardware输入参数,Hardware不知道是什么设备,应该类似于传感器输入之类的设备(usb输入或者串口输入)
- /// </summary>
- [StructLayout(LayoutKind.Sequential)]
- public struct HardwareInput
- {
- public uint uMsg;
- public ushort wParamL;
- public ushort wParamH;
- }
-
- [StructLayout(LayoutKind.Explicit)]
- public struct InputUnion
- {
- [FieldOffset(0)] public MouseInput mi;
- [FieldOffset(0)] public KeyboardInput ki;
- [FieldOffset(0)] public HardwareInput hi;
- }
-
- public struct Input
- {
- public int type;
- public InputUnion u;
- }
-
-
- [Flags]
- public enum InputType
- {
- Mouse = 0, //鼠标
- Keyboard = 1,//键盘
- Hardware = 2
- }
-
- /// <summary>
- /// 键盘状态
- /// </summary>
- [Flags]
- public enum KeyEventF
- {
- KeyDown = 0x0000, //键盘按下
- ExtendedKey = 0x0001, //不懂,看名字像追加键
- KeyUp = 0x0002, //键盘抬起
- Unicode = 0x0004, //不懂
- Scancode = 0x0008 //不懂
- }
- /// <summary>
- /// 鼠标参数类型
- /// </summary>
- [Flags]
- public enum MouseEventF
- {
- Absolute = 0x8000,
- HWheel = 0x01000,
- Move = 0x0001, //鼠标移动
- MoveNoCoalesce = 0x2000,
- LeftDown = 0x0002, //鼠标左键按下
- LeftUp = 0x0004, //鼠标左键抬起
- RightDown = 0x0008, //鼠标右键按下
- RightUp = 0x0010, //鼠标右键抬起
- MiddleDown = 0x0020, //鼠标中键按下
- MiddleUp = 0x0040, //鼠标中键抬下
- VirtualDesk = 0x4000, //不懂,看名字像是虚拟桌面
- Wheel = 0x0800, //鼠标滚轮
- XDown = 0x0080,
- XUp = 0x0100
- }
-
- [DllImport("user32.dll", SetLastError = true)]
- public static extern uint SendInput(uint nInputs, Input[] pInputs, int cbSize);
-
- [DllImport("user32.dll")]
- public static extern IntPtr GetMessageExtraInfo();
-
-
-
-
-
- /// <summary>
- /// 获取鼠标的坐标
- /// </summary>
- /// <param name="lpPoint"></param>
- /// <returns></returns>
- [DllImport("user32.dll")]
- public static extern bool GetCursorPos(out POINT lpPoint);
-
- [StructLayout(LayoutKind.Sequential)]
- public struct POINT
- {
- public int X;
- public int Y;
- }
-
- /// <summary>
- /// 设置鼠标的位置
- /// </summary>
- /// <param name="x"></param>
- /// <param name="y"></param>
- /// <returns></returns>
- [DllImport("User32.dll")]
- public static extern bool SetCursorPos(int x, int y);
-
- }
- }

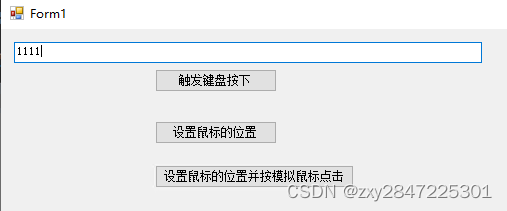
2 winform的UI布局如下:

3 实现演示效果1: 点击按钮,然后模拟键盘输入,把输入的内容显示到文本框上
'触发键盘按下'按钮的代码逻辑如下:
- public partial class Form1 : Form
- {
- public Form1()
- {
- InitializeComponent();
- this.btnPress.Click += new System.EventHandler(this.btnPress_Click);
- }
-
- /// <summary>
- /// 触发键盘按下按钮点击事件
- /// </summary>
- /// <param name="sender"></param>
- /// <param name="e"></param>
- private void btnPress_Click(object sender, EventArgs e)
- {
- this.txtKeyInput.Focus();
- Input[] inputs = new Input[]
- {
- new Input
- {
- type = (int)InputType.Keyboard,
- u = new InputUnion
- {
- ki = new KeyboardInput
- {
- wVk = 0,
- wScan = 0x02, // 数字1
- dwFlags = (uint)(KeyEventF.KeyDown | KeyEventF.Scancode),
- dwExtraInfo = Win32SendInputApi.GetMessageExtraInfo()
- }
- }
- }
- };
-
- Win32SendInputApi.SendInput((uint)inputs.Length, inputs, Marshal.SizeOf(typeof(Input)));
- this.txtKeyInput.Focus();
- }
-
- }
运行效果如下:
每点一次按钮,就录入一个1
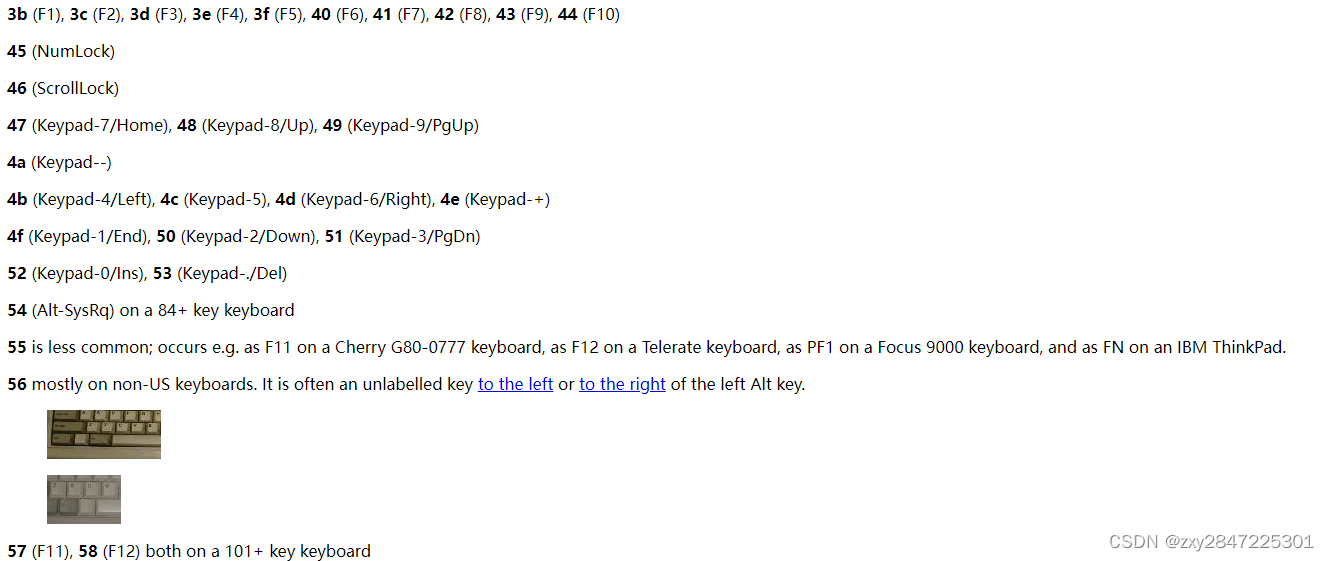
键盘的16进制编码可以参考这个网址:Keyboard scancodes: Keyboard scancodes

如上图中的01代表键盘上的ESC键,02 数字键1或者!键(在笔记本键盘上,这两个键是公用的),相信你能看懂后面编码对应的按钮含义了

4 实现演示效果2: 点击按钮,然后控制鼠标光标移动(对角线移动)
'设置鼠标的位置'按钮的代码逻辑如下:
- using System;
- using System.Collections.Generic;
- using System.ComponentModel;
- using System.Data;
- using System.Drawing;
- using System.Linq;
- using System.Runtime.InteropServices;
- using System.Text;
- using System.Threading;
- using System.Windows.Forms;
- using static SendInputDemo.Win32SendInputApi;
-
- namespace SendInputDemo
- {
- public partial class Form1 : Form
- {
- public Form1()
- {
- InitializeComponent();
- this.btnSetCurPosition.Click += new System.EventHandler(this.btnSetCurPosition_Click);
- }
-
- /// <summary>
- /// 设置鼠标的位置按钮点击事件
- /// </summary>
- /// <param name="sender"></param>
- /// <param name="e"></param>
- private void btnSetCurPosition_Click(object sender, EventArgs e)
- {
-
- for (int i = 0; i <150; i+=20)
- {
- POINT lpPoint;
- Win32SendInputApi.GetCursorPos(out lpPoint);
- Win32SendInputApi.SetCursorPos(lpPoint.X + i, lpPoint.Y +i);
- Thread.Sleep(100);
- }
- }
- }
- }
上面的逻辑是:获取到当前鼠标光标的位置,然后赋予鼠标光标新的位置,每次设置睡眠100毫秒才能看到效果
运行效果:
可以看到鼠标光标在按钮"设置鼠标的位置"上点击后,鼠标光标逐渐以对角线的方式往右下角移动
5 实现演示效果3: 点击按钮,然后控制鼠标光标移动到演示效果1中的那个按钮的位置上,并实现点击,接着就会看到效果1中的效果(模拟键盘输入,把输入的内容显示到文本框上)
'设置鼠标的位置并按模拟鼠标点击'的代码逻辑如下:
- using System;
- using System.Collections.Generic;
- using System.ComponentModel;
- using System.Data;
- using System.Drawing;
- using System.Linq;
- using System.Runtime.InteropServices;
- using System.Text;
- using System.Threading;
- using System.Windows.Forms;
- using static SendInputDemo.Win32SendInputApi;
-
- namespace SendInputDemo
- {
- public partial class Form1 : Form
- {
- public Form1()
- {
- InitializeComponent();
- this.btnPress.Click += new System.EventHandler(this.btnPress_Click);
- this.btnSetCurPosition.Click += new System.EventHandler(this.btnSetCurPosition_Click);
- this.btnMouseClick.Click += new System.EventHandler(this.btnMouseClick_Click);
- }
-
- /// <summary>
- /// 设置鼠标的位置并按模拟鼠标点击按钮点击事件
- /// </summary>
- /// <param name="sender"></param>
- /// <param name="e"></param>
- private void btnMouseClick_Click(object sender, EventArgs e)
- {
- //PointToScreen为btnPress控件转屏幕坐标
- Point pointScreen =this.btnPress.PointToScreen(new Point(0,0));
- //Point pointScreen =this.btnPress.PointToScreen(new Point(0,0))可以换成
- //这样的写法Point pointScreen = this.PointToScreen(new Point(btnPress.Location.X, btnPress.Location.Y));
- Win32SendInputApi.SetCursorPos(pointScreen.X+10, pointScreen.Y+1);
- Input[] inputs = new Input[]
- {
- new Input
- {
- type = (int) InputType.Mouse,
- u = new InputUnion
- {
- mi = new MouseInput
- {
- dx =pointScreen.X+10,
- dy =pointScreen.Y+1,
- dwFlags = (uint)(MouseEventF.LeftDown), //鼠标左键按下
- dwExtraInfo = Win32SendInputApi.GetMessageExtraInfo()
- }
- }
- },
- new Input
- {
- type = (int) InputType.Mouse,
- u = new InputUnion
- {
- mi = new MouseInput
- {
- dx =pointScreen.X+10,
- dy =pointScreen.Y+1,
- dwFlags = (uint)(MouseEventF.LeftUp), //鼠标左键抬起
- dwExtraInfo = Win32SendInputApi.GetMessageExtraInfo()
- }
- }
- }
- };
-
- Win32SendInputApi.SendInput((uint)inputs.Length, inputs, Marshal.SizeOf(typeof(Input)));
-
- }
- }
- }
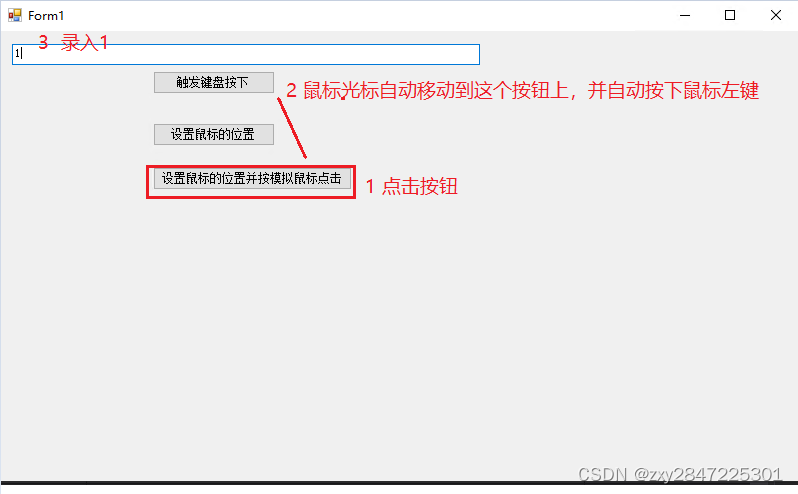
想要在'触发键盘按下'按钮(名为btnPress)触发自动按钮逻辑,就得通过PointToScreen把控件的坐标转换为计算机桌面的坐标(以前做Unity 3D的时候经常看到这种骚操作),然后把转换后的坐标作为鼠标光标的位置,最后通过模拟鼠标左键按下和抬起,一定要鼠标按下和抬起一起使用才有效,因为鼠标按下和抬起同时完成才算实现鼠标按下的逻辑。
运行效果如下图:
好了,本文的内容到此结束(Tips:在线招个亲,最近家里逼得太急了,老铁有亲戚朋友啥的适龄未婚、活的女的都可以介绍哈,本人情况:男,1993出生,广州工作,广东人,硕士毕业,其它的可以私聊)

